Contiguous (Christmas) Boléro
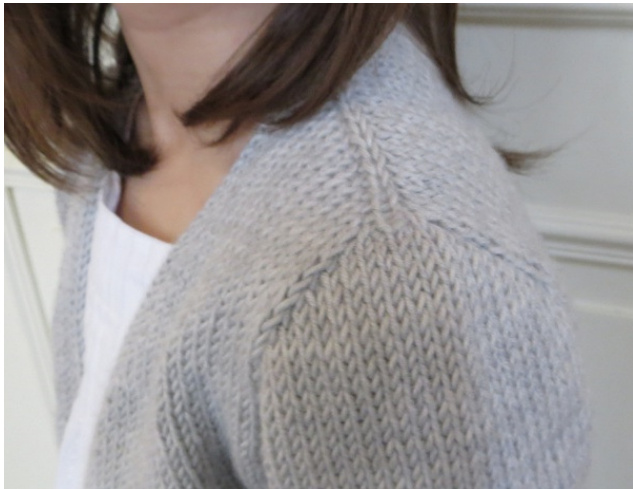
A very simple and chic bolero, knit from the top down with No seam! Ifthislittleboleroisnamed "Christmas Boléro", it is because I made the first prototype for this occasion. But it can be worn every day and on every dressed-up occasion, and be worked with various yarns, solid, hand dyed semi-solid, shining, variegated, wool, cotton, mohair..for its simplicity. Enjoy choosing a perfect yarn and make your own version for your little one!

Size: 4-5 years
Yarn: 390m of light DK weight yarn\* Shown in Lang Yarns Merino 12o (l00% merino,120m/50g per skein),color34.0223 \*Choosing a different weight yarn, you can get different sizes. See Finished Measurements. Notions: 4 split markers, tapestry needle, l button Gauge: 22 st x 31 rows in 10cm²/4" with main needle, blocked Please take the time to check your gauge blocking your swatch! Needles: 3.75 mm/Us5 circular needle or size to obtain correct gauge (main needle for body and sleeves), 3.25mm/US3 circular needle (smaller needle, for garter border)
NOTES
This bolero is worked seamlessly from the top-down, using the amazing Contiguous Sleeve Method developed by Susie Myers (http://www.ravelry.com/people/SusieM). The only "modification" is its shoulder seam: the increase techniques used in this pattern - KRL, KLL and their purling version - create a "faux" seam effect without seam stitch. With almost all increases worked with these techniques, this pattern is so to speak dedicated to them. It remains for me to add they are very usual in Japan and give a lovely result (Techknitter considers them as "very nearly invisible increases"). Get used to them at this occasion ;) Finished measurements
| Part/Gauge | 22sts x 31rows | 24sts x 34rows* | 20sts x 26rows* |
| Chest width | 30.5cm/12" | 28.5cm/10.5" | 35cm/15" |
| Total length | 29cm/11.5" | 24cm/9.5" | 32cm/12.5" |
| Shoulderwidth | 25cm/10" | 23cm/9" | 28cm/11.4" |
| Armhole height | 15cm/6" | 13.5cm/5.5" | 17cm/6.7" |
| Collar width | 12cm/4.7" | 11cm/4.5" | 14cm/5.5" |
| Cuff width | 9.5cm/3.75" | 9cm/3.5" | 10.5cm/4.1" |
| Sleevelength | 36cm/14.2" | 31.5cm/12.5" | 40cm/15.75" |
| (from underarm) | 24cm/9.5" | 21cm/8.25" | 26.5cm/10.5" |
\*Values with 24 sts and 20 sts gauge provided by my testknitters (excepted Sleeve length I improved according to their feedback) are for information.
Abbreviations
/(slash): slip marker bef: before co: Cast on inc: increase k:knit k2tog: knit 2 sts together KLL/KRL: knit left/right loop (see below) M: marker M1L/M1R: make 1 left/right p: purl PM: place marker PLL/PRL: purl left/right loop (see below) RS: right side SR: short row(s) ssk: slip slip knit ssp: slip slip purl st(s): stitch(es) St st: stockinette stitch W&T: wrap and turn (see below) WS: wrong side
Special Techniques
Knit Left Loop (KLL): knit a stitch, lift with LH needle the stitch 2 rows below the stitch you've just knitted and knit it (left-slanted increase) Knit Right Loop (KRL): knit into the stitch below the first stitch on LH needle, and knit this first stitch too (right-slanted increase) Purl Left Loop (PLL): purl a stitch, lift with LH needle the purl bump 2 rows below the stitch you've just purled and purl it (left-slanted increase) Purl Right Loop (PRL): purl into the purl bump below the first stitch on your LH needle and purl the first stitch too (right-slanted increase)
Wrap and Turn (W&T) :
On Rs: Knit to the stitch to wrap. Bring working yarn to front of work and slip knitwise the st to wrap to right hand needle. Bring working yarn again to back and replace the slipped st on your left hand needle and turn. To pick up wraps, insert your right hand needle in the wrap from the bottom and knit it with the wrapped stitch as k2tog. On WS: Purl to the stitch to wrap. Bring working yarn to back and slip purlwise the stitch to wrap to the right hand needle. Bring working yarn again to front and replace the slipped stitch on your left hand needle. Turn To pick up wraps, insert your right hand needle in the wrap from back and bottom to place the wrap on your left hand needle. Purl it with the wrapped stitch as purl 2 sts together.
INSTRUCTIONS
shoulders and back neck
With Long-tail CO method, CO 38 sts. Setup Row(WS):p2, PM, p34, PM, p2 (34 for back, 2 for each front) In this section, you will shape shoulders increasing every row, and back neck with short rows at the same time. Back neck short rows SR 1(RS): kl, KRL / KLL, kl, W&T. SR 2(WS): p2, PRL / PLL, p2. SR 3(RS):k3, KRL / KLL, k6 picking up wrap,W&T SR 4(WS): p7, PRL / PLL, p4Row 5(RS): k5, KRL / KLL, k to last 1 stpicking up wrap,KRL / KLL,kl SR 1'(WS): p2,PRL/ PLL,pl,W&T SR 2'(RS):k2,KRL/KLL,k3SR 3'(WS):p4,PRL / PLL, p6 picking up wrap,W&T SR 4'(RS):k7,KRL/ KLL,k5 Row 6(WS): p6, PRL / PLL, p to last 1 stpicking up wrap,PRL / PLL,p to end You have 8 front sts and 46 back sts.
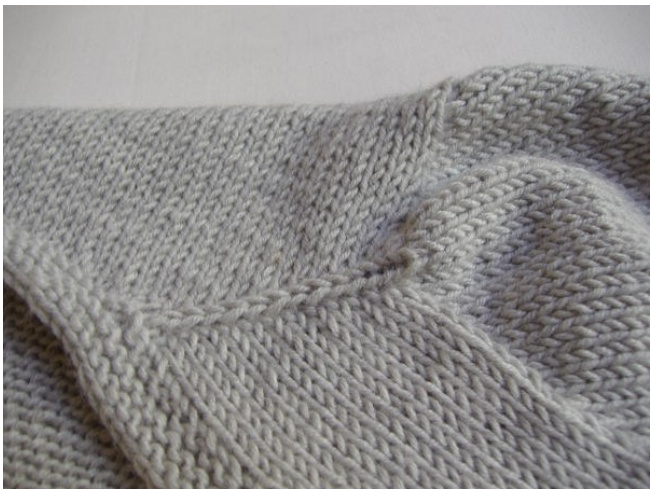
Row7(RS): (ktol st befM, KRL/ KLL) twice, ktoend Row8(WS): (pto1 stbefM, PRL/ PLL) twice, p to end Repeat these 2 rows once more. Row 11(RS=1st front inc): kl, KRL, k to 1 st bef M, KRL / KLL, k to l st befM,KRL / KLL, k to last 2 stS, KLL, kl Row 12-14: as Row 7 & 8 You have 17 front sts and 62 back sts.
\*\*\*\* \*\*\*\*\*\*\*
fronts and sleeves increases
Before starting this section, remove and replace your shoulder markers so that there are 14 sts for each front, 6 sts for each sleeve, and 56 for back. You'll increase simultaneously for fronts and sleeves. For Fronts, you increase each time 1 st and 3 x every 4 rows (including 1st inc done in the previous section), 4 x every 3 rows, 2 x every 2 rows, 4 x every 3 rows, and 4 rows later, and for sleeves, l st at both end each time and 9 x every row (sleeve cap), 4 x every 2 rows, 4 x every 4 rows and 3 x every 2 rows, and at last, you'll increase for underarm shaping too ;) .
So working in st st, increase for each part described as follows on the row with st counts (that you'll obtain with increase) on the table. For back, no increase until Row 45 where you begin underarm shaping (see below the table).
Fronts
On Right Side:(Left) kl, KRL, k to M /.../ (Right) k to last 2 sts, KLL,klOn Wrong Side:(Right) pl,PRL, p to M / .../(Left) p to last 2 sts, PLL,pl Sleeves(SL on the table) On Right Side: KLL, k to l st bef M, KRLOn Wrong Side (only on 8 first rows): PLL, p to 1 st bef M, PRL
| Row/Sleeve | Fronts | Sleeves | Row | Fronts | Sleeves | Back |
| 15/SL1 RS | 15 | 8 | 35/SL21 RS | 22 | 34 | |
| 16/SL2 SM | 10 | 36/SL22 WS | ||||
| 17/SL3 RS | 12 | 37/SL23 RS | ||||
| 18/SL4 SM | 14 | 38/SL24 WS | 23 | |||
| 19/SL5 RS | 16 | 16 | 39/SL25 RS | 36 | ||
| 20/SL6 SM | 18 | 40/SL26 WS | ||||
| 21/SL7 RS | 20 | 41/SL27 RS | 24 | |||
| 22/SL8 SM | 17 | 22 | 42/SL28 WS | |||
| 23/SL9 RS | 24 | 43/SL29 RS | 38 | |||
| 24/SL10 SM ( | 44/SL30 WS | 25 | ||||
| 25/SL11 RS | 18 | 26 | 45/SL31 RS | --/UA 26 | UA 58 | |
| 26/SL12 WS | 46/SL32 WS | |||||
| 27/SL13 RS | 28 | 47/SL33 RS | 27 | 40 | ||
| 28/SL14 SM | 19 | 48/SL34 WS | ||||
| 29/SL15 RS | 30 | 49/SL35 RS | ---/UA 28 | 42 | UA 60 | |
| 30/SL16 WS | 50/SL36 wS | |||||
| 31/SL17 RS | 20 | 32 | 51/SL37 RS | 29 | 44 | |
| 32/SL18 SM 8 | 52/SL38 WS | ---/UA 30 | UA 62 | |||
| 33/SL19 RS | 21 | 53/SL39 RS | ---/UA 31 | 46 | UA 64 | |
| 34/SL20 WS | 54/SL40 WS | CO 33 | (CO 50) | co 68 |
underarm shaping (UA on the table) Row 45 (SL31/RS): k to l st bef M, KLL / k to M / KRL, k to l st bef M, KLL / k to M/ KRL, k to end Row 47 & 51(SL33/RS): kl, KRL, k to M / KLL, k to l st bef M, KRL / k to M / KLL, kto l st bef M, KRL / k to last 2sts, KLL, k1 Row 49(SL35/RS): k to l st bef M, KLL / KLL, k to l st bef M, KRL / KRL, k to l st bef M,KLL / KLL, k to l st bef M, KRL / KRL, k to end Row 52(SL38/ws): p to 1 st bef M, PLL / p to M / PRL, p to 1 st bef M, PLL / p to M/ PRL, p to end Row 53(SL39/RS):k to 2 sts bef M, M1L, k2 / KLL, k to 1 st bef M, KRL / k2, M1R, kto 2 sts bef M, MlL, k2 / KLL, k to l st bef M, KRL / k2, MlR, k to end You have 31 front sts, 46 sleeve sts and 64 back sts. Row 54(ws): (p to M, remove sleeve M, place sleeve sts on scrap yarn, remove another sleeve M, CO 2 sts with backward loop, PM, Co 2 other sts) twice, p to endYou have 33 sts for each front, 68 sts for back.
\*\* \* \* \* \* \* \* \*
lower body
Row 55 & 56: work even in st st. Row 57(RS/last front inc):kl, KRL, k to M / k to M / k to last 2 sts, KLL, kl [34 front Sts] Rows 58-64: work even in st st Begin decreasing as follows: Row 65: k1, k2tog, k to end Row 66: p1, ssp, p to end Row 67 & 68: work even in st st Repeat these 4 rows once more, then repeat only Row 65 & 66 (Row 74 and 31 front sts). 26 front sts remain. Do NoT break yarn! border Switch to smaller needle. BO the first st of the next row, then removing markers, k to last 2 sts, k2tog. Then, pick up and knit along the front opening as follows: Pick up and knit all sts of the curved bottom edge, 5 sts on 7 rows from the upper right front opening, all Co edge sts, 5 sts on 7 rows from the upper left front opening, and all sts of the left curved bottom edge until you reach the bottom edge. Place a markei and join to work in the round. Beginning with p rnd, work in garter st for 5 rnds\*. Make a buttonhole with yo & k2tog on the 4th rnd, on the rounded part of the right front edge. \* For 6 years size, we recommend working only 3 rnds in garter st (buttonhole on 2nd rnd). BO knitwise all stitches, loosely on the rounded edge.
\*\* \* \* ¥\* \* \* \*
sleeves
Note: With all sts knitted, sleeves fabric can be tighter than body worked back and forth. So try to keep a looser tension if you are loose-purling knitter. Observe your fabric after a few rounds. If it's uneven, you can switch to a larger needle. main needle, pick up 46 left/right sleeve stitches held on scrap yarl Attach the yarn and pick up 2 sts from underarm edge, knit sleeve sts, pick up and knit 2 sts from underarm edge, pm, and join to work in the round. You have 50 sts. Tips: To avoid underarm holes, I knitted the first sleeve st picking just beside the 2nd picked up and knitted st (between sts), the result looks like k2tog, and knitted the last sleeve st picking beside the 2 sts to pick up and knit (as ssk). In this way, you can avoidgrafting! Begin to work in st st in rnd (k all sts). On 13h rnd, decrease as follows: k to 3 sts before end, ssk, kl, slip marker, kl, k2tog. Work this decreasing every 13\* rnd 3 more times (42 sts remain). Then continue even in st st for 13 rnds. \*As I ask to knit sleeve sts more loosely than body, the row gauge of sleeves was different from body row gauge in all my testknitters. That's why the number of rnds is smaller than one that would be necessary with body gauge. If you find you'll end up with too short sleeves, begin to decrease withlongerinterval! Switch to smaller needle. Beginning with p rnd, work in garter st for 5 rnds (or the same number of rnds as body border if you modified it). BO knitwise all sts.
\*\*\* \* \* \* \* \* \* \*
finishing
Weave in ends. Sew a button on the left front opening. Block lightly your bolero.
special thanks to
chibisuke, haruhina and rimaso!


