Thank you for purchasing my original pattern. If at any time you need assistance please feel free to contact me at the email below. Please remember that there may be a slight variance in sizing due to variations in materials used and yarn tensions. I tend to crochet looser than most, so if you crochet tight, go up a hook size. All patterns are copyright protected. Please do not resale, share, or publish this pattern or pictures included with this pattern. Please take pictures of your own work to use. You are welcome to sell finished products made from my patterns. Your purchase of this pattern makes it possible for my family to continue to enjoy our small hobby farm. I do ask that you mention my name along with my website address in the listing for your item you have made or have for sale as follows:
Kandace Green of Green Family Farm, Bladenboro, NC http://greenfamilyfarms.webs.com
I would love to see your finished products if you would like to send me pictures. These will be for my personal use only and will not be posted anywhere without prior written permission from you. Thanks, greenfamilyfarms@yahoo.com

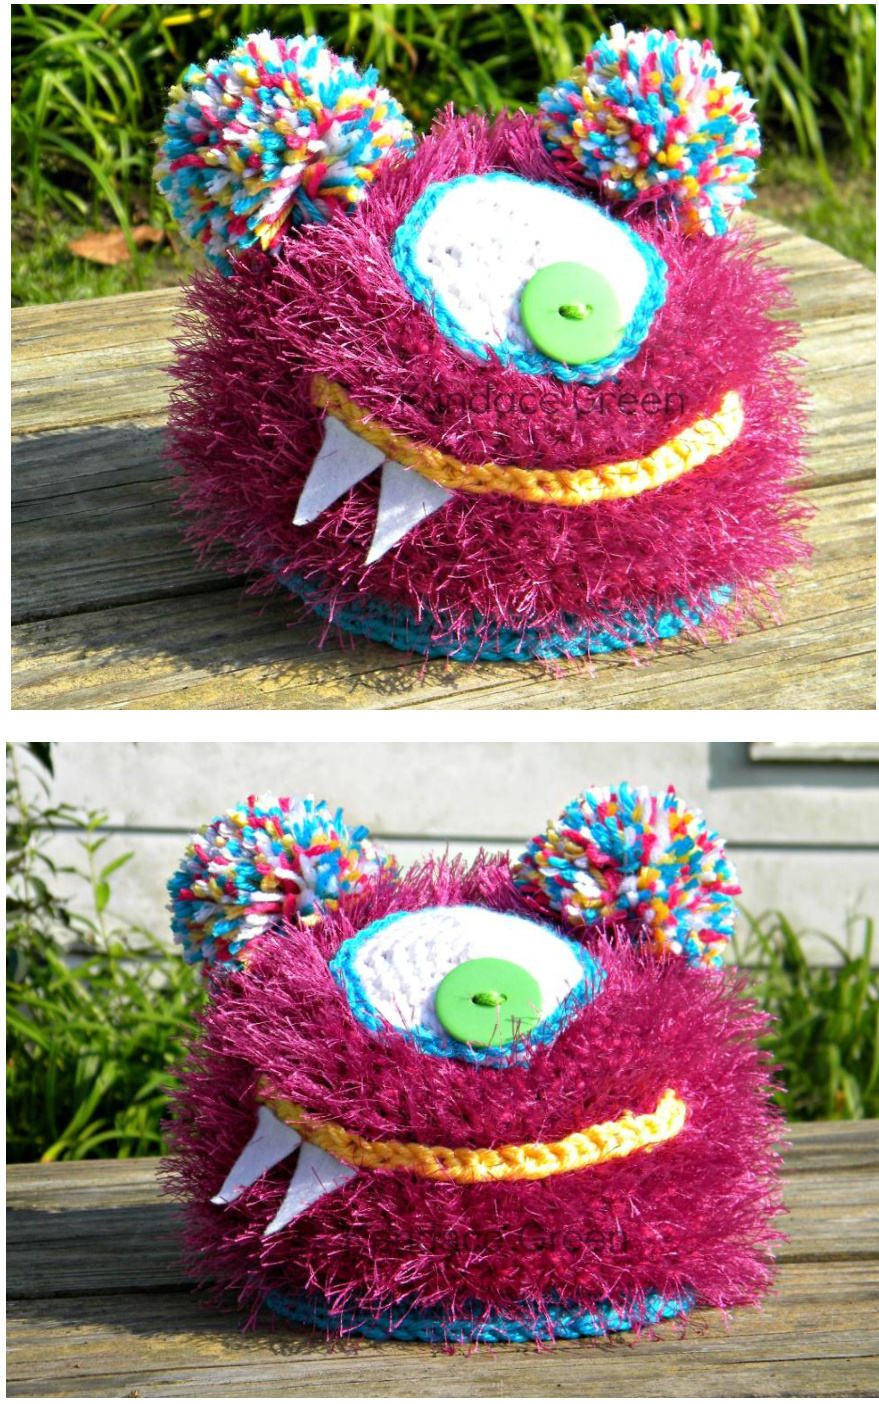
Fuzzy One-eyed Monster Beanie
Pattern Last Updated 5/2013

You'll need:
Worsted Weight (medium/weight 4) yarn in coordinating colors of your choice H-hook (5.0 mm) - I use Boye brand Sharp scissors Stitch marker Large-eye needle Large button for center of eye + coordinating scrap yarn to sew it into place Small scrap of white fabric or felt for teeth Iused: Caron Simply Soft in Blue Mint - Aqua blue (yarn B) Caron Simply Soft in White - White (yarn C) Caron Simply Soft in Sunshine - Medium Yellow (yarn D) Lion Brand Fun Fur in Magenta Red Heart Shimmer yarn in Hot Pink NOTE: I used 1 strand of shimmer yarn (which is a lighter weight of worsted weight yarn) and 1 strand of fun fur for the main body of the hat. I have labeled this in the pattern as "yarn A", but it is actually 2 strands held together. You are also welcome to use regular worsted weight yarn or double strands of sport weight yarn if you do not want your monster beanie fuzzy. Make sure to adjust your gauge if necessary. Also, be sure to work slowly when using the fun fur. If you try to crochet too quickly, it tends to get tangled.

Abbreviations: Please note this pattern is written using American standard abbreviations. ch = chain sc = single crochet dc = double crochet sl st = slip stitch
Hat Sizes:
NB - 3 months, fits 12-14" head 3 - 6 months, fits 14-17" head 6 - 18 months, fits 16-19" head Toddler - Preschool, fits 18-20" head Child, fits 19-20.5" head Teen-Adult-21"-23"head This pattern is worked in continuous rounds. Do not join rounds with a slip stitch. Use the stitch marker to mark the beginning of each round. Move the marker up after each row. Also, if you can, take a head measurement to ensure best fit. When you know the circumference, the diameter of the bottom of the hat will be the circumference divided by 3.14. Then, you can work in continuous rounds until you reach the needed diameter. Note: The purpose of the sc rows at the brim of the hat is to keep the fuzzy out of your face. You are welcome to just use the "yarn A" all the way to the brim if you prefer.
Size: Newborn - 3 months
With yarn A, make a magic ring and ch 2. 1: Work 9 dc into the magic ring. Join with a sl st to the first dc. (9 dc) 2: Ch 2. 2 dc into each st around. Join with sl st to the first dc. (18 dc) 3: Ch 2. 2 dc in same st as ch 2, dc in next st. \*2 dc, dc. Repeat around. (27 dc) 4: Ch 2. 2 dc in same st as ch 2, dc in next 2 st. \*2 dc, dc 2. Repeat around. (36 dc) 5: Ch 2. 2 dc in same st as ch 2, dc in next 8 st. \*2 dc, dc 8. Repeat around. (40 dc) 6-9: Ch 2. dc in same st as ch 2 and in each st around. (40 dc) Fasten off yarn A. If possible, try on beanie for fit. At this point, the wrong side will be the most fuzzy. You decide if you want the hat really fuzzy (like the one pictured) or less fuzzy. If you want it less fuzzy, continue to row 10 as usual. If you want it really fuzzy, turn the piece wrong side out and continue to row 10. 10-11: Join yarn B. Sc in each dc around (4 rows). Fasten off and weave in ends.
Size: 3 months - 6 months
With yarn A, make a magic ring and ch 2. 1: Work 9 dc into the magic ring. Join with a sl st to the first dc. (9 dc) 2: Ch 2. 2 dc into each st around. Join with sl st to the first dc. (18 dc) 3: Ch 2. 2 dc in same st as ch 2, dc in next st. \*2 dc, dc. Repeat around. (27 dc) 4: Ch 2. 2 dc in same st as ch 2, dc in next 2 st. \*2 dc, dc 2. Repeat around. (36 dc) 5: Ch 2. 2 dc in same st as ch 2, dc in next 3 st. \*2 dc, dc 3. Repeat around. (45 dc) 6-9: Ch 2. dc in same st as ch 2 and in each st around. (45 dc) Fasten off yarn A. If possible, try on beanie for fit. At this point, the wrong side will be the most fuzzy. You decide if you want the hat really fuzzy (like the one pictured) or less fuzzy. If you want it less fuzzy, continue to row 10 as usual. If you want it really fuzzy, turn the piece wrong side out and continue to row 10.

yarn B. Sc in each dc around (4 rows). Fasten off and weave in enc
Size: 6 months - 18 months
With yarn A, make a magic ring and ch 2. 1: Work 9 dc into the magic ring. Join with a sl st to the first dc. (9 dc) 2: Ch 2. 2 dc into each st around. Join with sl st to the first dc. (18 dc) 3: Ch 2. 2 dc in same st as ch 2, dc in next st. \*2 dc, dc. Repeat around. (27 dc) 4: Ch 2. 2 dc in same st as ch 2, dc in next 2 st. \*2 dc, dc 2. Repeat around. (36 dc) 5: Ch 2. 2 dc in same st as ch 2, dc in next 3 st. \*2 dc, dc 3. Repeat around. (45 dc) 6: Ch 2. 2 dc in same st as ch 2, dc in next 8 st. \*2 dc, dc 8. Repeat around (50 dc) Fasten off yarn A. 7-10: Ch 2. dc in same st as ch 2 and in each st around. (50 dc) Fasten off yarn A. If possible, try on beanie for fit. At this point, the wrong side will be the most fuzzy. You decide if you want the hat really fuzzy (like the one pictured) or less fuzzy. If you want it less fuzzy, continue to row 11 as usual. If you want it really fuzzy, turn the piece wrong side out and continue to row 11. 11-12: Join yarn B. Sc in each dc around (4 rows). Fasten off and weave in ends. Size: Toddler - Preschool With yarn A, make a magic ring and ch 2. 1: Work 9 dc into the magic ring. Join with a sl st to the first dc. (9 dc) 2: Ch 2. 2 dc into each st around. Join with sl st to the first dc. (18 dc) 3: Ch 2. 2 dc in same st as ch 2, dc in next st. \*2 dc, dc. Repeat around. (27 dc) 4: Ch 2. 2 dc in same st as ch 2, dc in next 2 st. \*2 dc, dc 2. Repeat around. (36 dc) 5: Ch 2. 2 dc in same st as ch 2, dc in next 3 st. \*2 dc, dc 3. Repeat around. (45 dc) 6: Ch 2. 2 dc in same st as ch 2, dc in next 4 st. \*2 dc, dc 4. Repeat around (54 dc) 7-11: Ch 2. dc in same st as ch 2 and in each st around. (54 dc) Fasten off yarn A.
If possible, try on beanie for fit. At this point, the wrong side will be the most fuzzy. You decide if you want the hat really fuzzy (like the one pictured) or less fuzzy. If you want it less fuzzy, continue to row 12 as usual. If you want it really fuzzy, turn the piece wrong side out and continue to row 12. 12-13: Join yarn B. Sc in each dc around (4 rows). Fasten off and weave in ends.
Size: Child
With yarn A, make a magic ring and ch 2. 1: Work 9 dc into the magic ring. Join with a sl st to the first dc. (9 dc) 2: Ch 2. 2 dc into each st around. Join with sl st to the first dc. (18 dc) 3: Ch 2. 2 dc in same st as ch 2, dc in next st. \*2 dc, dc. Repeat around. (27 dc) 4: Ch 2. 2 dc in same st as ch 2, dc in next 2 st. \*2 dc, dc 2. Repeat around. (36 dc) 5: Ch 2. 2 dc in same st as ch 2, dc in next 3 st. \*2 dc, dc 3. Repeat around. (45 dc) 6: Ch 2. 2 dc in same st as ch 2, dc in next 4 st. \*2 dc, dc 4. Repeat around. (54 dc) 7: Ch 2. dc in same st as ch 2 and in each stitch around. (54 dc) 8: Ch 2. 2 dc in same st as ch 2, dc in next 5 st. \*2 dc, dc 5. Repeat around. (60 dc) 9-12: Ch 2. dc in same st as ch 2 and in each st around. (60 dc) If possible, try on beanie for fit. At this point, the wrong side will be the most fuzzy. You decide if you want the hat really fuzzy (like the one pictured) or less fuzzy. If you want it less fuzzy, continue to row 13 as usual. If you want it really fuzzy, turn the piece wrong side out and continue to row 13. 13-14: Join yarn B. Sc in each dc around (4 rows). Fasten off and weave in ends.
With yarn A, make a magic ring and ch 2. 1: Work 9 dc into the magic ring. Join with a sl st to the first dc. (9 dc) 2: Ch 2. 2 dc into each st around. Join with sl st to the first dc. (18 dc) 3: Ch 2. 2 dc in same st as ch 2, dc in next st. \*2 dc, dc. Repeat around. (27 dc) 4: Ch 2. 2 dc in same st as ch 2, dc in next 2 st. \*2 dc, dc 2. Repeat around. (36 dc) 5: Ch 2. 2 dc in same st as ch 2, dc in next 3 st. \*2 dc, dc 3. Repeat around. (45 dc) 6: Ch 2. 2 dc in same st as ch 2, dc in next 4 st. \*2 dc, dc 4. Repeat around. (54 dc) 7: Ch 2. dc in same st as ch 2 and in each stitch around. (54 dc) 8: Ch 2. 2 dc in same st as ch 2, dc in next 8 st. \*2 dc, dc 8. Repeat around. (60 dc) 9: Ch 2. 2 dc in same st as ch 2, dc in next 19 st. \*2 dc, dc 19. Repeat around. (66 dc) 10-12: Ch 2. dc in same st as ch 2 and in each st around. (66 dc) If possible, try on beanie for fit. At this point, the wrong side will be the most fuzzy. You decide if you want the hat really fuzzy (like the one pictured) or less fuzzy. If you want it less fuzzy, continue to row 13 as usual. If you want it really fuzzy, turn the piece wrong side out and continue to row 13. 13-14: Join yarn B. Sc in each dc around (4 rows). Fasten off and weave in ends. Using the magic circle technique and yarn C, ch 1. 1: sc 6 into the ring. Pull the magic circle tight using the tail of yarn. 2: 2 sc in each sc. (12 s) 3: [sc 1, 2 sc in next stitch] repeat [] 6 times. (18 sc) 4: [sc 2, 2 sc in next stitch] repeat [] 6 times. (24 sc). End yarn C & join yarn B. 5: sl st in each sc around - (total 24 sl st). End yarn leaving a long tail for sewing onto your beanie. Using the yarn tail from row 5, sew the eye onto the beanie starting at row 2 or 3. Make sure the eye is laid flat - you may have to pin it in place as you sew it on. See picture for suggested placement. Sew large button onto the eye in any

position you chose. I put the button at the bottom right of the eye and sewed it on with a scrap piece of green yarn to make the green button. Mouth for all sizes (make one): Using 2 stands of yarn D, ch 25. End yarn leaving a long tail for sewing onto your beanie. Using the long tail of yarn, sew the mouth onto the beanie under the eye. Teeth Option 1: Cut two triangles from white fabric or felt for the teeth. Attach with fabric glue placed as desired. For extra security, tack the felt in place with a needle and thread. See picture for suggested placement. Teeth Option 2: Crochet basic triangles in white and sew onto mouth (pattern below). Basic Crochet Triangle 1: Ch 7, sc in 2nd ch from hook and in each remaining st. Ch 1, turn (6 sc). 2: Skip 1st sc, sc in each st across. Ch 1, turn (5 sc). 3-6: Repeat row 2, decreasing one sc each row until there is only one sc left. 7: Sc around the whole triangle. Fasten off, leaving a long tail for sewing.
Pom-Poms for all sizes (make two):
I used 1 strand each of pink sparkle, blue mint, white, and yellow. I tied off my pom-poms with a long stand of pink sparkle so it would hide easily into the beanie when attached. Attach each pom-pom on either side of the beanie, approximately 1" from row 1. See picture for suggested placement. If you need help making pom-poms, there are several free resources online or on YouTube that will help you. Make the pom-poms any size you wish.


