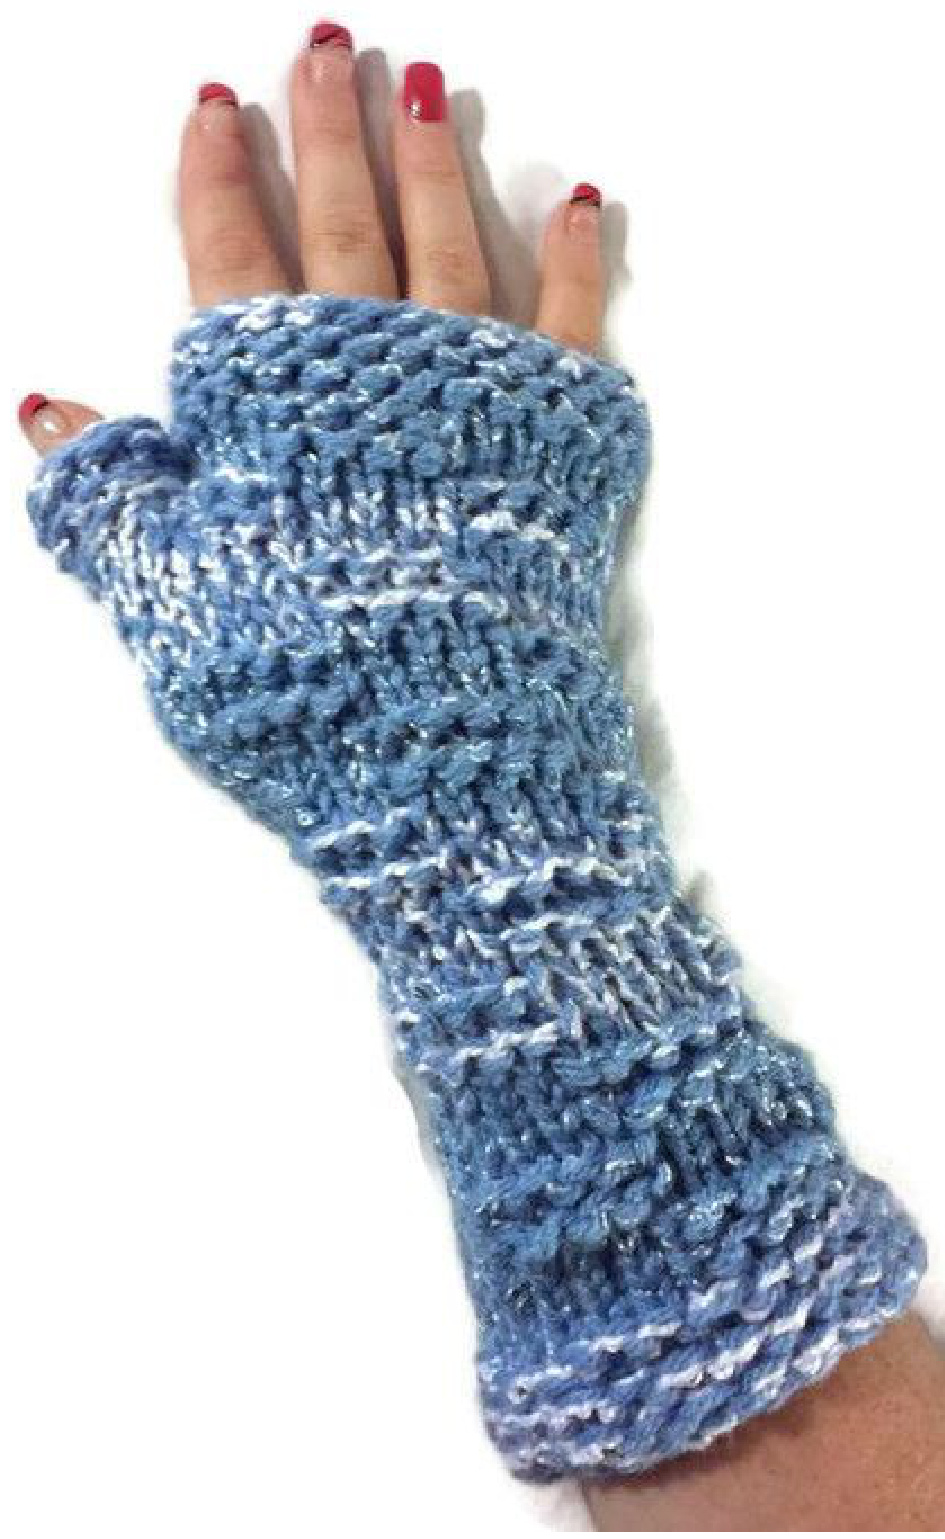
Inverted Garter Block Fingerless Glove
on the 9" Long Loom From CinDWood Crafts By: Amanda Pratt www.HypnoticHysteria.com http://premiumknittinglooms.com/
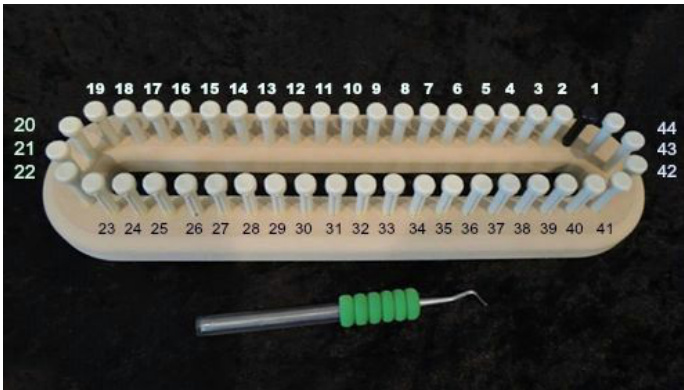
Peg Numbering Diagram
Materials
1 Skein Caron United in Light Blue http://www.michaels.com/caron-united-yarn/M10347909.html 1 Skein Bernat Baby Coordinates Yarn in Buddy Blue http://www.joann.com/bernat-baby-coordinates-yarn/prd12017.html CinDWood 9" long loom %2" gauge with 44 pegs \*photo above\* http://premiumknittinglooms.com/product/9-inch-hatscarf-combo-loom/ \*OR\*Custom order CinDWood 9" long loom ,%" gauge loom, 44 pegs with pegs already marked, and with 2 loom adjusters \*photo below\* http://premiumknittinglooms.com/product-category/looms/custom-order-only/ Knitting Hook http://premiumknittinglooms.com/product/pick/ Row Counter https://www.etsy.com/listing/227580092/led-finger-counter-muslim-counterfinger?ref=shop_home _active8 Scissors https://www.etsy.com/listing/225626587/pink-sewing-pruning-beading-scissor?ref=shop _home_active 6 2 Loom Adjusters http://premiumknittinglooms.com/product/wedge-for-ovalpanel-combo-looms/ Tensioner \*Optional\* http://premiumknittinglooms.com/product/knitting-aide/ Crochet Hook Size- Small, Child -Green pegs 9,33 ; 12,30 Medium, Adult - Purple Pegs 10,32 ; 13,29 Large, Adult Large - Blue pegs 11,31 ; 14,28
NOTE- during the pattern the peg on the loom adjuster is called peg 0
This pattern is wrote up for the LEFT Medium size with (small;large). to make the right glove you do R1/R2 (Right 1 / Right 2) in place of L1/L2 (Left 1 / Left 2 ) through the entire project.
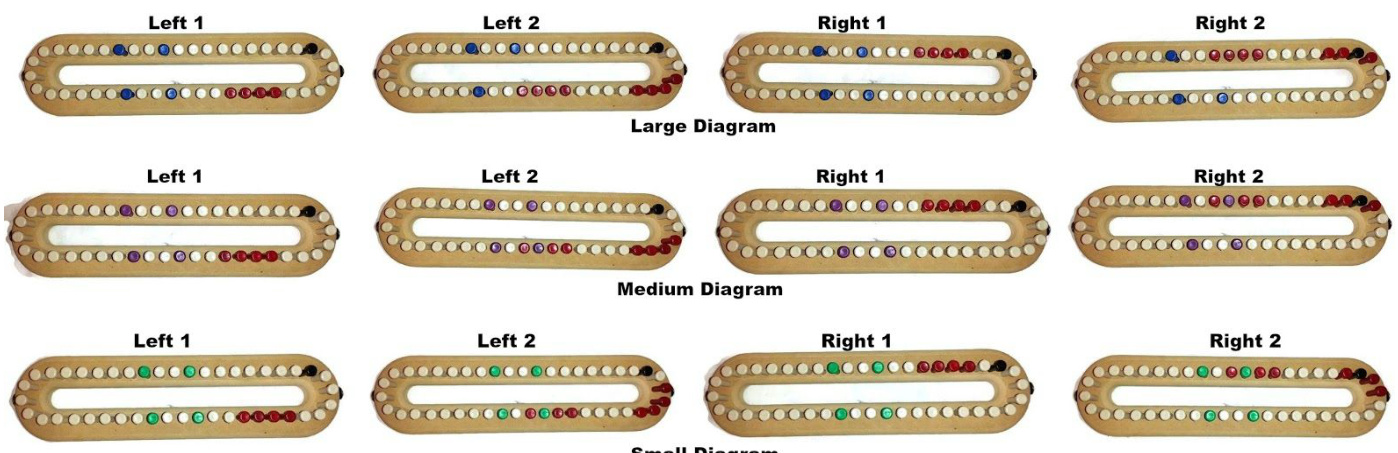
Inverted Garter Block Loom Diagrams Red Pegs = E-Wrap, (medium and large mark same pegs) Left 1 = L1 ( 35,36,37,38 / 36,37,38,39 ) Left 2 = L2, (31,32,33,43 : 39,40,41,42 / 32,33,34,35 : 40,41,42,43 ) Right 1 = R1 ( 7.6,5,4 / 6,5,4,3) Right 2 = R2 (8,9,10,11-0- : 3,2,1,44 / 7,8,9,10,-0- : 2,1,44,43)
| 1 | 1 | 1 | 1 | |||||||||
| N | 1 | |||||||||||
| 3 | 1 | |||||||||||
| 4 | ■ | ■ | ■ | ■ | ■ | ■ | ■ | ■ | ■ | |||
| ■ | ||||||||||||
| 6 | ■ | 1 | ■ | |||||||||
| 7 | ||||||||||||
| 8 | 1 | 1 | 1 | 1 | 1 |
Inverted Garter Block Diagram : / = Purl - = E-Wrap
Cast On
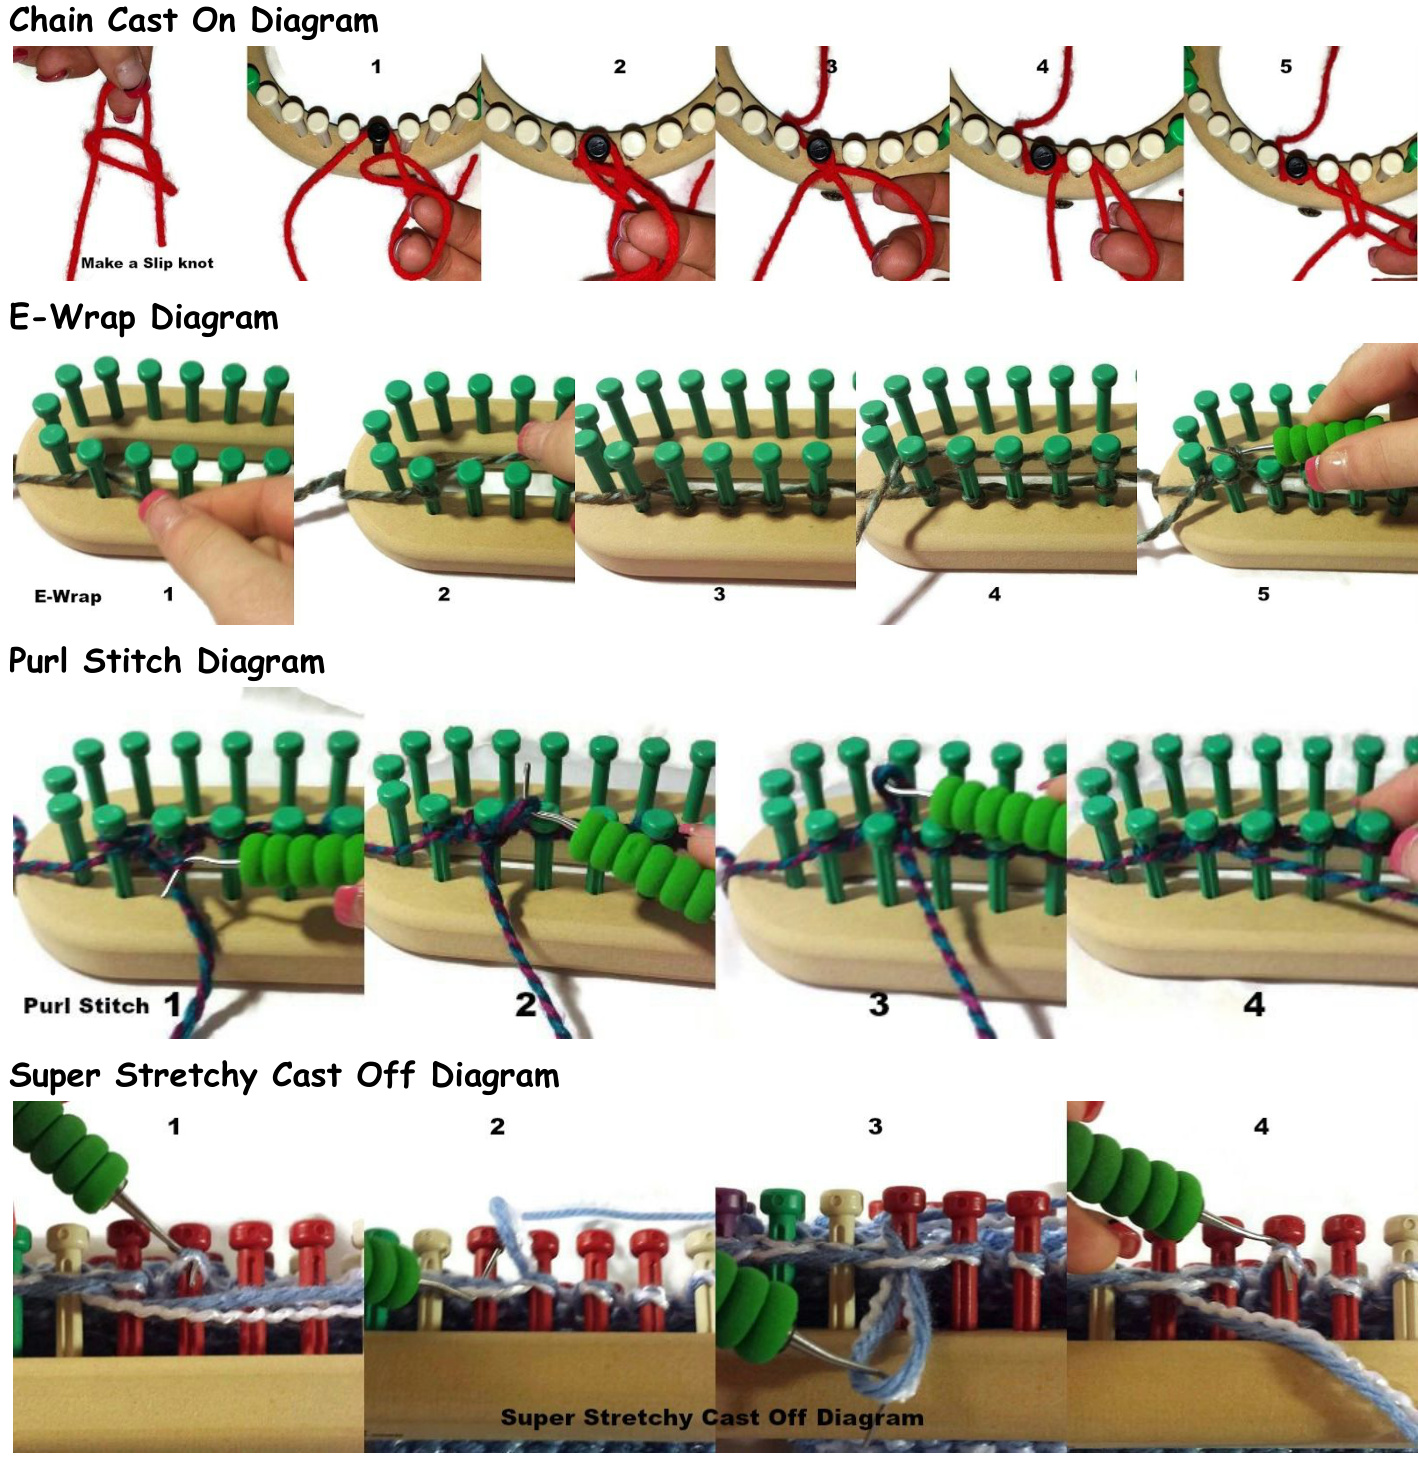
Place your loom adjuster in between pegs 10 & 32 \*Purple\* (9 & 33 \*green\* Child; 11 & 31 \*blue\* Large) Starting with peg 0 and moving to peg 32 (33; 31) all the way around to peg 10 (9;11) and ending on peg 0 do a chain cast on. \*Diagram Below\*
Finger Opening
Row 1 : E-wrap \*Diagram Below\* Row 2 : P \*Diagram Below\* Row 3 : E-wrap Row4: P Row 5 : E-wrap Now you will start the Inverted Garter Block Pattern. Follow the diagrams above for what pegs to E-Wrap and what to Purl. L1 = Left 1 of the size you are making and L2 = Left 2 of the size you are making \*Diagram Above\* Row7:P Row8 : L1 Row9:P Row10:L2 Cut Yarn move the stitch from peg 0 to peg 10 (9;11). Do not remove any other stitches
Thumb
Turn loom adjuster in opposite direction and place in between pegs 11 & 31 (10 & 32 ; 12 & 30) take your second loom adjuster and place in between pegs 13 & 29 \*purple\* (12 & 30 ; 14 & 28 \*blue\* ). Starting with peg 0 and moving to peg 11 (10;12)and all the way around to peg 31 (32;30) \*pegs 11,12,13,0,28,29,30\* and ending with peg 0 do a chain cast on. Row1(11) : E-wrap Row2(12) : P Row3(13) : E-wrap Row4 (14) : P Row5(15) :E-wrap DO NOT CUT YARN move stitch from peg 0 to peg 31 (32;30) . Do not remove any other stitches.
Body
At this point remove the first loom adjuster in between pegs 11 & 31 (10 & 32 ; 12 & 30) your yarn should be coming off peg 29 (30 ; 28) Row 16 : Purl stitch completely round from peg 30-13 (31-12;29-14) then 0 back to peg 33 (31;29) Remembertofollowdiagrams Row 17 : L2 Row 18 : P Row 19 : L1 Row 20 : P Row 21 : L1 Row 22 : P Row23:L2 Row 24 : P Row 25 : L2 DecreaseforWrist Remove the stitch from peg 13(12;14) move it to peg 12 (11;13) then remove stitch from peg 29 (30;28) ad: it to peg 30 (31;29) Row 26 : P Row 27 : L1 Move the stitch from peg 12 (11;13) and more to peg 11 (10;12) then more stitch from peg 30 (31;29) and more to peg 31 (32;30) Row 28 : P Row 29 : L1 Move the stitch from peg 11 (10;12) to peg 10 (9;11) and move the stitch from peg 31 (32;30) to peg 32 (33;31) Arm and Cuff Row 30 : P Row 31 : L2 Row 32 : P Row 33 : L2 Row 34 : P Row 35 : L1 Row 36 : P Row 37 : L1 Row 38 : P Row 39 : L2 Row 40 : P Row 41 : L2 Row 42 : P Row 43 : L1 Row 44 : P Row 45 : L1 Row 46 : P Row 47 : L2 Row 48 : P Row 49 : L2 Row 50 : P Row 51 : L1 Row 52 : P Row 53 : L1 Row 54 : P Row 55 : L2 Row 56 : E-Wrar Row 57 : P Row 58 : E-Wrar Row 59 : P Row 60 : E-Wrar
Cast Off using the Super Stretchy Cast Off \*Diagram Below\*
Finishing Up
The whole project knits inside out so once it is off the loom go ahead and use your crochet hook to weave in all the ends and sew up the hole between the thumb and fingers. Flip your glove inside out and you are done! VIDEO LINKS Chain Cast On: https://www.youtube.com/watch?v=GY8lxnMA6Uk E-Wrap https://www.youtube.com/watch?v=dn5qb2ohx_U Purl Stitch : https://www.youtube.com/watch?v=fLP-7l-Wcel Super Stretchy Cast Off : https://youtu.be/fjksKWHUQFQ FULL LENGTH Video Tutorial: https://www.youtube.com/watch?v=LRF8F5umLaw&edit=vd


Every effort is made to insure the accuracy of this pattern. If any instruction are not clear, please email me apomwp01@gmail.com for clarification. Pattern Design by Amanda Pratt. All Rights Reserved Do not copy or distribute in any way except for personal use. Hypnotic Hysteria 2015.


