knit. crochet. design.
Lady Mendl
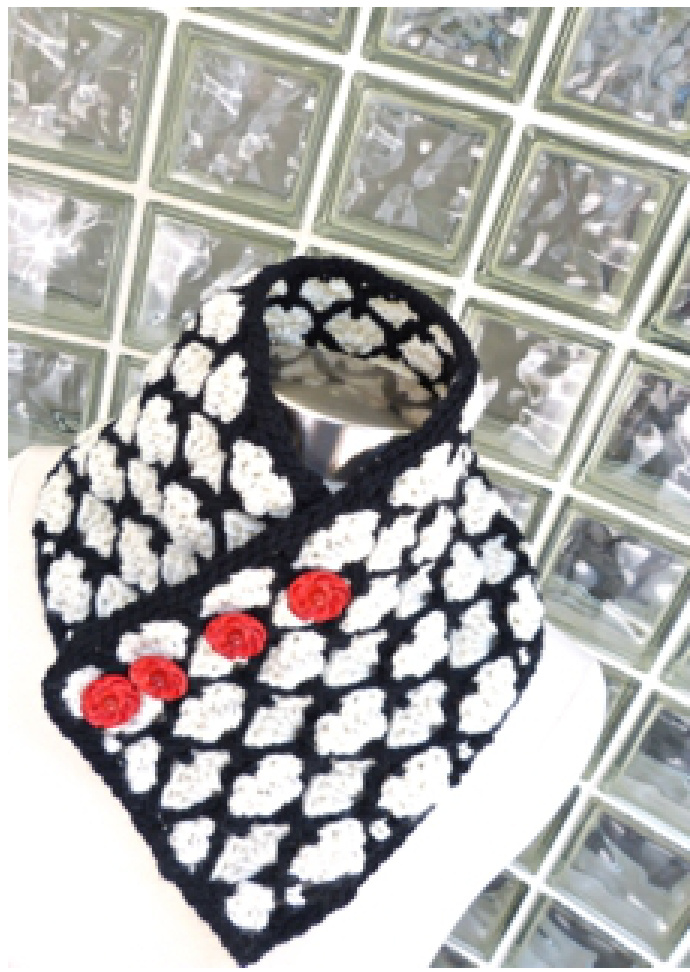
(crocheted cowl) Good dressing is largely a question of detail and accessories ElsiedeWolfe (Lady Mendl) Elsie de Wolfe knew a good accessory when she saw one, and while I'm not sure her ladyship would have worn this cowl out on the town, I think she would have appreciated the stitch pattern. De Wolfe wore many hats, literally and figuratively, and as an interior designer introduced trellis patterns to indoor décor. Her decorating innovations lightened and brightened the dark Victorian interiors of her childhood. One story has it that as a child some William Morris wallpaper threw her into a all-down-on-the-floor screaming fit, which really seems too good a story to be true. There should be no screaming fits involved in crocheting this cowl. It's construction-- crocheting side to side, turning every other row, carrying the yarn along up the sides without cutting--minimizes the number of ends to be worked in. Quick to crochet, the two skeins used in the samples provided enough yarn for two cowls. Left unseamed and finished with buttons, it can be worn in different ways to complement a plain jacket or sweater. Or seam the ends together for a circlet. Directions use US Terminology.
Finished dimensions circumference (unbuttoned) 24 inches(60cm) height, 6 inches (15cm)
Materials For two cowls: 170yds(155m) of heavy worsted weight/aran weight yarn in each of two colors. For a single cowl: 85 yards(78m) in each of two colors. The sample was worked in Quince & Co. Osprey, 100% American Wool (100g/170yd/155m) in Crow(CC) and Egret(MC). Size I/5.5mm crochet hook Size G/4.5mm crochet hook Yarn needle for working in the ends and the (optional) seaming. Buttons or other fasteners Gauge This is where I usually write that gauge doesn't matter or tell you to use whatever size hook gives you a fabric you like. However, in this case I highly recommend a small gauge swatch to become familiar with the stitch pattern, practice securing and carrying the yarn, and determining any adjustments to hook placement. Swatch Work a Double Base Chain of 15 and then work Rows 1 through 6 one time. The resulting swatch will measure approximately 2 12 inches(6.4cm) in height by 3 12 inches (9cm) in width. The pattern isn't difficult to decipher if you remember that to create the trellis effect, the CC rows of the pattern stitch are worked into the previous CC row, that is, the one below the MC row just worked.
Special Stitches and Techniques
Double Base Chain: Start with slip stitch. Chain 2. Insert hook through 2nd chain from hook. Yarn over and draw through the two loops on the hook. One Double Base Chain formed. You can see the two chains-one on top, one on the bottom. To continue, insert hook under two loops of the bottom chain, yarn over and draw through the two loops on the hook. Here's a link to a tutorial: yarnobsession's double base chain video. Secure: Fastening off without cutting the yarn so that it can be carried along. Extend the loop on the hook untilit is large enough to pass the yarn ballthrough. Pass the ball through and tug on the yarn to tighten the extended loop.
| Abbreviations | |
| sc=single crochet | dc=doublecrochet sl st=slip stitch |
| MC=MainColor CC=ContrastColor | ch(s)=chain stitch(es) |
| sp(s)=space(s) | Rep[]=repeat bracketed instructions |
Directions
NOTE: Chain sts at beginning of row count as sc or dc as indicated and will be referred to as sc or dc in the directions for the subsequent row. Foundation: With larger hook and CC, work a Double Base Chain of 78. Secure CC and drop. DO NOT TURN. Row 1: Using MC and working from right to left under the top. two loops of the Double Base Chain, fasten on, ch2 (counts as 1dc) and 2dc in first ch. Skip next 2 chs, sc in next ch. [Skip next 2 chs, 5dc in next ch, skip next 2 chs, sc in next ch.] Rep[] to last 3 chs. Skip 2 chs, 3dc in last ch. Secure MC and drop. TURN. Row 2: Pick up CC. Sl st, ch 1 (counts as 1 sc) in 1st dc. [ch1, skip next 2 dc and next sc, dc in sp after the skipped sc, ch 2, working around the last dc made, dc in space before the skipped sc, ch1, skip next 2 dc, sc in next dc] Rep[] to end of row. Secure CC and drop. DO NOT TURN. Row 3: Pick up MC. Sl st, ch 1 (counts as 1 sc) in 1st sc. Skip next ch 1 sp, 5dc in next ch-2 sp. [ch1, skip next two ch-1 sps, 5dc in next ch-2 sp] Repeat [] to last ch-1 sp. Skip last ch1sp, Sc in last sc. Secure MC and drop. TURN. Row 4: Pick up CC. Ch 2 (counts as 1 dc) and dc in 1st sc. Ch1, skip next 2 dc, sc in in next dc, ch1., [Working around previous row, dc in ch sp after sc one row below the next ch sp. Ch 2. Working around dc just made, dc in ch sp before the same sc. Ch1, skip next 2 dc. sc in next dc, ch 1] Rep[ ] to last 3 sts. Skip 2 dc, 2dc in sc. Secure CC and drop. DO NOT TURN Row 5: Pick up MC. Ch 2 (counts as 1 dc) and 2dc in first dc. Ch 1. [Skip next 2 ch-1sps, 5dc in next ch2 sp. ch1] Rep[] to last 2 ch-1sps. Skip last 2 ch-1 sps and next dc. 3 dc in last dc. Secure MC and drop. TURN Row 6: Pick up CC. Sl st, ch 1 in 1st dc (counts as 1 sc) [Ch 1. Working around previous row dc in ch sp after sc one row below the next ch sp. Ch 2. Working around dc just made, dc in ch sp before the same sc. Ch 1, skip next 2 dc, sc in next dc] Rep[] to end of row. Secure CC and drop. DO NOT TURN. Rows 7-14: Repeat Rows 3 through 6 two more times.
Finishing
If you are going to use buttons on a flat cowl: At the end of the last row 6 worked (CC), work the sc. The right (outer) side of the work will be facing. Switch to the smaller hook. Turn the corner and using CC slip stitch along the side edge in a way to neaten up the edge. Turn the corner and working through the front loop, sl st along the bottom border. Turn the corner and work sl st along side edge as before. Turn corner and working through the back loop, sl st along top border. Fasten off. Work in ends. If you are going to seam the cowl: You can omit the slip stitching along the shorter edges if you prefer. Block lightly if desired. If you are using buttons: sew them on. The spaces occurring in the stitch pattern will function as buttonholes. OR If you are seaming the cowl to form a circlet: seam along the shorter edge using your preferred method. For an alternate edging: After working the last MC row, continue around, working the 5-dc shells where they would occur in the staggered pattern. Work 2dc-ch1-2dc at the corners.


