Dorothy Day Shawl
Knit on 500 yards of romney yarn, worsted weight, from Wool-E-Farms, color "Mae" (I think that is the name of the sheep) - natural color on $\#10$ circulars.
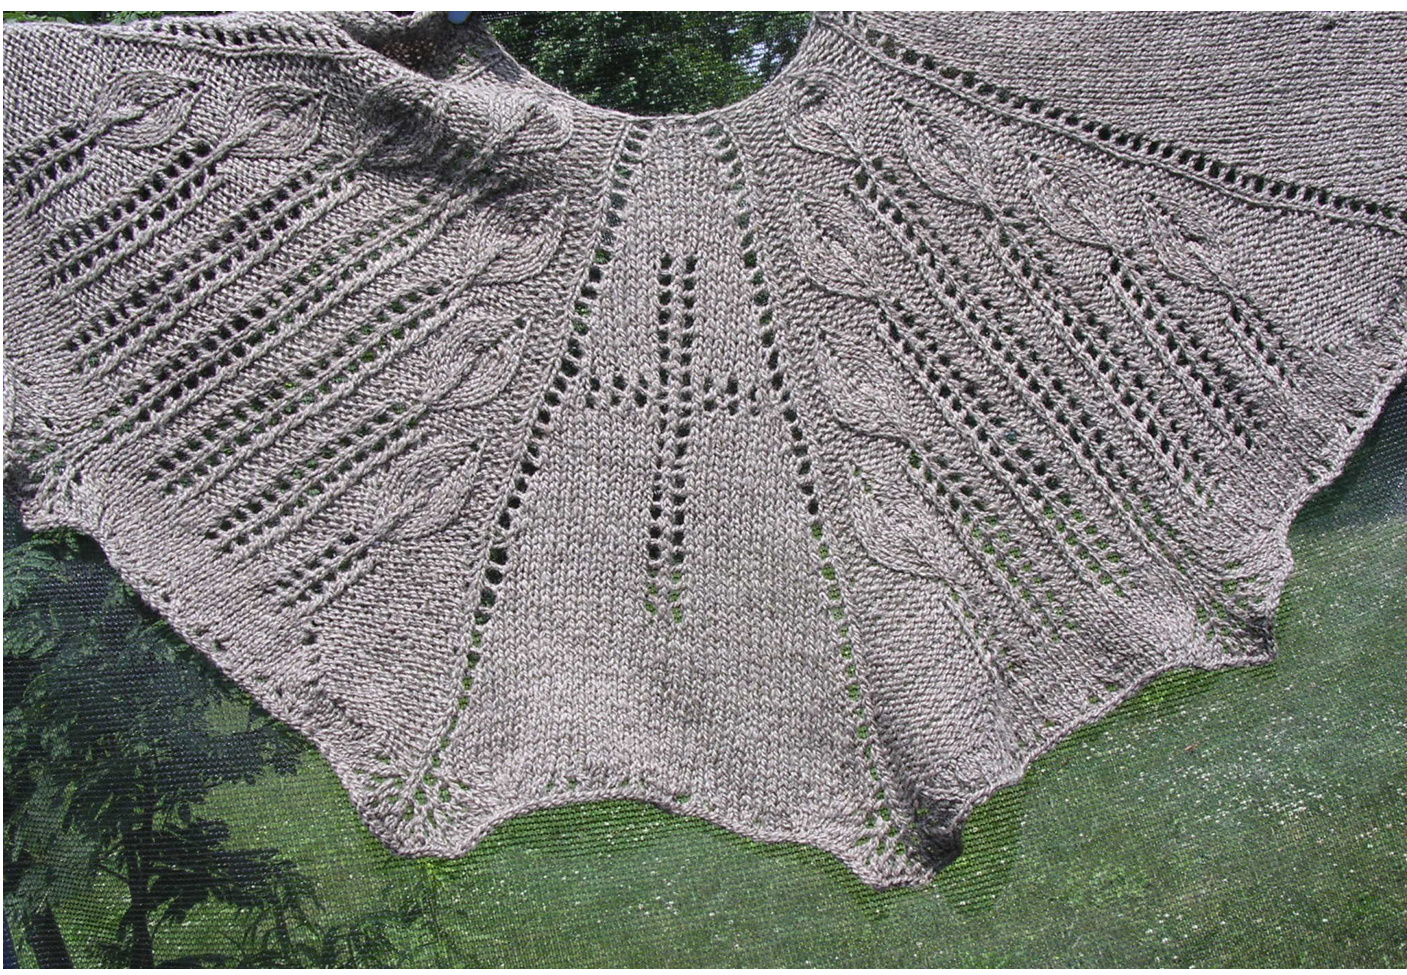
Dedicated to Dorothy Day, another great woman. This shawl is knit as 5 panels. The first, third, and fifth are very similar. Between them are the two candle panels, which made me think of Dorothy Day, because she is the founder of the Catholic Worker Movement. I've lived in the Peter Clavier house in Philly and met my friends there who now run the House of Grace, where they operate a free clinic for the poor in one of the "bad" neighborhoods in the city, and are starting one up in Haiti for the desperately poor. On TV if someone is Catholic, it seems like sooner or later they'll be lighting candles for some reason! The flame is a take-off on the candle flame pattern, which by itself makes a lovely shawl, but I spaced them out a bit and narrowed them some to make room for the candie sticks. You can think of this shawl as 5 panels all knit at the same time (or maybe do it as a group project and each person knit one panel). The first and last panels are identical, or maybe mirror opposites, simply knit in a stockinette stitch with a small cross near the bottom. The second and fourth panels are the candle panels, and the center panel is very similar to the first and last except with a larger cross pattern centered on the upper part.
Abbreviations
$\mathsf{k}=$ knit $p=p u r l$ ssk $=$ slip, slip, knit k 2 tog $=$ knit two together $\mathsf{u}=$ lifted increase: pick up the "bump" of the stitch beneath the current one on the needle, purl that, slip it off, purl the current one as usual - makes an invisible increase $\upgamma0=$ yarn over $\mathsf{k}\,3$ $1=$ $\mathsf{y o},$ knit into the same stitch $\textsf{k3t o g}=\textsf{k3}$ tog your favorite way, mine is to slip two stitches together from the hand side of the needle (not the point side) then knit the next stitch then pass the two slipped stitches together over the knit one - makes the center one come out on top
Pattern
To begin, cast on 29 stitches, 5 each for the front and center panels and 7 each for the two candle panels. Put in stitch markers where one pattern stops and the next one starts or it will get too confusing! (after 5, 7, 5, & 7). I just tied some contrasting yarn around the knitting needle there. You pass these to the next needle whenever you come to them in knitting. Knit the next row, then purl the next row, then begin following the instructions for the different panels, which is just the slow increase for three of them and the beginning of the candle pattern for the other two. First, the two front panels and the center one have what I callthe "slow increase" on the edges. There is a yarn over every knit row, but only every other one of them is actually an increase because every other time you counter it with a k2 tog or ssk to keep the same number of stitches, so it gets wider at half the rate of the candle patterns, which gain two stitches every knit row.

Pattern for Candle Panels $(2^{\mathsf{n d}}$ and $4^{t h}$ sections) This makes use of a "lifted increase" (thank you my knitist friends for telling me the name of that one!) around the candle flames so there aren't any unsightly "holes" where we don't want them. It is an unusual stitch but pretty easy to do. Row 1: p3, k, p3 Row 2: k3, p, k3 Row 3: p3, k3 into 1, p3 Row 4: k3, p3, k3 Row 5: p3, k, k3 into 1, k, p3 Row 6: k3, p5, k3 Row 7: p3, k2, k3 into 1, kK2, p3 Row 8: k3, p7, k3 Row 9: p3, k3, k3 into 1, k3, p3 Row 10: k3, p9, k3 Row 11: p2, u, k9, u, p2 Row 12: k4, p9, k4 Row 13: u, p2,u, k3, k3 tog, k3, u, p2, u Row 14: k6, p7, k6 Row 15:u, p,k, p2,u, k2, k3tog,k2,u, p2, k, p, u (you should have 21 stitches now) Row16:k3,p,k4,p5,k4,p,k3 (still) Row 17: p3, k3 into 1, p4, k, k3 tog,k, p4, k3 into 1, p3 (19 stitches) Row 18: k3, p3, k4, p3, k4, p3, k3 (23 stitches) Row 19: p3, k, k3 into 1, k, p4, k3 tog, p4, k, k3 into 1, k, p3 Row 20: k3, p5, k4, p, k4, p5, k3 (25 stitches) \*\*\*\*\*+ERPEAINGPATTRN STARTS HER\*\*\*\*\*\*\*\*\*\* BLUE IS THE LEFT CANDLE PATTERN, BLACK IS THE RIGHT CANDLE PATTERN (which is the left candle pattern, reversed), AND RED IS THE CANDLESTICK PATTERN - Notice that there are two stitches between each candlestick once there are more than one of them-they are purled on the right side and knit on the wrong side. Row 21: [p3, k2, k3 into 1,k2, p 2tog], [ssk, yo, k, yo, k 2 tog], [p 2 tog, k2, k3 into 1, k2, p3] Row 22: [k3, p7, k], [p5], $[{\mathsf{k}},\,{\mathsf{p}}{\mathsf{7}},\,{\mathsf{k}}{\mathsf{3}}]=27$ Row 23: [p3, k3, k3 into1, k3, p], [ssk, yo, k, yo, k 2 tog], [p, k3, k3 into 1, k3, p3] Row 24: [k3, p9, k], [p5], $[{\mathsf{k}},\,{\mathsf{p}}{\mathsf{9}},\,{\mathsf{k}}{\mathsf{3}}]=31$ Row 25: [p3, k9, p], [ssk, yo, k, yo,k 2 tog], [p, k9, p3] Row 27: [k3, p9, k], [p5], $[{\mathsf{k}},\,{\mathsf{p}}{\mathsf{9}},\,{\mathsf{k}}{\mathsf{3}}]=31$ Row 28: [u, P,u, k3, k3 tog,k3, u], [ssk, yo, k, yo, k 2 tog], [u, k3, k3 tog, k3, u, p, u] Row 29: [k5, p7, k2], [p5], [k2, p7, k5] = 33 Row 30: [u, p3, u, k2,k3tog, k2, u,pl, [ssk, yo, k yo, k2 tog], [p, u, k2, k3 tog, k2, u, p3, u] Row 31: [k3, p, k3, p5, k3], [p5], [k3, p5, k3, p,k3] = 35 Row32: [p3, k3 into 1, p2,u, k, k3 tog, k,u, p2], [ssk, yo, k, yo, k2tog], [2,u, k, k3tog, k, u, p2, k3 into 1, p3] Row 33: [k3, p3, k4, p3, k4], [p5], [k4, p3, k4, p3, k3] = 39 Row 34: [p3, k, k3 into 1,k, p4, k3 tog, p4], [ssk, yo, k, yo, k 2 tog], [p4, k3 tog, p4, k, k3 into 1, k, p3] Row35:[k3,p5,k4,p,k4],[p5],[k4,p,k4,p5,k3] =37 Row 36: [p3, k2, k3 into 1, k2, p2 tog], [ssk, yo, k, yo, k 2 tog], p2, [ssk, yo, k, yo, k 2 tog], p2, [ssk, yo, k, yo, k 2 tog], [p2 tog, k2, k3 into $1,\,{\mathsf{k}}2,\,{\mathsf{p}}3]=39$ (this is one flame pattern on each side with three candlesticks in the middle) Continue until there are 7 flames on the panel, then don't start any new ones and on each right side row do a lifted (u) increase at the beginning and end, purl (on the right side, k on the wrong side) until you get to the candlesticks, and from the last candlestick to the end of the panel (don't forget the u increase at the end). This will depend on gauge, but when you get near the end, like 3" or so, stop purling between candlesticks but repeat the candlestick pattern one more row (with two knits between each instead of two purls), from then on, just knit across on the right side, purl on the wrong side. That will set it up for the nice edge. I did 14 rows of candlestick pattern for the shortest candle (including the row that had knit between instead of purl).
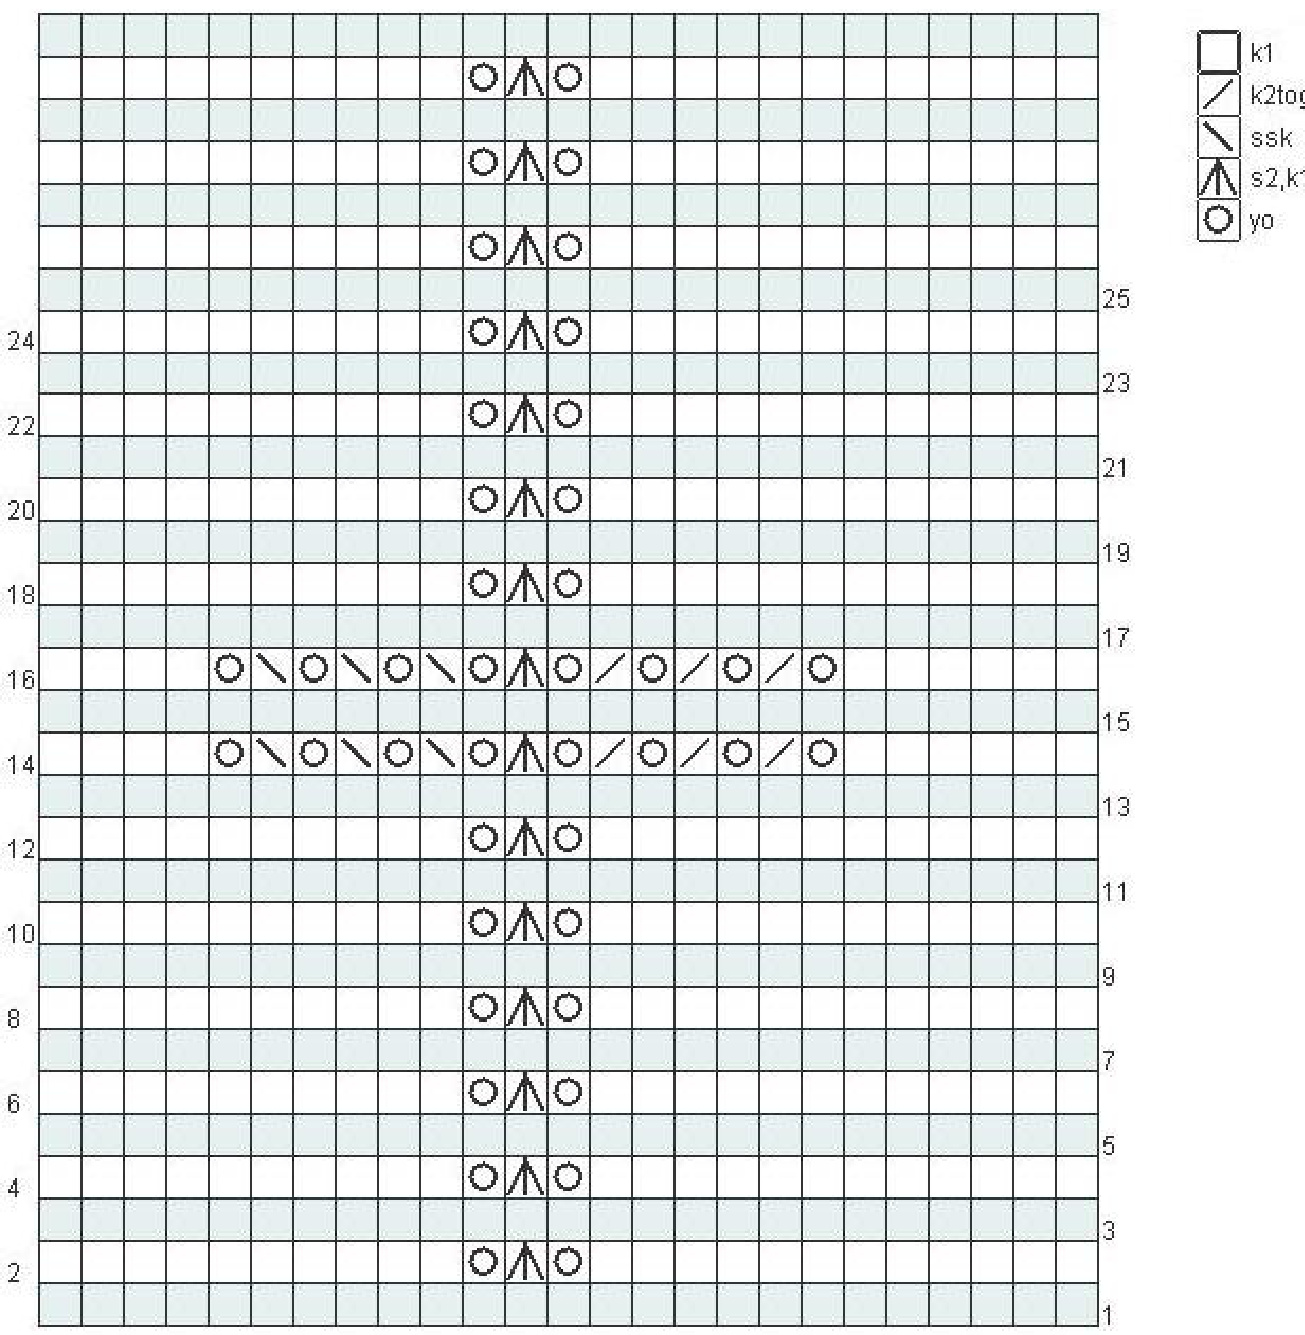
Center Panel
For the center panel, wait until you have around 15 stitches to start it, then begin the cross pattern. It is 15 rows wide and 40 rows long (the bottom of the cross was left out to save space - there should be a total of 20 yarn overs the long direction) Knit it centered on the center panel once. Begin it once you have more than 15 stitches in the center panel (between the second and third markers). Count the number of stitches you have, divide by two and subtract 1. Knit that number in the row before you do the first yarn over.
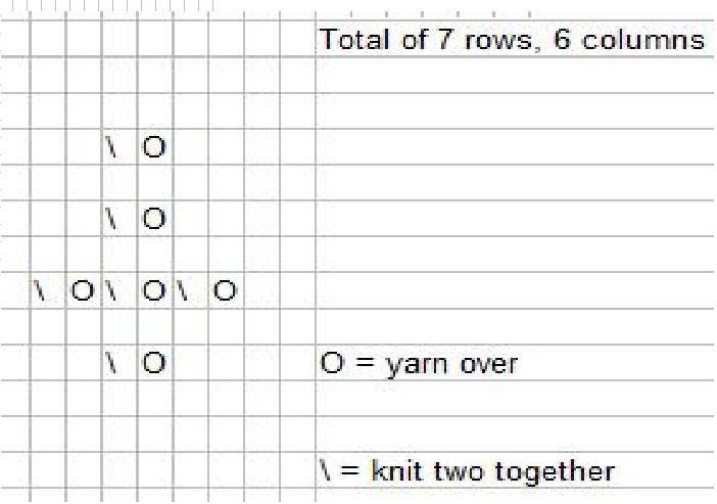
Front Panels
On the front panels there are two little crosses near the bottom. I started them the same row as the top of the last candlesticks. I centered it but you can put it more toward the corners too.
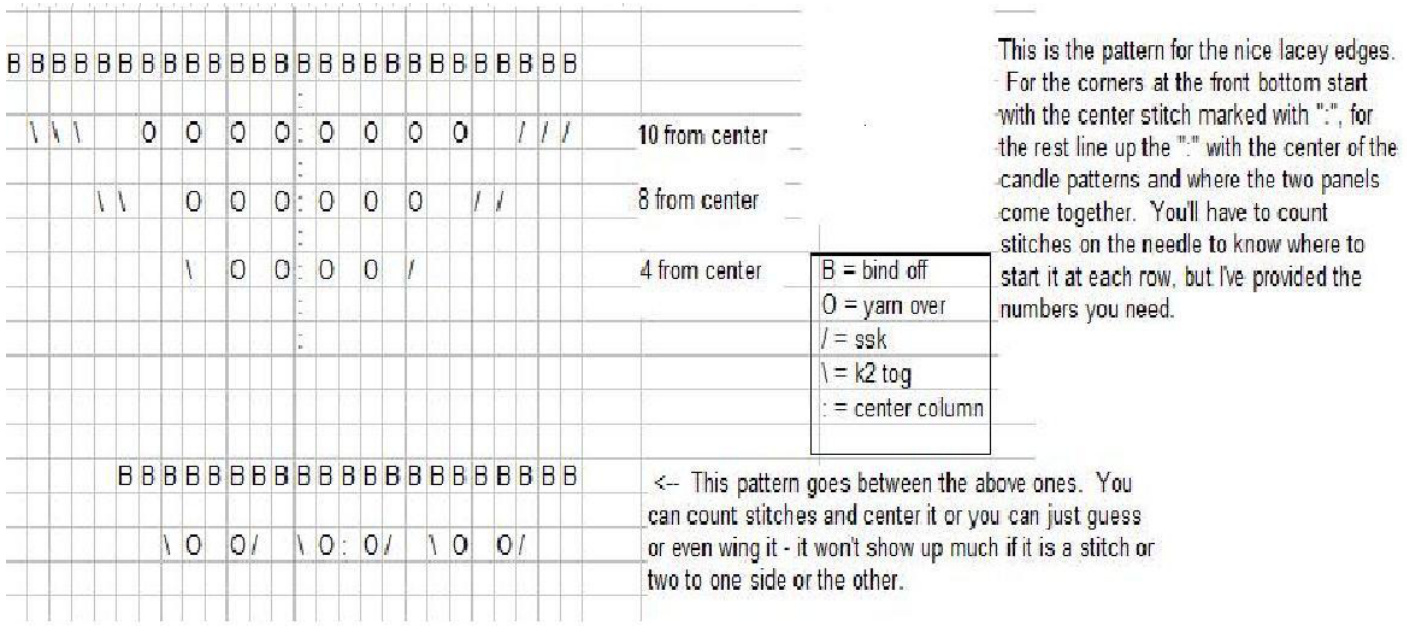
Edges and Finishing
I used two patterns for the edges, the first is centered on where each panel joins, the center of each candle panel, and at the edges. The other fills in the gaps and starts the last knit row before you bind off. The top one starts 6 rows before the end. It is the one that goes where the different panels come together, centered on the candle panels, and half of it on each bottom corner (knit from the ":") I don't know a better way to tell how to do it than to say you find the center stitch, line up the ":" in the chart with that and count stitches to see where to begin. I've supplied the numbers but in case you can't read them, the first row begins 4 from the center stitch, the next (knit row) 8 from the center and the last one 10 from the center stitch. Kind of centered between these "flourishes" are a simple pattern on the last knit row before you bind off which is three sets of $\backslash,\!0,\!\mathsf{K},\!0,\!/,\!\mathsf{K}$ . You can try to center them but it doesn't show much if they're a stitch or two off center.