Chiffon Arm Knit Scarf
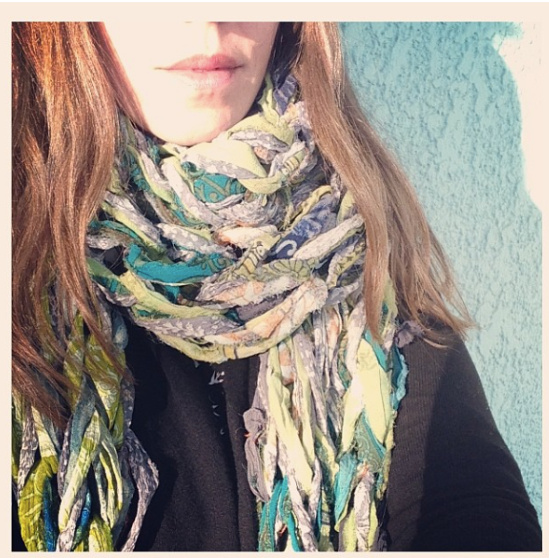
This summery chiffon scarf is a real showstopper because it is stunning and ethical. Made out of wispy, lightweight recycled chiffon rescued from the landfills of India and produced with fair labour standards, this is truly a project that is beautiful in so many ways. No knitting experience necessary, 'cause it's arm knittin'
Materials
Yo' arms 3 skeins of recycled chiffon ribbon by Darn Good Yarn Eucalan yarn wash & an old towel(or other delicate laundry detergent)
Prep Instructions
l.Unwind the skeins of chiffon one skein at a time so that you have 3 ball of recycled chiffon! 2. If you are unwinding skeins at home then you can open up the skein, drape it over the back of a chair, and wind the balls by hand. 3. Trim off loose threads as needed to tidy up the yarn. 4.Put your three balls of yarn into something that will keep them together while they roll around - a large bowl, laundry basket, box, or other container would work!
Note
There isn't a diagram in the world that does a good job of showing the steps for arm knitting - we recommend reviewing a video if you need help! Here are our two favourite videos for arm knitting. Arm Knitting for Beginners: bttna: //rw.outuho.aom/ratah?-lRlsyCaxzu. https: / /www.youtube.com/watch?v=lBlzVCaX7HU Darn Good Yarn Chiffon knitting demo: https: / /www.youtube.com/watch?v=4eUmxItxZjs
Let's Get Arm Knittin
1. Starting with an adjustable slipknot, cast a total of 9 stitches onto your right arm.
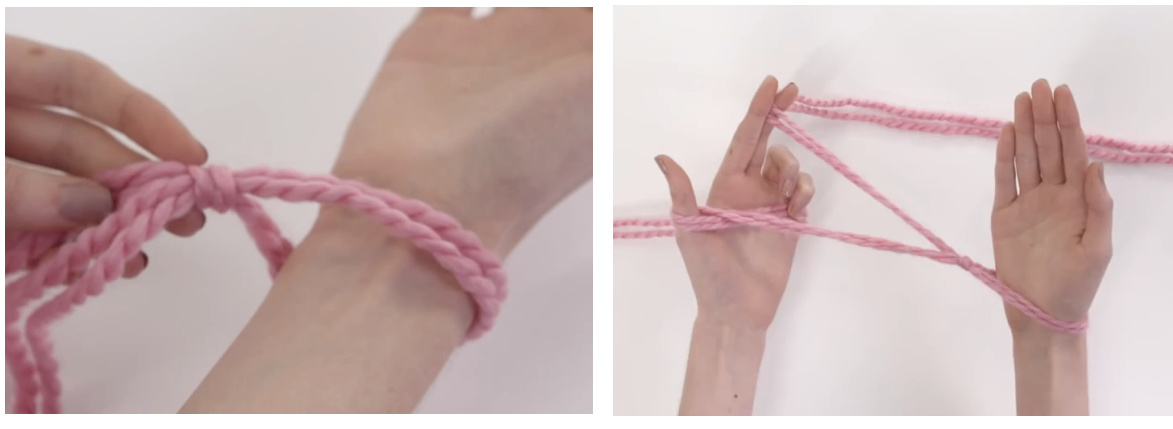
of your stitches off of your right arm onto your left arr 3. Knit again in the opposite direction, knitting all of your stitches off of your left arm onto the right arm. 4. Repeat steps 2 & 3 until your balls of chiffon yarn are each the size of a small orange - we need this length to cast off. 5. Cast off your stitches until you only have one stitch left on your wrist. Cut off your yarn so that it is 30 cm long and put all 3 ends into the loop on your arm, and pull tight. Congrats, you have finished arm knitting!
Finishing your scarf
First weave in the tails of yarn on the back or wrong side of your scarf. We want these ends to be away from the edges of your work. This scarf is super busy and even when you tie a knot to secure the ends no one will notice them! This project is nicest after it is washed and blocked. l.To wash it, fill a bathtub or sink up half way with lukewarm water. Add to 3 tablespoons of Eucalan wash to the water. 2. Add your scarf to the water, spreading it out as much as possible. 3. Let it soak for 20 to 40 minutes. Drain the sink/tub and gently squeeze as much water out of the scarf as possible. Do not wring the water out. 5. Place the scarf in an old towel and roll the towel up tightly. This will squeeze out even more water. 6. We like to hang our scarves outdoors to dry so that they smell fresh and remind us of the great outdoors! Drying time will vary from 4 hours to a wholeday.


