Please NOte: This pattern may not be redistributed in any form, or knit for profit. Knitting for non-profit purposes is permitted. Thank you.
& don't forget
to check LAYLOCK.org frequently for the latest news and patterns.


Overview:
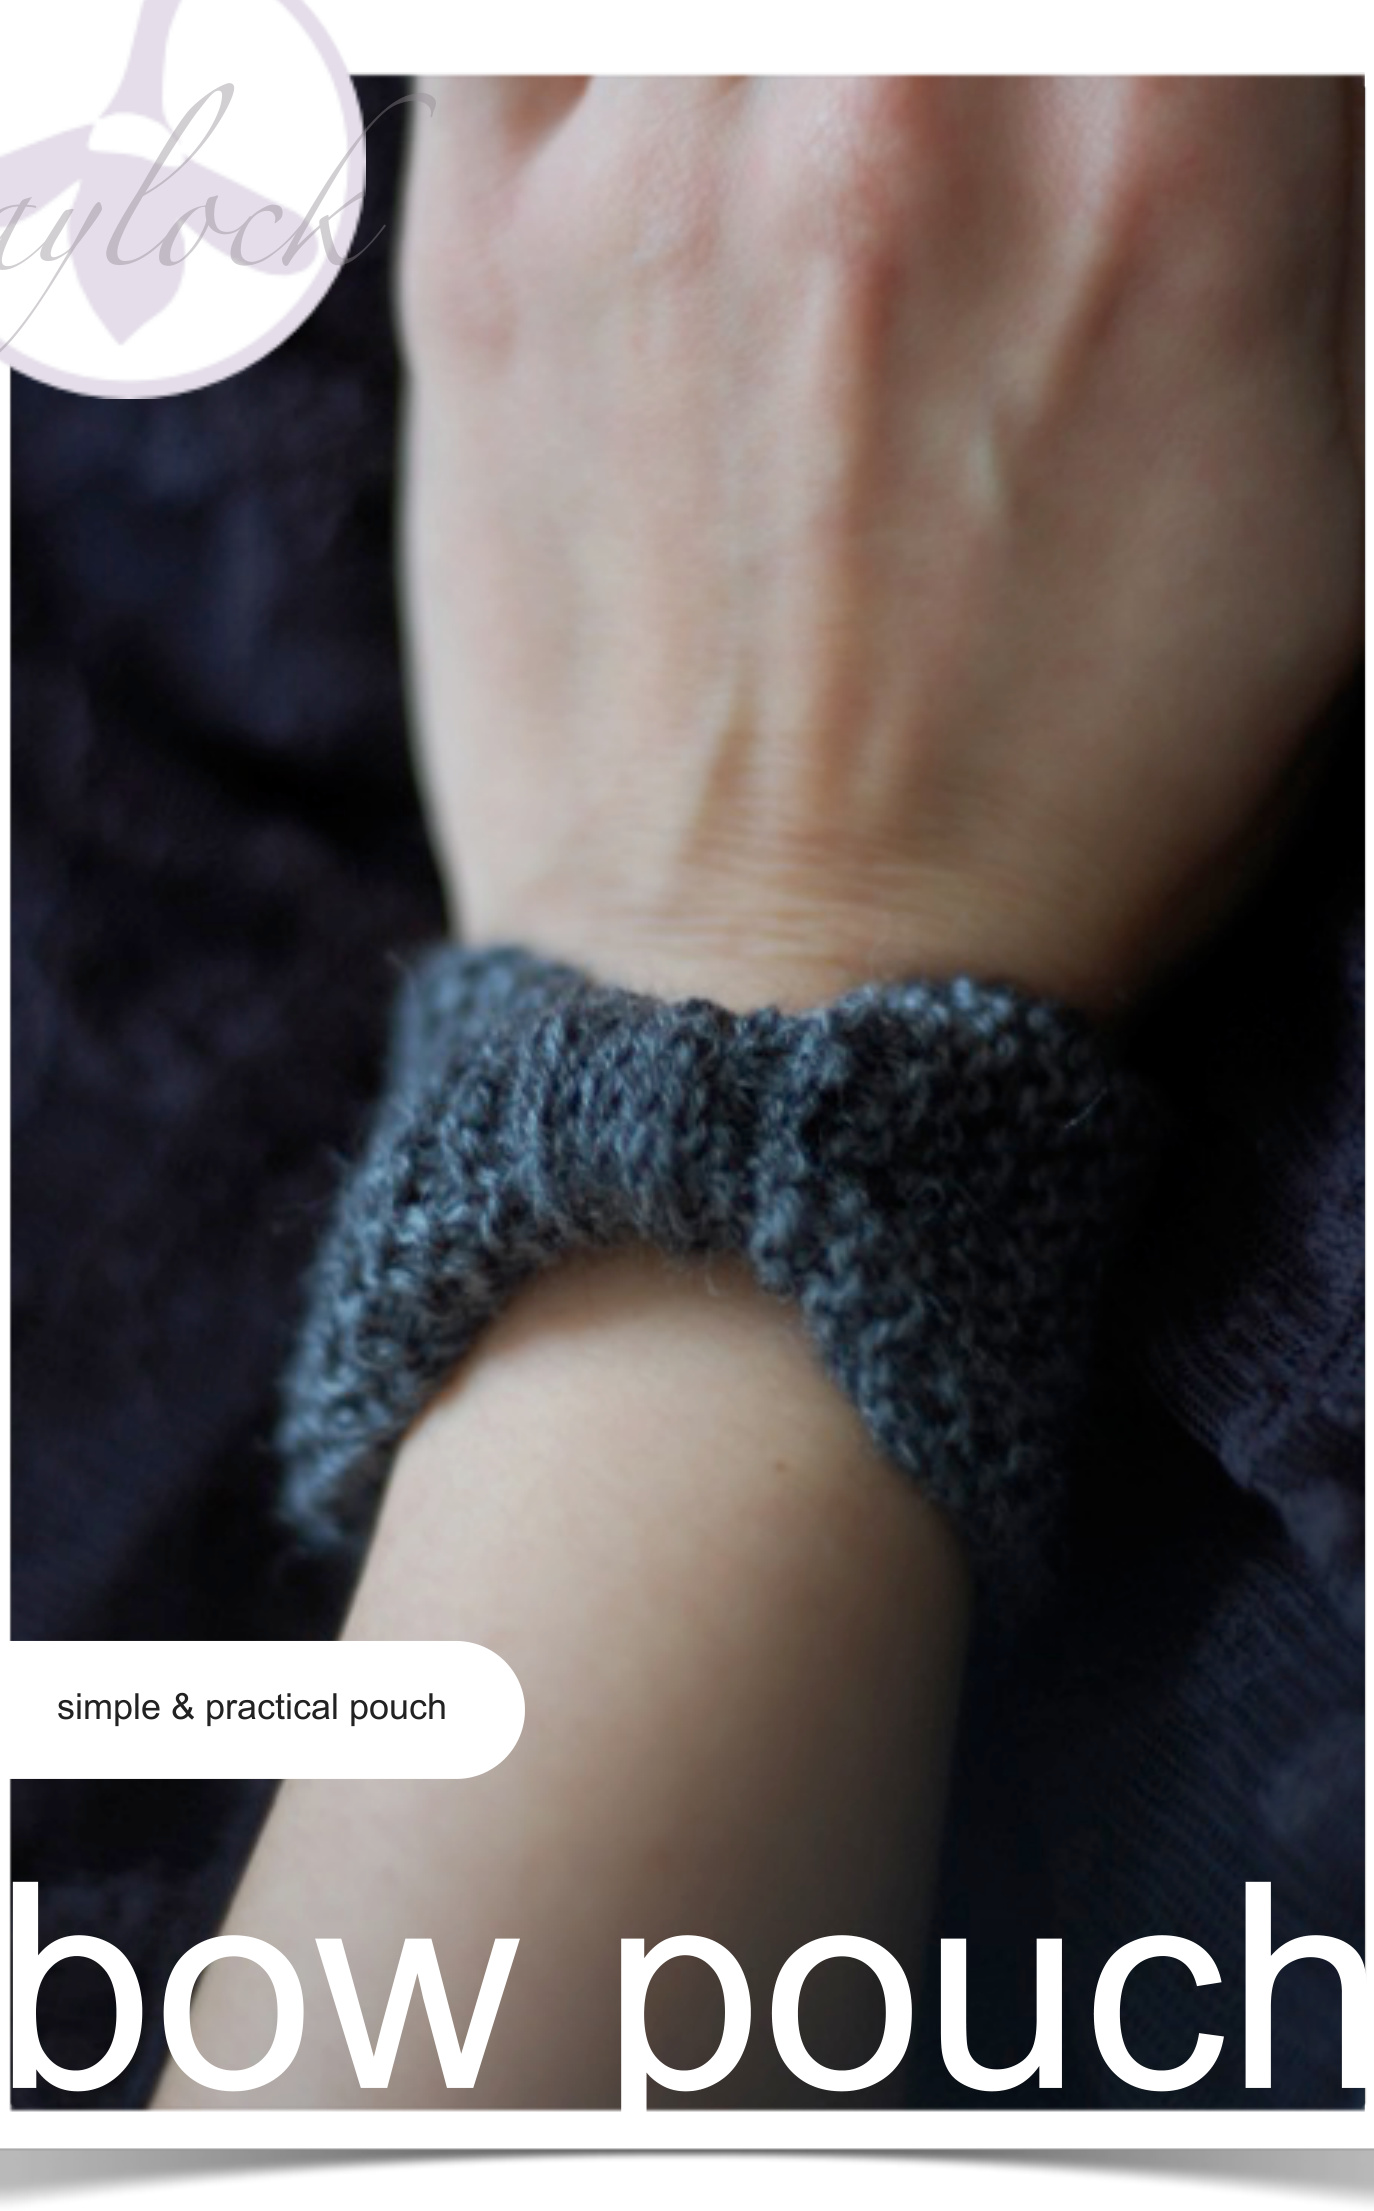
、Knit flat, ,in 3 pieces - , the bow, , the bow centre,and the pouch - Iand seamed.
Get
Yarn:
Needles:
Gauge:
And:
Approx.70m / 77yds of sock yarn. 3mm / Us 2 or size to get gauge. > 30sts / 36 rows to 10cm / 4in in stocking stitch. · See sidebar for tips on adjusting to gauge. A tapestry needle for weaving in ends, A button (for Loop Closure or Button Flap Closure only).
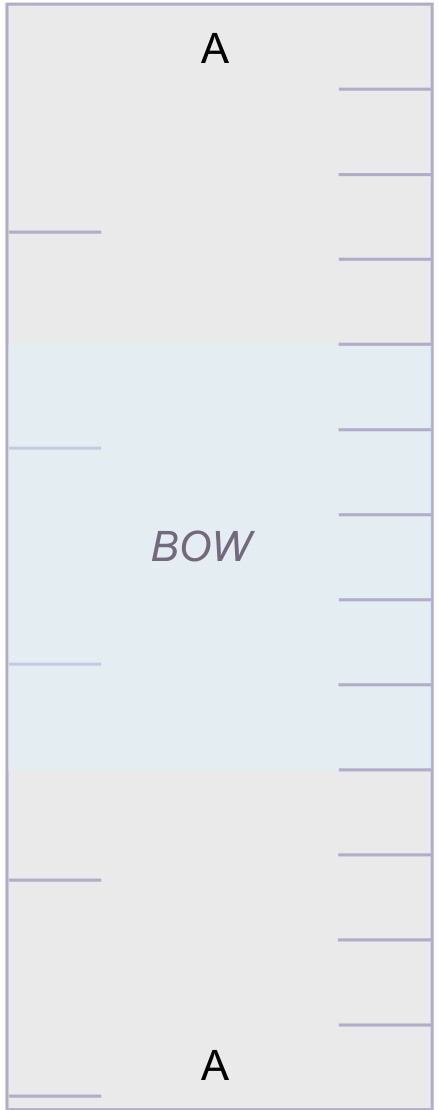
Schema:
The schematic is to scale, so you can use it to measure your piece.
Bow
(piece should be 5cm x 13cm / 2in x 5in) The fabric... should be thin enough that 3 layers are not uncomfortable to wear around the wrist. Can't get gauge? CO12ss. Work in garter stitch until 13cm / 5in long (or long enough to wrap around wrist) Cast off. Sew cast off edge to cast on edge (marked A on schematic). (piece should be 2cm x 3.5cm / %2in x 1 %2in) COsts.
Bow Centre
Work in stocking st for 3.5cm / 1 %in. Cast off. Wrap around seam of bow piece (marked A) with right side facing out, and sew cast on edge to cast off edge (marked B on schematic). Row gauge isn't important, just work to the length required. If you can't get stitch gauge, measure how many cm / in short or over you are. Then count the number of stitches you have in that length bracket, and either add or subtract that many stitches to or from your cast on. So if I find my bow piece is 1cm / 0.5in too narrow, and I have 2 sts per 1cm / 0.5in of knitting, then I'll unravel and re-cast on 14sts. Ill do the same with the other pieces.
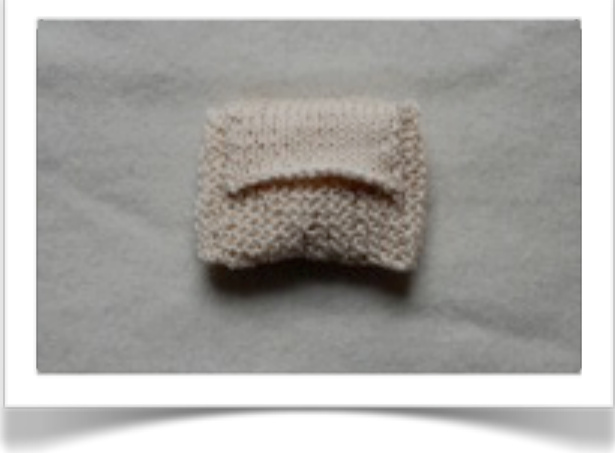
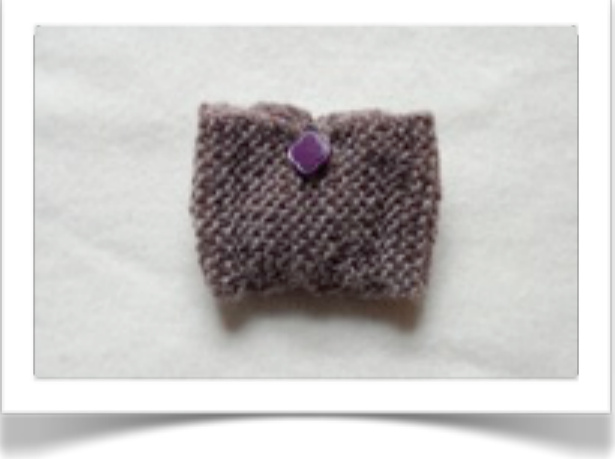
Pouch (choose one)
Seaming
COIrsts foral. Try to avoid whip stitch when seaming. I would recommend a simple back stitch instead. Work on the wrong side, and hide your ends inside the pouch, and in the bow centre. Fold-over Closure (Simplest) (piece should be 5cm x 7.5cm / 2in x 3in) Work in stocking stitch for 4.5cm / 13%4in, ending with RS facing. Next Row: P across.
Next Row: P across.
Cont. in stocking st (k next row, p row after, etc.) for 2.5cm / 1in. Cast off. Sew pouch centrally to the inside of the bow piece, opposite seam A. Make sure the right side of the fabric faces out. Fold over at purl ridge, and sew down the sides on the outside. Weave in all ends. When choosing which closure to knit... Consider what you will be using the pouch for. The button flap will be the most secure if you want it to hold small items such as coins. If you're a new knitter, the foldover closure is the easiest to work. If you're going to put something a little bulkier in your pouch, such as an MP3 player, you might like to choose the loop closure because it is the thinnest overall. Loop Closure (piece should be 5cm x 5cm / 2in ×2in) Work in stocking stitch for 5cm / 2in. Cast off, leaving a long tail.
Loop:
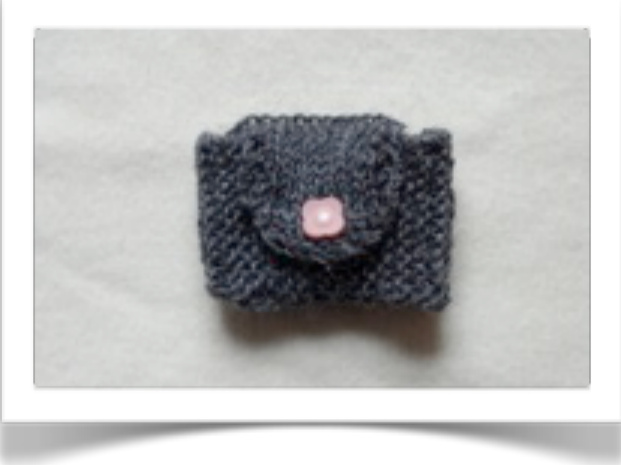
You can even eliminate the pouch completely & simply have a stylish knit cuff! What will you keep in your pouch? Some ideas... (See tutorial on next page for help.) With a crochet hook, slip stitch along cast off edge until you reach the middle, chain 8, slip stitch at base of chain 8, slip stitch to end of cast off edge. Cut yarn & pull through loop on hook. Sew pouch centrally to the inside of the bow piece, opposite seam A. Make sure the right side of the fabric faces out. Sew a button at the centre of the bow, far enough down that when the loop is looped around the button, it won't come loose. Weave in all ends. - Attach it to your laptop bag's strap & keep a USB stick, internet dongle, or other small accessories in it. - Put your knitting notions in it & toss it in your WiP bag. - Put your MP3 player in it & go out for a jog! - Put a few notes in it & go out dancing. - Slide it onto your guitar's headstock to keep your picks.
Button Flap Closure
(piece should be 5cm x 9cm / 2in x 312in) Work in stocking stitch for 5cm / 2in, ending with RS facing. Next row: P across.
Next row: P across.
Next row: K across. Next row: K3, p9, k3. Rep. last 2 rows once more. Next row: Ssk, k to last 2 sts, k2tog. [13 sts] Next row: K3, p to last 3 sts, k3.. Rep. last 2 rows twice more [9 sts]. Next row: Ssk, k2, yo, k2tog, k1, k2tog. [7 sts] Next row: K3, p1, k3. Next row: Ssk, k3, k2tog. [5 sts] Next row: K across.
Loop If you find the crochet loop too difficult, simply weave the yarn tail through the cast off edge to the centre, make a loop and knot it on the wrong side. Sew pouch centrally to the inside of the bow piece, opposite seam A. Make sure the right side of the fabric faces out. Sew button. Weave in all ends.
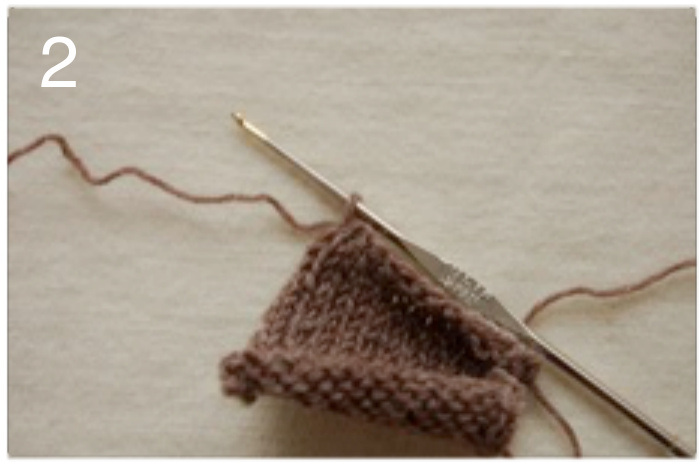
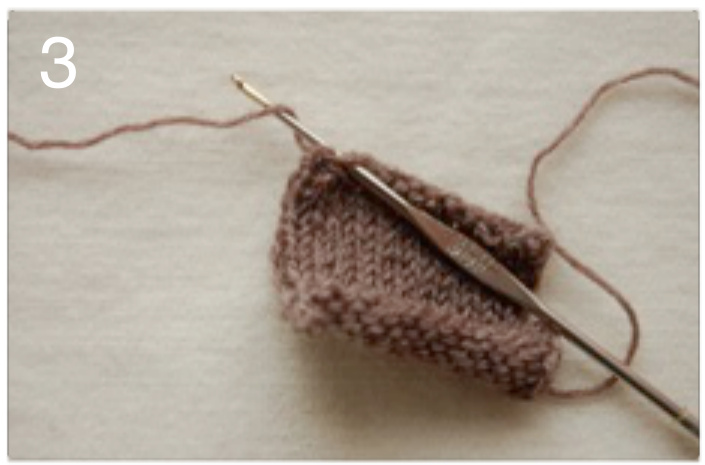
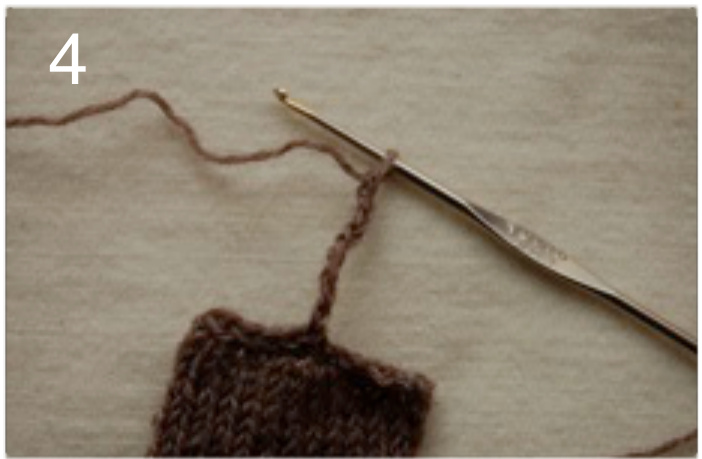
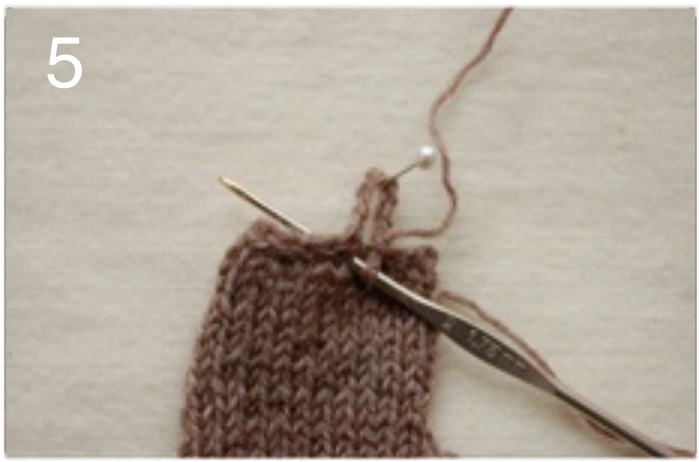
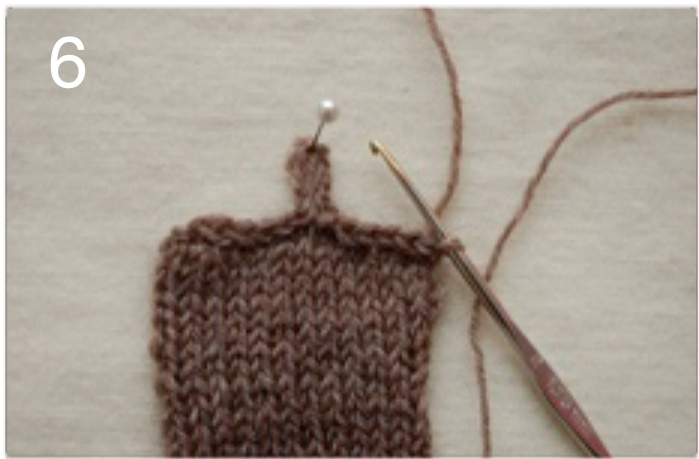
CROCHETLOOPTUTORIAL
ABBREVIATIONS
| CO | cast on |
| P | μnd |
| K | knit |
| st | stitch |
| cont | continue |
| rep | repeat |
| yo | yarnover |
| k2tog | knit two sts together |
| ssk | slip two sts separately knitwise, returnthemtoleftneedle together, knit slipped sts togetherthroughthebackloops |
Cast off.
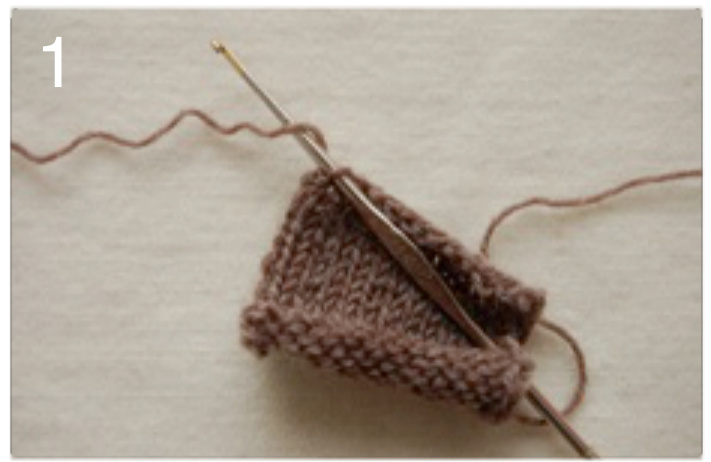
Insert crochet hook into first "chain" of cast off edge.. ..and pull a loop through.
Insert crochet hook into second "chain" & pull a loop through both loops on hook. Repeat these 3 steps until you reach the centre of the cast off edge. (Pulla loop through the loop on the hook) 8 times.
Insert crochet hook into the base of the 8 chains, and pull a loop through the 2 loops on the hook.
Continue as given in steps 1-3 until you reach the end of the cast off edge. Cut yarn & pull through last loop.


