Drip Drip Drop Socks
Clue #2.... drip!
At this point, you'll be working on the Right Leg, so if you want to work your socks one at a time, skip this clue and wait till next week. If you're ready to continue, you'll need to use a second ball of yarn, or the other half of your yarn, or find the other end from your yarn! Skill Level: Intermediate. This involves some serious cable work, and a slightly complicated pattern. Materials: Approx. 400 yds (365m) of sock yarn. I used a skein of Dream in Color's Everlast 8-ply Sock yarn, and it's gorgeous. Colorway: Shy If knitters would prefer to do colorwork cabling, I'm estimating 250-300 yds of Main color &100-150 yds of Contrast color. Needles: US1 or 2.25mm sock needles. Note that the pattern will eventually be written with DPNs in mind, but Magic Loop users can easily adapt the pattern with stitch markers. Sizing: Small (Large) sock creates a circumference of 8(9) inches or 20(22.5) cm. However, because a lot of the leg is ribbing, the circumference of this sock is really forgiving. Leg length and foot are adjustable to fit. Gauge: 8 stitches & 12 rows/rounds to the inch or 2.5cm in stockinett:
Abbreviations:
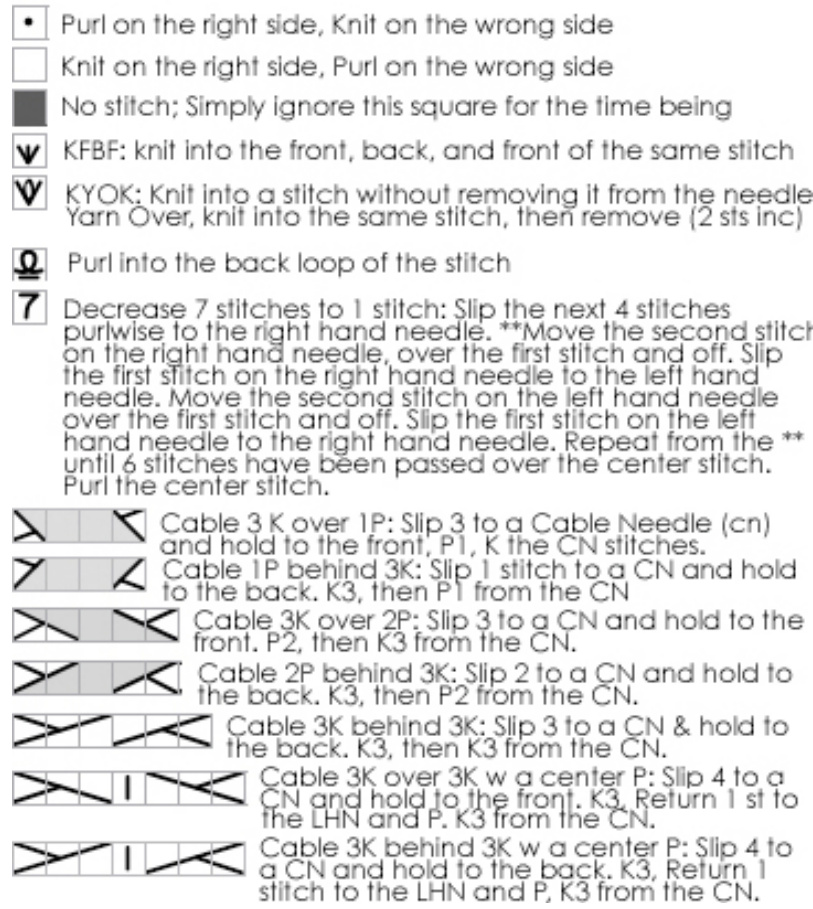
K= knit on the right side, purl on the wrong side P=purl on the right side, knit on the wrong side S= slip one stitch purlwise SSK= slip, slip, knit K2tog= knit two stitches together as one P2tog= purl two stitches together as one P3tog= purl three stitches together as one 3x3 rib= a pattern of ribbing that features 3 knit stitches then 3 purl stitches PM= place a marker (you'll need at least 3) SM= slip the marker \*Cable descriptions and chart symbols are defined in the chart key. (Optional) For Colorwork: As in clue #1, establish your colorwork from the beginning of the sock by working the Knit stitches in the CC and the Purl stitches in the MC. This means that your ribbing should look like a corrugated rib. When working the cables, continue this pattern, and work knit stitches in the CC and Purl stitches in the MC. You'll be able to work this by stranding until the end of the leg, but you'll need to anchor the longer strands. Once the heel flap/turn/gusset begins, you'll need to create bobbins and work intarsia cables to avoid carrying the yarn across the sole of the sock. CUFF: Cast-on 66(72) stitches and join for working in the round, being careful not to twist the stitches. Left Leg: Work [K3, P3] ribbing for 2 rounds (or until the cuff reaches desired length). Right Leg: Work [P3,K3] ribbing for 2 rounds (or until the cuff reaches desired length). This is the only place to make minor adjustments to the length of the leg (major adjustments are possible by choosing the SHORT SOCK or the LONG SOCK options in the Leg section). 2 Rounds is the bare minimum necessary to establish the cuff pattern, so for a shorter sock work these 2 rounds then move on to the leg. For a longer sock, work as much cuff as you enjoy, and then move on to the leg. For reference, with only two rounds of 3x3 ribbing, the SHORT SOCK's leg will measure approximately 3 inches or 7.5cm and the LONG sOcK's leg will measure approximately 5.5 inches or 14cm. Add cuff length as you prefer to those base measurements. \*\*It's probably best to work the same amount of cuff as you did for the left sock.
LEGS:
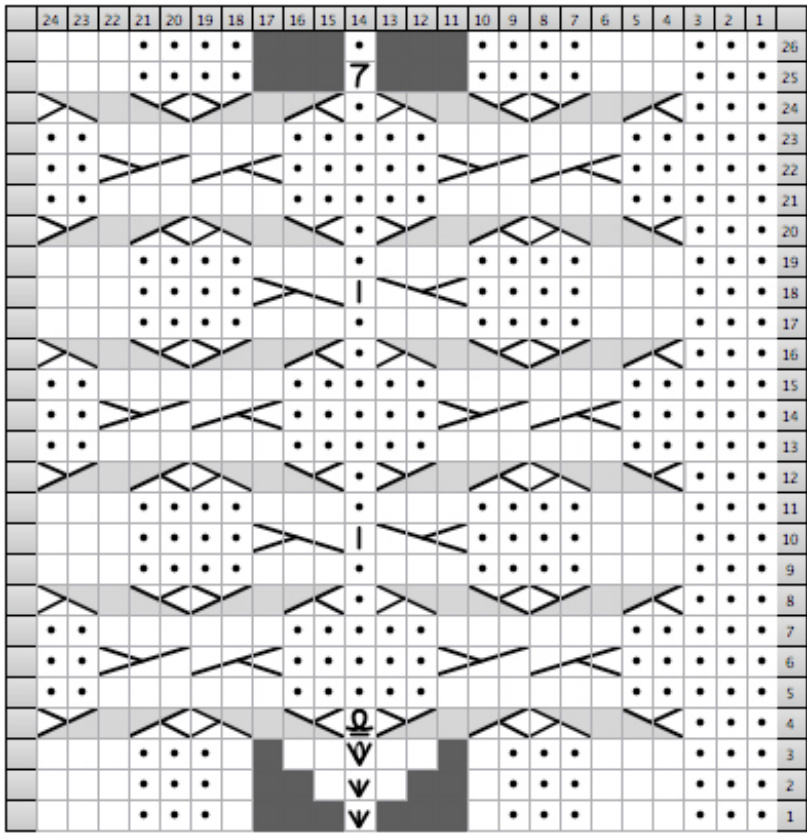
As with the left leg, what begins as a 3x3 rib becomes a tangled cable-motif, but that motif is staggered down and around the sock like circular stair steps. The difference is that this time, you're going the other way. Remember to work the stitches as they appear once the motif is complete. For the SHORT sOcK, each new motif begins at Round 14 of the current motif (Motif 1, Round 14 = Motif 2, Round 1). For the LONG socK, each new motif begins on the final round of the previous motif. Trust me, it's a whole lot easier to knit! RIGHT LEG: Use the Right leg chart for all right leg rounds & rows. Also, please note, the markers will be placed in the opposite order-- i.e. the first marker will be the furthest from the beginning of the round. Color coding continues as for the Left Leg-- Directions for the SHORT SOCK are given first, in RED lettering. Directions for the LONG SOCK are given second, in BLUE lettering. Both the SHORT and LONG socks should work the same Round 1。 Rleg Round 1: Work [P3,K3] ribbing over 48(54) stitches in pattern as established. PM1, then work the first round of the chart. RLeg Rounds 2-13 (RLeg Rounds 2-25): Work [P3,K3] ribbing until the marker, SM, then work the next chart round. Rleg Round 14 (RLeg Round 26): Work [P3,K3] ribbing 0ver 30(36) stitches in pattern as established. PM2, then work the first round of the chart, SM1, then work the next chart round in pattern. RLeg Rounds 15-26: Work [P3,K3] ribbing until Marker #2, SM2 then work the next chart round, Sm1, and work the next chart round. RLeg Rounds 27-50: Work [P3,K3] ribbing until Marker #2, SM2, then work the next chart round, Sm1, and knit the knit stitches and purl the purl stitches till the end of the round. RLeg Round 27 (RLeg Round 51): Work [P3,K3] ribbing over 12(18) stitches in pattern as established. PM3, then work the first round of the chart, SM2, then work the next chart round, SM1, and knit the knit stitches and purl the purl stitches. RLeg Rounds 28-39: Work [P3,K3] ribbing until Marker #3, SM3, work the next chart round, SM2, work the next chart round, SM1, and knit the knit stitches and purl the purl stitches. RLeg Rounds 52-63: Work [P3,K3] ribbing until Marker #3, SM3, work the next chart round, SM2, and knit the knit stitches and purl the purl stitches until the end of the round.
Charts and other important things..
KEY and Stitch Descriptions

Right Leg Chart


