knit. crochet. design.

Nymeria
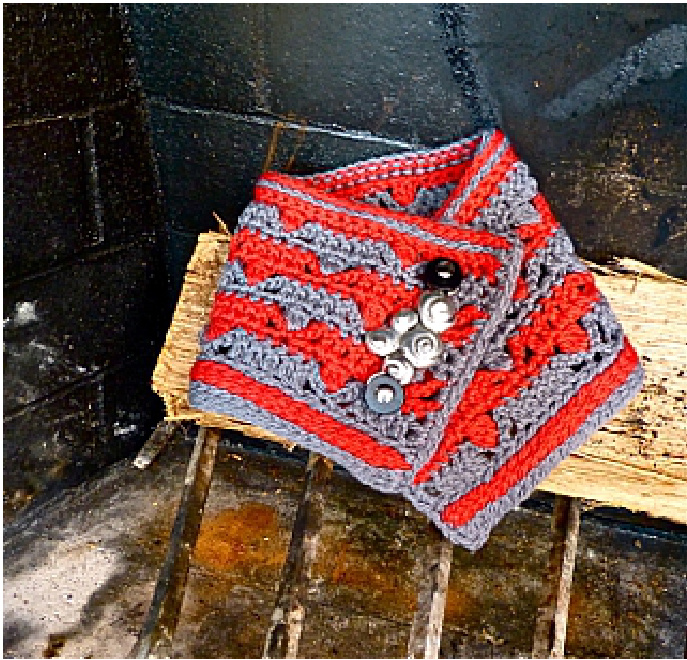
(crocheted neckwarmer) Gray for the wolf; red for the blood; light, lofty wool because "Winter Is Coming." This versatile cowl/neckwarmer was inspired by one of my favorite fictional animals, Nymeria, Arya's tdirewolf in A Song of. Iceand Fire.
Skills:
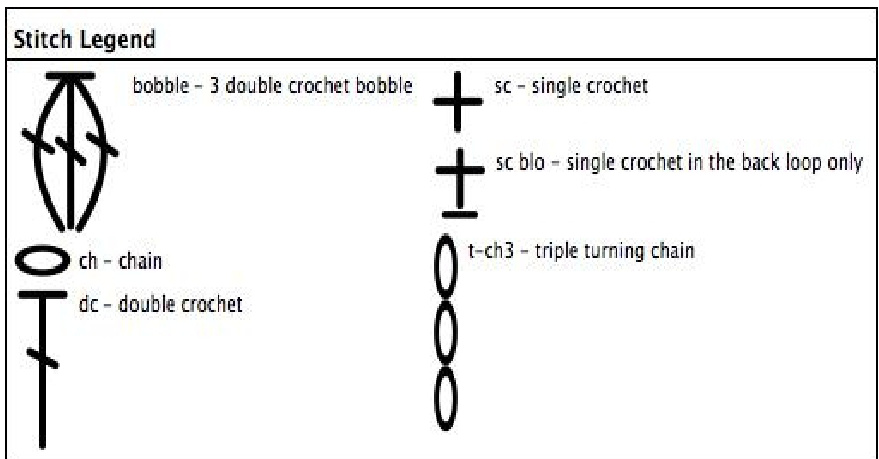
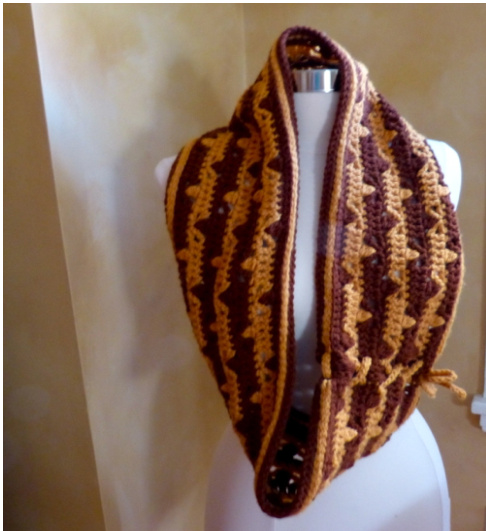
Basic crochet stitches: slip stitch (sl st), single crochet (sc), double crochet (dc) Working stitches through the back loop (tbl) Changing color at end of row Simple decrease (sc2tog) Double Base Chain (directions provided) Bobble (directions provided) Size: One, but easily altered ished Measurements: 24 in (86 cm) circumference; 7 in (18cm) heigh Materials: Quince & Co. Osprey (100% American Wool, 170 yds,155m in 100g) #104 Storm (Color A), 1 skein, #133 Winesap (Color B), 1 skein Or substitute an equivalent wool or blend, one with plenty of body and not too much drape. The two skeins of Quince & Co. Osprey provide sufficient yarn for two cowls even without reversing the colors, or a larger scarf, or one longer double loop cowl (pictured below.) US I/5.5mm hook, for working border rows US H/5.0mm hook, or size needed to obtain gauge for working the stitch pattern rows Yarn needle to work in ends Buttons or other closures (optional) Gauge: 10 sc in 4 in (10cm), using the smaller hook
Notes:
The cowl is worked flat from the bottom up, edged, and then either seamed or finished with buttons or other removable closures. Both the top and bottom borders are worked with the larger hook. When working with two colors, carry the non-working yarn up the side; it will be covered by the edging. The pattern stitch is worked over 8 sts + 5; if you want to adjust the finished circumference, adjust the stitch count by multiples of 8. The neckwarmer is fully reversible, which means the pattern is quite suitable for a longer scarf or a double loop cowl.
Stitches and Techniques:
DoubleBaseChain Chain 2. Insert the hook in the first chain and work one single crochet. Insert the hook into the vertical thread on the lefthand side of the single crochet you have just worked, and work one single crochet. Continue until you have worked the required number of stitches. Bobble The bobble used inthis pattern is a 3dc bobble. Work 3dc into the next st, leaving the last loop of each dc on the hook, yarn over and pull through all 4 loops. In this pattern, each bobble is preceded and followed by a chain stitch. The chain stitches and bobble count as one stitch each when working the next row. Use your favorite method, or try this one, for a less bulky alternative: one loop on hook; insert hook in next st, yarn over and pull through the work resulting in two loops on hook; insert hook in next st, yarn over and pull through the work and through the two loops on the hook. One stitch has been decreased.
Directions:
Bottom Border: The bottom border consists of three right side (RS) rows worked on a double base chain. Base Chain: Using the larger hook and Color A, work double base chain 70. (Do not include the first stitch worked into the initial slip stitch in the count). Do not turn the work. Row 1 (RS): Using Color A Ch 1 then sl st under each free loop at the top of the base chain. 70 sts. Fasten off Color A and cut yarn. Do not turn. Row 2 (RS): Fasten on Color B at the first stitch on the right hand edge of the row just worked. Working through the back loop, sl st to end of row. Do not turn. Row 3 (RS): Working left to right, using Color B and inserting the hook through the Color A loop behind each slip stitch in the row just worked, work 70 sl sts back to the beginning of the previous row. Drop Color B. Transition Rows: There are two transition rows, the first of which is a decrease row, which prepare the work for the pattern stitch. The decrease row and the change of hook size compensate for the smaller degree of stretch of the border rows relative to the stitch pattern rows. Row 4 (RS): Fasten on Color A . Inserting the hook into the Color A loop at the back of each st in the row just worked,_ work sc across, working 9 sc2tog decreases distributed evenly across the row, that is, every 7 or 8 sts. 61 sts remain. Turn the work. Row 5 (WS): Switch to the smaller hook. Using Color A ch3 (counts as 1dc), skip 1 sc, dc in next 4 sc. [ch3, skip 1 sc, 1 sc in next sc, ch3, skip 1 sc, dc into each of next 5 st ] to end. On the final yarn over of the final stitch, drop color A (which will be picked again after the next two rows are worked) and pick up Color B to complete the stitch. Turn work. Stitch Pattern Rows: The pattern rows are worked in the usual manner, alternating right and wrong sides, turning at the end of each row. Use the line by line directions or consult the stitch chart. Row 1 (RS): Using Color B, 1ch, work 1 sc into first 5 dc. [1ch, 1 bobble into next sc, 1ch, 1sc into each of next 5dc] to end. Turn. Row 2 (WS): Using Color B, 6ch (counts as 1dc, 3ch), skip 2sc, 1sc into next sc, 3ch [skip 1 sC, 1dc into each of next 5 sts, 3ch, skip 1 sc, 1sc into next sc, 3ch] to last 2sc, skip 1sc, 1 dc into last sc, turn. Row 3 (RS): Using Color A, 1ch, work 1 sc into first dc, 1ch, bobble into next sc, 1ch [1sc into each of next 5dc, 1 ch, 1 bobble into next sc, 1ch] to last dc, 1sc into 3rd of 6ch at beginning of previous row. Turn. Row 4 (WS): Using Color A, ch 3 (counts as 1 dc), skip first sc, 1dc into each of next 4 sts, [3ch, skip 1sc, 1 sc into next sc, 3ch, skip 1sc, 1dc into each of next 5 sts] to end. Turn. Work Stitch Pattern rows 1-4 one more time. Then work Stitch Pattern row 1 (Color B, RS row). TurnWork. Transition Row: (WS) Ch1, work sc in each sc st (61 sts) and at the same time work 9 increases (2sc worked into one st) distributed across the row as follows: increase in the second st in the row, in the top of each of the 7 bobbles, and in the second to last st in the row. At the end of the row switch to Color A. Top Border : Row 1 (RS): Switch to the larger hook, and Using A, work sl sts tbl across the row. Drop A but do not cut. Row 2: _(RS): Pick up Color B, work a row of sc, inserting the hook into the color B loop behind each. Fasten off and cut. Edging: With the right side of the work facing and using Color A, sc along the side edge, working in any loose tails as you encounter them. Ch1 at the corner. Sl st tbl across bottom. Ch1 at the corner. Sc along the side edge, working the same number of sc as for the first side edge. Ch 1 at the corner. Sl st into backmost loop from the row below across the top edge. Finishing: Before fastening off choose your finishing option. Option 1: The Unbroken Circle With the wrong sides together and Using.A sl st the edges together, or, for a raised seam use sc to join. Fasten off and cut yarn. Work in any remaining ends. Wash and block. Option 2: The Open Circle Fasten off and cut yarn. Work in any stray ends. Wash and block. The samples are finished with this option. The smaller (red/gray) is joined with a leather and metal fastener and the larger with a length of crocheted chain cord. Use the closure of your choice. Closures can include buttons, especially shank buttons which are moveable; laces such as leather, knit i-cord or crocheted chain cord; any shawl pin or other metal fastener.
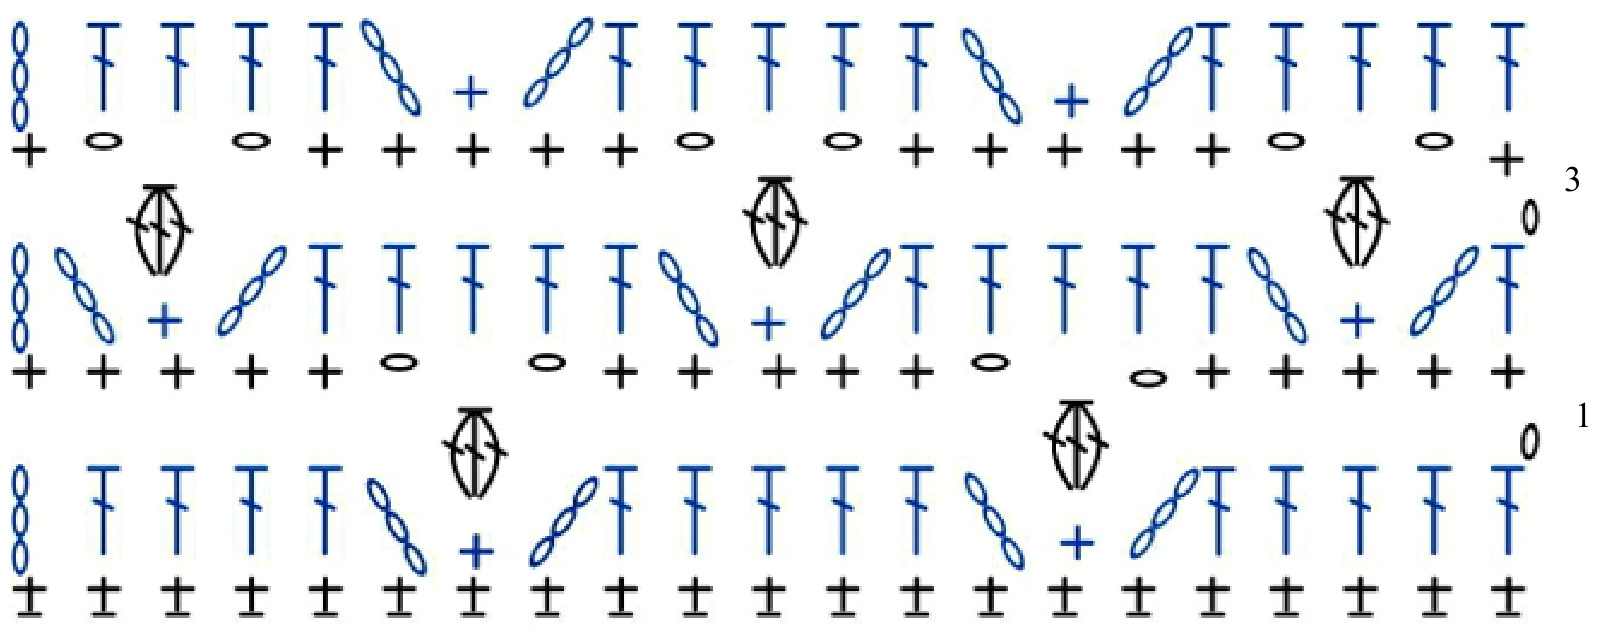
CHART Reading from the bottom up, the chart shows a condensed example of 2 transition rows and Rows 1-4 of the stitch pattern; not all repeats are shown.