The Parlor Cat
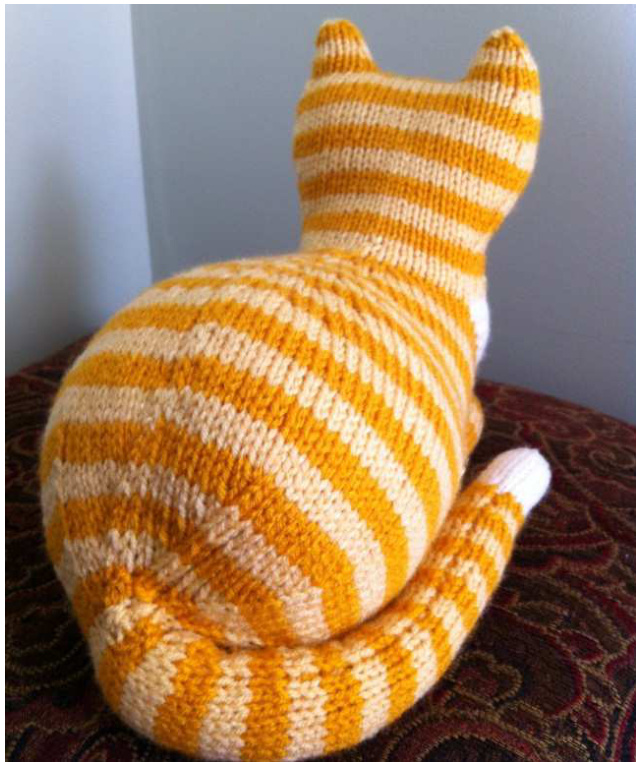
With paws tucked in and tail to his side, The Parlor Cat makes a very prim and proper house guest. Knit in the round, it is one piece from head to tail, and a befitting 10" long and 7" wide. This is the second in my series of house cats.
Materials Required
Worsted weight yarn - app. 170 yards Size 4 double pointed needles Size 4 circular needle (optional) Darning needle Stitch markers Stuffing
Abbreviations
co cast on dpn double pointed needle Kknit Ppurl M1 make one stitch (see special note below) st stitch sts stitches K2tog knit two stitches together PU pick up (create) a new stitch from existing work WT wrap and turn (see special note below) SSK slip next two stitches knit-wise, place them back onto left needle, and then knit them together through the back loop pm place a marker
Special Notes
The increases in this pattern (M1) are made by lifting the right “leg" of the next stitch (the right side of the stitch directly below the next stitch on your left needle), placing it on the left needle, then knitting it as you would any other stitch. >The wrap & turn (WT) rows are worked across two dpns only. After knitting the number of sts specified, bring yarn to the front of your work, slip the next st on the left dpn to the right one, move yarn to the back of your work, and slip the stitch back to the left needle. Turn your work and purl the stitches back to the beginning of the needle. Purl the number of sts specified on the other dpn, bring yarn to the back of your work, slip the next st on the left dpn to the right one, move yarn to the front of your work, and slip the stitch back to the left needle. Turn your work and knit the stitches back to the beginning of the needle. There's a very good video on how to knit wrap & turns (or short rows) at: http://www.youtube.com/watch?v=14YwbnGfohM
Body
dpns and work the following rounds. You may switch to a circular needle as needed 1-2) K all sts 3) K1, M1, K2, M1, K to last 3 sts, M1, K2, M1, K1 4-7) Kall sts 8) K1, M1, K2, M1, K to last 3 sts, M1, K2, M1, K1 9-12) Kall sts 13) K1, M1, K2, M1, K to last 3 sts, M1, K2, M1, K1 14-17) K all sts 18) K1, M1, K2, M1, K2, M1, K to last 5 sts, M1, K2, M1, K2, M1, K1 19-22) K all sts 23) K1, M1, K2, M1, K2, M1, K to last 5 sts, M1, K2, M1, K2, M1, K1 24-27) K all sts 28) K1, M1, K2, M1, K2, M1, K to last 5 sts, M1, K2, M1, K2, M1, K1 29-44) K all sts Measure off about 25 yards of yarn for finishing the rear and tail later, and then cut. Thread a darning needle with a piece of scrap yarn, and slip all of the live sts (82) onto it, removing the dpns as you go.
Chest
Stitches are now picked up in the original CO sts to form the cat's chest. Yarn color can be changed at this time, if desired. Count 10 sts to the left of the first CO st, then with a dpn and new yarn PU the following 15 sts. With a second dpn, PU the next 15 sts. The 30 sts on these two dpns should form a "V" which points straight down the middle of the neck. > Purl back across all sts on the 2nd dpn only. This will leave your working yarn in between the 1st and 2nd dpns, and you are ready to work the short rows. Short rows are now worked back and forth across these two dpns: 1) 2nd dpn: K3, WT, P3 1st dpn: P3, WT, K3 2) 2nd dpn: K4, WT, P4 1st dpn: P4, WT, K4 3) 2nd dpn: K5, WT, P5 1st dpn: P5, WT, K5 Continue in this manner, increasing the number of stitches to knit/purl by one on each short row, until all 15 sts on both dpns (except the first 3 on each dpn) have been wrapped. Cut yarn.
Head
Additional sts are now picked up between the end of the 2nd dpn and beginning of the 1st. With your 3rd dpn and the color yarn that was used for the cat's body, PU 22 sts, one in each of the remaining CO sts. Work the following rounds beginning with the 1st dpn from the chest section above (at left “"shoulder"): 1) K all sts 2) K2tog, K21, SSK, K1, K2tog, K to last 2 sts, SSK 3) K2tog, K19, SSK, K1, K2tog, K to last 2 sts, SSK 4-5) K all sts 6) K2tog, K17, SSK, K1, K2tog, K to last 2 sts, SSK 7-8) K all sts 9) K1, M1, K17, M1, K3, M1, K to last 2 sts, M1, K2 10-11) K all sts 12) K1, M1, K19, M1, K3, M1, K to last 2 sts, M1, K2 13-14) K all sts 15) K1, M1, K21, M1, K3, M1, K to last 2 sts, M1, K2 16-17) K all sts 18) K1, M1, K23, M1, K3, M1, K to last 2 sts, M1, K2 19-20) K all sts 21) K1, K2tog, K22, SSK, K2, K2tog, K to last 3 sts, SSK, K1 22-23) K all sts 24) K1, K2tog, K20, SSK, K2, K2tog, K to last 3 sts, SSK, K1 25-26) K all sts 27) K1, K2tog, K18, SSK, K2, K2tog, K to last 3 sts, SSK, K1 28-29) K all sts At this point 44 sts remain and you are ready to knit the ears. Slip the first 7 sts onto your working dpn without knitting them. Thread a darning needle with a piece of scrap yarn, and slip the next 30 sts onto it for working later. You now have 14 sts remaining on 2 dpns. Transfer some of them to a 3rd dpn since you will be knitting in the round. Begin with the first original st on the outer right side of the head and work the following rounds: 1-3) K all sts 4) SSK, K3, K2tog, SSK, K3, K2tog 5-6) K all sts 7) SSK, K1, K2tog, SSK, K1, K2tog 8) K all sts Cut yarn and thread through a darning needle. Remove dpns and thread through remaining live sts. Pull tightly closed, insert needle down through center of ear and secure to inside. Place the next 8 sts from scrap yarn at the front of the head onto a dpn. Place last 8 sts from the scrap yarn at the back of the head onto a 2nd dpn. With the Kitchener stitch, graft these 16 sts together to form the area between the ears. Arrange the 14 remaining live sts onto 3 dpns. The first stitch should be the innermost stitch on the right side of the ear. Repeat all rounds (1-8) for this ear as with the first one. Sew up any holes, weave in any loose ends, and stuff the head and front half of body. Be sure to stuff the entire chest area very firmly. This will ensure the proper posture for your Parlor Cat!
Rear and Tail
Place the live sts on scrap yarn back onto 3 dpns (or circular needle). Work the following rounds: 1) (K7, K2tog) 4 times, pm, K10, pm, (K7, K2tog) 4 times 2) K all sts 3) (K6, K2tog) 4 times, K10, (K6, K2tog) 4 times 4) K all sts 5) (K5, K2tog) 4 times, K10, (K5, K2tog) 4 times 6) K all sts 7) (K4, K2tog) 4 times, K10, (K4, K2tog) 4 times 8) K all sts 9) (K3, K2tog) 4 times, K10, (K3, K2tog) 4 times 10) K all sts 11) (K2, K2tog) 4 times, K10, (K2, K2tog) 4 times 12) K all sts 13) (K1, K2tog) 4 times, K10, (K1, K2tog) 4 times 14) K all sts 15) (K2tog) 4 times, K10, (K2tog) 4 times - (remove the st markers on this round) The 18 remaining sts willform the tail. Finish stuffing the cat's body. K all sts for 3 inches, decreasing 1 st every inch, then K all 15 sts for approximately 5 inches. Decrease every other round until 12 sts remain, then K all sts for 1 inch. Cut yarn, thread through remaining live sts. Stuff tail, pulltightly closed, and secure. Hold the tail alongside of the body and seam together at bottom.
Front legs
CO 15 sts onto 3 dpns and K in the round for 5 inches. Cut yarn, thread through live sts, pull tightly closed and secure. Stuff all but about 1 inch at open end. Fold the closed end of paw inward and stitch to hold in place. Seam leg to bottom of cat's body as pictured on the Tips Page.
Face
Eyes, nose, mouth and whiskers can be embroidered, painted, appliqued, etc. Make your Parlor Cat as uniqueas you like!
Tips Page
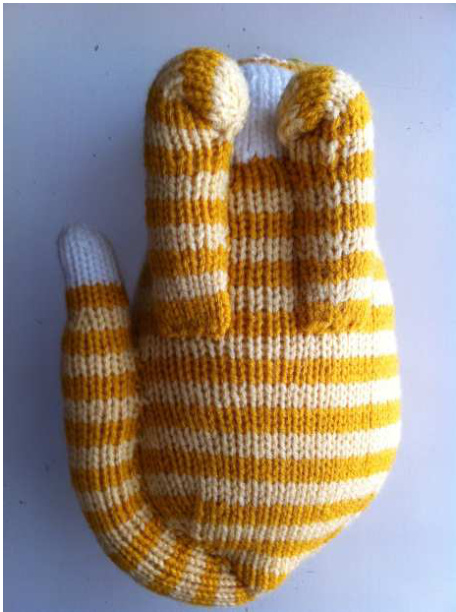
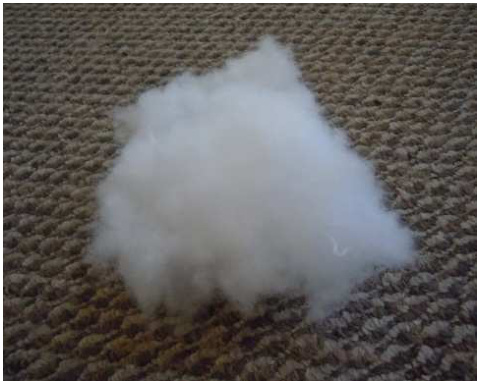
This picture shows the approximate placement of The Parlor Cat's tail and legs. Seam all but about 2 inches of the tail to the side of the body, and all of the legs up to the paws. To make knitting the tail easier, you may want to knit it for an inch or two before stuffing the end of the body. I recommend using this type of stuffing which makes it much easier to "sculpt" your toy and create the desired shape.
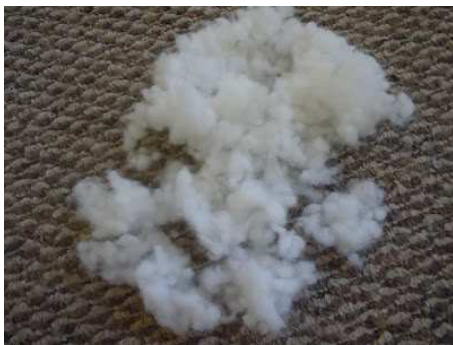
This type of stuffing has a mind of its own and tends to clump together into balls, making it harder to shape your toy the way you want it. Dpns are great for moving the stuffing into tight areas like ears and tips of tails.

No need to spend a lot of money on yarn. Acrylic-based yarns work great for toys! Try not to knit tightly!


