Su Tehlike
A Mosaic Hat and Mitten Design by Renee Burton August 28, 2013 Table of Contents. The table of contents below provides hyperlinking only within the Google document version of this pattern. Otherwise, it provides an organized list of the elements within this document. Overview. Yarn, Needles, and Gauge. Overview of Construction. Sizing and adjustments. A Word about Decreases. Mosaic Knitting in the Round. The Hats. Detailed Instructions for Adult L, Sport Weight. Table 1. Sport Weight Hat. Table 2. Fingering Weight Hat. Chart 1. Sport Weight Su Tehlike Hat. Chart 2. Fingering Weight Su Tehlike Hat. Chart 3. The Crown Decreases. Matching Mittens. Chart 4. Sport Weight Mitten. Chart 5. Fingering Weight Mitten. References and Credits.
Overview.
This hat uses mosaic knitting techniques to create a dramatic geometric pattern. It's very well suited to boys and men. The design uses a border motif and a larger motif, due to Barbara Walker, which is repeated for the remainder of the hat. This hat can be knit by advanced beginning knitters, but will hold interest for even the most advanced knitters. Mosaic knitting uses slipped stitches to create patterns in two colours. Only one colour is used at a time, and each row is repeated twice. More detail is provided below. The hat uses the standard panel construction described later in this document. A wide range of sizes is achieved by varying the number of panels used in the hat, as well as the length of the panel. Instructions are included for sizes infant 3-6 months through adult large, and are provided for both sport weight and fingering weight yarn. The matching mittens also use a panel construction. Detailed instructions on how to knit custom fiting mittens from the chart provided are found in my mitten tutorial document, provided as a separate pdf on Ravelry.
Yarn, Needles, and Gauge.
Instructions are provided for both sport weight and fingering weight. The gauge for sport weight is 25st x 48 rows / 4" (10cm). The gauge for fingering weight is 28 st x 52 rows / 4" (10cm). The row gauge is measured in the mosaic pattern. Make sure to check your gauge, as knitted in the round, as you go along, particularly your row gauge, as it may vary. The two colours are used fairly evenly through the pattern. For the adult medium, you will need approximately 100-130 yards of each colour, with the fingering weight will require 120-140 yards. This design also works really well with a variegated contrasting colour. You will need circular needles in two sizes, one for the ribbing and one for the body of the hat. A size US4-6 (3.5mm-4mm) is generally used for this gauge, but you should adjust your needles to get the a gauge and material you like. Test knitters used needles ranging from 2.5mm-4mm. You can choose to do the ribbing in the same size needle, but a smaller needle will give a finer look. Choose the larger needle so that you get the stitch gauge in stst. I recommend the traveling loop technique for knitting the ribbing and body, but you can also use magic loop, two circulars, or a 16" circular. When the crown becomes too small, you will have to switch to magic loop, two circulars, or dpns.
Overview of Construction.
This hat is based on a standard construction which utilizes a set of identical panels. Each panel is given as a chart, which is knit from bottom to top in the direction you knit. An individual panel chart looks like this:
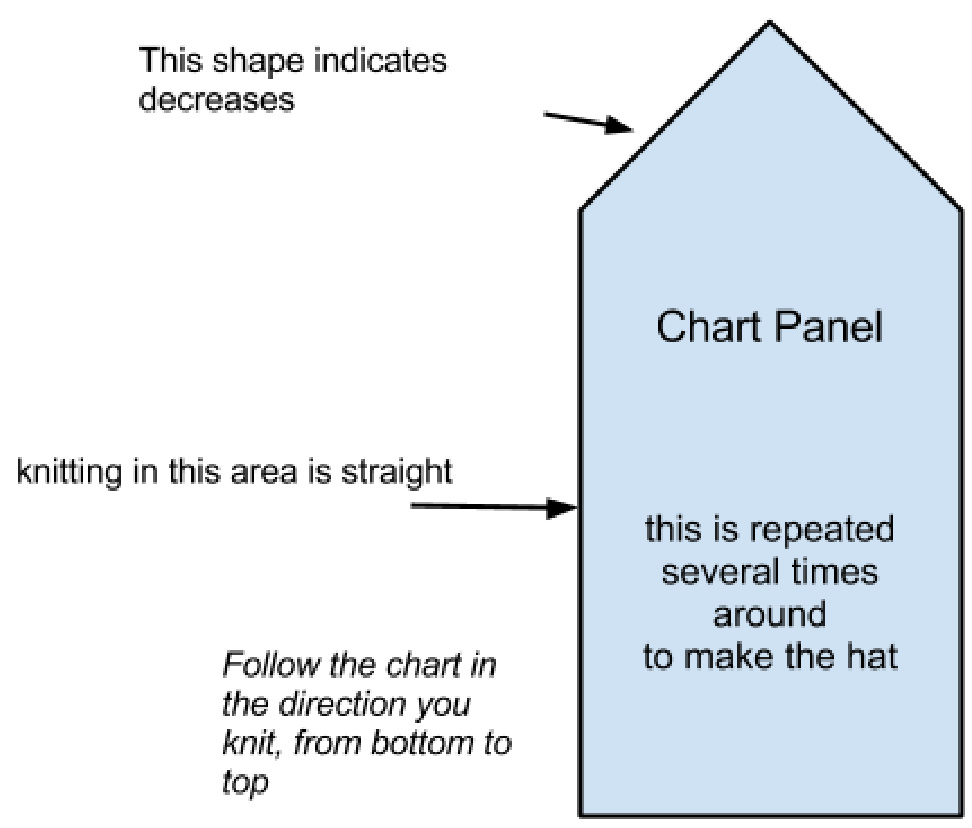
The entire hat construction looks like this:
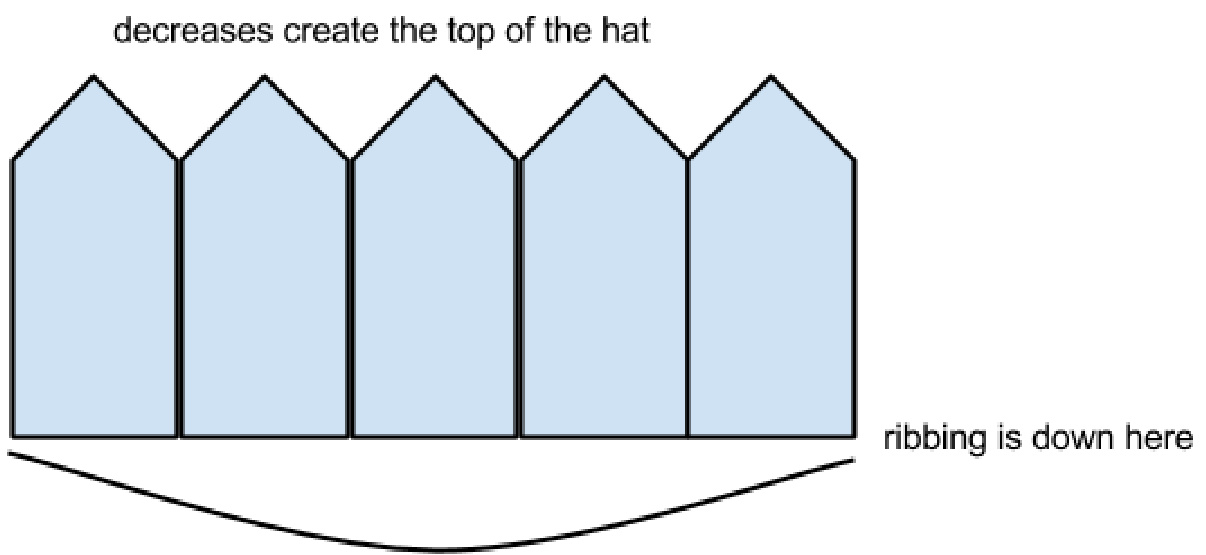
The first and last stitches are joined in the round For the overall construction, you will cast on a certain number of stitches, join in the round and knit the ribbing. Then, you will put stitch markers n stitches apart, where n is the width of your chart. This will give you several (generally patterns use five) copies of the panel in your hat. You'll knit the same chart for each panel. When you reach the decrease section, you'll decrease each section between stitch markers. Eventually this will bring you down to a handful of stitches equaling the number of panels you are using. You'll run a thread through those stitches and close up the hole. All done. :)
Sizing and adjustments.
Table 1 and Table 2 provide finished dimensions for the hats, according to the specified gauge, and correlated with standard head sizes. These hats are roughly designed to be beanie length, meaning that they fit closely from the crown to the base of the ear. If you need to make adjustments, there are a few things you can do. The main motif pattern is centered and fills the entire hat. If you need to make the hat longer, you can add some length to the ribbing. If you need to make the hat shorter, you could remove some ribbing or remove some of the earlier rows of the main motif pattern. You can also perform the five sets of decreases every row, instead of every other row. After you finish knitting the border motif, you can take a measurement for your row gauge which will help determine whether you want to add or subtract length. The nature of mosaic knitting yields much shorter rows than regular stockinette stitch knitting. The design row gauge is 48 rows=4" (10cm) over the mosaic pattern for sport weight, and 52 rows=4" (10cm) for the fingering weight. Your row gauge may vary substantially, and you should check gauge along the way!
A Word about Decreases.
Each colour is used for two rounds. All of the decreases are made on "white rounds" that use the background colour (A) shown in white on the charts. Decreases should be made on the second row to keep the pattern from distorting. To decrease on the second round of a row, you will knit the stitch to be decreased in colour A during the first round. Chart 3 shows the decreases explicitly and provides two options for the rate of decrease. Decreases on the left side of the chart should be right leaning, decreases on the right side of the chart should be left leaning. The notation dec1 is used in the written part of the pattern for decreasing stitches. The lean of the decrease does not matter for those decreases. You can use any type of decrease you like, just be consistent. NOTE: The first decrease in this pattern is not symmetrical. That is, you will decrease one stitch on the right side of each panel only. All other decreases occur on both sides of the panel.
Mosaic Knitting in the Round.
Mosaic knitting is extremely easy to do and allows you to incorporate colour into your knitting with only basic knitting skills. Mosaic knitting was invented by Barbara Walker, and her stitch books contain many charts to choose from. By it's nature, mosaic knitting is generally geometricpatterns. There is surprisingly little information on the Internet about Mosaic Knitting, and almost all of it is about flat knitting. For that reason, I'm going to provide some detail here, however, I also recommend searching google and youtube for other resources if you feel lost. Here are a few references: · First, there is the book Mosaic Knitting by Barbara Walker, the inventor of the technique, ·A IechKnitter blog about mosaic knitting, and This article is about flat knitting using the mosaic technique Mosaic knitting uses charts indicating stitches in two colours. If colour A is being used for the row, colour A stitches will be worked, and the stitches for colour B will be slipped. Since we are knitting in the round, all of our stitches are knit; there is no purling! Mosaic knitting charts are more condensed than most knitting charts, because every row is knit twice. Look at chart 1. The border motif in rows 2-6 is actually a repeat that is 6 stitches wide, but we are showing more repeats so you can see how it knits up. Each row of this chart will be knit twice, so the entire hook motif is 12 rows high. You only use one colour of yarn for each row of the chart, and each row of the chart corresponds to two rounds of knitting. Read the chart from the bottom up, and read the chart in the direction that you knit, right-to-left or left-to-right. Each row has an active colour. This is the colour that you are going to knit with; all the other stitches will be slipped, not knit. Knit each row twice. The active colour is indicated by a column of alternating blocks on the far side of the chart. When a row is marked with a black block, your complementary colour will be active and you will knit the black stitches, slipping the white stitches in the chart. Look at chart 1, row 2, and pretend you knit right-to-left, for example. This is a black block row, so we will knit with our complimentary colour, slipping all the white block stitches. So you will knit 1, slip 1, knit 5, slip 1, etc. for the first TWO rounds. Got it? How about the second row of the chart, which is rounds 3 & 4 of your knitting?? You will switch to your "white" yarn. Then, slip 1, knit 1, slip 1, knit 3, slip 1, knit 1, etc. for two rounds. Make sense? It's really that easy. The chart generally shows one repeat of the pattern, so you will repeat the chart across the entire round. It is recommended that you put in stitch markers at regular intervals so you can check for mistakes easily. Tip! Keep the slipped stitches spread slightly on the needle, and don't pull the next stitch too tightly. Otherwise, your knitting will pucker around the slipped stitches.
The Hats.
Detailed written instructions for the Adult L size in sport weight are provided below as a reference. All other sizes are given by concise instructions found on Charts 1 and 2, using the sizecalculations found inTables1 and 2.
Detailed Instructions for Adult L, Sport Weight.
Cast on 140 stitches in the colour of your choice with your smaller needles, and join in the round. Knit 1.5" of k2p2 ribbing. If you would like to have a folded ribbing, you can knit up to 3" of k2p2 ribbing. Optionally: Try a two-colour long-tail cast on for a bit of contrasting colour at the bottom edge of your hat.
Border Design.
Yarn colour A is your background colour, and colour B is your contrast colour. With colour A, you are going to knit a row, decreasing by 2 stitches to get the number necessary for the border on your needles. To do this: k1, dec1, k68, dec1, knit to end of row. The placement of the decreases does not need to be exact. You have 138 stitches on your needles. Knit 1 round in A. You are ready for the border. Your border pattern is 6 stitches wide. Knit rows 2-6 of Chart 1 repeatedly across the round. Notice that you begin knitting with colour B. It may be helpful to place stitch markers every 12, 18, or 24 stitches so that you can keep on track of the pattern. Remember! Each row is knit twice. Each colour is used for two rounds. The colour to use for each two rounds is indicated on the far right side of the chart --- DO NOT KNIT THESE STITCHES -- they are only to remind you which colour is active. The light grey blocks are not stitches; they indicate shaping and separate the colour key from the chart. White squares are A, and black squares are B. If you are using A, you will knit all the white stitches, and you will slip on the black stitches. It's that easy! The chart shows multiple repeats of the border motif so that you can see what they will look like across the entire border. The motif itself is only 6 stitches wide, and you repeat After you finish the border motif (rows 2-6 of Chart 1), knit 2 rows in A, increasing 2 stitches evenly in the first row. To do this, k1, m1, k68, m1, knit to end of row. Then knit one more row. This is row 7 of the chart. You have 140 st on your needles. Knit the remainder of Chart 1 ten times across the round, noting the details about the chart shape and decreases below. It is helpful to place stitch markers every 14 stitches to separate the panels. Cut yarn B with a 6" tail. Use chart 3 for a round-by-round description of the decreasesforthecrown. As you come to the top of the hat, some of the chart is in grey. These are not stitches, but instead represent the shaping of the panel. For each “step" in the shaping, you will decrease one stitch. Since row of the chart represents two rounds of knitting, and you will decrease in the second round. Notice that you will decrease every other row, and that you always decrease on A rows, represented in the chart by white. It is best to make your decreases one stitch in from the edge of the chart. To do this, k1, dec1, follow chart to last three stitches, dec1, k1. Make decreases on the left side of the panel right leaning, decreses on the right side, left leaning. At the top of the hat, you will have 1 stitch for each panel remaining, for a total of 10 stitches. To make the decreases clearer, a separate chart, chart 3, indicates only the decrease rounds. In chart 3, every row is a single round of knitting. The active colour is still represented in the key on the far right. Two options are given for the final decreases, after colour B is no longer used. For a longer hat, follow the dark grey outline and treat the light grey blocks as white blocks. For a shorter hat, follow the light grey outline. A third option for decreasing, resulting in a more gentle crown to the hat, is to decrease across two panels instead of every panel. To do this, perform the left side decreases on the left panel in a pair, and the right side decreases on the right panel in a pair. This will reduce you to twenty stitches. One the round, dec 1 all the way around and return to the main instructions. You have 10 stitches on the needle. Repeatedly Dec 1 across the round. You have 5 stitches on the needle. Cut the yarn with a 6" tail. Thread it through a tapestry needle, and thread the needle through all five (5) stitches, removing them from the needle. Cinch the thread tight to close upthecrown. Weave in all ends. Table 1. Sport Weight Hat. Gauge 25st x 48 rows to 4"x4", mosaic pattern in the round. Follow Chart 1 for instructions.
| Size | Cast On Stitches | Decrease after Ribbing | Number of Panels | Rows of mosaic | Finished Size, incl. specified ribbing length |
| 3-6 mo (YXXS) | 84 | 0 | 6 | 30 | 13.44"x5.5" (0.5" rib) |
| 6-12 mo (YXS) | 100 | 2 | 7 | 34 | 15.7"x6.0" (0.5" rib) |
| 12 - 36mo (YS) | 100 | 2 | 7 | 34 | 15.7"x6.5" (0.75" rib) |
| 3 - 10 years (YM) | 112 | 0 | 8 | 37 | 18"x7.25" (1.25" rib) |
| 11 - 14 years (YL) | 112 | 0 | 8 | 37 | 18"x7.5" (1.5" rib) |
| Adult Medium (M) | 128 | 2 | 9 | 43 | 20"x8.5" (1.5" rib) |
| Adult Large (L) | 140 | 2 | 10 | 43 | 22.4"x9" (1.5" rib) |
2 rows to 4"x4", mosaic pattern in the round. Follow Chart 2 for instructions. Table 2. Fingering Weight Hat.
| Size | Cast On | Decrease after Ribbing | Number of Panels | Rows of mosaic | Finished Size, incl. specified ribbing length |
| 3-6 mo (YXXS) | 100 | 2 | 7 | 34 | 14"x5.9" (0.5" rib) |
| 6-12 mo (YXS) | 112 | 0 | 8 | 36 | 16"x6.2" (0.5" rib) |
| 12 - 36mo (YS) | 128 | 2 | 9 | 38 | 16"x6.75" (0.75" rib) |
| 3 - 10 years (YM) | 128 | 2 | 9 | 42 | 18"x7.33" (0.75" rib) |
| 11 - 14 years (YL) | 128 | 2 | 9 | 42 | 18"x7.7" (1" rib) |
| Adult Medium (M) | 140 | 0 | 10 | 46 | 20"x8.2" (1" rib) |
| Adult Large (L) | 156 | 2 | 11 | 50 | 22"x9.4" (1.5" rib) |
Su Tehlike
SportWeight,25stx48rows/4"(10cm)sizes YouthXXS-Adult L
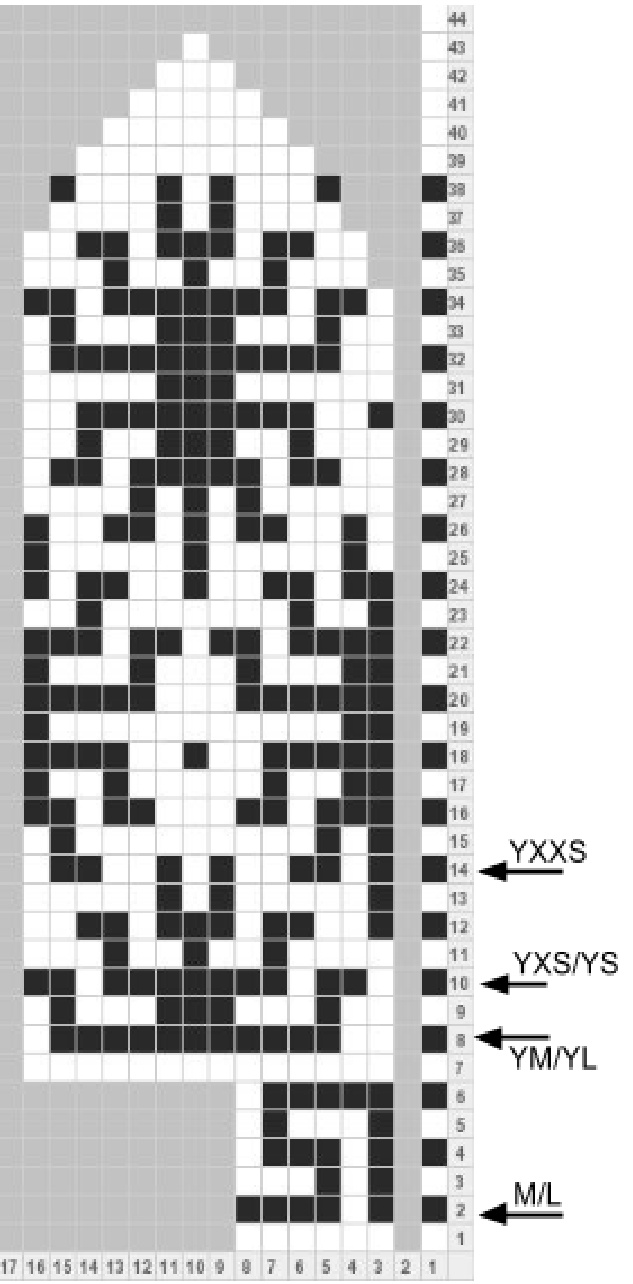
Chart 1. Sport Weight Su Tehlike Hat. Cast on number of stitches specified in Table 1 for size, and join in the round Knit specified length of rib, or longer, of k2p2 ribbing on smaller needles Knit two rounds of colour A, decreasing 2 stitches evenly for Adult M, Youth XS, and Youth Ssizes. Adult M/L only: Knit rows 2-6 of the chart. 21 (23) copies of motif. Knit two rounds of colour A, increasing 0 (2) stitches evenly in the first round. This is row 7 of chart. 126 (140) stitches. Knit the chart, starting at row specified for size, using mosaic technique. The number of panels per size is specified in Table 1. Don't forget to knit each row twice!! Decrease according to chart, starting on row 35. Decrease on the second round of each row. See chart 3 for detailed decrease instructions. K2Tog, as stitches allow, for two rounds. Break yarn and thread through remaining stitches. Cinch closed.

Don't Forget: Knit each row twice with the same active colour. The far right column is a colour key indicating the active colour for the row. Black Indicates colour B, white indicates colour A. The grey blocks are not part of the chart. They indicate shaping. 中The first decrease row has only one decrease per panel. Perform your decreases on the 2nd row of the colour, that is, on even rows. See Chart 3 for details. Starting in row 39, you are only knitting with colour A. You can knit each row of the chart either once or twice at this point to adjust the length.
Su Tehlike
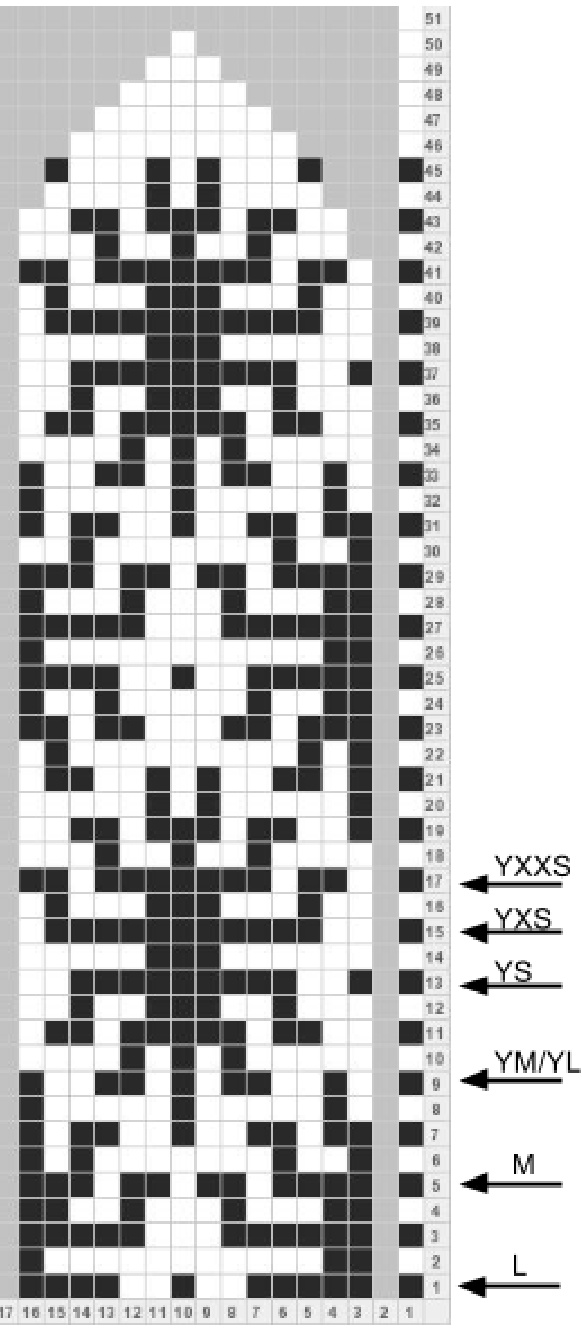
Chart 2. Fingering Weight Su Tehlike Hat.
Fingering Weight,28stx52rows/4"(10cm)sizesYouthXXS-Adult L
Cast on number of stitches specified in Table 2 for size, and join in the round Knit specified length of rib, or longer, of k2p2 ribbing on smaller needles Knit two rounds of colour A, decreasing 2 stitches in the first row for all sizes except Youth XS, Adult M. Knit the chart, starting at row specified for size, using mosaic technique. The number of panels per size is specified in Table 2. Don't forget to knit each row twice!! Decrease according to chart, starting on row 35. Decrease on the second round of each row. See Chart 3 for detailed decrease instructions. K2Tog, as stitches allow, for two rounds. Break yarn and thread through remaining stitches. Cinch closed.
Don't Forget:
Knit each row twice with the same active colour. The far right column is a colour key indicating the active colour for the row. Black indicates colour B, white indicates colour A. The grey blocks are not part of the chart. They indicate shaping. The first decrease row has only one decrease per panel. 中Perform your decreases on the 2nd row of the colour, that is, on even rows. See Chart 3 for details. Starting in row 48, you are only knitting with colour A. You can knit each row of the chart either once or twice at this point to adjust the length.
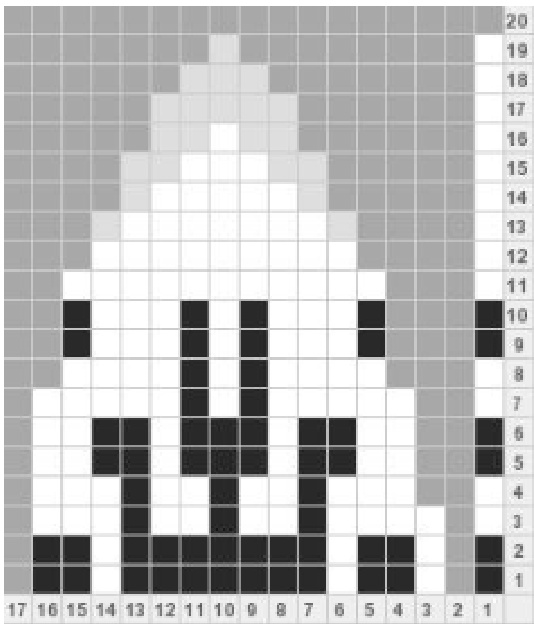
Chart 3. The Crown Decreases. Chart 3. The Crown Decreases. Row 1 of this chart corresponds to the last full row of the main chart, however, every row of this chart corresponds to one round of knitting. For a taller hat, with more gentle decreasing. follow the dark grey outline. For a shorter hat, follow the light grey outline. The far right column is a key depicting which yarn to use for that round.
Matching Mittens.
You can use this pattern to make matching mittens using my mitten tutorial, provided as a separate pdf file for this pattern on Ravelry. Mitten panels for both sport weight and fingering weight yarn are included at the end of this document in Chart 4 and 5, respectively.
Su Tehlike Mitten

Chart 4. Sport Weight Mitten. Sport Weight, Women's M (25st/4",48rows/4") Refer to MittenTutorialforInstructions Cast on 52 stitches, join in the round, and work 2-4" of k2p2 ribbing Knit one row of colour A Knit two copies of the chart Insert thumbhole at 2-%2", approximately row 15 of chart Decrease starting at row 37 of the chart (round 74 of knitting), but do not decrease the framing stitches. Decrease on the 2nd round of the row. Row 48 of the chart, 4 stitches remain per panel. k2tog over the next two rounds. 2 stitches remain. break yarn and use tapestry needle to thread through remaining stitches. Cinch tight.
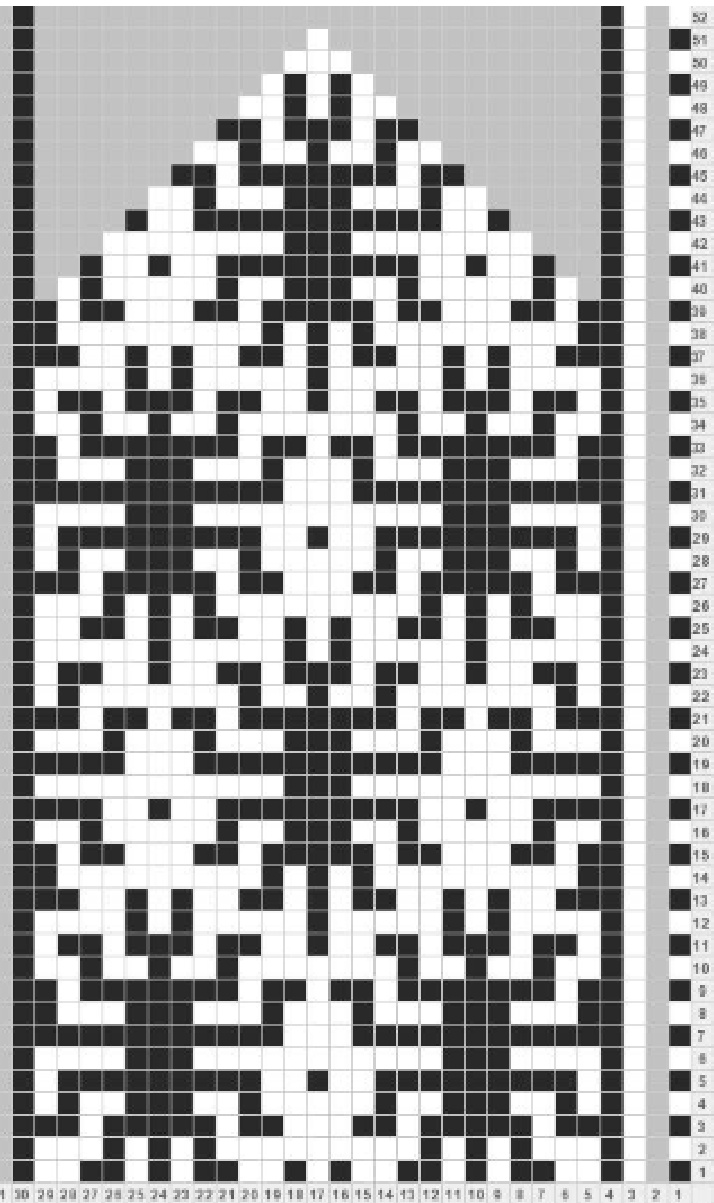
Chart 5. Fingering Weight Mitten.
Su Tehlike Mitten
FingeringWeight,Women'sMedium (28st/4",52rows/4") SeeMittenTutorial for Instructions Cast on 52 stitches, join in the round,and work 2-4” of k2p2 ribbing Knit one row of colour A Knit two copies of the chart, using the active colour shown by key on far right Insert thumbhole at 2-1/2”,approximately row 13 of the chart, casting on new stitches in the active colour. Decrease starting at row 40 (round 80 of knitting), but do not decrease the framing stitches.Decrease on the second round of knitting for the row. Row 52 of the chart, 4 stitches remain per panel. k2tog over the next two rounds.2 stitches remain. break yarn and use tapestry needle to thread through remaining stitches. Cinch tight.

References and Credits.
This design would not be possible without the considerable help from Ravelry members worldwide who acted as test knitters and tech editors. They found errors, checked gauge, tested yarn combinations, and provided feedback to improve the design. My test knitters were: Artyelf, MTCup, TheLadyK, DebraC2, Billy62, and TermiKnitter2. The scorpion motif is found throughout Turkish carpets and other crafts. It can be shown very simply, as it is here, or very complexly. This motif pattern comes from Barbara Walker's Mosaic Knitting, an incredible resource for mosaic patterns. The border motif represents water, and is also seen in many forms across Turkish carpets and kilims. Water, of course, is the source of life. The name Su Tehlike (pron. soo teh-LEE-kay) translated directly to “water danger", to indicate both the water motif and the scorpion. I love the scorpion symbols in Turkish kilims, and once paired with the water motif for the border, I was reminded of the fable where the frog carries the scorpion across the river. Apparently, there is an older Eastern fable -- fitting for Turkish designs -- in which it is a turtle who carries the scorpion. In this version, midway across the river the turtle dives under to drown him once he realizes the scorpion is attempting to sting him through his shell. This is how the name Su Tehlike was derived. These charts are created with the wonderful free colour chart maker provided by tricksykitter.com.


