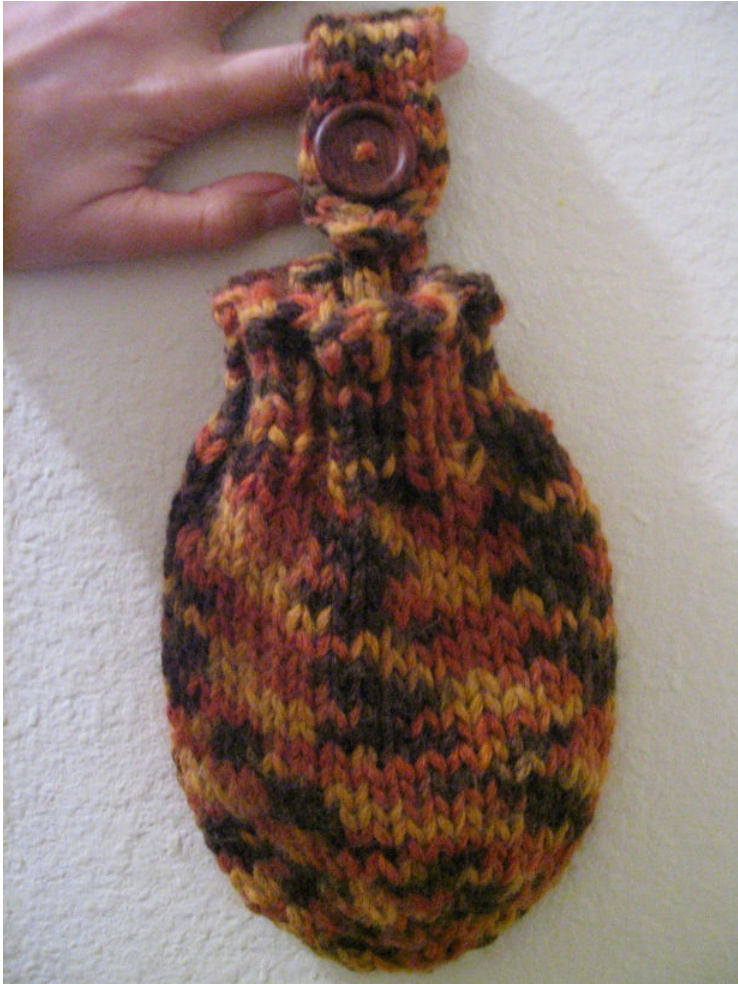
Peripatetic Knitter's Bag By Quinn
This bag is worked in the round, either on double-pointed needles or a circular needle. It is an excellent project for the Magic Loop Method. The strap is worked flat. Two sets of instructions are includedverbose for those who want to be talked through the process and superbrief for those who want to cut to the chase. The brief instructions are on page 5. The model pictured was made to a gauge of 3 stitches per inch using Bollicine Victor yarn and size 11 needles, but I knit very tight, so you will probably need to go down a size or two. The ribbing and strap are worked on needles two sizes smaller than that used to get gauge. Exact gauge is not essential. If worked at gauge specified, the bag is about 8 inches from tip to edge.
Materials/Tools:
${\sim}60$ yards bulky weight yarn $(\sim\!7\mathrm{wpi})$ 1 Large button (1 inch or larger) 1 Long Circular needle, 2 Circs, or set of DPNs to obtain gauge of 3 stitches per inch 1 Long Circular needle, 2 Circs, or set of DPNs two sizes smaller than above 1 Darning needle to sew on button and weave in final end
Techniques:
Standard: Long Tail Cast On (CO) Standard Bind Off (BO) Knit 2 Purl 2 Rib (K2P2) Knit 2 Together decrease (K2Tog) Purl 2 Together decrease (P2Tog) Knit 2 Together Through Back Loop Decrease (K2TogTBL) Purl 2 Together Through Back Loop Decrease (P2TogTBL) Make 1 Increase (M1)- lift the “bar" between two existing stitches, twisting it to make a closed loop, and knit into the loop. If done correctly, this does not leave a visible hole in the fabric.
Unusual/Full Instructions:
K2Together Bind-off (BO w/K2Tog)- Knit 2 stitches, then knit these 2 stitches together. Knit the next stitch, and then knit these 2 stitches together. Continue; each time you get 2 stitches on the right needle, Knit them together. If not casting off the whole row, Knit the last bind-off stitch together with first stitch lef live, and work remaining stitches normally. Doubled-yarn increases- Work a row holding the live yarn and the tail from the cast-on together. On the next row, work into both loops of the doubled stitch with only the live yarn, turning each doubled stitch into two stitches. Weaving in ends while working- Before working each stitch, pull the end to be woven in across the live yarn, and then drop it again at the back. This catches the tail in the back of each stitch, weaving it in without requiring an extra finishing step. Two-strip vertical buttonhole- Starting on a Right Side row, half the stitches are worked to the desired length of the buttonhole, and then the yarn is loosely carried back down to the other half. The second half is worked out to the same length and the loose yarn is caught in the loop of one or more stitches when the pieces are rejoined by purling across both strips. This is an easy buttonhole that works well when the piece will usually be seen buttoned. Carrying the yarn down rather than cutting and rejoining saves time and trouble weaving in ends. When it is worked in stockinette, the edges tend to curl in somewhat, making an almond-shaped buttonhole.
Verbose Instructions Start:
CO 6 stitches, leaving about $2~\%{-3}$ feet of extra tail. (If you usually cast on to two needles or a larger size, do not do so now- you want this to pull tight when joined into the round.) Place a row marker either now or after the first row.
Bottom:
Row 1: Join into round without twisting and Knit all stitches, holding the working yarn and the tail from the cast on together. You now have 6 double-yarn stitches. Row 2: Knit into each loop from the previous row with the working yam only, weaving the tail in along the row. You now have 12 stitches. Row 3: Knit allstitches, holding the working yarn and the tail together. You now have 12 double-yarn stitches. Row 4: Knit into each loop from the previous row with the working yarn only, weaving the tail in along the row. You now have 24 stitches. Drop the tail at the end of this row, and trim to about 1'. Row 5: Increase row- make sure to use the working yarn for increases, not the carriedalong tail. K1, \*(M1, K2), repeat \* until you reach the last stitch, M1, K1. You now have 36 stitches.
Body:
Knit allstitches until pouch almost covers the largest ball, torus, or yarn cake you wish to carry. I don't recommend making it long enough to hold tubular skeins- it would hang all the way down your leg. Mine is sized for a full skein of sock yarn, and has 22 rows in the body, for a length of about $6{\sqrt{2}}$ from the tip to where I started my ribbing.
Ribbing:
Go down two needle sizes. Work 8 rows of K2, P2 ribbing. I had the easiest time if the same kind of stitch was on both sides of a needle transition, so my Magic Loop pattern for each row was K1, $^{*}(\mathbb{P}2{,}\!\mathrm{K}2)$ , repeat \* until last 3 stitches, P2, K1. This puts a Knit stitch on either side of the row transition and a Purl stitch on either side of the halfway point.
Bind-off Pouch edge:
K4, BO 28 w/K2Tog, K4. This leaves you with 8 stitches on the needle, with your row marker in the center. You can remove the row marker. The remainder of the piece is worked flat.
Strap:
The Right Side of your work is towards the interior of the pouch. Work stockinette (Knit Right-Side rows, Purl Wrong-Side rows) until your strap is about an inch longer than your button. My button was about 1'", and my strap is about $2^{\bullet}$ and 15 rows. Attach your button now, centered on the Right Side of the strap, with its bottom edge just above the ribbing. I recommend splitting your yarn into fewer plies (if possible) and using it to attach the button to get a good color match. You can sew the button down firmly or leave a wrapped shank- your buttonhole will get less distorted over time if you leave a shank about the thickness of your fabric. Work Reverse Stockinette (Purl Right-Side rows, Knit Wrong-Side rows) to make the other half of the strap- this creates a natural turning point, and shows the Knit side when the strap is buttoned. Allowing the strap to fold at the natural turning point, work until the post-fold section reaches the top of your button.
Buttonhole:
On a Knit row, work only the first 4 stitches, and then turn your work. Work just this half of the strap for the number of rows your button covers, rounded down. At the end of the next Knit row, carry the yarn down to the other 4 stitches, making sure to leave enough slack to span the height of the buttonhole without binding. Work this half of the strap to the same length as the other- again, you should end after a Knit row. Purl back across all 8 stitches to rejoin at the bottom of the buttonhole and check to make sure that it fits over your button and holds the strap snugly. Decrease and Cast-Off: Row 1- K1, K2TogTBL, K2, K2Tog, K1 Row 2- P1, P2Tog, P2TogTBL, P1 Row 3- BO all stitches. Pull yarn through remaining stitch and snug down to create a smooth, rounded tip to the strap.Weave about $3^{\circ}$ of tail into the strap, leaving the end somewhere around the center of the fold, then trim to about $^{1}\!/\!_{2}^{\,,\,\bullet}$
Congratulations, you're done! Enjoy your bag!
Possible Variations: Cables instead of ribbing to draw in the top, Reverse Stockinette or Moss Stitch for the main body, a pattern on the main body, a longer strap so it can be hung from your wrist, or a smaller gauge to make a cell phone or MP3 player pouchremember to make the strap long enough!
Super-Brief Instructions Start:
CO 6 stitches, leaving about $2~\sqrt[1]{_{2}}-3\$ of extra tail. Row 1: Knit all stitches with Live Yarn and Tail held together. Row 2: Knit into each loop of previous row with Live Yarn, weaving in Tail. Row 3: Knit all stitches with Live Yarn and Tail held together. Row 4: Knit into each loop of previous row with Live Yarn, weaving in Tail. Row 5: K1, \*(M1, K2) repeat \* until last stitch, M1, K1. You now have 36 stitches. Body: K all stitches for 22 rows or until desired length is reached. Ribbing: Go down two needle sizes. Work 8 rows of K2P2 ribbing. Pouch Edge: K4, BO 28 w/K2Tog, K4. Remaining 8 stitches will be worked flat.
RS is toward interior of pouch.
Work Stockinette for 15 rows or until strap is about 1' longer than the button. Attach button, centered on RS of strap, with bottom edge just above ribbing. I recommend leaving a shank rather than sewing the button down tight. Switch to Reverse Stockinette for the second portion of the strap and work until second portion reaches the top of the button. Work vertical buttonhole over 6 rows or of suitable size for button being used. After Buttonhole: Row 1 (K side)- K1, K2TogTBL, K2, K2Tog, K1 Row 2 (P side)- P1, P2Tog, P2TogTBL, P1 Row 3 (K side)- BO Enjoy! Possible Variations: Cables instead of ribbing to draw in the top, Reverse Stockinette or Moss Stitch for the main body, a pattern on the main body, a longer strap so it can be hung from your wrist, or a smaller gauge to make a cell phone or MP3 player pouchremember to make the strap long enough!


