Mystery shawl 2011 by MiaDehmer Measurements: Over your shoulders appr 100cm, neck down appr 52cn Materials: VickeVira handspun single thread shawl yarn, 110gr abt 350-400m, or any other shawl yarn of your choice. Weight and meterage of the yarn is not important, but will effect the size of your shawl. Needle size: US 6 - 4.0 mm (or needles suitable to your yarn). Gauge: Star pattern 10cm = 28 stitches. The gauge is not important, but the size of the shawl and the amount of yarn needed will differ if gauge is not the same. Before measuring the gauge, block your swatch and allow to dry and relax. VickeVira handspun yarns: http://www.etsy.com/shop/VickeVira Part one, cast on and setup Cast on 10 sts. Knit 17 rows following the "Cable chart" below. After that, along the left side of the work pick up 8 sts (between edge stitch and next, pick up 1 in each second row), and along the cast-on side pick up 10 sts = 28 sts. Set up row (WS): k1, p1, k1, p4, k1, p3, k1, p4, k1, p3, k1, p4, k1, p1, k1. Lagg upp 1om. Sticka 17 varv enligt "Cable chart" nedan. Darefter, utmed vanster sida av arbetet, innanfor kantmaskan, plocka upp 8m (en i vartannat varv), och utmed uppliggsvarvet plocka upp 1om = 28m. Startuarv (avigsidan): 1r, 1a, 1r, 4a, 1r, 3a, 1r, 4a, 1r, 3a, 1r, 4a, 1r, 1a, 1r. Part two, cables and estonian stars: You will now work three cables and estonian stars. Seen from RS of your work and in the order parts will be knitted: 1. Knit cable acc to "Cable chart" but without the last edge stitch. C1 = 9 sts 2. Knit estonian star pattern. 3. Knit cable acc to "Cable chart" but without both edge stitches. C2 = 8 sts 4. Knit estonian star pattern. 5. Knit cable acc to "Cable chart" but without the first edge stitch. C3 = 9 sts. When you start knitting part2 of the pattern, the first row knitted is row3 of the “cable chart" on the two cables at the beginning and the end of the knitting. However, technically the middle cable is only on row1... To make the knitting a bit easier you can start also the middle cable on row3 of the chart - this way all three cables will be twisted on the same row. 1t03 stitch: k1 in the next st, without dropping the st from the left needle, yo and k1 in back loop of the stitch. 1 st increased to 3 sts. 3t03 stitch: k3tog without dropping the sts from the left needle, yo, knit same 3 sts together and drop the sts from left needle. Number of sts has not changed. Row 1: C1, 1t03, C2, 1t03, C3. Row 2 and every WS row: C3, purl to next cable, C2, purl to last cable, C1. Row 3: C1, 1t03, k1, 1t03, C2, 1t03, k1, 1t03, C3. Row 5: C1, 1t03, k1, 3t03, k1, 1t03, C2, 1t03, k1, 3t03, k1, 1t03, C3. Row 7 and every RS row: C1, 1to3, \*k1, 3to3\* until 2 sts left before next cable, k1, 1to3, C2, 1to3, \*k1, 3t03\* until 2 sts left to next cable, k1, 1to3, C3. Continue knitting cables and star pattern until 75 sts on each part of the estonian stars pattern, and last row knitted is a WS row. Together with the cables 9+8+9 sts there are now in total 176 sts. If you have more yarn than advised for this shawl, you can choose to continue knitting this part of the shawl. The next parts are not dependent on the number of sts of your work. Du ska nu sticka 3 flaitor och estniska stjarnor. Sett fran ratsidan av arbetet, och i den ordning delarna stickas: 1. Flata enl "Cable chart" men utan den sista kantmaskan. C1 = 9m 2.Estniska stjarnor 3. Flata enl "Cable chart" men utan bada kantmaskorna. C2 = 8m 4.Estniska stjarnor 5. Flata enl "Cable chart”" men utan forst kantmaskan. C3 = 9m Nar du borjar pa del2 av monstret sa ár det forsta varvet du stickar, varv3 enl diagrammet “cable chart". Du befinner dej pa varv 3 pa de tua flatorna i borjan och slutet pa varvet, men egentligen pa varv 1 pa flatan i mitten pa varvet. For att forenkla stickningen sa kan du lata den mittersta flatan ocksa borja pa varv3, sa att du vrider alla tre flatorna samtidigt pa samma varv. 1till3: 1r i nasta m, hall kvar m pa vanster sticka, 1omslag, och 1r i bakre maskbagen au samma m och lyft av.1 maska blir 3 maskor. 3till3: sticka 3m rata tillsammans, hall kvar m pa vinster sticka, 1 omslag, och sticka samma 3m rata tillsammans en gang till och lyft av. 3 maskor blir 3 maskor. Varv 1: C1, 1till3, C2, 1till3, C3. Varv 2 och alla aviga varv: C3, sticka aviga till nasta flata, C2, sticka aviga till nasta flata,C1. Varv 3: C1, 1till3, 1r, 1till3, C2, 1till3, 1r, 1till3, C3. Varv 5: C1, 1till3, 1r, 3till3, 1r, 1till3, C2, 1till3, 1r, 3till3, 1r, 1till3, C3. Varv 7 och alla rata varv: C1, 1till3, \*1r, 3till3\* upprepa tills 2m kvar till nasta flata, 1r, 1till3, C2, 1till3, \*1r, 3till3\* upprepa tills 2m kvar till nasta flata, 1r, 1till3, C3. Fortsaitt sticka flator och stjarnor tills du har 75m pa varje del med stjarnmonster. Ausluta med ett stickat varv fran avigsidan. Tillsammans med maskorna i flatorna, 9+8+9 maskor, har du nu totalt 176m. Om du har mer garn än angivet i monstret, och vill sticka en storre sjal, sa kan du fortsatta sticka flator och stjarnor sa langt du onskar. De kommande delarna av monstret r inte beroende av ett sarskilt maskantal.
Part three, cables and eyelet row:
Row 1: C1, yo, knit to next cable, yo, C2, yo, knit to next cable, yo, C3 Row 2: C3, purl to next cable, C2, purl to next cable, C1 Row 3: C1, yo, knit to next cable, yo, C2, yo, knit to next cable, yo, C3 Row 4: C3, knit to next cable, C2, knit to next cable, C1. Row 5: C1, yo, \*k2tog, yo\* repeat to 1 sts left to next cable, k1, yo, C2, yo, k1, yo, \*k2tog, yo\* repeat to next cable, C3 Row 6: C3, knit to next cable, C2, knit to next cable, C1 Row 7: C1, yo, knit to next cable, yo, C2, yo, knit to next cable, yo, C3 Row 8: C3, purl to next cable, C2, purl to next cable, C1 Varv 1: C1, omsl, sticka rata till nasta flata, omsl, C2, omsl, sticka rata till nasta flata, omsl,C3 Varv 2: C3, sticka aviga till nasta flata, C2, sticka aviga till nasta flata, C1 Varv 3: C1, omsl, sticka rata till nasta flata, omsl, C2, omsl, sticka rita till nasta flaita, omsl,C3 Varv 4: C3, sticka rata till nasta flata, C2, sticka rata till nasta flata, C1 Varv 5: C1, omsl, \*2 rata tills, omsl\* upprepa till 1 m kuar till nasta flata, 1r, 1 omsl, C2, omsl, 1r, omsl, \*2 raita tills, omsl\* upprepa till nasta flata, C3 Varv 6: C3, sticka rata till nasta flata, C2, sticka rata till nasta flata, C1 Varv 7: C1, omsl, sticka raita till nasta flaita, omsl, C2, omsl, sticka rata till nasta flata, omsl,C3 Varv 8: C3, sticka aviga till nasta flaita, C2, sticka aviga till nasta flaita, C1
Part four, cables and waves pattern:
When working the waves pattern, don't worry if the number of stitches of the chart do not even up at the end of the row. With the yarn overs beside the cables, the number of stitches will increase on every second row. The new stitches are added sideways to the pattern chart. Row 1: C1, yo, k1, work "Wave chart'", k1, yo, C2, yo, k1, work "Wave chart", k1, yo, C3. Row 2: C3, purl to next cable, C2, purl to next cable, C1. Repeat these rows until you have worked the 6 rows of the "Wave chart" 1o times. If you have doubt your yarn will not be enough for 1o times, you can work the "Wave chart" 8 or 9 times and still have a very beautiful shawl. And, if you have lots of yarn you can continue knitting more than 1o times of the "Wave chart" to have a larger shawl. Just make sure you have enough yarn left for the edging (part five, below). Nar du stickar vag-monstret behover du inte tanka pa om maskorna i diagrammet gar jamt upp eller inte pa varje varv. Med omslagen vid sidan om flatorna sa okar antalet maskor pa vartannat varv, och de nya maskorna laggs till monstret sidledes. Varv 1: C1, omsl, 1r, sticka enligt diagram "Wave chart", 1r, omsl, C2, omsl, 1r, sticka enligt diagram "Wave chart", 1r, omsl, C3. Varv 2: C3, sticka aviga till nasta flata, C2, sticka aviga till nasta flaita, C1. Upprepa dessa varv tills du har stickat de 6 varven enligt "Wave chart" 10 ganger. Om du kanner dej tveksam till om ditt garn raicker att sticka vagmonstret 10 ganger, sa kan du sluta sticka efter 8 eller 9 ganger, och anda fa en mycket vacker sjal. Och, om du har mycket garn kvar kan du fortsatta sticka vagmonstret fler ganger och fa en storre sjal. Se bara till att du har tillrackligt med garn kvar for att gora uddkanten som beskrivs iPart5 nedan.
Part 5, Picot edging:
You will now from the RS work a picot cast off, which is worked over all stitches. If you do not want to work the picots, you can bind off loose without them. Bind off 2 sts, \*slip the remaining stitch from right needle back to left, knit cast on 2 sts, bind off 6 sts\*. Repeat from \* to \* until all stitches are made. Try to cast off the 2 sts of the picot quite normal, and the other 4 sts loose. Finish by cutting the yarn and weave in loose ends. Block your shawl and pin it out on flat surface to dry. Fran ratsidan av stickningen ska du nu gora en picot-aumaskning over samtliga maskor. Om du inte vill gora picot'erna sa kan du valja att maska av alla maskor lost. Aumaska 2 m, \*sitt tillbaka maskan fran hoger till vanster sticka och med stickad upplaggning ligg upp 2 maskor, maska av 6 maskor\*. Upprepa fran \* till \* tills alla maskor är avmaskade. Forsok att maska av de 2 maskorna i picot'en normalt, och de fortsatta4maskornalost. Klipp nu av garnet och fast losa tradar. Blocka sjalen, nala ut den pa en flat yta och lat torka.
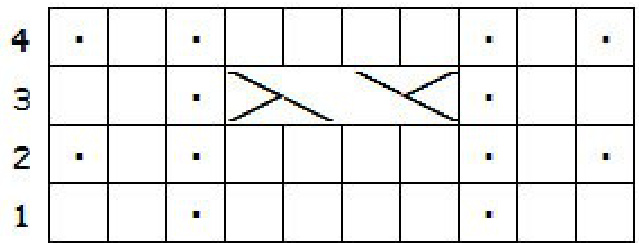
CABLECHART
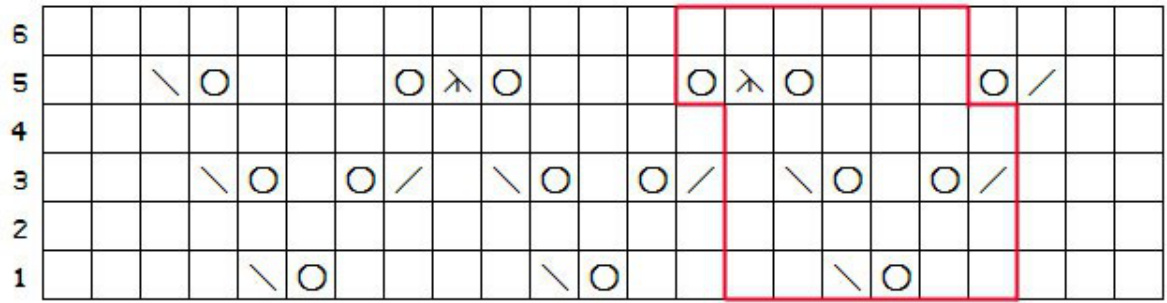
WAVECHART
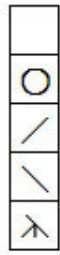
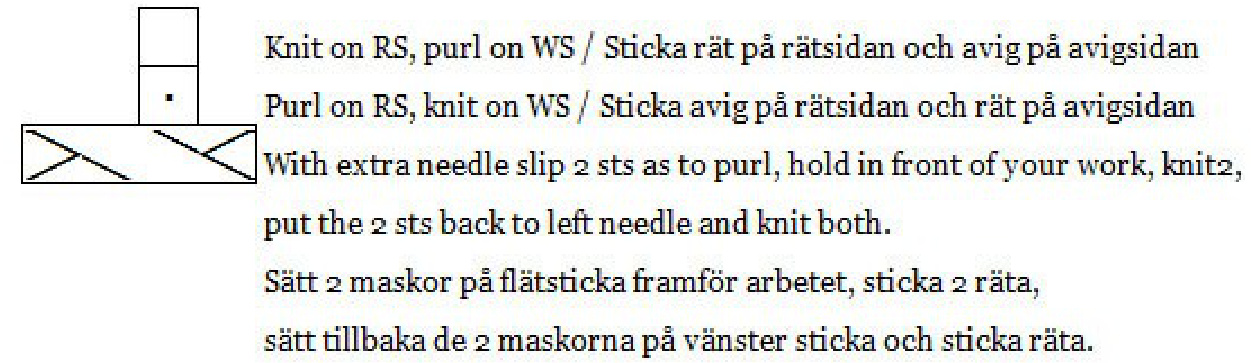
Knit on RS, purl on WS / Sticka rat pa ratsidan och avig pa avigsidan Yarn over / Omslag Knit2together/Sticka2ratatillsammans Slip 1 as tokmit,kit 1,pass slipped stitch over/Lyft maska, sticka maskarat, dra denlyftamaskan vr Slip 1 as to knit, knit 2 together, pass slipped stitch over Lyft 1 maska, sticka 2 ratamaskor tillsammans, dra den lyftamaskan over You are welcome to discuss the pattern and show off your project or FO at Ravelry http://www.ravelry.com/groups/fans-of-vickevira If you want to follow my day-to-day crafting, you are welcome to visit my blog http://minspiration.blogspot.com Sign up as Facebook fan of VickeVira for quick updates and special offers http://www.faceb0ok.com/pages/VickeVira/130746596964881


