Arkema 000 C
Beading Tutorial
I use a special method to work with beads that are too small for a crochet hook to thread them
Materials
350 meters / 383 yards of fingering weight yarn (shown in Wollmeise 100% superwash, colorway Lavendel), about 100 g / 3,5oz 2,25 mm circular needle (or size to get the given gauge) long enough for magic loop Wasteyarn 460 3mm japanese seed beds (Toho) 2 split ring stitch markers Tapestry needle or spare circular needle same size as above or smaller Cableneedle
Gauge
36 stitches and 48 rows on 10 cm / 4" in stockinette stitch.
| Sizing Size | Handcircumference |
| S | 18cm/7" |
| M | 19cm/7,5" |
| L | 20,5cm/8" |
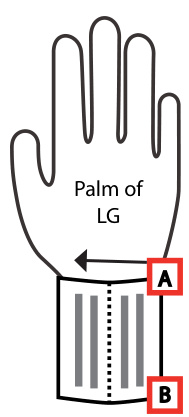
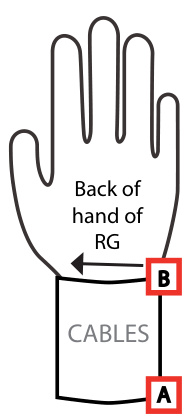
Have a look at the little hand to the right for the correct way to measure your hand circumference!
Notes
These gloves are knit using the,magic loop" method, however, you can use double pointed needles or two circular needles if you prefer. Just be aware that the instructions often refer to N1 and N2 (meaning eachhalf of thetotal stitchcount). Where stitch counts vary depending on the size, the following format is used: S [M, L]. RG = Instructions for the right glove LG = Instructions for the left glove
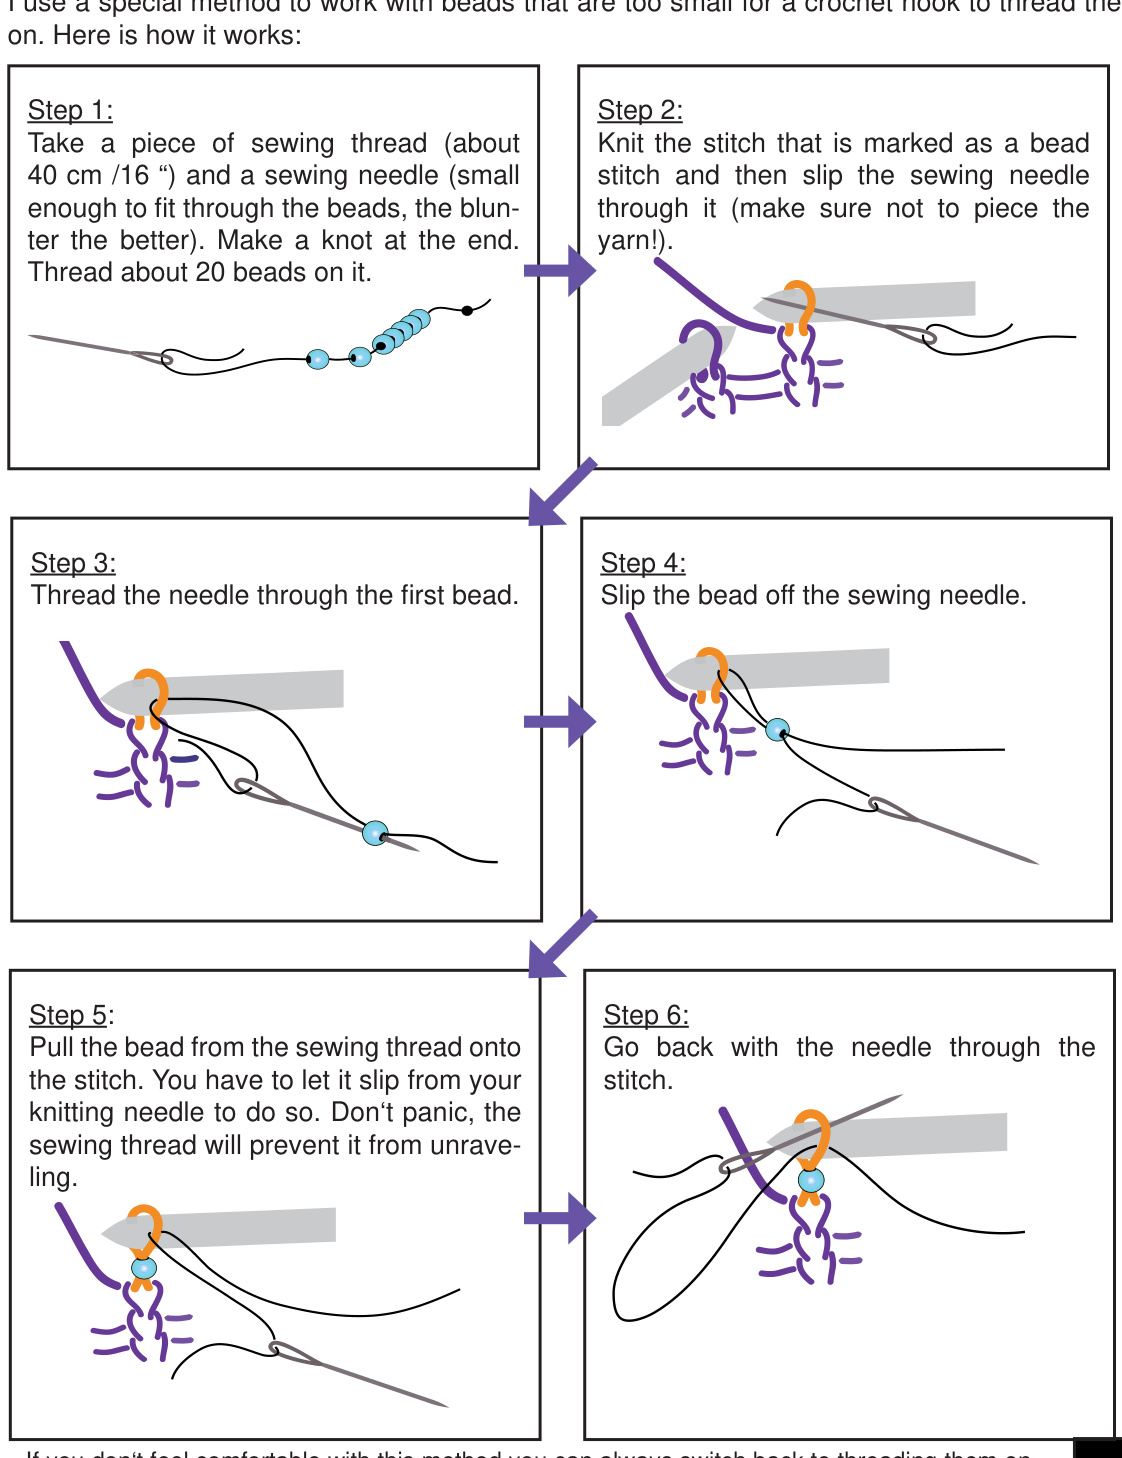
st(s) = stitch(es) Instructions between 2 asterisks need to be repeated to the end of the round. If you don't feel comfortable with this method you can always switch back to threading them on with a crochet hook, as long as you choose big enough beads.
| ymwos | |
| On a right side row (flat knitted part) and for all circular knitted parts: Knit (k). On a wrong side row (flat knitted part): Purl (p). | |
| On a right side row (flat knitted part) and for all circular knitted parts: Knit through the back loop (ktbl). On a wrong side row (flat knitted part): Purl through the back loop (ptbl). | |
| B | Knit the stitch through the back loop, then slip a bead on it. |
| On a right side row (flat knitted part) and for all circular knitted parts: Purl (p) On a wrong side row (flat knitted part): Knit. | |
| No stitch | |
| N | Knit two together (k2tog) |
| Slip one stitch knitwise, then slip the next stitch knitwise.Insert left needle into the front loops of the slipped sts and knit them together from this position through the back loops (ssk). | |
| Slip two stitchestogetherknitwise (as if they were one stitch),knit one stitch,pass the two slipped stitches over(central double decrease). | |
| Cast on one st using backward loop method. | |
| Make one by lifting strand in between stitch just worked and the next stitch, knitting into back of this thread. | |
| Purl one, yarn over, purl one into one stitch (double increase). | |
| 树 | K1tbl, yarn over, k1tbl into one stitch (double increase). |
| R | Slip two onto cable needle, hold in back, k3tbl, p2 from cable needle. |
| X | Slip three onto cable needle, hold in front, p2, k3tbl from cable needle. |
| Slip three onto cable needle, hold in back, k3tbl, k3tbl from cable needle. | |
| Slip three onto cable needle, hold in front, k3tbl, k3tbl from cable needle. | |
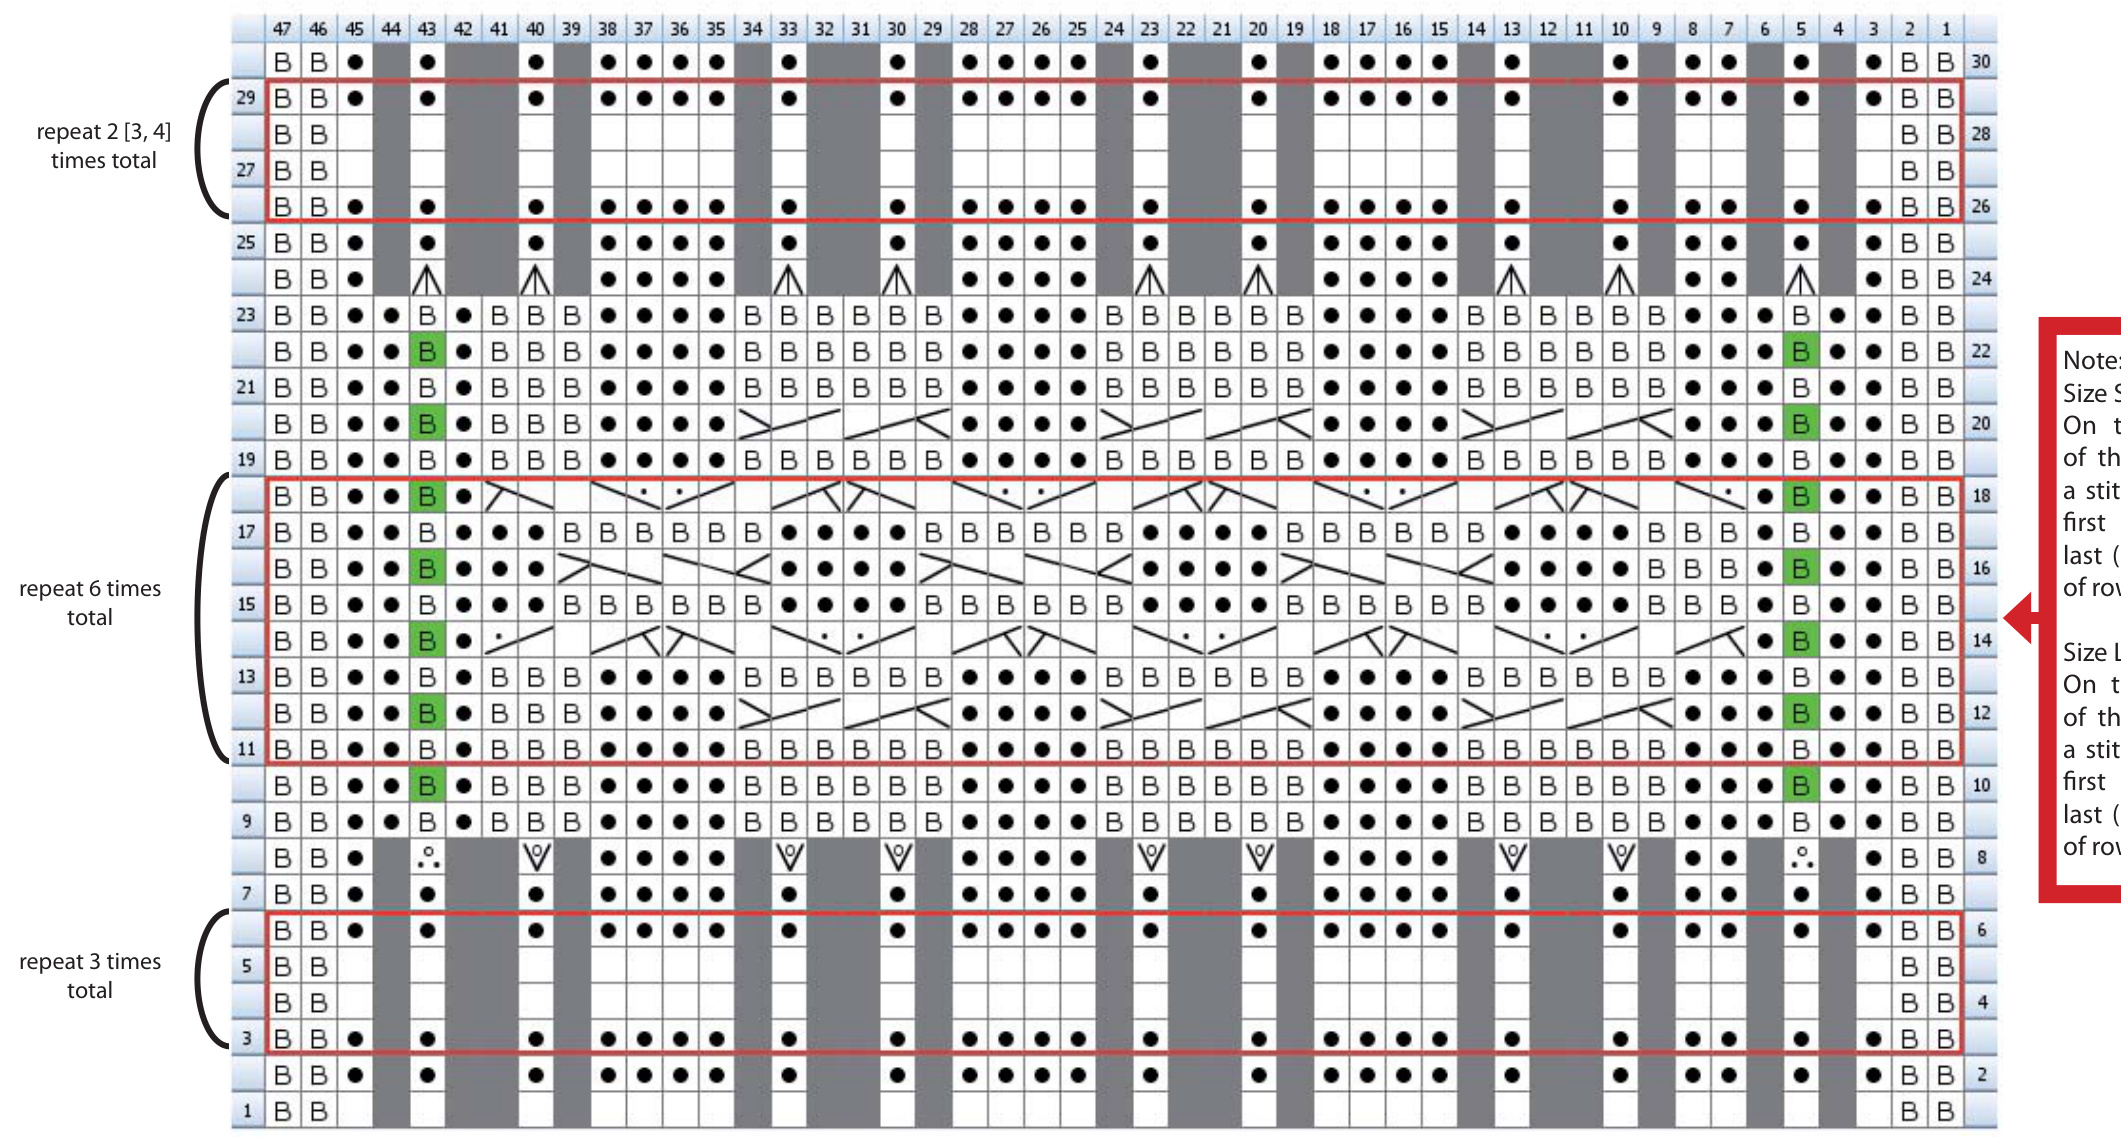
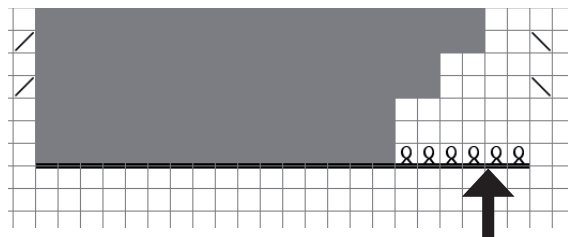
| Black horizontal lines indicate sts which need to be transferred onto waste yarn (as necessary for the thumb and the pinky in the charts). In the given example: The frst round (normal knit symbols) is worked as usual. On the second round, you thread 5 sts on waste yarn. | |
| Red dots next to a line in a chart tell you that there are written directions at the bottom of the page for thisline whichfurtherexplain what needstobe done in that round. | |
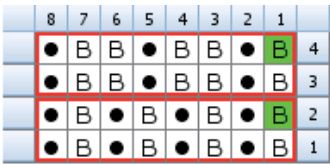
| BBBBB BB·B· BB·B· 12 BBBBB | Red frames highlight repeat sections. |
| ···间 B· BO | Blue vertical lines indicate where the sts are separated (N1/ 2).Please note that this line may not always be in between the same columns, as due to the pattern it may be necessary to shift stitchesfromN1toN2andviceversa. |
Once you've finished the last row join the cast-on edge to the stitches on your needle by using the Kitchener stitch (Grafting). If you are unfamiliar with this technique follow the link to learn more about it: Knitty (http://www.knitty.com/ISSUEsummer04/FEATtheresasum04.html) Cast on 29 sts using the provisional cast-on (for example the crochet-cast on). Work chart 1. Please note thatthefirstrow is awrongsiderow!

This will result in a total of 82 [86, 90] rows total (plus 1 row due to the grafting). The next step is to knit the hand of the glove. To do so you need to pick up stitches from the sides of the continuous band you formed before. To give you an idea how to do so have a look at the slip ring markers you placed in the side sts of the band and read the following section:
For the RG
RG and LG: Start at marker B, rejoin the yarn and pick up\* 4 sts for every 5 cuff rows on the back of the hand side (cabled part of the band) and then on the palm side (ribbed part). This will result in 64 [68, 72] sts total.
For the LG
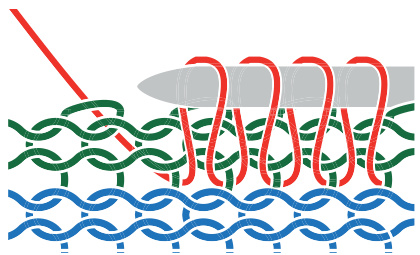
Start at marker A, rejoin the yarn and pick up\* 4 sts for every 5 cuff rows on the palm (ribbed part) and afterwards on the back of the hand side (cabled part of the band). This will result in 64 \* Pick up sts by inserting your needle in between the first and the second stitch column of the band and pull through a loop of the working yarn. For further clarification have a look at the illustration below.
Separate the stitches asfollows: Divide the sts it 32 [34, 36] sts on N1 and 32 [34, 36] sts on N2. The beginning of the round is marked by the stitchmarker (RG: Marker B, LG: Marker A). Chart 1: Cuff Band [RG and LG, allsizes)
| Pleasenote:Thispatternisforpersonaluseonly.Anycommercialuseis strictlyprohibited. Thisincludesdistributionofthispatternthroughelectronicorprintmedia. | |
| Ifyouhaveanyquestions,suggestionsorcorrections,pleasegetincontact withme: | |
| byemail: | info@laris-designs.com |
| orthroughmywebsiteat | www.laris-designs.com |
Thumb gusset and hand:
Work chart 2. Note: There are separate charts for the RG and LG as well as for each size. After working chart 2 transfer all sts on a spare circular needle (same size you use for the pattern or smaller) or waste yarn.
Fingers:
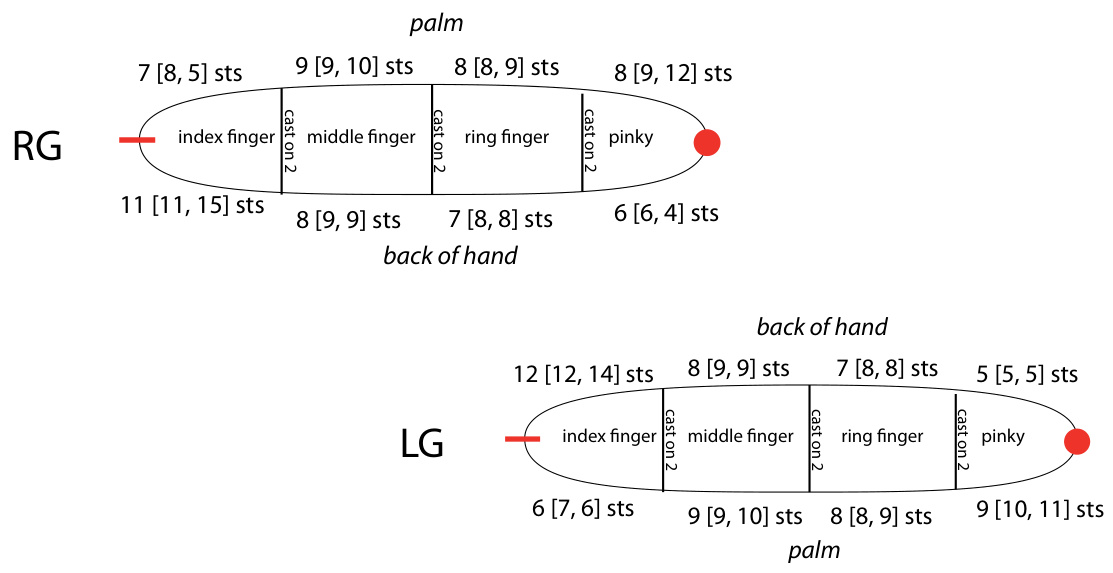
The following illustrations highlight which sts are used for which finger as a guidance. The red dot shows the beginning of the round and the red rectangle the point where the sts are divided between N1 and N2. RG: Ring finger: Put 7 [8, 8] sts from the back of the hand side on N1 and 8 [8, 9] sts from the palm side as well as 2 sts (resulting from the cast-on edge of the pinky) on N2. Knit the stitches on N1 (back of hand), cast on 2 stitches using the backward loop method and knit the stitches on N2 (palm). Continue working these 19 [20, 21] sts till the finger is 3 mm shorter than your ring finger when wearing the glove. Work k2tog to the end of the round (if the total stitch count is odd: knit the remaining stitch). Break the yarn and thread it through the remaining stitches twice. Pull tight and weave in the end. Middle finger: Put 8 [9, 9] stitches from the back of the hand back on N1 and 9 [9, 10] stitches from the palm side back on N2. Knit the stitches from the back of the hand, cast on 2 stitches using the backward loop method, knit the stitches from the palm and pick up 2 stitches from the cast-on edge to the ring finger. Continue as described for thering finger. Index finger: Put the remaining 18 [19, 20] sts back on the needle. Knit allsts and pick up 2 stitches from the cast-on edge to the middle finger. Continue working these 20 [21, 22] sts as described for the ring finger. Pinky: Put 8 [9, 12] sts from the palm side on N1 and 6 [6, 4] sts from the back of hand side on N2. Knit the stitches from the palm, afterwards the sts from the back of hand side, then pick up 2 stitches from the cast-on edge to the ring finger. Continue knitting these 16 [17, 18] sts as described for the ring finger. LG: Ring finger: Put 8 [8, 9] stitches from the palm on N1 and 7 [8, 8] stitches from the back of hand side plus 2 stitches (resulting from the cast-on edge of the pinky) back on N2. Knit the stitches from the palm, cast on 2 stitches using the backward loop method and knit the stitches from the back of hand. Continue working these 19 [20, 21] sts as described for the ring finger (RG). Middle finger: Put 9 [9, 10] stitches from the palm on needle 1 and 8 [9, 9] sts from the back of hand side on needle 2. Knit the stitches from the palm, cast on 2 stitches using the backward loop method, knit the stitches from the back of hand side and pick up 2 stitches from the cast-on edge to the ring finger. Continue as described fortheringfinger. Index finger: Same as for the index finger on the RG. Pinky: Put 5 sts from the back of hand side on N1 and 9 [10, 11] sts from the palm on N2. Knit the stitches from the back of hand side, knit the sts from the palm, then pick up 2 stitches from the cast-on edge to the ring finger. Continue knitting these 16 [17, 18] sts as described for the middle fi nger (RG).
Thumb
RG and LG: Move the 20 [22, 24] sts back on your needles. The beginning of the round is placed 2 sts to the left from the cast-on gap (this makes weaving in the yarn tail easier!). Rejoin the yarn and go on as follows: Round 1: k18 [20, 22] sts, pick up one stitch in the gap between the cast on edge and the stitches which were on waste yarn (work through the back loop to prevent holes), pick up 6 sts from the cast-on edge to the index finger, pick up one stitch in the gap (as described before), k2. Round 2: K 17 [19, 21], ssk, k6, k2tog, k1. Round 3: K 17 [19, 21], ssk, k4, k2tog, k1 Round 4: K 17 [19, 21], ssk, k2, k2tog, k1 Round 5: K 17 [19, 21], ssk, k2tog, k1 Continue knitting these 20 [22, 24] sts as described for the ring finger.
You don't need to work this chart. It's only purpose is to highlight the beginning of the round.
Cuffealge
For the RG
For the LG

Start at marker A rejoin the yarn and pick up\* (see page 2) 4 sts for every5 cuff rowson the palm (ribbed part) and afterwards on the back of the hand side of the glove (cabled part of the band).

This will result in 64 [68, 72] sts total. Work chart 3 (repeat the given 8 stitch-repeat 8 times in one round) working round 1 and 2 a total of 5 times, afterwards working round 3 and 4 a total of 4 times. Bind off loosely Size M: Work chart 3, decrease in the first round 4 sts as follows: work the given 8-stitch-repeat 3 times. On the fourth and fth repeat work: k1tbl, p1, k2tog, p1, k1tbl, p1, k2tog, p1 (thus decreasing 4 sts), then continue with 3 normal repeats as given in the chart. Afterwards finish the pattern repeat by knitting round 2 as charted. Work 5 more repeats of round 1 and 2, then work 5 repeats of round 3 and 4. Bind off loosely. Start at marker B, rejoin the yarn and pick up\* (see page 2) 4 stsforevery5cuff rowson the back of the hand side of the glove (cabled part of the band) and then on the palm side (ribbed part). This will result in 64 [68, 72] sts total. Size L: Work chart 3 (repeat the given 8 stitch-repeat 9 times in one round) working round 1 and 2 a total of 6 times, afterwards working round 3 and 4 a total of 5 times. Bind off loosely.
J-Cords Now you need to pick up sts out of the 2nd and 46th stitch column of the cuff band (meaning the two columns of ktbl-stitches directly next to the line where you picked up the sts for the hand of the glove / cuff edge. Rejoin the yarn and pick up (as described before) one st out of every knit stitch using a 2mm circular needle. Cast on 3 sts using a provisional cast-on and work a 3-stitch I-cord: \*k2, then k2togtbl the last I-cord st with the first picked up st. Transfer the three knitted sts back on the left hand needle. Make sure that you knit the first stitch quite tight so the strand of yarn across the back of the 3 sts won't be sloppy. Continue until all picked up sts are consumed. Graft both ends of the I-cord together. Do this for both sides of the cuff band. The I-Cords must not be too tight or too wide. Try on the glove after having done about 50% to see if it fits comfortable and everything sits smooth. If it's too wide: Use a smaller needle or switch to a pick up ratio of 4:5 (picked up sts: knit stitches on theband). if it's too tight: Use a bigger needle. Weave in all ends. Close any holes if necessary while wearing the glove.
Chart 2: Thumb gusset and hand - RG - size S
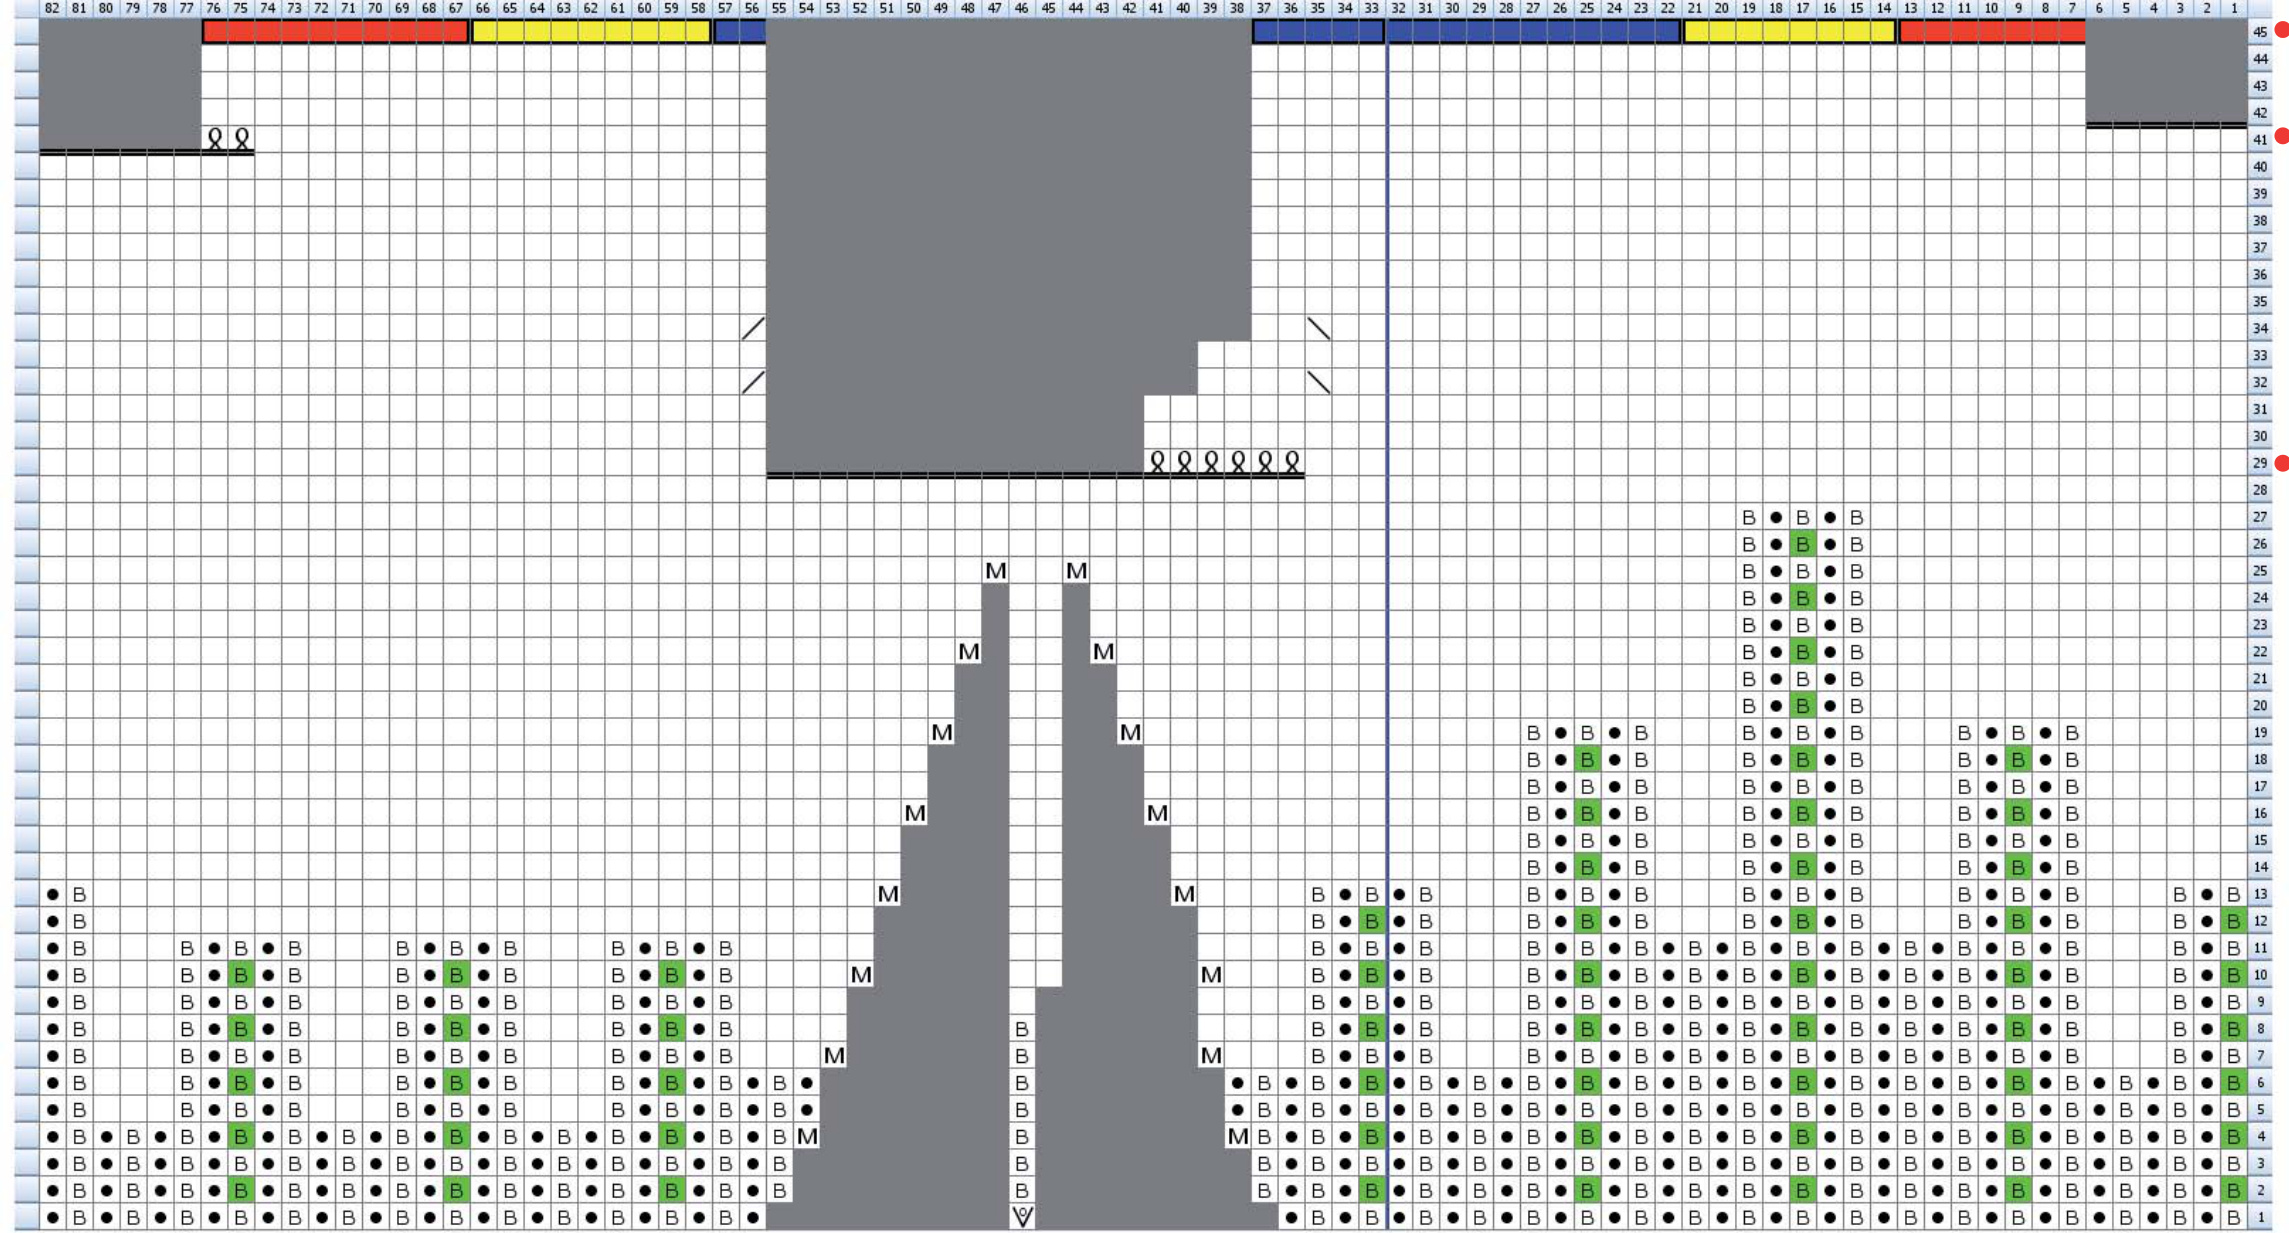


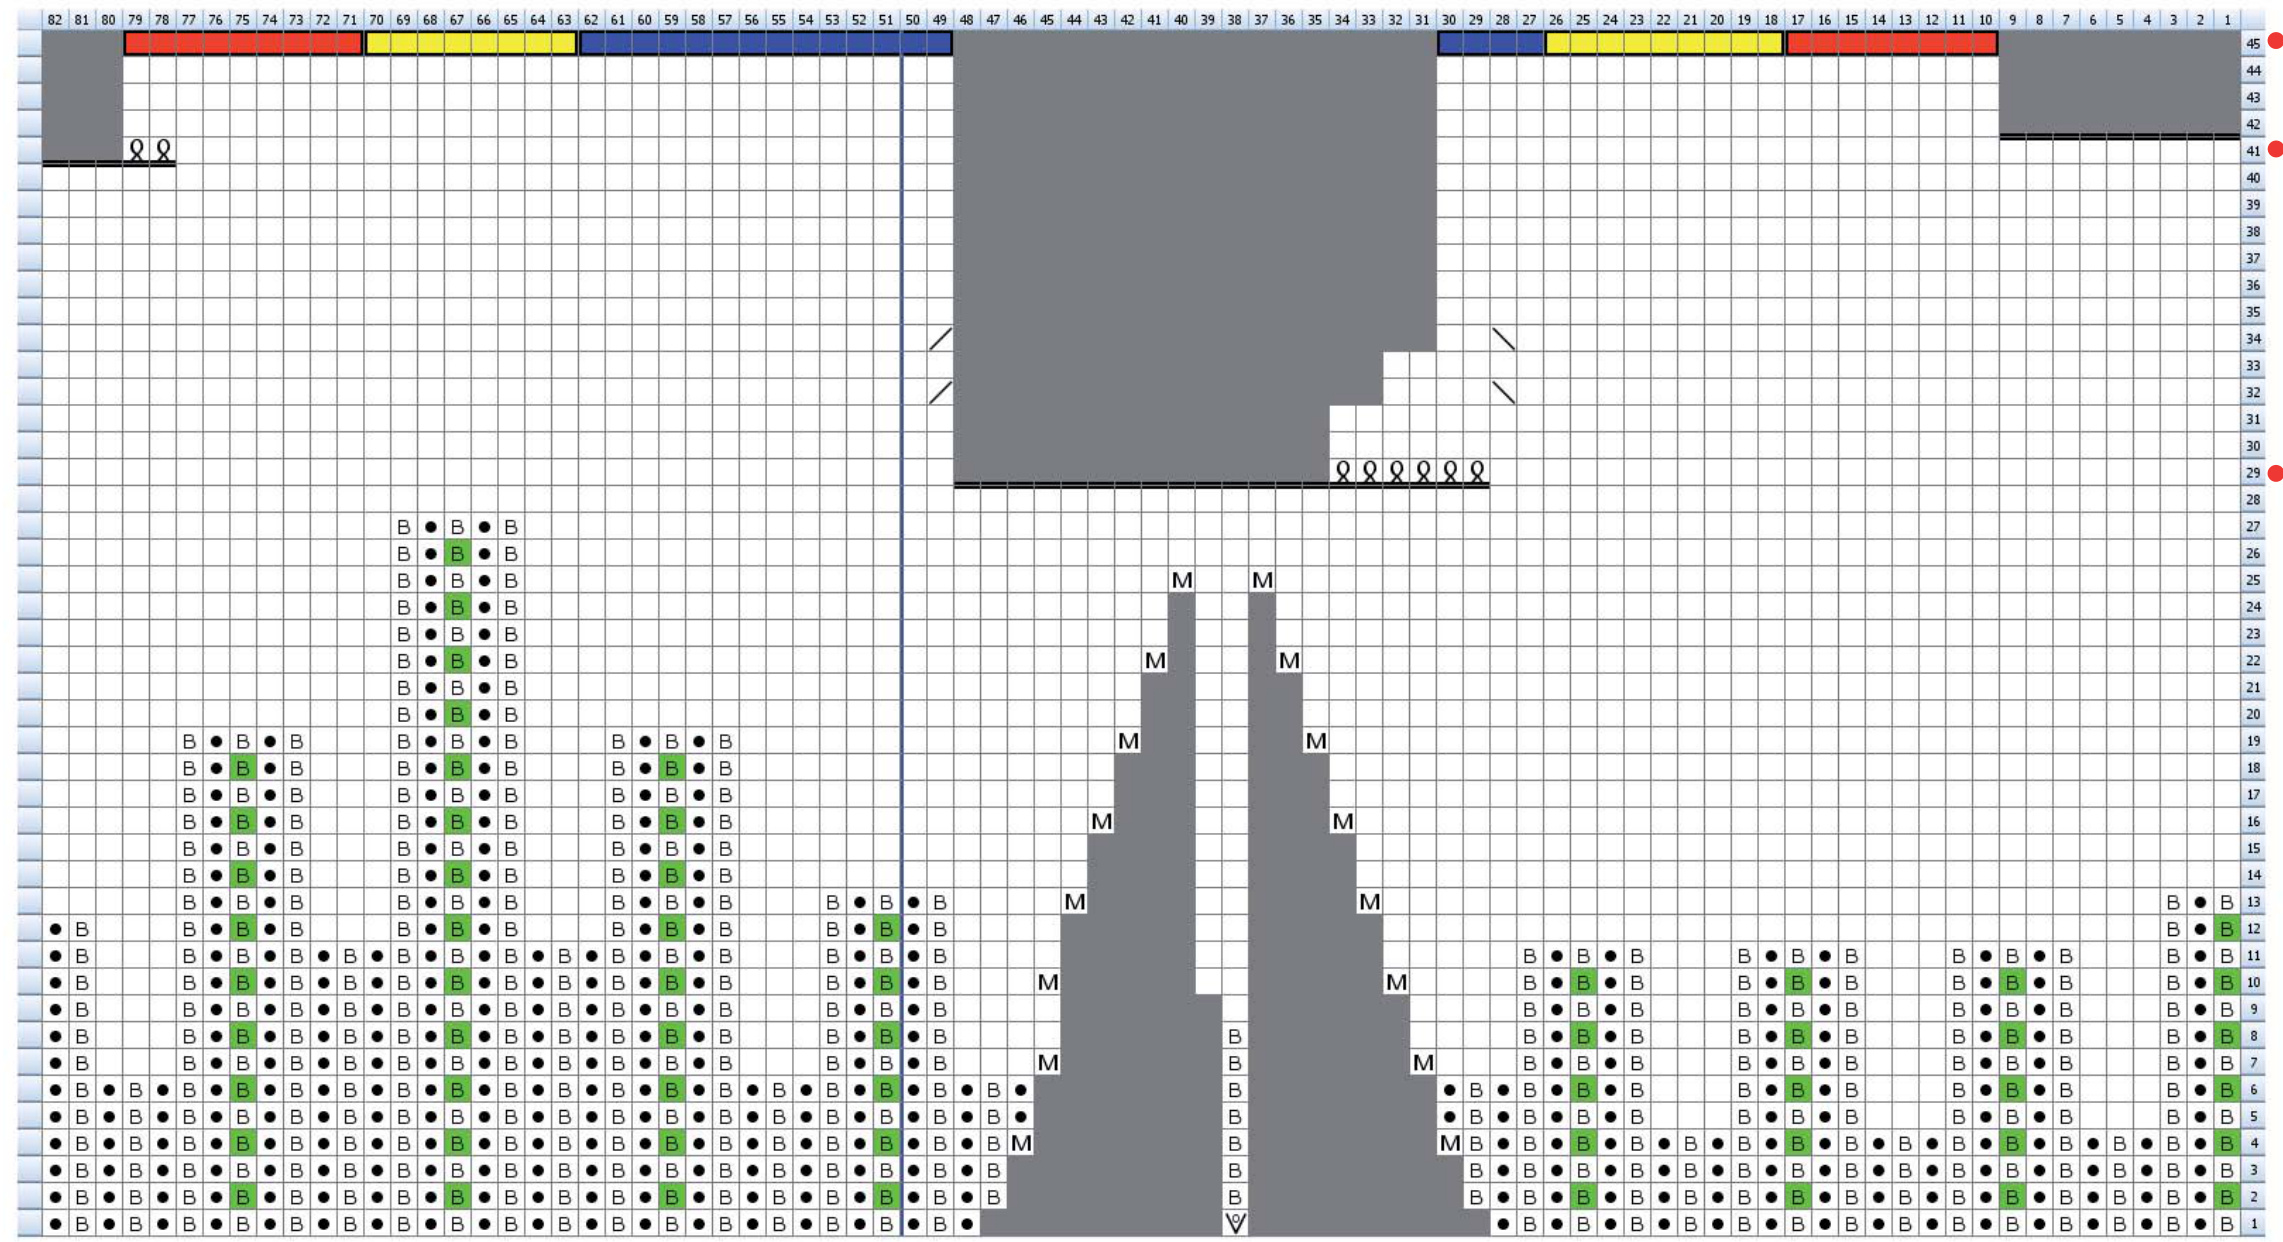
CreatedinKnitVisualizer(www.knitfoundry.om) Round9:nthisrod,thstsfrthethmgueeedtbpuldWrstsashwinthchart, thntransfststpiefwasteycatstsusing thebackwad method, work the remaining sts as charted.
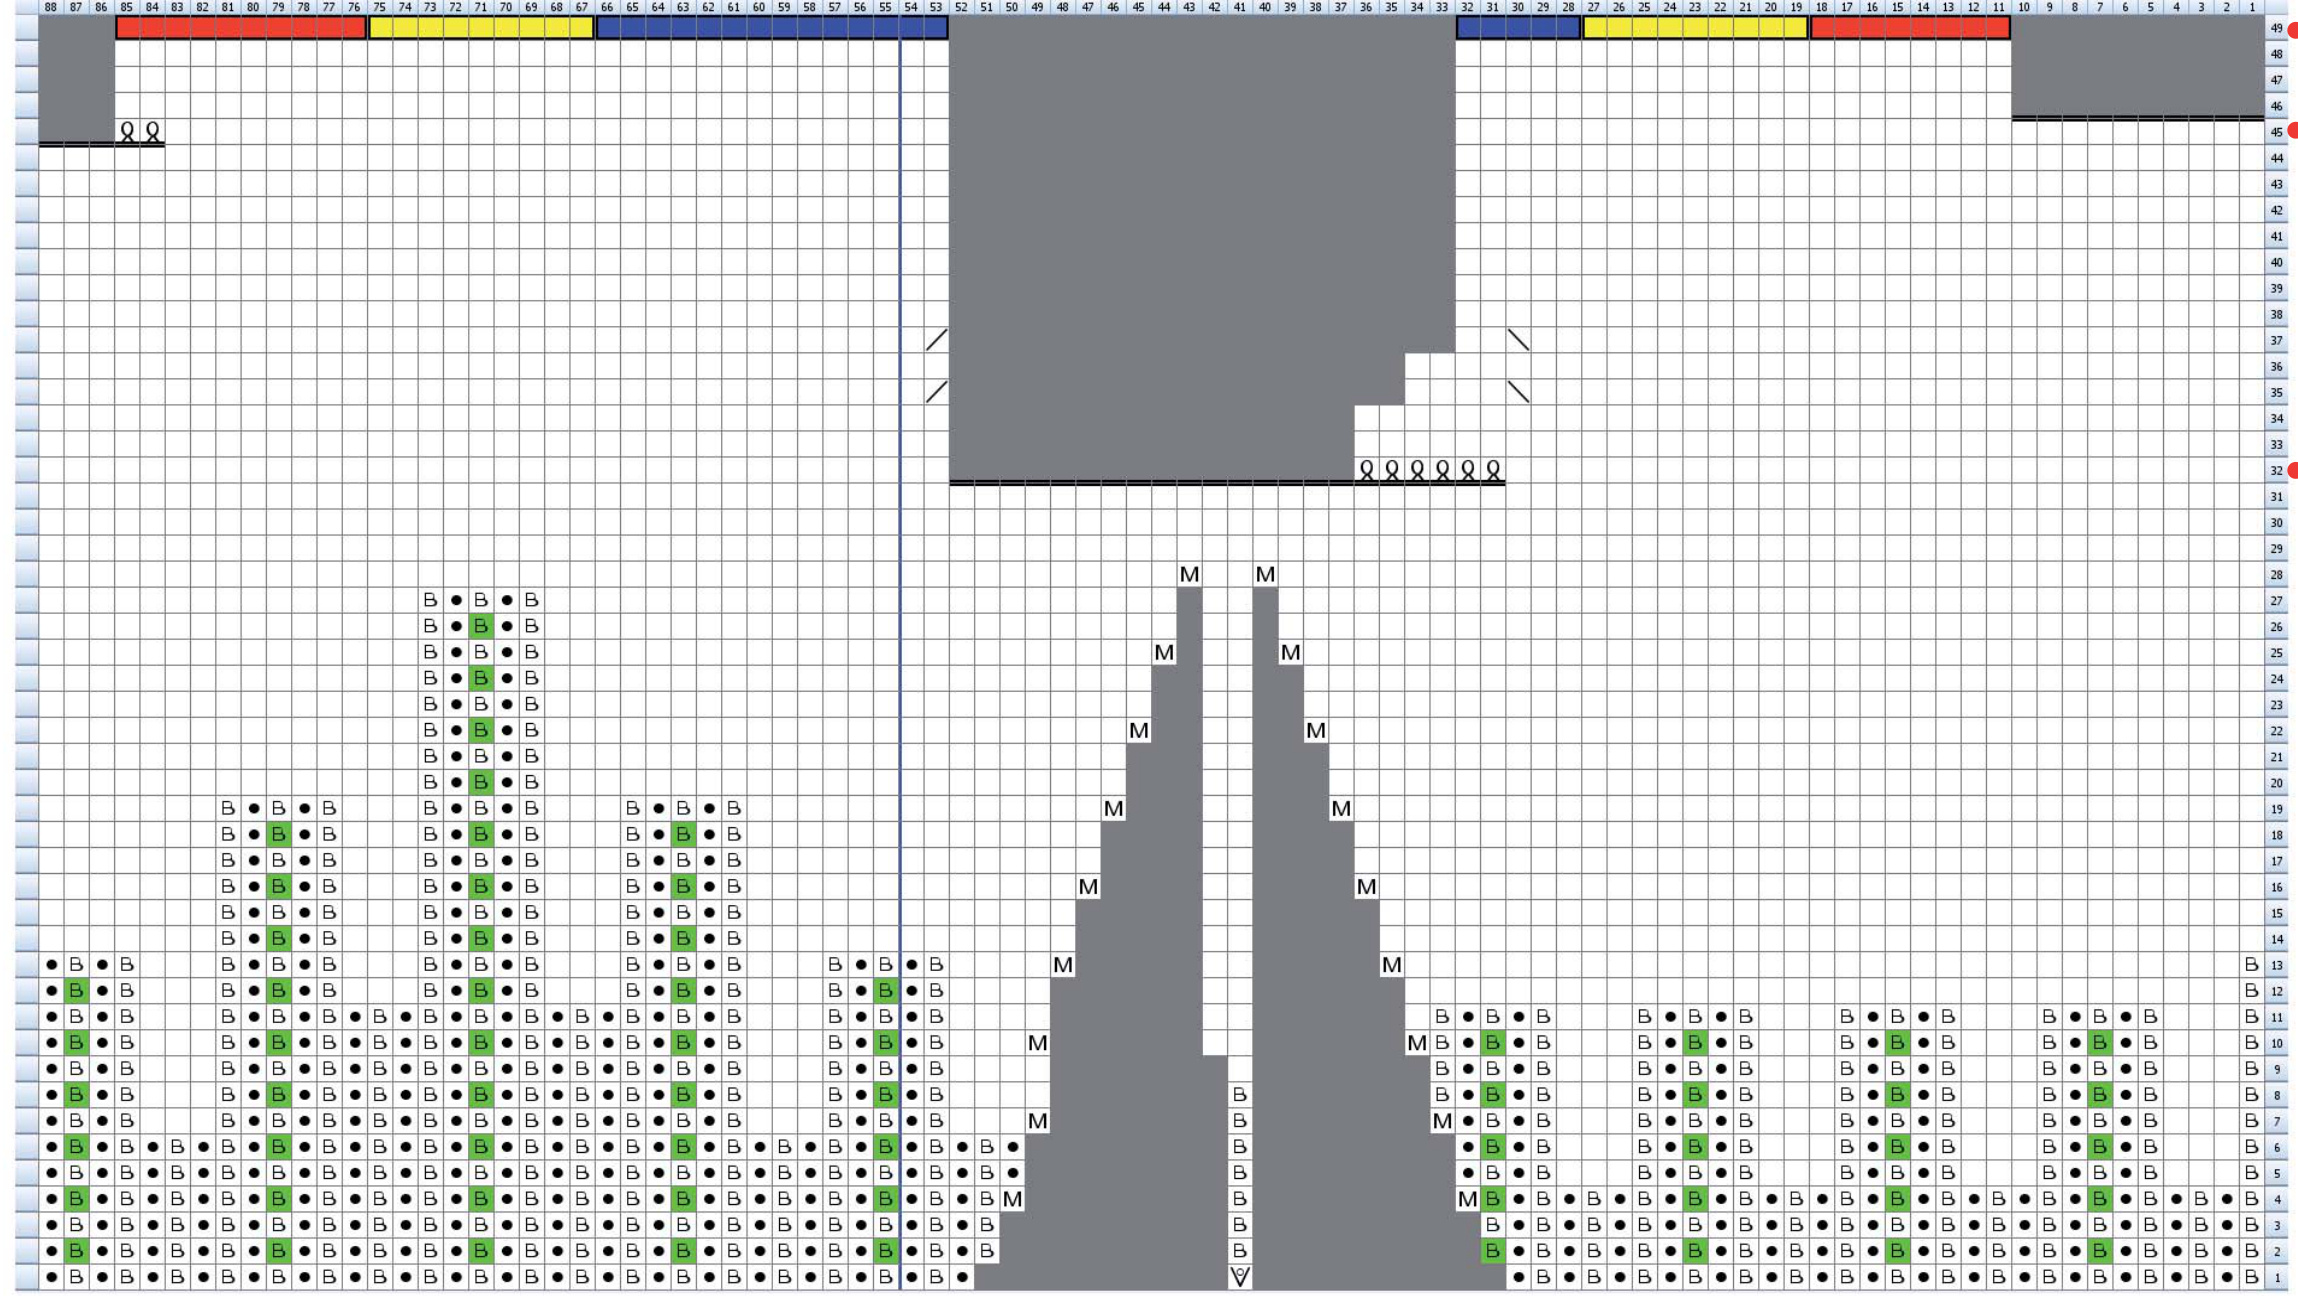
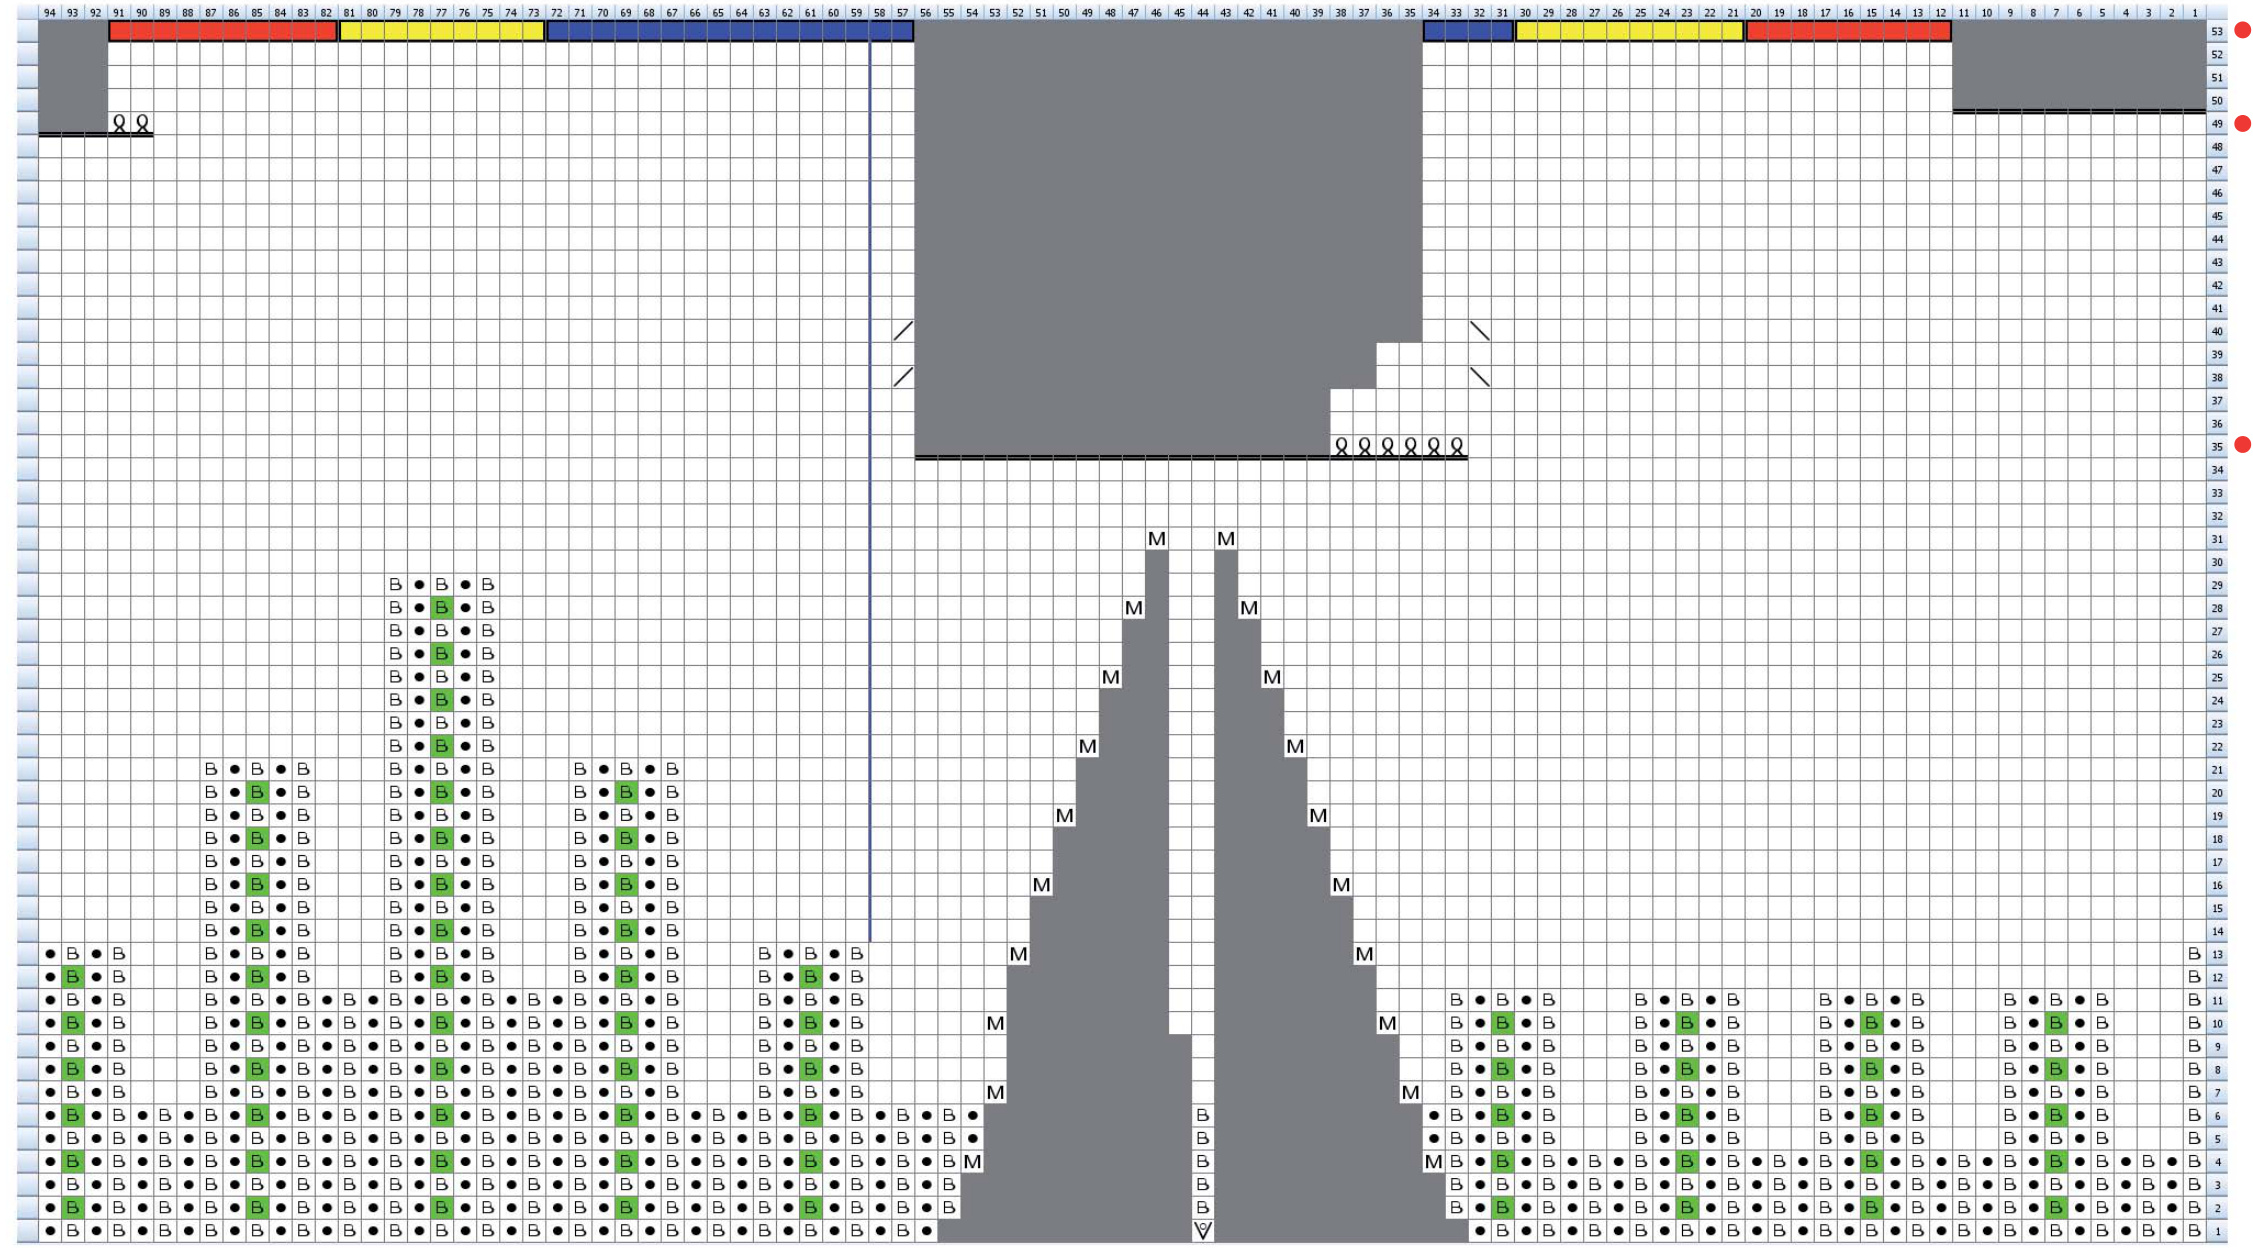
Round35:thisu,tstsforthethut edttlWrtsahwinthchat,thetraf ststpifastaatstuin thackwadl method, work the remaining sts as charted.


