$\mathbf{100\%}$ organic sweater - $50\%$ certified organic wool & $50\%$ certified organic cotton)
Created by Patty Thomas of Daisy Yarns of San Francisco for individual use (not to be copied or published without permission, www.daisyyarns.com),2009. Asimple understated cardigan that works wellfor any age. Generous sizing and deep armholes allow this cardiganto be worn on top of other garments or alone. Level: Intermediate.
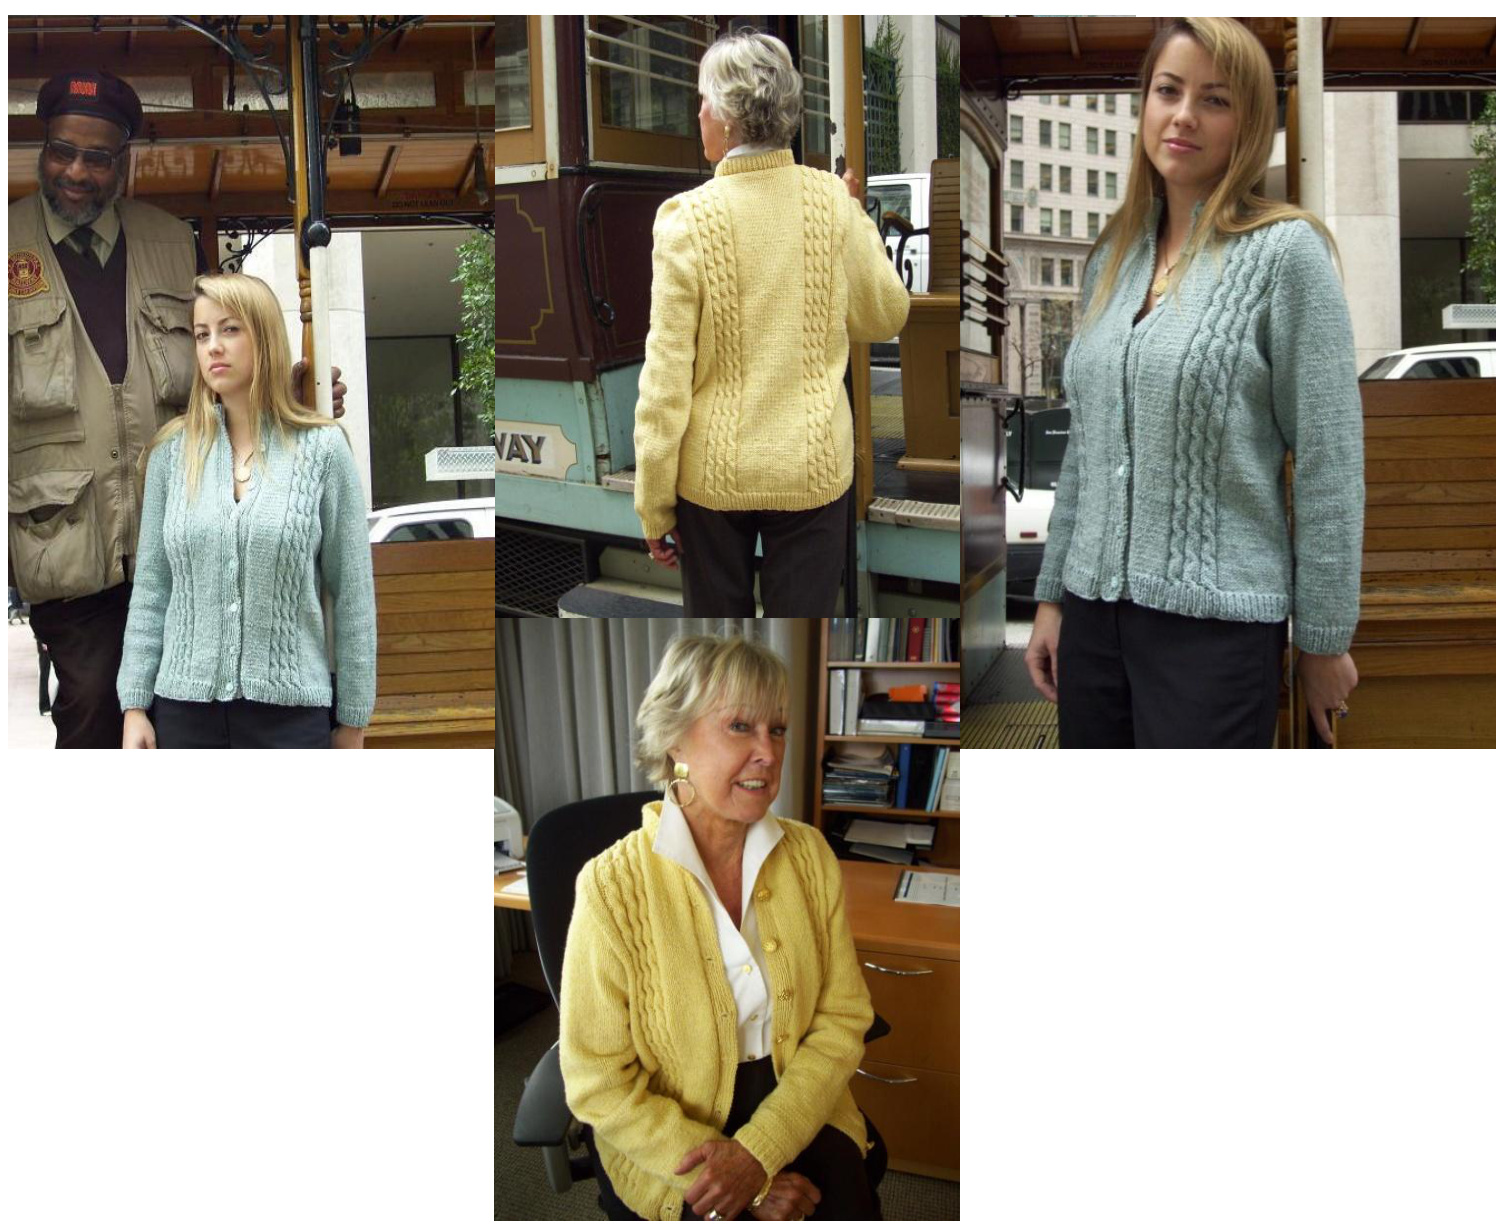
Sizes: Size: XS fts 2bust (S fis 3 bust, M fts 36 bust, Lfts 38bust, XL fits 40 bust Model wearin OWol Organie Balance Opal (blue) is XS size. Model wearing O-Wool Organic Balance Butterstone (yellow) is M size. The finished length is 21 1/2 (25, 26, 27,28). The "finished" width is 40" (44" 50" 55" 59").
MATERIALS:
10 (11, 12, 13, 14) hanks of yarn in the O-Wool Organic Balance line, which is $50\%$ certified organic wool/ $50\%$ certified organic cotton. Each hank is 50 grams and 130 yards. Needles Size 3 Straight and Size 6 Circular $-24^{\prime\prime}$ ,Yarn Needle, Stitch Counter, Stitch Markers, Cable Hook, 8 Buttons (l always purchase them after I have knitted the sweater as the gauge can effect the button size. Always remember to buy one extra button!), T-Pins for finishing/sewing process. GAUGE: 20 stitches $=4$ inches and 30 stitches $=4$ inches for cabled pattern
ABBREVIATIONS:
$\mathsf{K}\mathbf{1}=\mathsf{K}\mathsf{n}\mathsf{i}\mathbf{t}\,\mathsf{1}$ K2 tog $=$ Knit 2 stitches together as 1 stitch Stockinette $=$ Knit right side/Purl wrong side $\mathsf{P1}=\mathsf{P u r l\ 1}$ P2 tog $=$ Purl 2 stitches together as 1 stitch (M1F) Make 1 stitch $=$ Insert LEFT needle coming in from Front side and lift loop between the two stitches (one on the right needle and one on the left needle). Knit through the back of that stitch. (M1B) Make1 stitch $=$ Insert LEFT needle coming in from Back side and lift loop between the two stitches (one on the right needle and one on the left needle). Knit through the front loop of that stitch. (K Th bl) Knit through Back Loop $=$ Knit through the back of the stitch loop, rather than going up on the front of the stitch. It causes a slight twist that makes the piece look smoother, where appropriately used. SSK - Slip 2 stitches knitwise “individually" to the right needle and insert Left needle in front of both stitches and knit them together as 1 stitch. SSP - Slip 2 stitches purlwise “individually' to the right needle and insert remaining needle on Right needle of these 2 stitches and purl them together as 1 stitch). (BO)Bind Off $=$ Start with two stitches on the right needle and slip the right stitch over the left stitch. Knit next stitch and repeat. (PU) Pick Up Stitches $=$ Using your knitting needle on the RIGHT side,pick upstitchesjust one stitch under the raw edge. (CB4F) Cable 4FRONT $=$ Put two stitches on cable needle and hold in front. Knit the next two stitches as normal, then knit the two stitches from the cable needle over to the RIGHT needle. Thereby creating a twist that is slightly bunchy for the first two rows until the next cable is knitted. This cable is repeated every 8 rows.
B. BACK Body of Sweater using Size 6 Needles:
It's highly recommended to use a stitch counter at this point. Row 1 (Right Side): Knit 20 (24, 30, 38, 44), P2, Cable 4 Front, P2, Cable 4 Front, P2, Cable 4 Front, P2, Knit 24 (28, 28, 24, 24), P2, Cable 4 Front, P2, Cable 4 Front, P2, Cable 4 Front, P2, Knit 20 (24, 30, 38, 44) Row 2 (Wrong Side): Purl 20 (24, 30, 38, 44), K2, P4, K2, P4, K2, P4, K2, Purl 24 (28, 28, 24, 24), K2, P4, K2, P4, K2, P4, K2, Purl 20 (24, 30, 38, 44) Row 3: Knit 20 (24, 30, 38, 44), P2, K4, P2, K4, P2, K4, P2, Knit 24 (28, 28, 24, 24), P2, K4, P2, K4, P2, K4, P2, Knit 20 (24, 30,38, 44) Row 4: Purl 20 (24, 30, 38, 44), K2, P4, K2, P4, K2, P4, K2, Purl 24 (28, 28, 24, 24), K2, P4, K2, P4, K2, P4, K2, Purl (24, 30, 38, 44) Row 5: Knit 20 (24, 30, 38, 44), P2, K4, P2, K4, P2, K4, P2, Knit 24 (28, 28, 24, 24), P2, K4, P2, K4, P2, K4, P2, Knit 20 (24, 30, 38, 44) Row 6: Purl 20 (24, 30, 38, 44), K2, P4, K2, P4, K2, P4, K2, Purl 24 (28, 28, 24, 24), K2, P4, K2, P4, K2, P4, K2, Purl 20 (24, 30, 38, 44) Row 7: Knit 20 (24, 30, 38, 44), P2, K4, P2, K4, P2,K4, P2, Knit 24 (28, 28, 24, 24), P2, K4, P2, K4, P2, K4, P2, Knit 20 (24, 30, 38, 44) Row 8: Purl 20 (24, 30, 38, 44), K2, P4, K2, P4, K2, P4, K2, Purl 24 (28, 28, 24, 24), K2, P4, K2, P4, K2, P4, K2, Purl 20 (24, 30,38, 44) Repeat Rows 1-8 for pattern until piece is $14^{\prime\prime}\left(14^{\prime\prime},\,14\,\mathcal{V}_{2}^{\prime\prime},\,15^{\prime\prime},\,15\,\mathcal{V}_{2}^{\prime\prime}\right)$ from bottom of cast on row. a. Start Shaping the Armhole by binding off stitches using the detailed instructions: i. Start binding off 3 stitches at the beginning of EACH row 4 times while working in pattern; IN PATTERN $=$ i. Right Sides: Knit all except for the Cabled Section follow same pattern you have been working. ii. Wrong Sides: Purl all except for the Knit Stitches in the Cabled Section). i. Then start binding off 2 stitches at the beginning of EACH row 6 (8, 8, 10, 12) times while working in pattern. ili. Right Side ONLY work next rows of decreases by: K1, K2 tog till the last 3 stitches of the row then SSK, K1. Repeat this on the Right side of the sweater body 6 (6, 10, 13, 16) times and working in pattern. You should have 68 (76, 80, 82, 84) stitches remaining on your needle. Continue knitting in pattern until the armhole is a total of $7\%$ (11, $11\%$ ,12, 12 %) inches. The total length from the bottom cast on line to the START of the neck bind off is: $21\,\%$ (25, 26, 27, 28) inches. iv. Start Neck shaping: i. WRONG side bind off FIRST 21 (25, 25, 27, 27) stitches and knit the rest of the row in pattern. i. RIGHT side bind off FIRST 21 (25, 25, 27, 27) stitches and knit the remaining stitches in pattern. ii. WRONG side work in pattern. iv. RIGHT side bind off remaining stitches in pattern. Note: You need to understand the FRONT Right panelis as if you had the sweater on you and itis YOUR right side. This will save to grief later if you understand this correctly. C. Sweater FRONT RIGHT Panel Cast on: Cast on with Size 3 Needles 54 (60, 66, 72, 78) stitches. Start Ribbing Pattern for $1\%$ inchesby: a. Row A: Knit 1, Purl 1 to the end of the row. b. Row B: Purl 1, Knit 1 to the end of the row. i. After ribbing reaches 1% inches to step c. below. C. Switch to Size 6 Needles i. Knit entire row. ii. Purl entire row. D. Sweater FRONT RIGHT Panel Body: Remember you are still knitting with Size 6 Needles. Please put a stitch counter on your needle and turn to 1 and after completion of row, move to next number. A stitch counter ensures that all of your cables are equal in size. Row 1 (Right Side): Knit 14 (16, 16, 14, 14), cable pattern (P2, Cable 4 Front, P2, Cable 4 Front, P2, Cable 4 Front, P2), Knit 20 (24, 30, 38, 44) $=54$ (60, 66, 72, 78) stitches Row 2 (Wrong Side): Purl 20 (24, 30, 38, 44), K2, P4, K2, P4, K2, P4, K2, Purl 14 (16, 16, 14, 14) Row 3: Knit 14 (16, 16, 14, 14), P2, K4, P2, K4, P2, K4, P2, Knit 20 (24, 30, 38, 44) Row 4: Purl 20 (24, 30, 38, 44), K2, P4, K2, P4, K2, P4, K2, Purl 14 (16, 16, 14, 14) Row 5: Knit 14 (16, 16, 14, 14), P2, K4, P2, K4, P2, K4, P2, Knit 20 (24, 30, 38, 44) Row 6: Purl 20 (24, 30, 38, 44),K2, P4, K2, P4, K2, P4, K2, Purl 14 (16, 16, 14, 14) Row 7: Knit 14 (16, 16, 14, 14), P2, K4, P2,K4, P2, K4, P2, Knit 20 (24, 30, 38, 44) Row 8: Purl 20 (24, 30, 38, 44), K2, P4, K2, P4, K2, P4, K2, Purl 14 (16, 16, 14, 14) Repeat Rows 1-8 for pattern untilpiece is $14^{\prime\prime}\left(14^{\prime\prime},\,14\,\mathcal{V}_{2}^{\prime\prime},\,15^{\prime\prime},\,15\,\mathcal{V}_{2}^{\prime\prime}\right)$ from bottom of cable cast on. E. Sweater FRONT RIGHT ARMHOLE binding off: Start Shaping the Armhole by binding offstitches using the detailed instructions: a. WRONG side ONLY: start off binding off 3 stitches at the BEGINNING of armhole side rows 3 (3, 4, 5, 6) times while still knitting in pattern. i. RIGHT side continue knitting in pattern (Do not bind off on the RIGHT side at this point until the above binding off has been completed to the correct number of times). i. After the last Wrong side binding off go to b. below. b. RIGHT side knit in pattern until the LAST 6 stitches SSK, K1, SSK, K1 for 3 (3, 4, 5, 6) times while following pattern. i. WRONG side continue knitting in pattern. (Do not bind off on the WRONG at this point until the binding off has been completed to the correct number of times). C. WRONG side bind off 2 stitches at the beginning of the WRONG side for 1 (2, 2, 2, 2) times. i. RIGHT side continue knitting in pattern. (do not bind off on the RIGHT side at this point). Continue working in pattern. d.RIGHT side start decreasing 1 (1, 0, 0, 1)times using the following for the LAST 3 stitches of the row, SSK, K1. VWKUING siae continue knitting in pattern. You snouia nave 56 (4U, 42, 45, 44) stitcnes remaining on your needle. Continue knitting in pattern and START THE NECK SHAPING WHEN THE PIECE IS 19 % (23, 24, 25, 26) INCHES FROM THE BOTTOM CAST ON LINE. Start Neck Line: 0RIGHT sides only bind off at the BEGINNING 2 stitches \*for 4 times continue working in pattern $=8$ stitches. 0 WRONG side continue working in pattern (NO Binding off of this side/row). O RIGHT sides only bind off at BEGINNING 3 stitches continue working in pattern. 0 WRONG side continue working in pattern (NO Binding off of this side/row). O Bind off all remaining stitches on your needle on the RIGHT SIDE. e. Your sweater back should have a total length from the bottom cast on line to the bind off line of: $21\,\%$ (25, 26, 27, 28) inches. At this point, Ilike to lay both the back piece and the Front side together. It's easier to fix anything at this point rather than later! F. Sweater FRONT LEFT Panel Cast on and bottom ribbing: Cast on with Size 3 Needles 54 (60, 66, 72, 78) a. Row A: Knit 1, Purl 1 to the end of the row b. Row B: Purl 1, Knit 1 to the end of the row i. After ribbing reaches 1% inches to step c. below. c. Switch to Size 6 Needles Knit entire row d. Purl entire row. G. Sweater FRONT LEFT Panel Body: Remember you are stillknitting with Size 6 Needles. Please put a stitch counter on your needle and turn to 1 and after completion of row, move to next number. A stitch counter ensures that all of your cables are equal in size. Row 1 (Right Side): Knit 20 (24, 30, 38, 44), cable pattern (P2, Cable 4 Front, P2, Cable 4 Front, P2, Cable 4 Front, P2), Knit 14 (16, 16, 14, 14) $=54$ (60, 66, 72, 78) stitches Row 2 (Wrong Side): Purl 14 (16, 16, 14, 14), K2, P4, K2, P4, K2, P4, K2, Purl 20 (24, 30, 38, 44) Row 3: Knit 20 (24, 30,38,44), P2, K4, P2,K4, P2, K4, P2, Knit 14 (16, 16, 14, 14) Row 4: Purl 14 (16, 16, 14, 14), K2, P4, K2, P4,K2, P4, K2, Purl 20 (24, 30, 38, 44) Row 5: Knit 20 (24, 30,38,44), P2, K4, P2, K4, P2, K4, P2, Knit 14 (16, 16, 14, 14) Row 6: Purl 14 (16, 16, 14, 14), K2, P4, K2, P4, K2, P4, K2, Purl 20 (24, 30, 38, 44) Row 7: Knit 20 (24, 30,38,44), P2, K4, P2,K4, P2, K4, P2, Knit 14 (16, 16, 14, 14) Row 8: Purl 14 (16, 16, 14, 14), K2, P4, K2, P4, K2, P4, K2, Purl 20 (24, 30, 38, 44) Repeat Rows 1-8 for pattern until piece is $14^{\prime\prime}\left(14^{\prime\prime},\,14\,\mathcal{V}_{2}^{\prime\prime},\,15^{\prime\prime},\,15\,\mathcal{V}_{2}^{\prime\prime}\right)$ from bottom of cable cast on.
Sweater FRONT LEFT ARMHOLE binding off:
H. Start Shaping the Armhole by binding off stitches using the detailed instructions: IGHI side UNLY: at the beginning start binding oft 3 stitches 3 (3, 4, 5, 6) times. a. WRONG side ONLY: continue in pattern (Do not bind off on the WRONG side at this point until the above binding off has been completed to the correct number of times). b. After the last RIGHT side binding off go to 2. below. 2. RIGHT side ONLY at the beginning start binding off 2 stitches \*for 3 (3, 4, 5, 6) times. a. WRONG side ONLY: continue in pattern (Do not bind off on the WRONG side at this point until the above binding off has been completed to the correct number of times) 3. RIGHT side ONLY: At the beginning, K1, K2 tog, K1, K2 tog for 1 (2, 2, 2, 2) times. a. WRONG side ONLY: (Do not bind off on the WRONG side at this point). 4. WRONG side decrease 1 (1, 0, 0, 1) times using the following guide: LAST3 stitches of the row, SSP, P1. Continue working in pattern. You should have 36 (40, 42, 43, 44) stitches remaining on your needle. a. START THE NECK SHAPING WHEN THE PIECE IS 19 % (23, 24, 25, 26) INCHES FROM THE BOTTOMCASTONLINE.
Start Neck Line:
WRONG side only bind off at BEGINNING 2 stitches for \*for 4 times $=8$ stitches. Continue working in pattern. RIGHT side continue working in pattern (NO Binding off of this side/row). WRONG side only bind off at BEGINNING 3 stitches continue working in pattern. RIGHT side bind off all remaining stitches on your needle. b. Your sweater back should have a total length from the bottom cast on line to the top bind off line of: $21\,\%$ (25, 26, 27, 28) inches. At this point, I like to lay both the back piece and the Front side together. It's easier to fix anything at this point rather than later! 1. SLEEVES (MAKE TWO): a. Sleeve cable cast on with SIZE 3 NEEDLES 48 (50, 50, 50, 50) stitches. b. Work Knit 1, Purl 1 for 1% inches c. RIGHT side switch to SIZE 6 NEEDLES and Knit entire row d. WRONG side (size 6 needles for the rest of the sleeve) Purl entire row. e. RIGHT side: Allsizes K1, Make 1 stitch (M1F), then knit to the LAST stitch & M1B, K1 $\mathbf{\alpha}=\mathbf{2}$ extra stitches. DefinitionNote: (M1F) Make1 stitch $=$ Insert LEFT needle coming in from Front side and lift loop between the two stitches (one on the right needle and one on the left needle). Knit through the back of that stitch. (M1B) Make 1 stitch $=$ Insert LEFT needle coming in from Back side and lift loop between the two stitches (one on the right needle and one on the left needle). Knit through the front loop of that stitch. IG side: Purl entire row. RIGHT side: All sizes ${\underline{{\mathbb{K}}}}1,$ Make 1 stitch (M1F), then knit to the LAST stitch & M1B, K1 ; i. xs Size only after above increase knit 4 more rows stockinette and move onto instructions in g. below. All other sizes REPEAT ABOVE EVERY $4^{\mathsf{T H}}$ ROW for 0 (2, 5, 8, 17) more times. ii WdONG cidec: Durl antire row for all cate ahove g. RIGHT side: REPEAT after every $8^{t h}$ row K1, Make 1 stitch (M1F), then knit to the LAST stitch & M1B, K1 for for 3 times repeat $=$ total 6 extra stitches. i. WRONG sides: Purl entire row for all sets above. h. RIGHT side: K1, Make 1 stitch (M1F),then knit to the last stitch and M1B, K1 for every 2nd row for 9 (9, 7, 5, 4) times. i. WRONG sides: Purl entire row for all sets above. i. There should be 76 (82, 84, 86, 92) stitches on your needle. j. Continue knitting until piece measures $15\%$ (16, 16, $16\%$ , 16%) inches FROM the cast on line.
k. SLEEVE CAP SHAPING:
i. RIGHT side start binding off3 stitches at the beginning of the row. i. WRONG side start binding off 3 stitches at the beginning of the row. ii. RIGHT side start binding off 2 stitches at the beginning of the row. iv. WRONG side start binding off 2 stitches at the beginning of the row. v. ALL rows bind off 1 (1, 1, 1, 1) stitches Beginning of EVERY row for 18 (18, 18, 16, 16) times. vi. Knit in stockinette pattern until armhole measures 4 $(6\,\%,\,6\,\%\,,\,6\%,\,6\%)$ inches. vi. RIGHT side ONLY bind off 1 stitch at the beginning and for the last 3 stitches; SSK, K1 for 15 (17, 18, 20, 22) times. i. WRONG sides: Purl entire row for all sets above. vili. Continue working in stockinette until armhole measures $7\%$ (11, 11%, 12, 12 %) inches, depending on your gauge it should be exactly there or near to it. ix. Bind off remaining stitches 18 (20, 20, 20, 22). x. Make sure both sleeve match piece each as close as possible!
J. ASSEMBLE PIECES ONLY AT THIS POINT:
a. Using yarn pins carefully pin the sweater back and front panels together with the RIGHT SIDES touching each other and the WRONG SIDES on the outside as you pin and sew together. Use a yarn needle and your same yarn carefully and slowly stitch the pieces together 2 stitches under the raw edge. Make sure you DO NOT stitch over the top of your beautiful sweater as this will be uncomfortable to wear later. b. Sew sleeves using the same above method from the cuff to the beginning of the armhole. Next, open up armhole and slide into position and carefully easy into the armhole. Make sure you first match the armhole seams of both pieces. K. NECK LINE FACING: Pick up on the RIGHT NECKLINE side 68 (76, 80, 82, 84) stitches using SIZE 6 CIRCULAR NEEDLES. a. Row 1: Knit 1, Purl 1 to end. b. Row 2: Purl 1, Knit 1 to end. C. Repeat above ribbing for a total of 7 rows. d. Row 8: Bind off in pattern. L. SWEATER FRONT FACINGS SIZE 3 NEEDLES (MAKE one for right FRONT buttonhole side and one for left FRONT panel) Note: The right FRONT side is as if you had the sweater on you and it's on your right side! a. Knit two separate facing strips: b. Knit first the facing strip for the left FRONT panel without button holes by: i. Cast on 11 stitches and knit the following 2 rows of RIBBING PATTERN; i. Row 1: Knit 1, Purl 1 to end. il. Row 2: Purl 1, Knit 1 to end. ii. Repeat until the first facing without button holes is 20 (23%, 24%, 25%, 26%) inches. c. Knit the second facing strip for right FRONT with buttonholes by: 1. Row 1: Knit 1, Purl 1 to end. ii. Row 2: Purl 1, Knit 1 to end, Repeat until facing is $1^{\prime\prime}$ in length from the bottom cast on line start your first buttonhole. a. BUTTONHOLE ROWS: ii. The buttonholes are 4 stitches wide to make a 3-stitch buttonhole. I always knit these and the stitch before & after the buttonhole tightly and they come out super clean! iv. K1, P1, K1, P1, bring yarn to front; slip 1 purl-wise, bring yarn to back and slip 1 purl-wise, pass first slipped stitch over second. (repeat this 2 more times, passing over 3 stitches total, for a 3-stitch buttonhole). Place last stitch back on left needle. Turn work. V. Cast on 4 stitches (for the 3 stitches you bound off, plus 1) using the cable cast on method. vi. Turn work (so the Right Side is facing). Bring yarn to back; slip first stitch of left needle onto right needle and pass last CO st over it. Work to end of the row, then to next buttonhole detailed below. BUTTON HOLE 2 FROM THE BOTTOM: 3 (3%, 4, 4%4, 4%) inches BUTTON HOLE 3 FROM THE BOTTOM: 5% (6%, 7%, 7%, 8) inches BUTTON HOLE 4 FROM THE BOTTOM: 8% (10, 11%, 11%, 11%) inches BUTTON HOLE 5 FROM THE BOTTOM: 11% (13, 14%, 15, 15%) inches BUTTON HOLE 6 FROM THE BOTTOM: 14% (16%, 17%, 18%, 19) inches BUTTON HOLE 7 FROM THE BOTTOM: 17 (20, 20%, 21%, 22%) inches BUTTON HOLE 8 FROM THE BOTTOM: 19% (23, 24, 25, 26) inches vii. Knit button hole facing strip for $\%$ extra. (The length of the front panels is less than the back of the sweater due to the collar being slightly lower in the front for a good fit.) Bind off in pattern. d. Place one facing on the sweater RIGHT side and using T-pins to hold pieces together. Make sure facing strip is evenly distributed before sewing onto sweater RIGHT side! Using a yarn needle and matching yarn and stitch just under the $2^{\mathsf{n d}}$ stitch from the raw edge. Do Not stitch over the top of the seam, but sideways as seamstress' do. Flip facing after sewing. Next, use a low level steam iron and a clean dish towel placed directly over the RIGHT side of the sweater facing, press gently. e. I prefer to buy buttons after I have knitted the garment to ensure a good fit.


