Drip Drip Drop Socks
Clue #4..... drop!
Finally, the last clue! Just like rain drops collecting and becoming part of little streams, the trails of the leg cables are going to join and cross and wind down the feet of these socks. Perfect for puddle jumping-- just make sure you've got your galoshes on! Skill Level: Intermediate. This involves some serious cable work, and a slightly complicated pattern. Materials: Approx. 400 yds (365m) of sock yarn. I used a skein of Dream in Color's Everlast 8-ply Sock yarn, and it's gorgeous. Colorway: Shy If knitters would prefer to do colorwork cabling, I'm estimating 250-300 yds of Main color &100-150 yds of Contrast color. Needles: US1 or 2.25mm sock needles. Note that the pattern will eventually be written with DPNs in mind, but Magic Loop users can easily adapt the pattern with stitch markers. Sizing: Small (Large) sock creates a circumference of 8(9) inches or 20(22.5) cm. However, because a lot of the leg is ribbing, the circumference of this sock is really forgiving. Leg length and foot are adjustable to fit. Gauge: 8 stitches & 12 rows/rounds to the inch or 2.5cm in stockinett
Abbreviations:
K= knit on the right side, purl on the wrong side P=purl on the right side, knit on the wrong side S= slip one stitch purlwise SSK= slip, slip, knit K2tog= knit two stitches together as one P2tog= purl two stitches together as one P3tog= purl three stitches together as one 3x3 rib= a pattern of ribbing that features 3 knit stitches then 3 purl stitches PM= place a marker (you'll need at least 3) SM= slip the marker \*Cable descriptions and chart symbols are defined in the chart key. (Optional) For Colorwork: As promised, it's time for bobbins and true intarsia cables. Use the MC to pick up the gusset stitches along the heel flap, and work all the sole stitches in the MC. But on the top of the foot, remember to keep the knit stitches in the CC and the purl stitches in the MC.
GUSSET
The gusset returns to working in the round using the heel turn stitches, stitches picked up along either side of the heel flap, and the reserved leg stitches. The pattern will continue along the top of the foot using the Foot Chart. From this point, the pattern is written for DPNs, but knitters who prefer the Magic Loop method can easily continue by marking needle position with stitch markers. Set-up: Using the needle currently holding the heel turn stitches, and working on the right side of the fabric, pick up and knit one stitch in each stitch along the side of the heel flap. This will be Needle 1. Using a second needle (Needle 2), work across the first line of the appropriately sized Foot Chart. Using a third needle (Needle 3), pick up and knit the same number of stitches along the other side of the heel flap and knit 10 of the heel flap stitches on Needle 1. Now, the instep stitches should all be on Needle 2, and the sole stitches should be divided equally between Needles 1 & 3. Gusset Round 1: On Needle 1, knit to the last three stitches, K2tog, K1. On Needle 2, work the next line of the Foot Chart. On Needle 3, K1, SSK, knit to the end. Gusset Round 2: On Needle 1, knit all stitches. On Needle 2, work the next line of the Foot Chart. On Needle 3, knit all stitches. Alternate Gusset Rounds 1&2 until 65(73) stitches remain.
FOOT
The foot of the sock continues the pattern established by the Gusset without further decreases. Foot Round: On Needle 1, knit all stitches. On Needle 2, work the next line of the Foot Chart. On Needle 3, knit all stitches. Continue working the Foot Round until the foot of the sock measures 1.5 inches or 4cm shorter than the desired total foot length'.
TOE
This sock features a standard, stockinette wedge toe. If knitters prefer to continue the pattern into the toe, that's possible, but I found that I preferred the look of plain knitting. Toe Round 1: On Needle 1, knit to the last three stitches, K2tog, K1. On Needle 2, K1, SSK, knit to the last three stitches, K2tog, K1. On Needle 3, K1, SSK, knit to the end of the round. Toe Round 2: Knit all stitches on all needles. Alternate Toe Rounds 1 & 2 until 41 stitches remain, then work only Toe Round 1 (decrease every round) until 21 stitches remain.
FINISHING
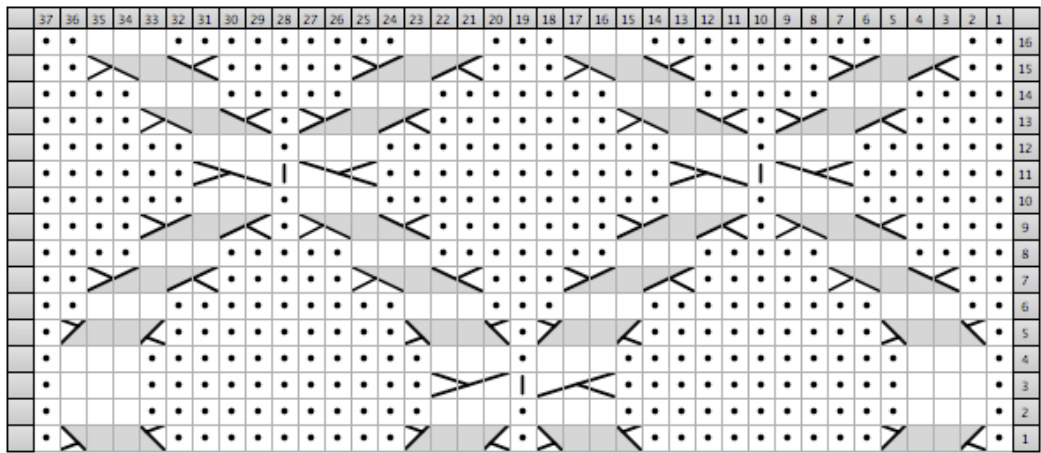
Using Needle 3, knit the 5 stitches remaining on Needle 1. Leaving a long tail, break the yarn, and work the Kitchener Stitch to close the toe. Weave in and trim all ends, and lightly block, if desired. 1 To calculate “desired total foot length" stand on a tape measure (standing gives you a more accurate measurement). This is the size of your foot, but it is NoT the desired foot length because socks are supposed to have a touch of negative ease-- otherwise they bunch up and are gross. So, subtract around a half inch or 1.5cm or so-- this doesn't have to be exact. That'll give your socks the stretch they need. So a person with perfect 8 inch feet would subtract a half-inch for stretch, making “desired total foot length" around 7.5 inches. Then stop an inch and a half short as the pattern directs, so the foot of the sock would measure near 6 inches from the heel. Charts and other important things.. Small Foot Chart
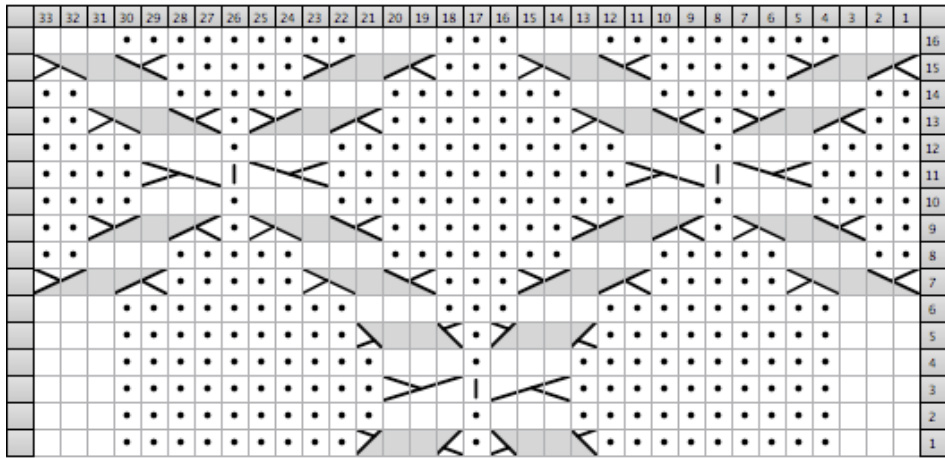

Large Foot Chart