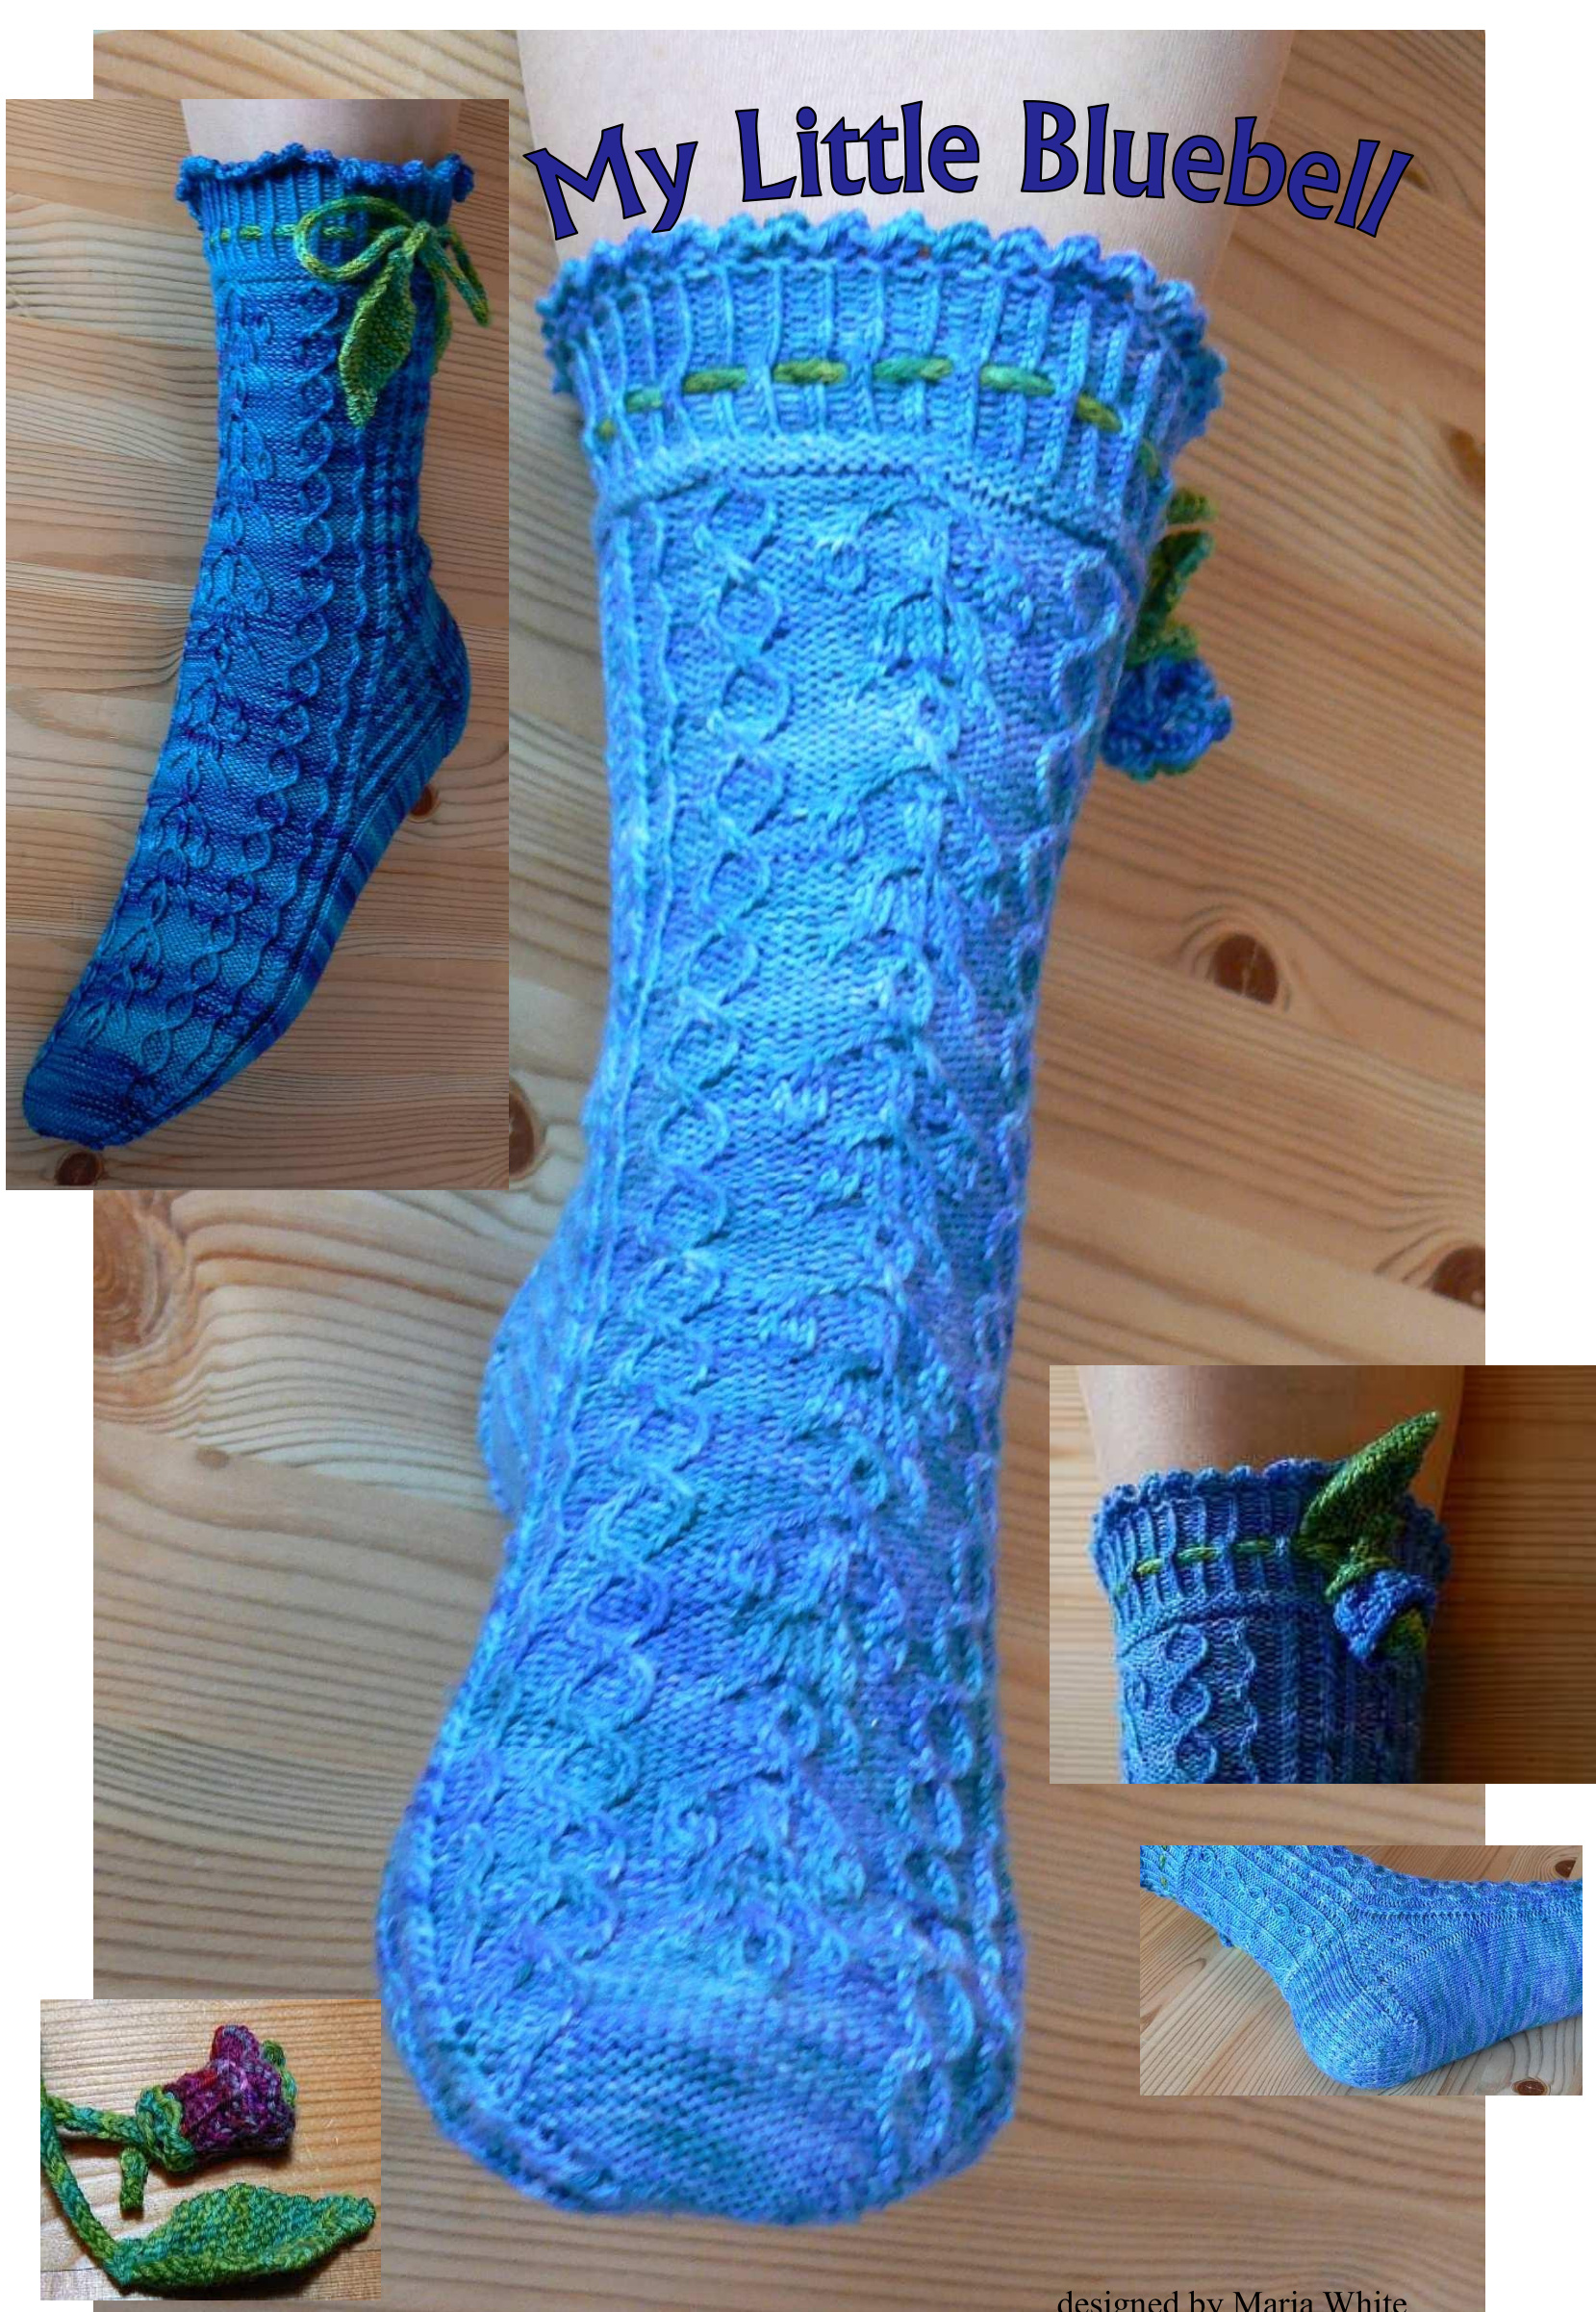
These are top down socks knitted from cuff to toe in a rather fine gauge with lots of patterning and lots of twisted stitches. The stitch patterns are mostly traditional Bavarian and Austrian with adaptations. The pattern is chart based and written for a set of 5 double pointed needles (dpn). For casting on you will need dpns 8" length. You may convert the pattern to magic loop or socks on two circular needles at your discretion.
Size
Women smal/medium ( $\tilde{}$ shoe size 7-9 US, 38-40 German) $\sim8-9$ inches around foot (after instep) and around ankle (above ankle bone) and large ( $\sim$ shoe size 9-11, 40-42 German). Differing numbers for size L will be given in (brackets}. Note: Although the sock pattern is stretchy,if you don't knit for slim ankles or prefer a looser fit, you might consider going up slightly in needle size for the leg part of the sock. Please try on your sock from time to time as you progress to ensure you are achieving the fit you prefer.
Yarn requirements:
·1 skein Wollmeise superwash $150\,\mathfrak{g}$ $(350\mathsf{m}/100\mathsf{g}$ or 574 yards/150 g) or similar 4ply sock yarn Remnant in contrasting color (green is recommended) for embellishment (flower stem and leaf)
Gauge:
Obtained over stockinette stitch in the round: 10 sts and 13 rows $=$ 1 inch x 1 inch
Needle size:
0 US (2mm metric) 8 inches (20 cm), or needle size to obtain gauge
Notions:
Stitch markers, cable needle (optional), darning needle
Explanatory remarks:
Important: Please read each entire section of the sock pattern before you start knitting. Pattern stitches between \*asterisks\* are to be repeated. Charts and legend are to be found on separate pages.
Cuff and Leg:
The first few rows require a large amount of stitches and may be a bit fiddly for some to knit. Please do not get discouraged by this, as the end result is well worth the small effort and concentration that may be required.
Cast on:
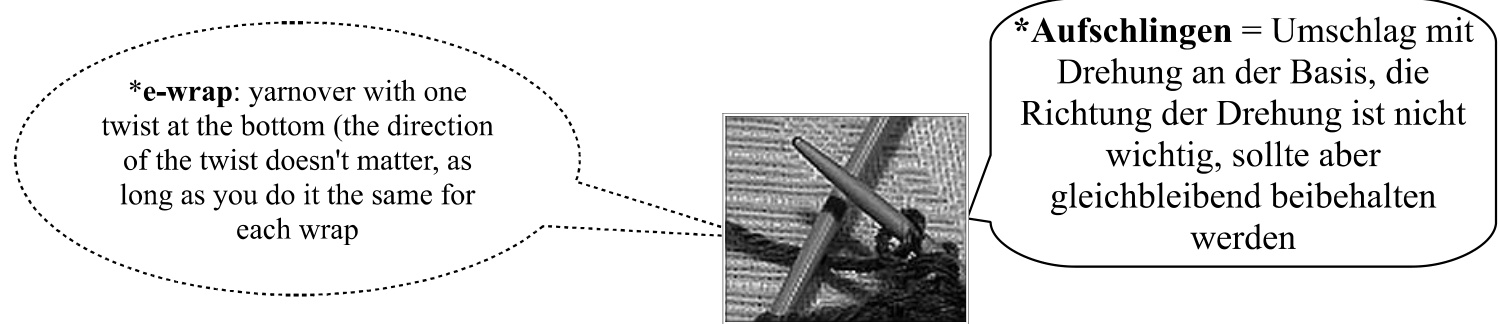
Long tail cast on: 180 {200 sts} stitches -divided evenly over 4 needles, join in the round being careful not to twist the stitches. Round 1: decrease row: \* (k5, pass $4^{\mathrm{th}}$ ,$3^{\mathsf{r d}}$ ,$2^{n d}\,\&\,\,1^{\,\mathrm{st}}$ already knitted stitches over the $5^{\mathrm{th}}$ knitted stitch), ${\mathsf{y o}}^{\star}$ , repeat stitches between \* to end of round being careful not to lose the yo at end of each needle. (180 {200} stitches will be reduced to 72 {[80} sts) Round 2 and 3: \*k2tog; yo\* Round 4 - 13: \*p1, k1 tbl\* Round 14: \*k2tog; yo\* (Note: If you don't want to embellish the sock with the bluebell omit this round. Iinstead repeat pattern of round 13 for seven more rows and ignore following rounds 15 - 20). Round 15 - 20: \*k1tbl, p1\* Round 21 - 23: purl Round 24: increase row: \*k 9 {10], M1 (snug e-wrap)\* rep to end of round $(=80$ [88} sts) Round 25: knit
Note: ALL of the knit stitches in all given charts are meant to be knitted through the back loops (tbl)
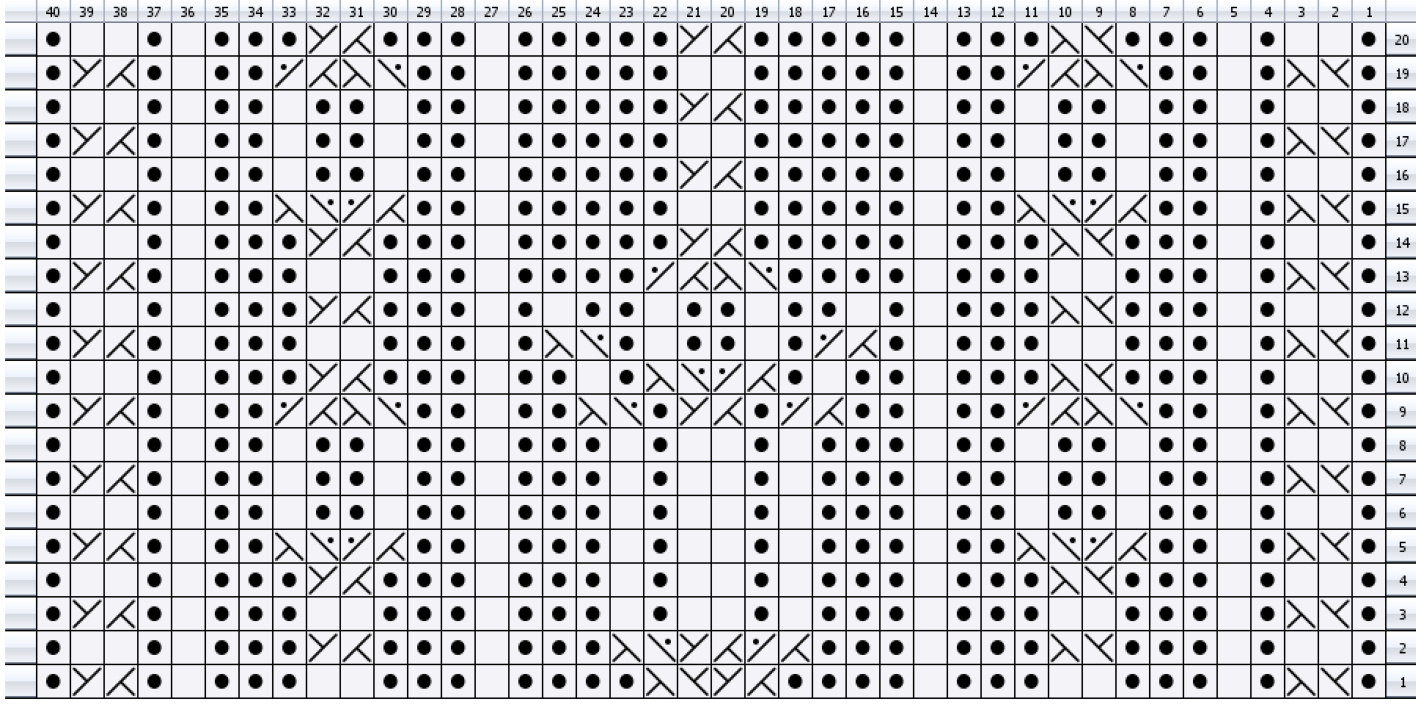
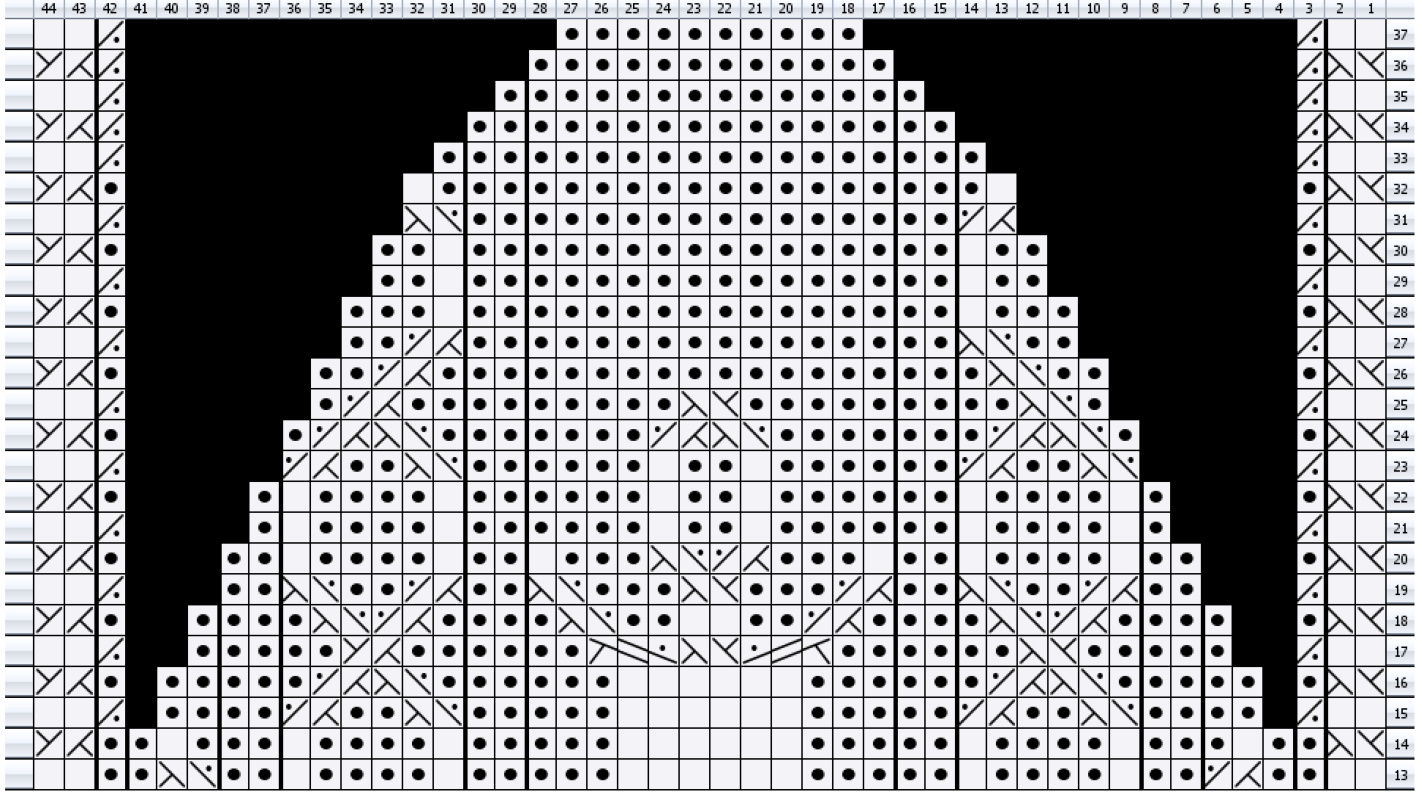
Row 26: Proceed to follow chart A {A Large} ( $\stackrel{\cdot}{=}$ frontside of sock) followed by chart B {B Large} ( $\stackrel{.}{=}$ backside of sock). Continue to follow these 2 charts for a total of 54 rows. Note: The second sock starts with chart B {B Large}) followed by chart A. {A Large} Make note of row number where you left off in chart A {chart A/Large} before starting heel.
Heel
Heel flap
After finishing 54 rows of both charts A and B {A Large and B Large} the heel is knit back and forth over 40 {44} sts from chart B {B Large}. Note: For feet with a high instep, knit a longer heel flap. For smaller sizes you may prefer to reduce the length of the heel flap. For the $1^{\mathrm{st}}$ sock, knit one additional row of chart A only, in order to place yourself in the proper position for starting the heel flap. The flap will be worked using the stitches from chart B. The second sock should already be in the proper position to start the heel flap. Note: The already established small twisted cables are maintained on each side for the entire heel flap. Setup row (RS): k1 tbl p1 in same st, left twist 1, p1,\*slip1 pw wyib, $\mathsf{k}\mathsf{1}^{\star}$ , rep to last 4 sts, p1, right twist 1, p1 k1 tbl in same s $\mathfrak{I}=42$ st {46 st} on heel needle, turn your work (2 sts are increased) Row 2 (WS): sl1 wyif, k1, p2 tbl, k1, p32 {36}, k1, p2 tbl, k1 sl1 wyif, turn Row 3 (RS): k1 tbl, p1, left twist1, p1, $^{\star}{\sf s l}\,^{\star}$ pw, $\mathsf{k}\mathsf{1}^{\star}$ to last 5st, p1, right twist1,p1 sl1 wyif, turn Row 4 (WS): k1 tbl, k1, p2 tbl, k1, p32 {36}, k1, p2 tbl, k1 sl1 wyif,turn Repeat rows 3 and 4 for a total of 40 {44} rows on the heel flap, ending with a WS row. (lt is easy to count rows according to your twists in the small cables on each side of your heel flap - each twist represents two rows).
Turning the Heel
Row 1 (RS): follow established pattern for 23 {25} st , ssk, k1, turn Row 2 (WS): slip 1 wyif, p5, p2tog, p1, turn Row 3 (RS): slip 1 wyib, follow established pattern to 1st before gap, ssk, k1, turn Row 4 (WS): slip 1 wyif, p to 1 st before gap, p2tog, p1, turn Repeat rows 3 and 4 until all stitches are used up $(=24$ [26} sts on heel needle) ending with a RS row. If required, knit one row to finish at the end of a right side row. At the same time place marker in the middle of this row to indicate the beginning of the row.
Gusset (please read completely, before proceeding)
Note: stitch counts will vary if you have worked more or fewer heel flap rows. Simply pick up an appropriate number of sts depending on how many gusset rows you worked, then decrease accordingly.
Setup row
First Gusset Side: Pick up and knit 8 st, place marker to indicate end of sole stitches, pick up and knit 12 {14} more stitches for gusset plus one st in bottom corner from purl bump below (dpn knitters, use your heel needle for these stitches).
Top of foot:
work across pattern of chart A {A Large} continuing from where you left offin the chart. Second gusset side and half of sole: Pick up and knit one corner st from purl bump below to avoid hole. Pick up and knit 12 {14} more sts from the right side of the heel flap (one for each slipped stitch), place marker to indicate end of gusset stitches, pick up and knit 8 more st, knit to (beginning of round) marker. Your stitches should now be arranged as follows: 2x 34 {36} sts on two needles for gusset and sole stitches and $2\times20^{\star}\{22^{\star}\}$ sts for top of foot (to be worked on in chart A {A Large} pattern.) \*Note: Stitch count may vary due to pattern increases in rows 7-10 of chart A/flowerbuds, and also for knitters with longer or shorter heel flaps.
Row 1 of gusset
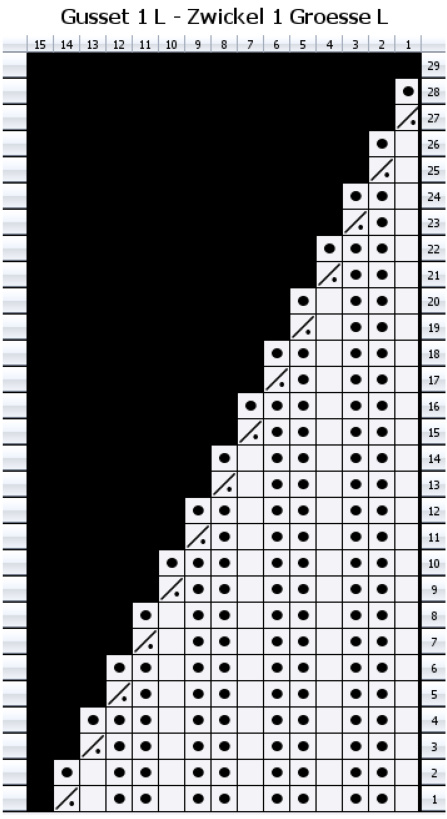
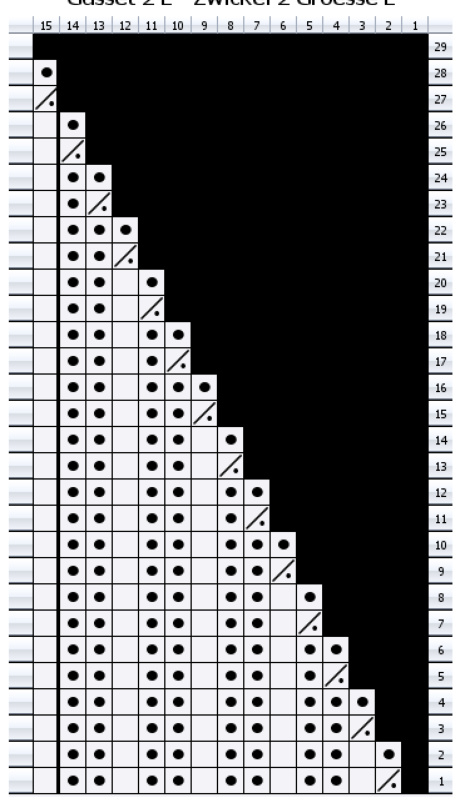
knit 18 {20} st, p 2 ( $\stackrel{\cdot}{=}$ end of sole stitches), follow gusset chart 1 (row 1) for sizes S/M {L} followed by chart A{A/Large), followed by gusset chart 2 (row 1) for sizes s/m [L} to marker, p 2, k 18 [20} $\mathbf{\dot{\omega}}=\mathbf{\dot{\omega}}$ end of round $=$ middle of sole)
Gusset Charts:
Column 1 is the first gusset stitch (after 2 purl stitches of sole). The charts should be used as an example also if you made a longer or shorter heel flap. There is a decrease in every second round made by a p2tog. Continue with the gusset decreases on every second round as shown in the charts until all the gusset stitches are used up and only the sole stitches remain. Note: Sole stitches stay bordered by two purl stitches on either side for the entire length of the Sole. The last remaining gusset stitches on each side are to be purled together with the last or first of thesolestitches $\mathbf{\omega}_{=}$ no gusset stitches remain).
Foot
Continue in pattern as set, until foot measures $1~\%$ inches (4 cm) less than desired length of sock.
Toe
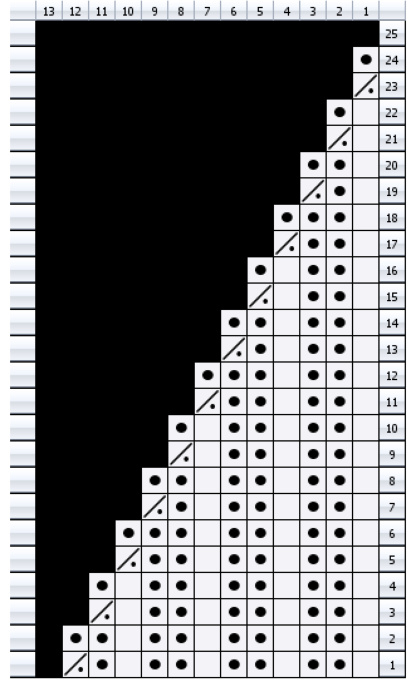
IMPORTANT: Read the following completely before you continue knitting. On upper side of sock, follow toe chart. Before proceeding, you will need to determine where on the sock according to desired length you'll end your middle motif. The toe chart is an example only. You may end the middle motif sooner or later according to desired length of foot. Rows 11 and 24 of chart A {chart A Large} are good ending rows. Continue following the chart for the side cables and twist stitches (columns 1-13 & 28-40 Chart A) {columns 1-14 & 31-43 Chart A Large}, according to where you are in the chart, they will be “eaten up" by the decreases on either side. Both twisted sts cables continue alongside the entire toe length on the upper side of sock. The decreases will be made by p2tog inside these framing twist stitches (see toe chart and toe chart L).
At the same time decrease on sole side:
Row 1: p2, ssk, k to end of needle, next needle $\mathsf{K}$ until 4 st are left, k2 tog, p2, Row 2: stay in established sole pattern without decreases Repeat decreases in this manner every $2^{\mathsf{n d}}$ row untilthere are 20 $\{22\}=2\times10\{11\}$ sole sts left, then work decreases in every row. (Optional: You may want to knit the very last row in order to facilitate grafting). Using Kitchener stitch, graft 12 {14} sole st to $12\{14\}$ front st and sew in ends.
My Little Bluebell Embellishment
Starts with a garter stitch leaf, which goes on with an I-cord. This is threaded through the holes made by the yarnovers in the upper cuff part. Then a bluebell is attached to the i-cord, while the i-cord forms the stamens of the flower.
Leaf:
Cast on 8 sts in contrasting color (preferably something green, chartreuse, et Row 1: k8, cast on 7 sts Row 2: k7, p1, k7 Row 3: k1, m1, k5, (sl 2, k1, p2sso), k5, m1, k1 Row 4: k7, p1, k7 Row 5 - 10: Repeat row 3 and 4 three times more Row 11: k6, (sl 2, k1, p2sso), k6 Row 12: k6, p1, k6 Row 13: k5, (sl 2, k1, p2sso), k5 Row 14:k5, p1, k5 Row 15: k4, sl 2, k1, p2sso) Row 16: k4, p1, k4 Row 17: k3, (sl 2, k1, p2sso), k3 Row 18: k3, p1, k3 Row 19: k2, (sl 2, k1, p2sso), k2 Row 20: k2, p1, k2 Row 21: k1, (sl 2, k1, p2sso), k1 Row 22: k1, p1, k1 Row 23: k 3
I-cord:
With (short is recommended but any length dpns will do) dpns k3 tbl, don't turn (instead slide knitted sts to right edge of needle) and knit these 3 st tbl again. The yarn is carried across the back of the work when starting a new row. Take care to pulltight enough, so no gap will be forming on Ws. Repeat until i-cord is 6 inches (15 cm) longer than your leg circumference at the same height as your sock cuff. Do not stretch the i-cord when measuring. Break yarn and leave a sufficient tail for sewing up. Thread yarn tail through remaining 3 stitches; pull sts together, leaving tail. Weave i-cord through the holes on the sock cuff beginning with hole next to the middle of outside of sock. Leave ends hanging.
Bluebell:
is knit flat and sewn closed later Cast on 35 st in main color (preferably blue). Leave a tail for sewing. Row 1 (RS): $\star|_{\mathsf{K}5}$ , pull $4^{\mathrm{th}}$ ,$3^{\mathrm{rd}}$ ,$2^{\ n d}\&\ 1^{\ s t}$ sts over already knit $5^{\mathrm{th}}$ st, ${\mathsf{y}}0^{\star}\times7$ omitting the last yo $(=13$ sts) turn. Row 2 (WS): $^{\star}\mathsf{k}\,^{\sf1}$ , k1 tbl, $\mathsf{y}\mathsf{o}^{\star}\times6$ ,k1 $(=19$ sts) turn Row 3 (RS): p1, k1 tbl, $\star_{\mathsf{p}2}$ , k1 tbl\* x 5, p2, turn Row 4 (WS): $^{\star}\mathsf{k}2$ , p1\* x6, k1, turn Row 5 (RS): p1, $^{\star}{\sf k}^{\intercal}$ ,$\mathsf{p}2^{\star}\times6$ , turn Row 6 (WS): $^{\star}\mathsf{k}2$ , p1\* x6, k1, turn Row 7 (RS): p1, $\star|\star|$ ,$\mathsf{p}2^{\star}\times6$ , turn Row 8 (WS): $^{\star}\mathsf{k}2$ , p1\* x6, k1, turn Row 9 (RS): p1, $\star|\star|$ ,$\mathsf{p}2^{\star}\times6$ , turn Row 10 (WS): $^{\star}\mathsf{k}2$ , p1\* x6, k1, turn Row 11 (RS): $\mathrel{\ast}_{\S}|\,2$ as if to knit, k1, pass sl sts over\* $\mathtt{x5}$ , sl 2 as if to k, k2tog, pass sl sts over $(=6$ sts) Row 12 (WS): purl, purling last 2 sts tog, set aside $(=5$ sts) Now off to knit the green part (sepal) which connects the blue flower to the stem: With contrasting color (same as already used for flower stem and leaf) cast on 25 sts, turn WS: $^{\star}{\sf k5}$ , pull $4^{\mathrm{th}}$ ,$3^{\mathsf{r d}}$ $2^{n d}\&\ 1^{s t}$ st over already knit $5^{\mathrm{th}}\;\mathrm{st}^{\star}\times5$ $(=5$ sts) turn Place WS of this against the RS of former worked bluebell part and work a three needle bind off with CC (stem color), leaving last st on needle (don't cut yarn), turn, 1.Row: K in front, back and front of this st $(=3$ Sts),turn, 2.Row: P1, k1, p1, turn 3.Row: K1, p1, k1, turn Repeat row 2 and 3 once more. Sl2 as if to k, k1, pullsl sts over, pull yarn through and cut yarn (this makes an extra little leaf sticking from the flower bottom). Now take the last piece of i-cord (3 - 4 inches should be plenty) already threaded through the sock cuff and form a pretty knot'. This knot will be inside the bluebell flower, sticking out just a little bit. Do not pull the knot too tight at first so you can adjust the length and form of the knot. Wrap the flower parts around the knot and stem and stitch the flower "skirt" shut around the knot and sew in ends. While sewing up, adjust form of flower. Try on sock and tie your flower with a single knot or a litle bow (depending on length of i-cord) to the leaf part. Cast on second sock and enjoy!
Acknowledgement
This is my very first pattern to be published and I could not have done it without my knowledgeable supportive and excellent test knitters - I cannot thank them enough: Thank you Arlene, Cheri, Debby, Julia and last but by no way least Waltraud. Also I want to give my sincerest thanks to Claudia Hoell-Wellmann, who made this pattern possible in the first place - thank you! If you have any questions about the pattern or found an error in the pattern, do not hesitate to contact me at pattern@whitework.de The pattern is for personal, noncommercial use only. All other uses require prior permission of the author. Please ask the author's permission for reproduction or distribution of this pattern. This includes distribution of this pattern through electronic or print media. You may print copies of this pattern for personal use, but not to resell them. $\circledcirc$ 2009-2010MariaWhite

Chart A and B, Size Large
all knit stitches are to be knit through the back loop (tbl) Strickschrift A und B, GroBe L alle rechten Maschen der Strickschriften sind rechts verschrankt abzustricken
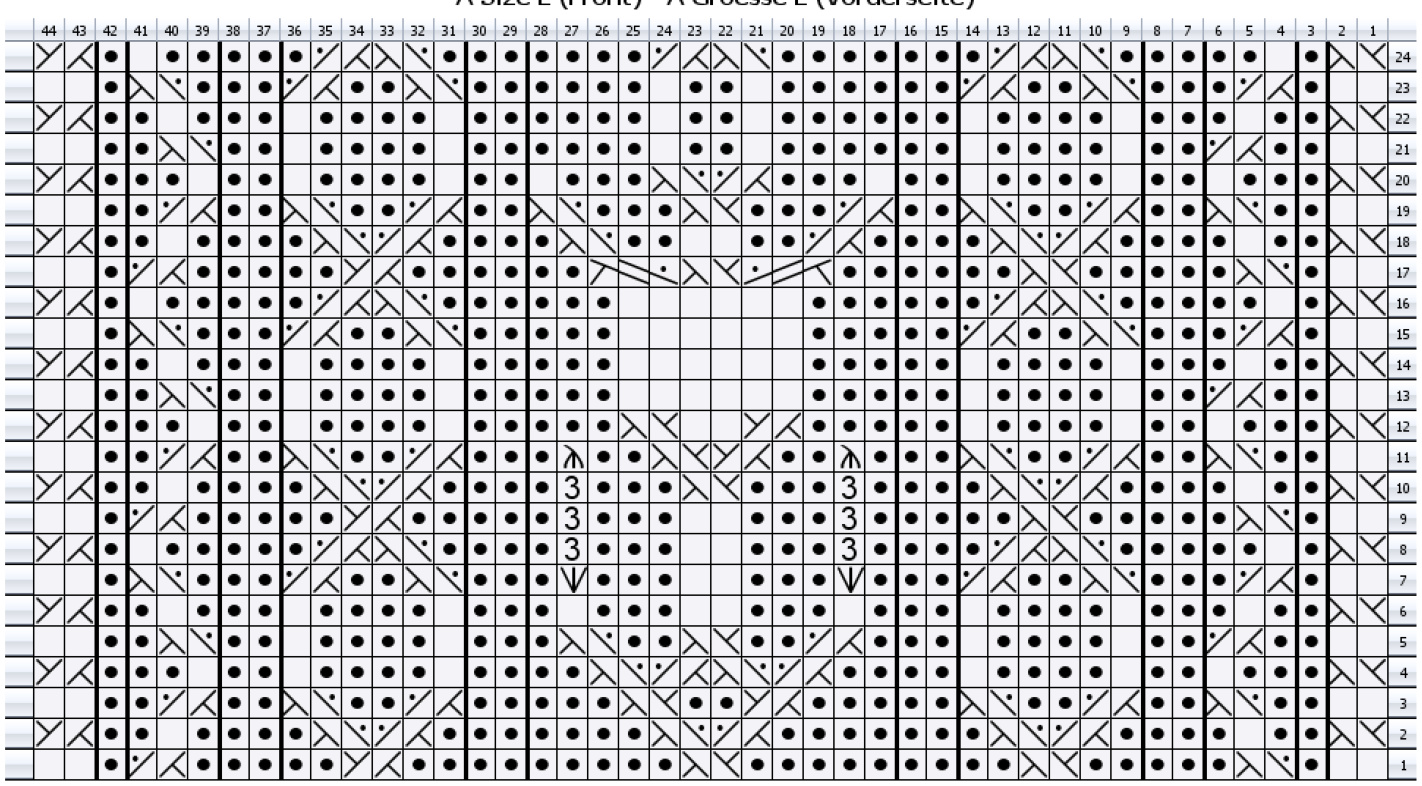
A Size L (Front) - A Groesse L (Vorderseite)
B Size L (Back)-B Groesse L (Rueckseite)
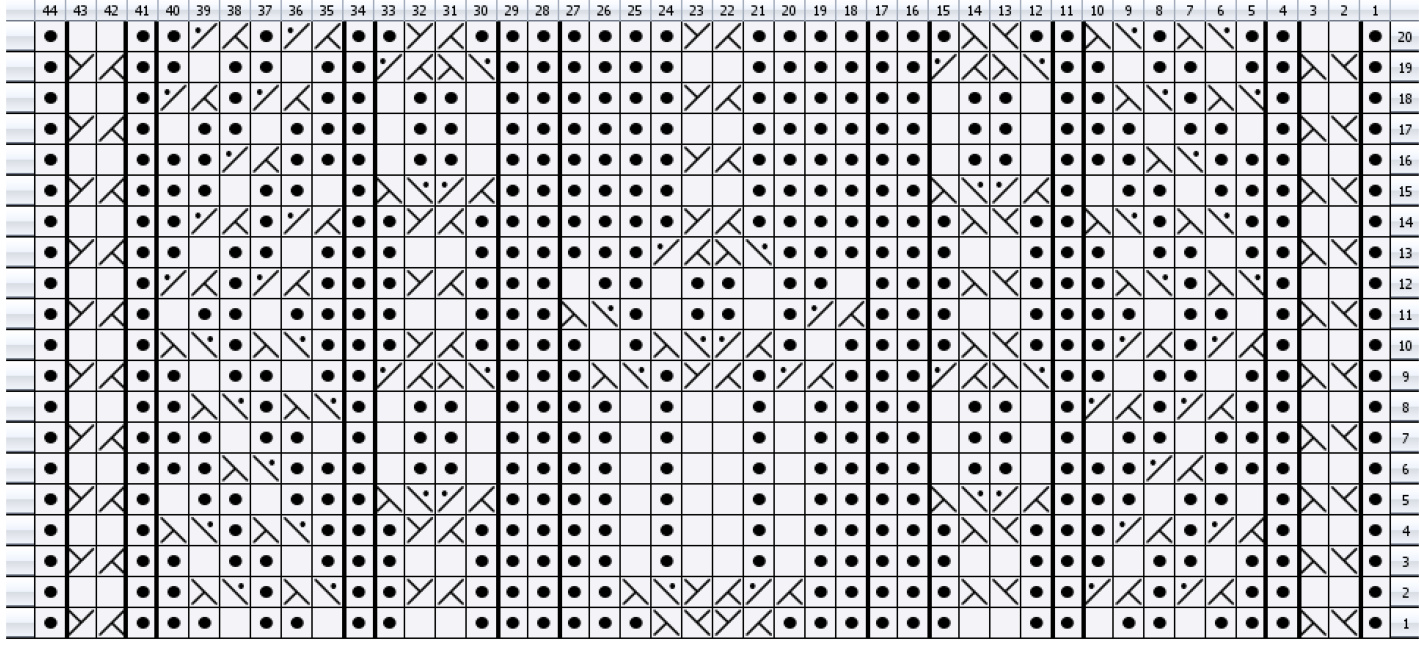
Chart A and B, Size S/M
all knit stitches are to be knit through the back loop (tbl)
Strickschrift A und B, GroBe S/M
alle rechten Maschen der Strickschriften sind rechts verschrankt abzustricken
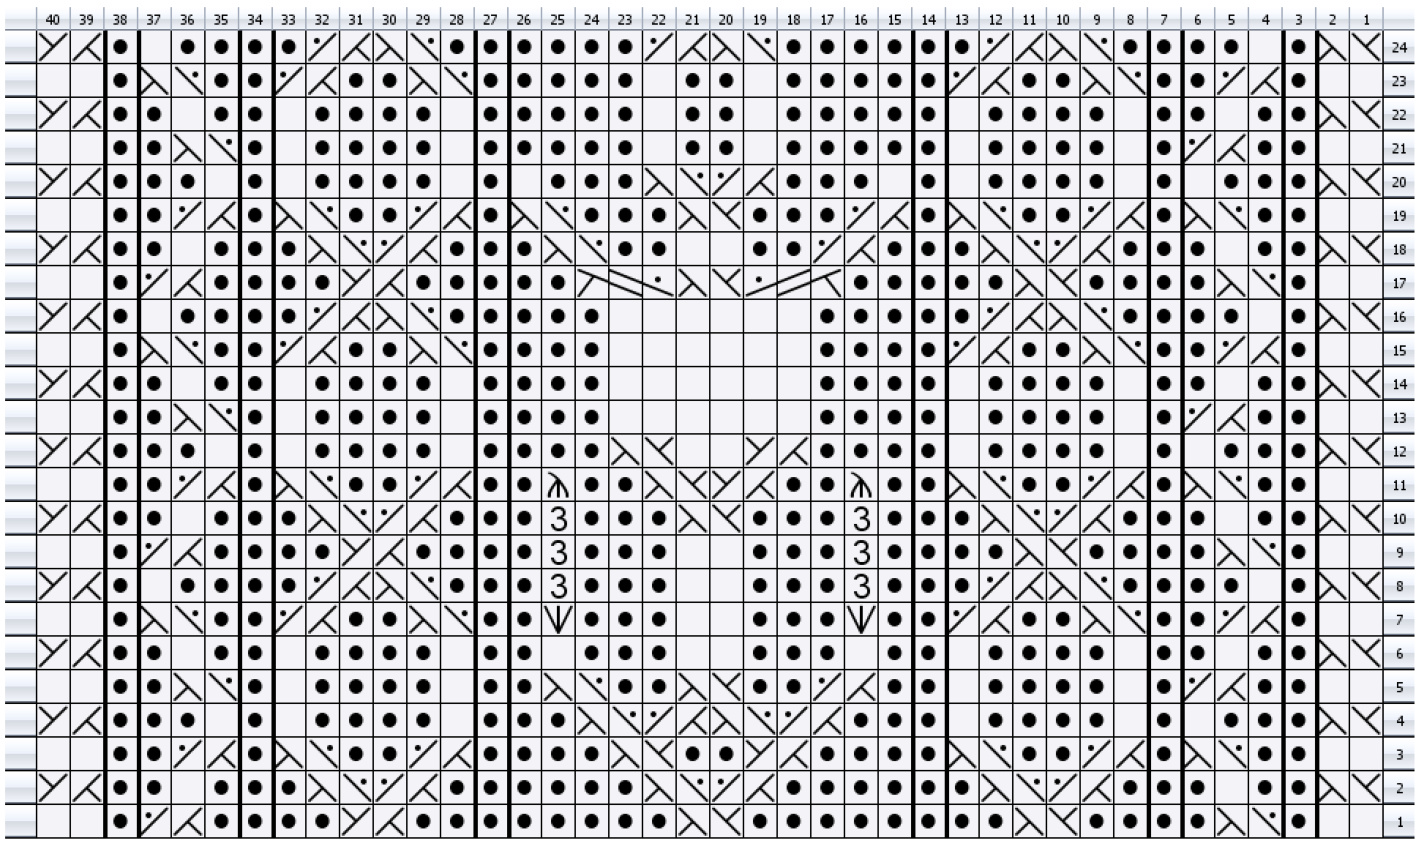
A Size S/M (Front) - A Groesse S/M (Vorderseite)
B Size S/M (Back) - B Groesse S/M (Ruickseite)
Example Toe Charts
all knit stitches are to be knit through the back loop (tbl) Beispiel fur Zehenabnahmen alle rechten Maschen der Strickschriften sind rechts verschrankt abzustricken
Toe Chart Size S/M-Zehenabnahmen GroesseS/M

ToeChartSizeL-ZehenabnahmenGroesseL
Gusset Charts
all knit stitches are to be knit through the back loop (tbl) Strickschriftenfur dieZwickelabnahmen alle rechten Maschen der Strickschriften sind rechts verschränkt abzustricken
Gusset 1 S/M - Zwickelabnahmen 1 Groesse S/M
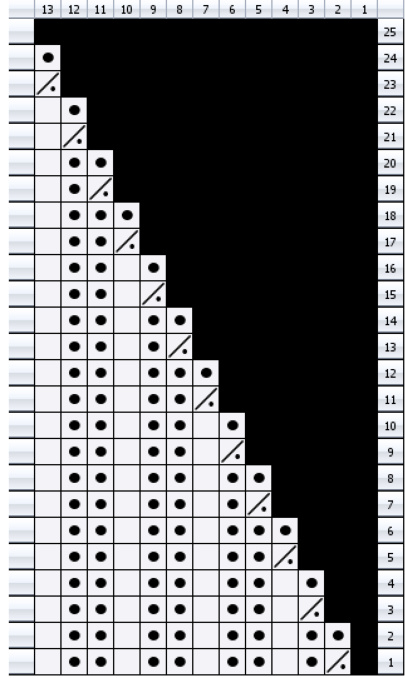
Gusset2S/M-Zwickelabnahmen2GroesseS/M
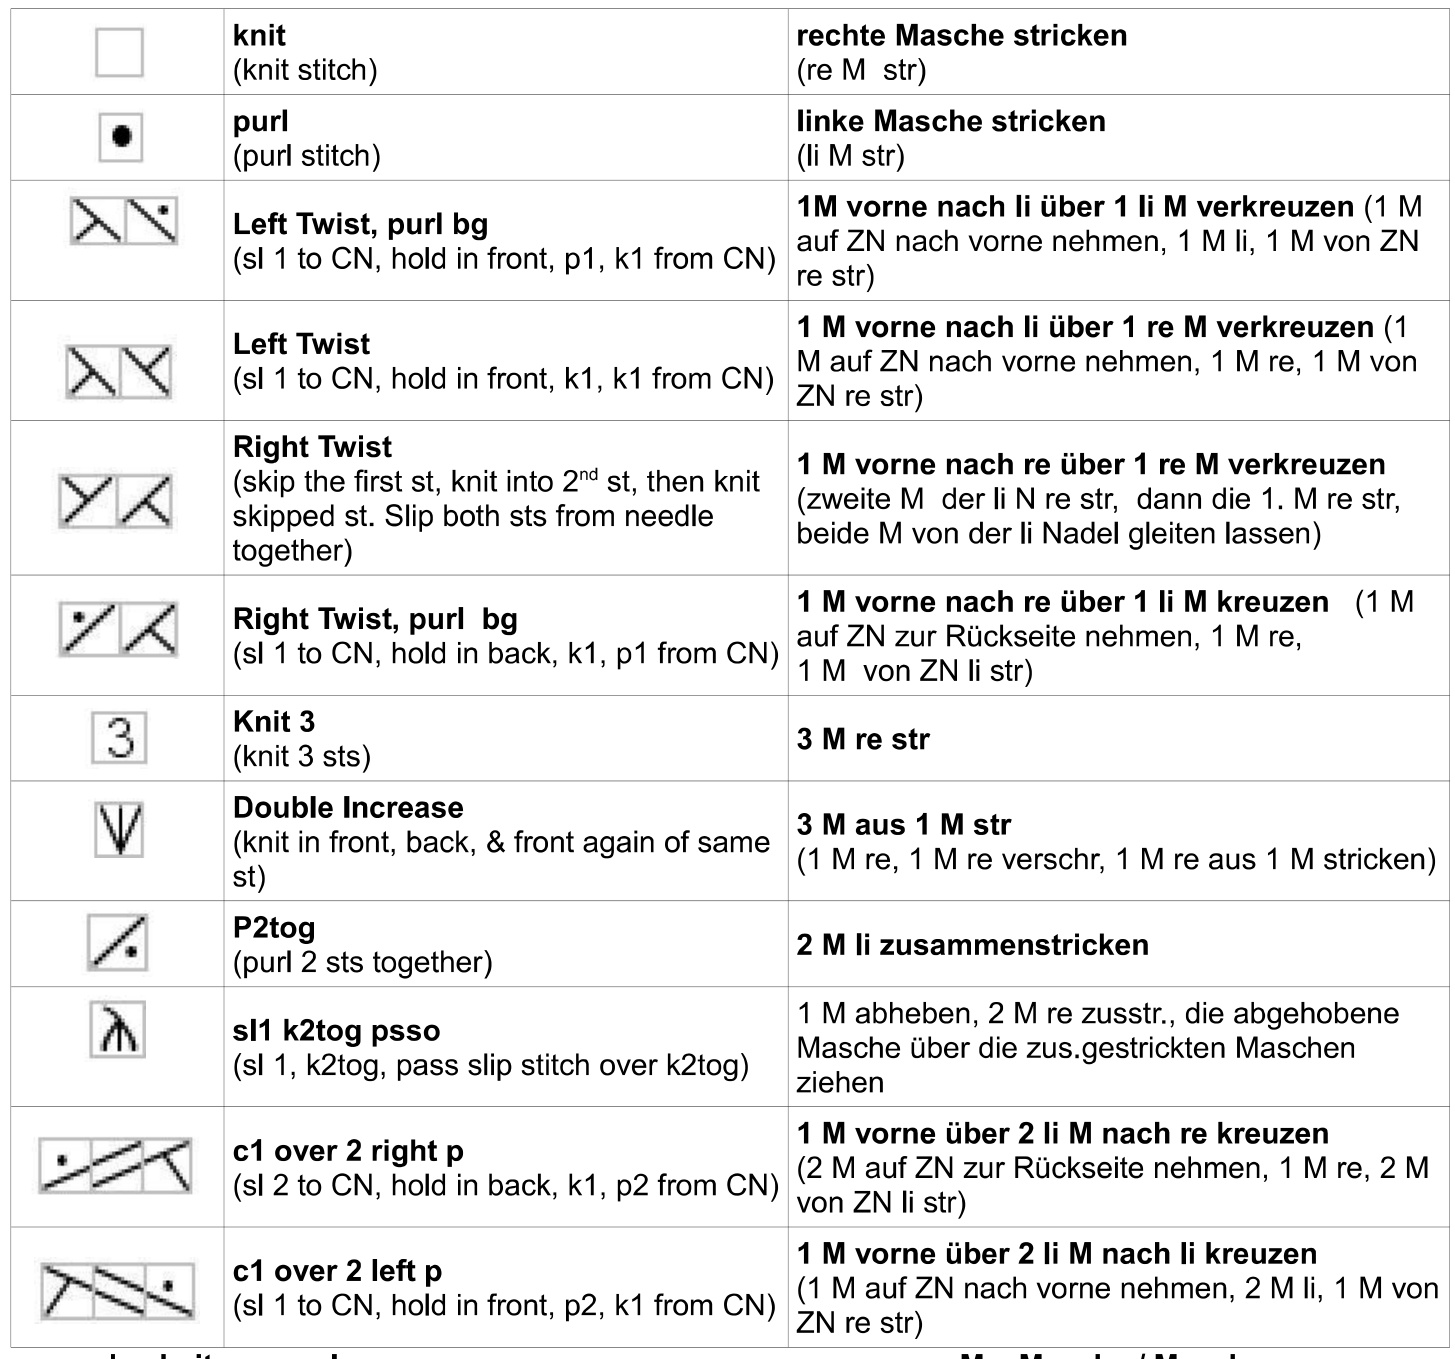
${\bf k}={\bf k}{\bf n}{\bf i}\mathrm{t}$ , $\mathsf{p}=$ purl $\left.\mathsf{\pmb{s}}\right\vert=$ slip one stitch knitways sl pw $=$ slip one stitch purlways $\mathsf{c w=}$ cableneedle st $=$ stitch, sts $=$ stitches left twist1: sl 1 st to CN and hold in front, k1 tbl, k1 tbl from cable needle right twist1: sl 1 to CN and hold in back, k1 tbl, k1 tbl from cable needle wyib: with yarn in back wyif: with yarn in front $\pmb{\mathsf{M}}=$ Masche / Maschen abh $=$ abheben $\mathbf{Z}\mathbf{M}=$ Zopfnadel str $=$ stricken re $=$ rechts, li $=$ links