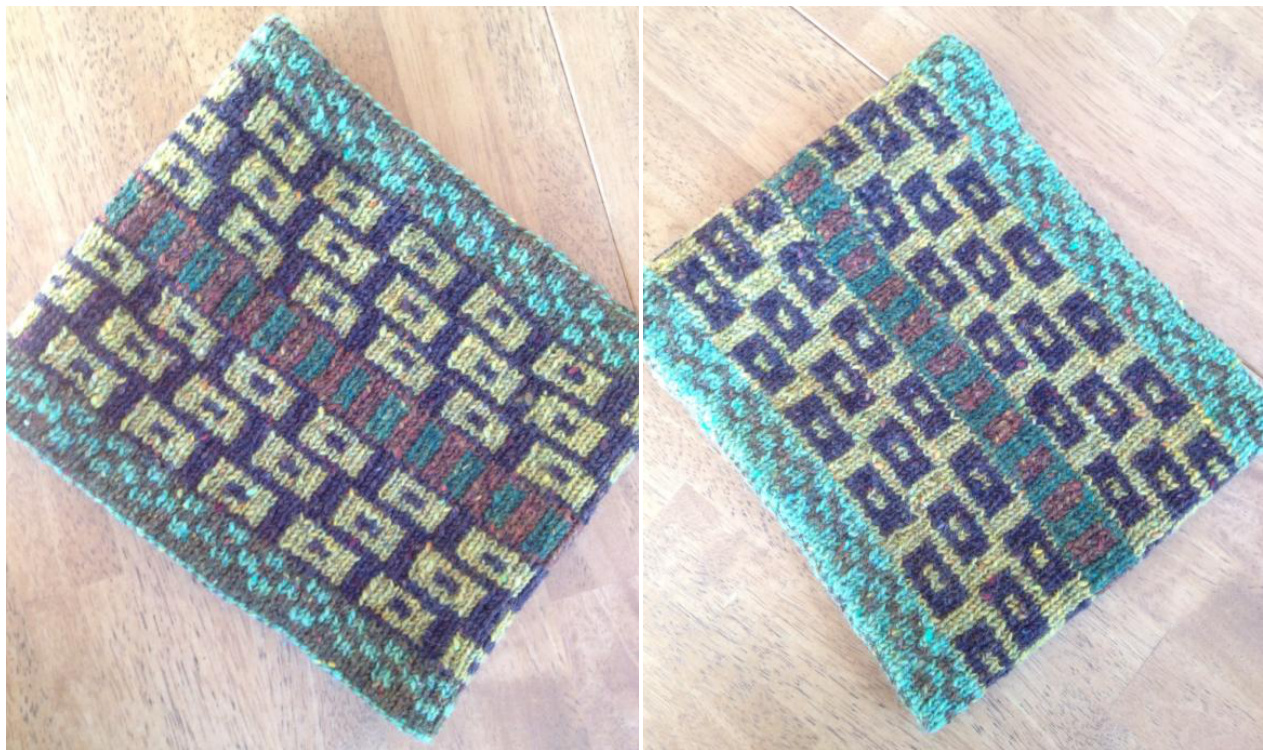
Reversible Ski Tube
This is a snug-fitting alternative to a scarf that can be pulled up over the mouth and nose. Finished dimensions: approximately 60cm in the round x 23 cm high. This is a simple doubleknit project, done in the round. It is a good way to use leftover sock yarn. If you are new to double knitting, read the entire pattern through first. You will be watching you-tube videos to learn the cast-on.
Skills required:
knitting and purling using two colours long-strand cast-on.
Materials:
fingering-weight yarn in 6 colours; 25g each for the colours in bands 2 and 4 (squares with holes), and \~10g of each of the others. Use 3 dark yarns and 3 lighter ones and arrange them in light/dark pair for good contrast on this beginner project. Smooth yarn is easiest to handle. Circular 2mm needle for magic loop, two circs, or long DPNs.
Important "Read These or Weep Later" Notes:
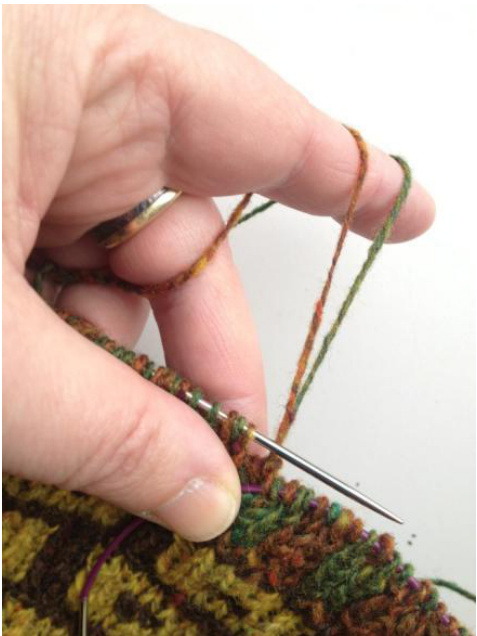
· double-knitting results in stockinette done at half-tension, so use a smaller needle than you normally would with fingering weight yarn. Although it is colourwork, are no floats and you don't have to worry about weaving the two colours together. The resulting work is very stretchy and stable, far more so than stranded colourwork. Done in the round, it makes beautiful headbands, hats, cowls/neckwarmers, and wristbands. the chart shows one side of the fabric only. The inside of the fabric will have the inverse colours (ex. rows 1-10: where front is green, the back will be brown; where front is brown, the back will be green). Check out the photo, too. Each square on the chart represents a PAiR of stitches (the first stitch ALWAYS a knit, the second ALWAYS a purl). The total width of the chart is 96 pairs of stitches, I've only gridded the 8-stitch repeat. You may find it useful to use stitch markers at 8-pair (16-stitch) intervals. You will be effectively knitting the front and back of the fabric at the same time. The knit stitches are the "outside" of the tube, the purl stitches, the "inside". Reading your knitting takes a little time, but you'll catch on with this simple project. A common mistake is to knit (or purl) 2 stitches together. This will throw off the K1P1 rhythm and you will get out of sync on the front and back. It's fairly obvious when this happens as the wrong colour starts being pulled to the front of the work and you'll get purl bumps. Tink back to fix. Another problem is that you sometimes forget to move both yarns to the front or back together. This will result in a litle strand of the wrong colour showing on one side. You can drop sts to fix this - just move the offending strand to the inside of the work, between the layers, where it belongs. If you have knit the wrong colour in the row below, you can drop sts and fix it (usually both sides of the work will be wrong!). It's a bit fiddly but you'll have enough yarn once the two wrong sts are dropped. Effectively you're just moving the yarn from one side to the other and there is no tightening. Cast on: Using either the Latvian braided-cast-on : (video: http://www.youtube.com/watch?v=nTq5suN3Wcc ) or the alternating colour long-tail cast on : (video : http://www.youtube.com/watch?v=OkjKak6Bx1o cast on 96 pairs of stitches for a total of 192 on your circ. Make the first stitch brown (it will have to be the colour wound around your index finger for the long-tail "slingshot". Join, being careful not to twist. (note: the slipknot is removed and is not part of the cast-on). The first two rows are done in "plain" double knitting. This means: 1. hold both yarns to the back 2. knit the first stitch in the colour presented on the left needle (also the colour of the cell in the chart) - ie. brown, for the first stitch. 3. bring both yarns to the front 4. purl the second stitch in the colour presented on the left needle (it will be the other, "opposite" colour) - ie. green. 5. repeat steps 1-4. Use whatever colourwork technique for managing your yarns that you find works. I find the technique of knitting continental style with both yarns over my left index, and picking out the appropriate colour to either knit or purl, is very convenient and fast; it is then easy to swing both yarns to the front and back of the work for the alternating knit/purl. See photo below. I poke my left-hand middle finger between the two yarns to keep them apart (shown: brown yarn in front over middle finger, green yarn over the back) and I grip the yarns against my palm with my pinky and ring fingers to maintain tension.
Note the rhythm: the first stitch of the pair is ALWAYS knit, the second ALWAYS purled. It i like knitting 1x1 ribbing. The entire piece is done in this "rhythm". It doesn't produce ribbing, though. It produces stockinette on two sides, done at half-tension due to the inter-splicing of the two layers. Now that you've warmed up with 2 rows of plain doubleknit, the colourwork begins on row 3!
Row 3:
1.hold both yarns to the back 2. knit the first stitch in the colour presented on the chart (ex. lime green for 1st stitch pair). The chart shows only the colour of the FIRST STITCH OF THE PAIR. It does NOT show the second stitch - which is in the "opposite" colour. This is so that you can see what the pattern is supposed to look like from the side of the work facing you. 3.bring both yarns to the front 4. purl the second stitch in the "opposite" colour (ex. brown for the 1st stitch pair). 5. repeat steps 1-4. So, in super-detail: 1t stitch is knit green 2nd stitch is purled brown 3rd stitch is knit green 4th stitch is purled brown 5th stitch is knit brown (colour change resulting in 2 brown sts next to each other!) 6th stitch is purled green ...and so on. The colour changes are independent of the rhythm. They always happen on the first stitch of the pair, so ALWAYS on a knit stitch. This is the most important thing to remember in double knitting. You will quickly see that you get "pairs" of stitches appearing on your needle. The first st (reading from R→L) of the pair will end up on the front of the work, the 2nd stitch, on the back. So, when you change colours for the motif, the order of the colours in the pair will change. You'll see, for instance, on your needle: (G B)(G B)(B G)(B G)(G B)(G B)→ BBGGB on front, GGBBG on back. It helps to imagine the parentheses in order to read your knitting. Stitches of identical colour next to each other indicate you've made a colour change! The chart is designed to have (at least) 2 rows of each sequence. The second row of the sequence is easier than the first, because you will be duplicating the order of colours you see on your left needle. You need to concentrate only during the ODD rows, where the new pattern is set. In the middle of the work, rows 35-46, you can relax, because all the rows are the same. Colour Breaks: For times when BOTH colours change (ex. row 10, 34), simply break the old yarns, leaving 3-4 inches, and start with the new colours. Do not splice or use the Russian Back Join. Leave a 3-4 inch tail on the new yarn as well. We'll deal with these at the finishing step. Cast Off: The usual knit-and-pass-over bind off works just fine. For regular knitting it would be too tight, but because you are knitting both front and back, this cast-off is stretchy enough. Adjust the tension of the cast-off to match the look of the cast-on. Finishing: Anchor the loose ends by duplicate-stitch. The ends can be passed between the two fabric layers and just left there. Wash gently and dry flat; blocking is not really necessary because the work is so stable, but the washing will fluff out the yarn.
Variations:
Play with the colours. The charts on the next page are just the beginning! This is a traditionally-sized "ski-tube". You may want to add multiples of 8 sts to make the circumference bigger, to make more of a "cowl". The chart is easily made taller by extending the design elements. Or, use a small section of the design to make a head band. You can also cast on just enough stitches for a set ofwrist-warmers! Copyright info:this pattern is now yours.Feel free to use it for any purpose you like.Yes,that includes pretending you invented it, and making millionsfromitssale.Justremembermeinyourwill!
| rowspan="15">75 4 372 1 10698776654362616985755 43255404948444645434244038733635433323130 292872210254232 120191811115413 121 1092 | 75 4 372110987665543621699854554 35255404948444645443444039873635433323302928122625423212201918111615413121 10987 | 1543210 | |||||||||||||||||
| 68 | |||||||||||||||||||
| 66548 | |||||||||||||||||||
| 8 | |||||||||||||||||||
| 87 6 43 2 1 | 8 | ||||||||||||||||||
| 765432 | 6 5 4 | 8 |


