JMO Creations
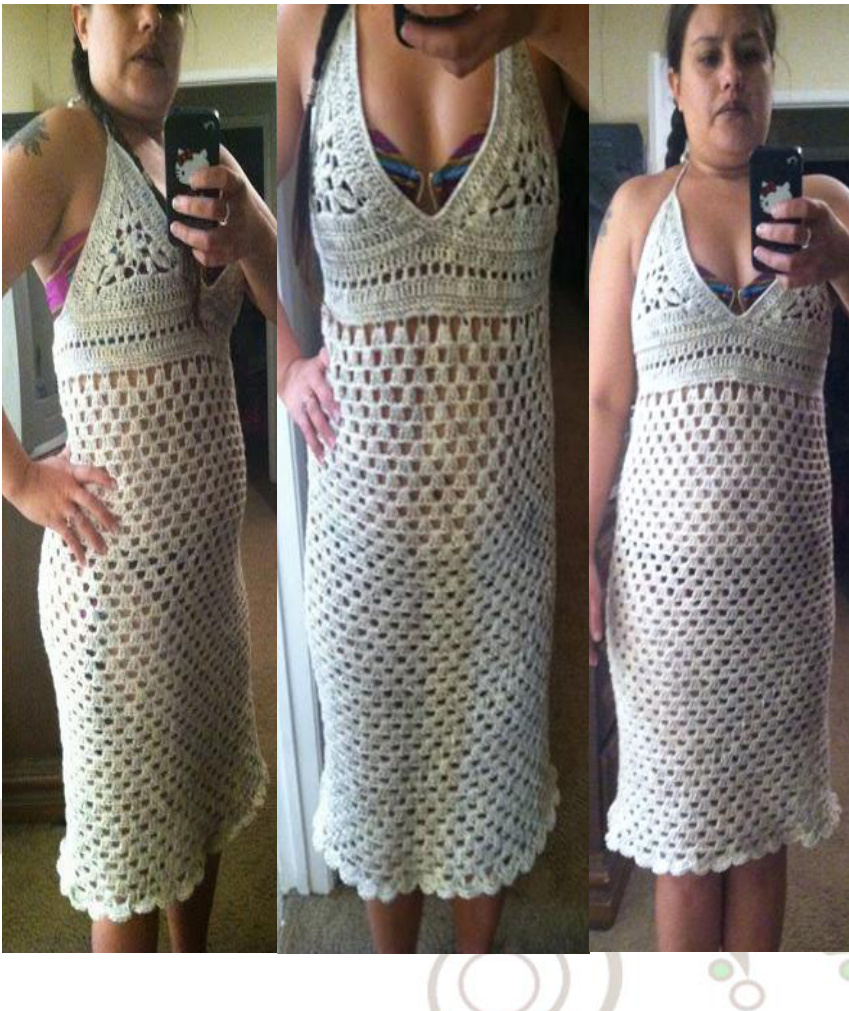
Beachy Swim Suit Cover Up Dress
Pattern by Jessica Oliveira @ JMO Creations @2014 JMO Creations
JMO Creations
JMO Creations
Materials:
Sportweight yarn : cotton would be best but I used Lion Brand Wool-Ease Sportweight. (At least 15 ounces) Hook sizes: 1/5.50mm, H/5.00mm, G/4.00mm, F/3.75mm Tape Measure Large Eye Needle Scissors Stitch Markers
Stitch Gauge Guide

5 granny clusters and chain spaces and 8 rows = aprox. 5" using a size I hook.
Special Stitches
Magic Loop Single Crochet Double Crochet
JMO Creations
DC2Tog
Yarn over and insert hook into next stitch, yarn over and pull up a loop, yarn over and pullthrough 2 loops, yarn over and insert hook into next stitch, yarn over and pull up a loop, yarn over and pull through 2 loops, yarn over and pull through remaining 3 loops on hook.
Beginning Double Crochet Cluster
(Beginning DC Cluster) uses one space Chain 3,( \*Yarn over, insert hook in next space indicated, yarn over and pull up a loop, yarn over and draw through 2 loops on hook\*) twice, yarn over and pull through all 3 loops on hook.
Double Crochet Cluster
(DC Cluster) uses one space (\* Yarn over, insert hook in indicated stitch, yarn over and pull up a loop, yarn over and draw through 2 loops on hook\*) 3 times, yarn over and draw through all 4 loops on hook.
Treble Crochet Cluster
(TR Cluster) uses one chain 5 space (\* Yarn over twice, insert hook in chain 5 space indicated, yarn over and pull up a loop, (yarn over and draw through 2 loops on hook) twice\*) 3 times. Yarn over and draw through all4 loops on hook.
Picot
Chain 4, slip stitch in 4th chain from hook (counts as one chain 3 space)
JMO Creations
Skirt: uses size 1/5.50mm hook
Ising the measuring tape; measure the largest part of your body. (Hips, bust, middle Make a chain the length of your measurement in multiples of 4. When you get your measurement add 4 morechains Round 1: Taking care not to twist your chain, sl st to the furthest chain from the hook and chain 3, 2 dc in same stitch as joining, ch 1, sk 3 sts, \*3 dc in next st, ch 1, sk 3 sts\* repeat from \*to\* to end. Sl st to the top of the ch 3 to join. Round 2: sl st across to first ch 1 sp, ch 3, 2 dc in same sp, ch 1, \*3 dc, ch 1 in next ch sp\* repeat from \* around. Sl st in the top of the ch 3 to join. Repeat round 2 for the desired length of your skirt. You can make it short to use it as a top or long for a dress. I did 44 rounds for my skirt.
Skirt Band: using size H/5.00mm hook
Note: join yarn with a sl st into the top of any cluster on the original starting chain. Round 1: Ch 1(doesn't count as 1st st), 1 sc in same st, 1 sc in next st and each st around skipping the ch 1 spaces. SI st to 1't sc to join. Rounds 2-3: Ch 1(doesn't count as 1"t st), 1 sc in same st, 1 sc in next st and each st around. Sl st to 1st sc to join.
JMO Creations
Switch to G Hook
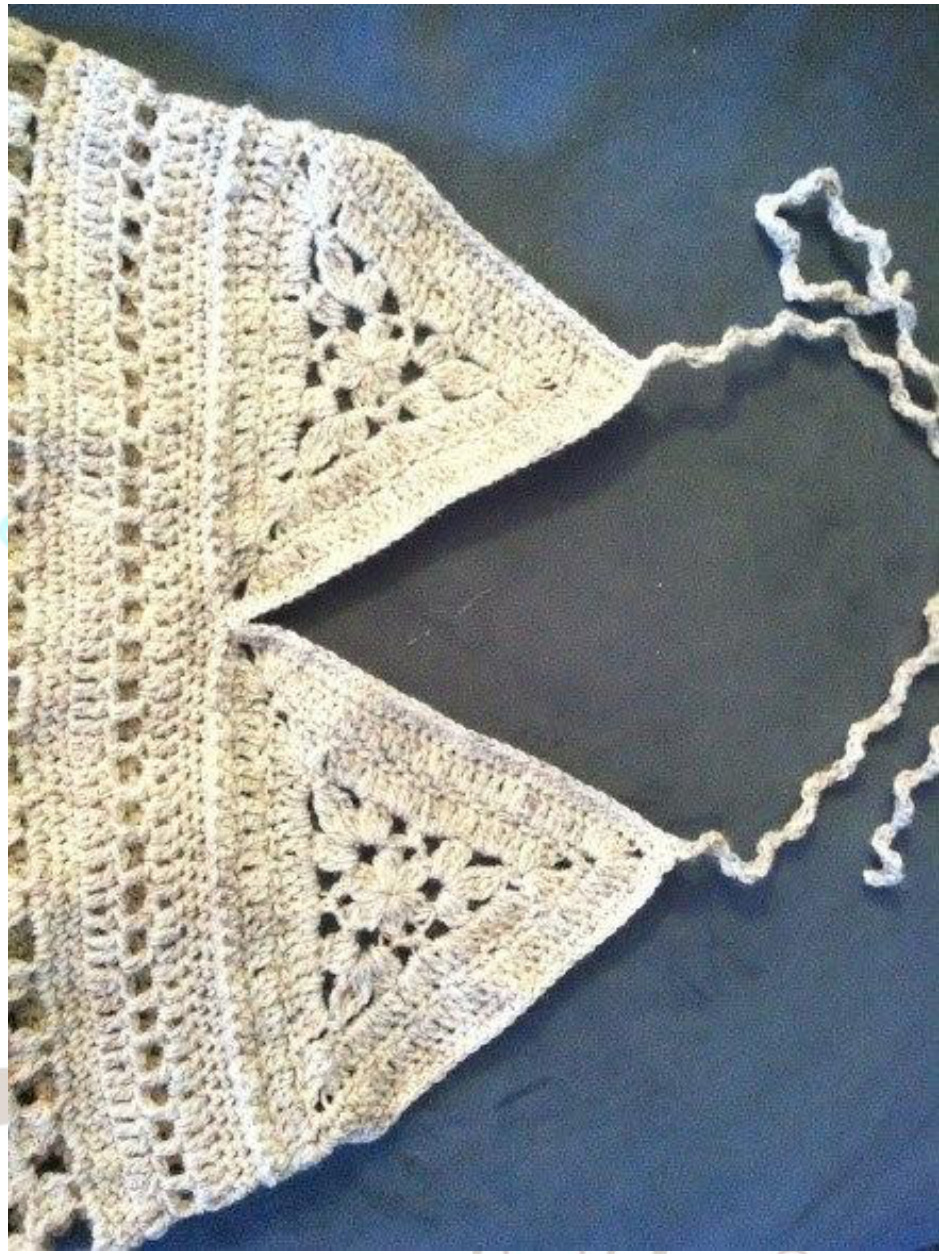
Round 4: Ch 3 (counts as 1st st), 1 dc in the next 9 sts, dc2tog, \*1 dc in the next 10 sts, dc2tog\* repeat from \*to\* to end. (Iit is ok if you end up with an odd number at the end) Sl st to the top of the ch 3 to0 join. Round 5: Ch 4(counts as 1st dc and ch1), sk next st, 1 dc in next st, ch 1, sk next st, \* 1 dc, ch1 in next st, sk next st\* repeat from \*to\* to end. SI st to the 3 ch of the ch 4 to join. Switch to F/3.75mm hook 3, 1 dc in next st. 1 dc in each st and ch sp around. Sl st to the top of the ch 3 to joi Rounds 7-9: Ch 1 (does not count as 1st st), 1 sc in same st and in each st around. Sl st to 1st sc to join. Fasten off. Bust Triangles: uses F/3.75mm hook. Make 2 Note: If you are unfamiliar with using the Magic Loop you can also use the chain and join method as follows. Ch 4; sl st to the furthest ch from hook to join and form a ring. Fastening off after each round of the triangles is so that the stitches look cleaner for every round. Round 1: Magic Loop, make a beginning DC Cluster in ring, ch 3, work DC Cluster in ring, ch 5, (\* make DC Cluster in ring, ch 3, work DC Cluster in ring, ch 5\*) twice, sl st to the top of beginning dc cluster to join. Fasten off (6 spaces)
JMO Creations
Note: using a st marker mark any stitch to indicate right side of work. Round 2: With right side facing, join with a sl st to any ch 5 sp. (beginning dc cluster, ch 4, tr cluster, picot, ch 4, dc cluster) allin same space, ch 3, sc in next ch 3 sp, ch 3, in next ch 5 sp, work (dc cluster, ch 4, tr cluster, picot, ch 4, dc cluster), ch 3, sc in next ch 3 sp, ch 3\* twice; sl st in top of beginning dc cluster to join. Fasten off. 12 sts and 15 sps. Round 3: With right side facing, join yarn in the ch 3 sp of any picot; ch 3 (counts as dc), (2 dc, ch 3, 3 dc) all in same sp, \*{4 dc in next ch 4 sp, dc in next dc cluster, (3 dc in next ch 3 sp, dc in next st) twice, 4 dc in next ch 4 sp}, (3 dc, ch 3, 3 dc) in the ch 3 sp of next picot; repeat one more time from the \*, then repeat from {to} one more time; sl st to the 1st dc to join. Fasten off. 69 dc and 3 ch 3 sps Round 4: with right side facing, join yarn in any ch 3 sp; ch 3, sc in th same sp and in the next dc, (ch 1, sk next dc, sc in next dc) repeat this to next ch 3 sp, \*(sc, ch 3, sc) all in next ch 3 sp, sc in the next dc, (ch 1, sk the next dc, sc in the next dc) repeat this to next ch 3 sp\*; repeat from the \* one more time. Sl st to the 1st sc to join. Round 5: ch 3, (3 dc, ch 3, 3dc) all in next corner sp, 1 dc in each sc and ch 1 sp from previous round to next corner sp; \*(3 dc, ch 3, 3 dc) in next corner sp, 1 dc in each sc and ch 1 sp from previous round\* repeat to end. SI st to top of ch 3 to join. If you have a larger bust you may want to repeat round 5 until you get the coverage you desire. Rounds 1-5 will cover a B cup. Bust size C cup- repeat round 5, once more Bust size D-DD- repeat round 5, 2 times And so on.
JMO Creations
Joining bust to skirt:
Divide the stitches from the band of the skirt in half. Mark the middle left and right spaces. (These will be the spaces on your left and right sides). With the join seam of your skirt band lying down away from you, attach the triangles with a whip stitch starting from the sides of your band and the matching corner of your triangle making sure you match them stitch for stitch so that your triangles meet in the middle of the front of the skirt. Fasten off. Still using the F/3.75 hook : joining stitch from the back of the band where you joined the last round of the skit Ch1, sc in same st; and in each st across until you reach your first triangle corner. Make 2 sc into the 1st corner. 1 sc in each st to next corner, 2 sc in next corner; ch 105, 1 sc in 1st ch from hook and each ch across to corner. 2 sc into corner; 1 sc into each st to next corner. 2 sc into corner, 1 sc into the st of the skirt between the two triangles; 2 sc in next triangle corner. 1 sc in each st to next corner; ch 105, 1 sc in 1t ch from hook and each st across to next corner. 2 sc in corner, 1 sc in each st to next corner. 2 sc in last corner. 1 sc in each st to end of skirt. Sl st to 1't sc to join. Note: If you would like your straps to be thicker; you can do extra rounds of sc into the strap stitches and around skirt band until they are the desired width. Shell Skirt Trim: Using size 1/5.50mm hook Join yarn to the bottom of the skirt in any ch sp. Ch 3, 5 dc in same sp, sl st into the middle stitch of the next cluster (this willbe the 2nd stitch of the clusters 3 sts), \*(6 dc in next ch sp, sl st into the middle stitch of the next cluster sp)\* repeat from \*to\* to end of round. Sl st to the top of the ch 3 to join, sl st to next st. Fasten Off and weave in ends.
JMO Creations
All of my patterns whether paid or free are my designs. I do not mind if you sell whatever item you make from my patterns, as your finished works are yours to do as you please. I do ask that you do not sell my patterns and please give credit where it is due. I enjoy making designs that others can easily make themselves. It is my passion. If for any reason you have any questions or need any help; please do not hesitate to send me an email. I will gladly answer any questions and offer whatever help I can pertaining the pattern. Thank you for choosing JMO Creations and I wish you all a great day!


