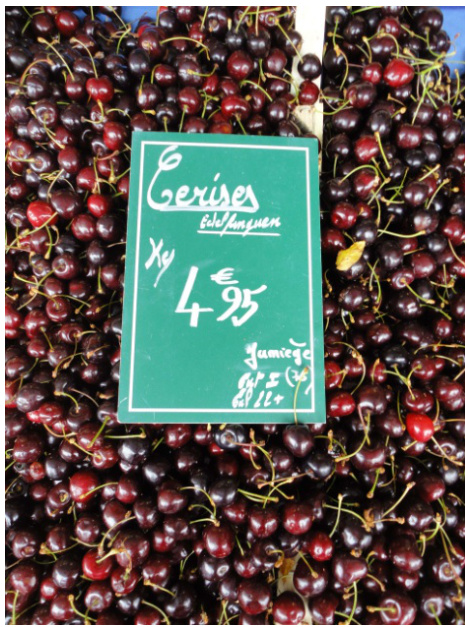
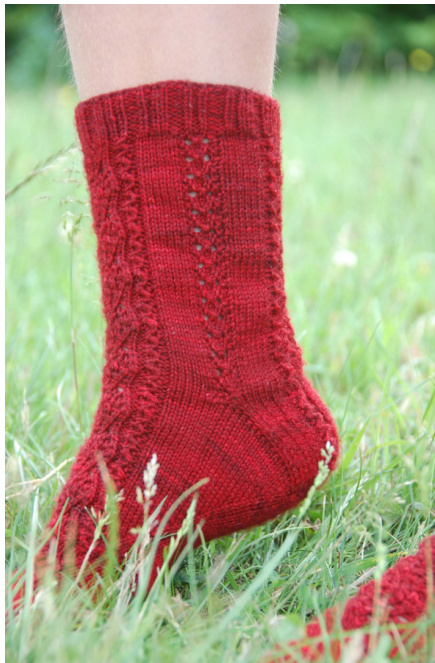
Cerises de Jumieges
June is the season for cherries in Normandy, and as I walked by our local fruit stand recently, the colours of the cherry display reminded me of the sock I'd just finished for that other key June happening: the SKA DYO challenge! I've been feeling a bit nostalgic for all things “France" lately, as I am busy packing up my home near Rouen for a move across the English Channel to Cumbria, so when I noticed the sign indicating that the fruit was “Cerises de Jumieges", I knew that this was the name I should give these socks. Jumieges is a farming community located on one of the many meanders of the Seine river just west of the city of Rouen. While the cherries grown along the banks of the Seine are sold all over Normandy in the spring, the town of Jumieges is most famous for the Abbey which was founded in the 7th century. The buildings were
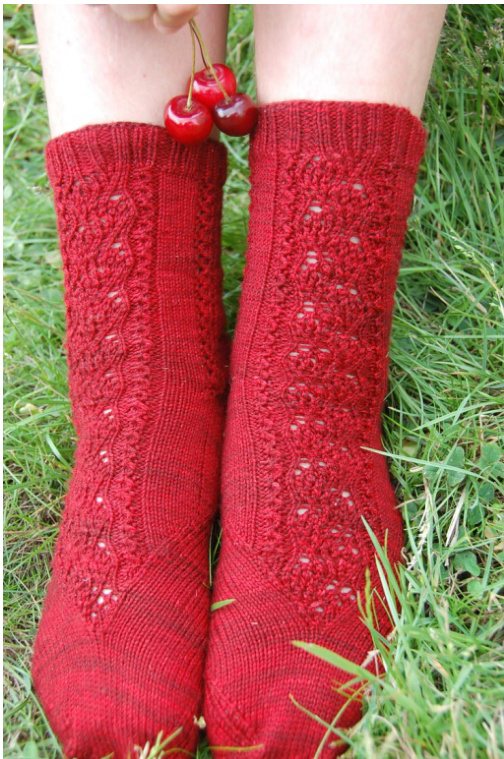
sacked and restored several times over the centuries until the French Revolution, when the monks left for the last time. The ruins of the abbey are beautiful, and were one of the first historical sites that I visited when I came to work here in France. This sock is knit cuff-down and includes both lace and cables in an easy-to-memorise design. The lace reminds me of the intricate stonework in many of the cathedrals I've seen here in France, and the construction of the foot is such that the panel on the top of the foot comes to a very graceful peak, reminiscent of the church spires. Janel Laidman's Artichoke pattern, also designed for the SKA group, is the source of the foot construction method.
SIZE
Ladies' Small, Medium & Large (Medium measures approx. 8"/20cm unstretched on the leg, 8"/20cm usntretched on the foot after blocking).
MATERIALS
450yds/411m of heavy fingering/sportweight sock yarn. Shown in size Medium, knit with the Sanguine Gryphon's Bugga! Yarn, colourway Longhorned Beetle. One or two circular 2.25mm needles, per your preference. Cable needle (optional - the cabled stitches in this pattern are easily worked without a cable needle if this is your preference) Tapestry needle for grafting toe Removable Stitch markers Note 1: no matter what your choice in needle, always use the size that gives you the gauge listed below -- every knitter's gauge is unique, and can be different with differenttechniques. Note 2: I have written this pattern for knitting with one or two circular needles, however it can easily be adjusted to using five double-pointed needles (DPN's) - just divide the stitches of Needle 1 evenly over DPNs 1 & 2, and the stitches of Needle 2 overDPNs3&4.
GAUGE
9 sts/11 rows = 2.5cm/1 inch in stockinette st
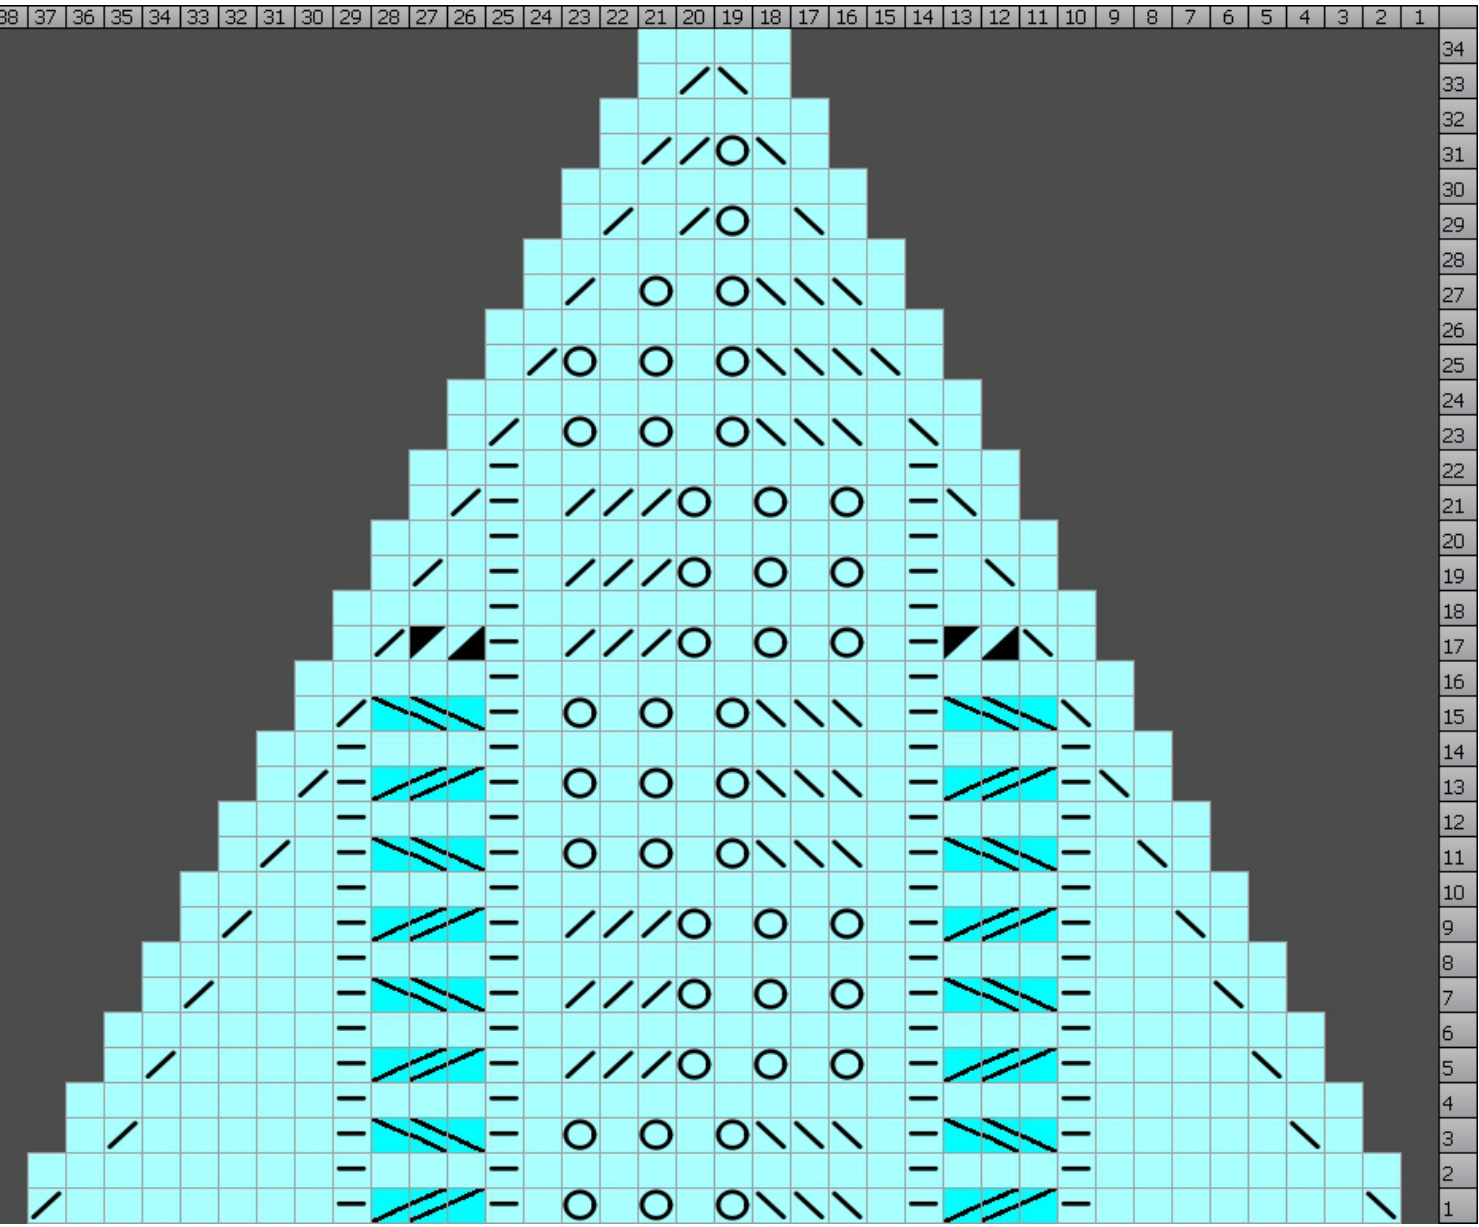
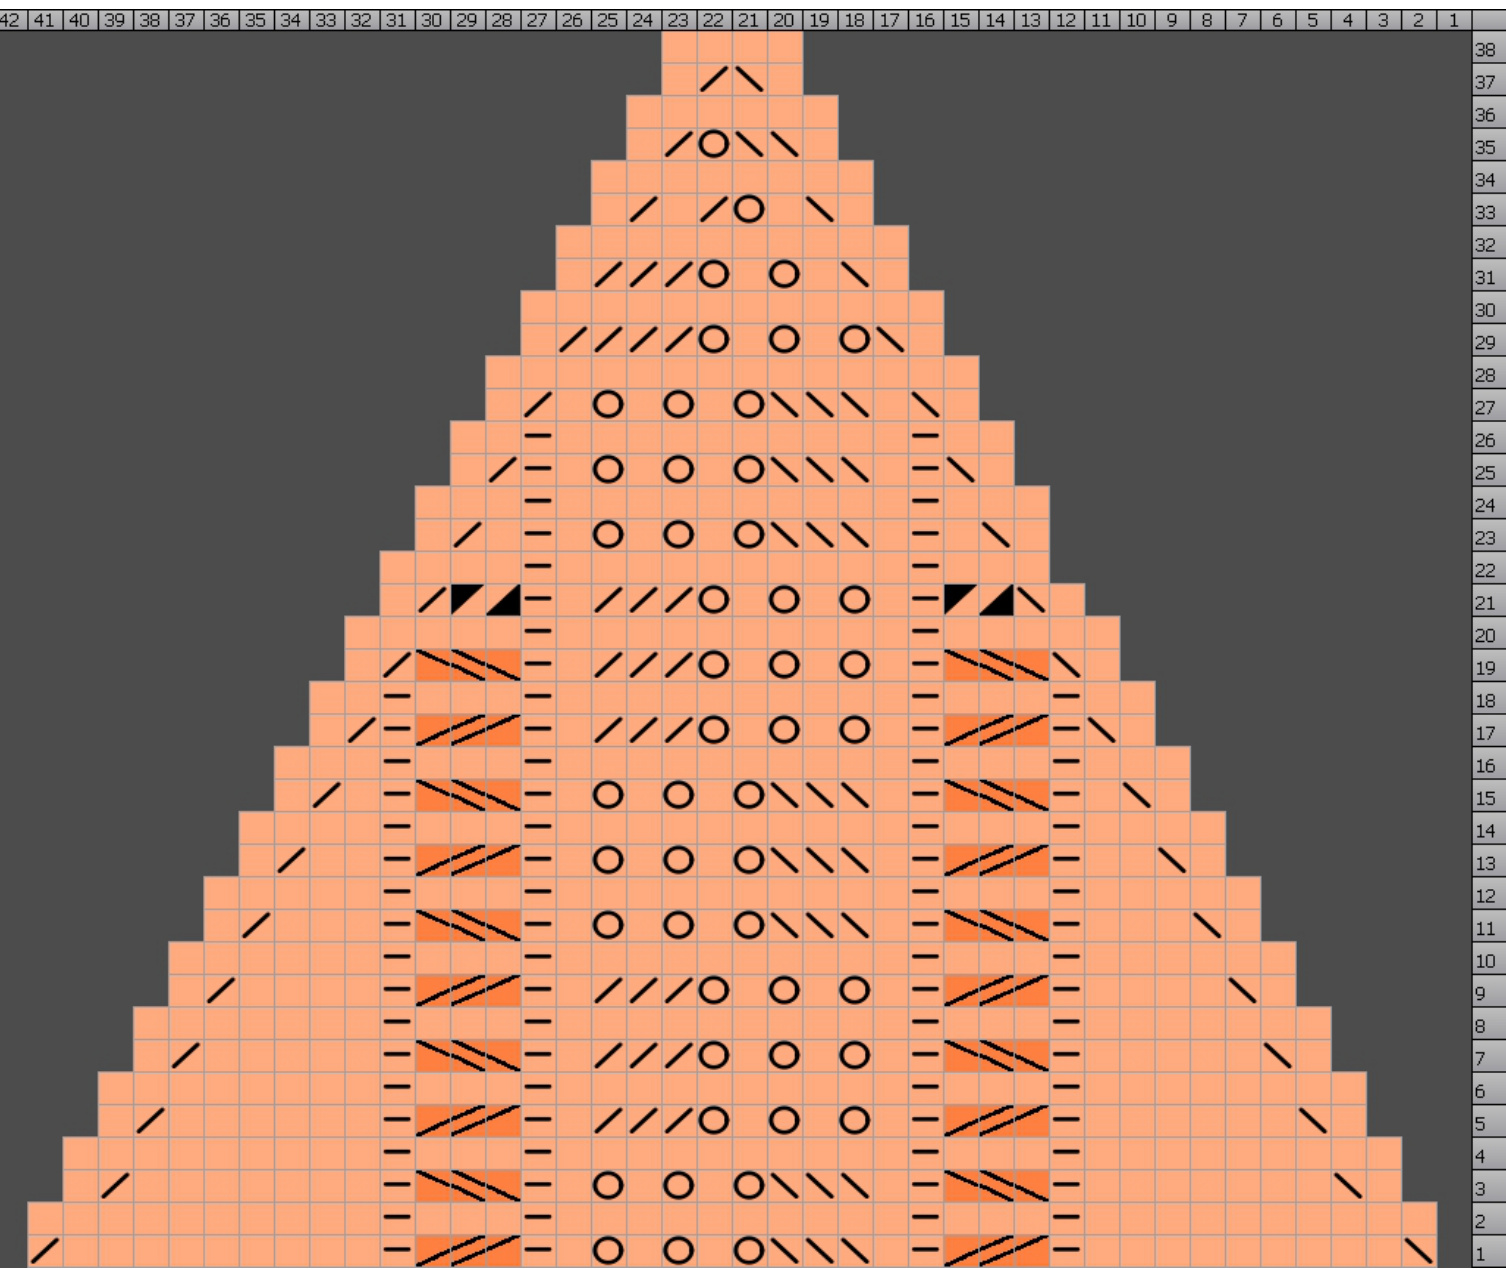
STITCH COLOUR KEY
Knit these stitches only for size SMALL Knit these stitches in addition to the white stitches for size MEDIUM Knit these stitches in addition to the white and blue stitches for size LARGE
Copyright 2011 Laura Jenkins.All rightsreserved.Forpersonal,non-commercialuse only. Instructions and charts maybe photocopied forpersonal use only.
OTHER DEFINITIONS
pm = Place Marker Slide a removable stitch marker onto the Right Needle. sm = Slip Marker Slide the removable stitch marker from the Left Needle to the RightNeedle
LIFTEDINCREASE DESCRIPTIONS
The foot construction calls for the “Make 1 stitch" technique on either side of a center “panel" of 4 stitches. I found that the Lifted Increase method gave the neatest fabric, so I have provided a description of the technique below. For illustrations of the technique, go to http://www.knotions.com/techniques/increases/how_to knit lifted increases.aspx M1R = Make One Right =Use your right needle to pull the knit stitch one row below the first stitch on your left needle. Place the stitch on the left needle, taking care to ensure it doesn't slip over the stitch next to it. Knit the stitch and slip it off the needle, taking care not to slip off the stitch that was originally on the needle M1L = Make One Left =Unlike the MiR, this increase is worked on the stitch that is two rows below the needle. Insert your right needle from back to front underneath the second stitch below the stitch just knit. Place this stitch on the left needle. Knit it through the front loop (insert needle from right to left). CABLING WITHOUT A CABLE NEEDLE 1 /2 Left Cross =Skipping the first st, slip the Right Needle through the back loops of the second and third sts on the Left Needle. Pinch the first st on the Left Needle between the thumb and forefinger of your right hand and slide all 3 sts off the Left Needle - the first st is held by your fingers and the second and third sts are temporarily held on the Right Needle: Use the Left Needle to pick up the first ("pinched") st, then slip the second and third (or “held") sts from the Right Needle back to the Left Needle. Knit the stitches as usual in the order that they now appear. 1 /2 Right Cross =Skipping the first and second sts, slip the Right Needle through the front loop of the third st on the Left Needle. Pinch the first and second sts on the Left Needle between the thumb and forefinger of your right hand and slide all 3 sts off the Left Needle - the first and second sts are held by your fingers and the third st is temporarily held on the Right Needle: Use the Left Needle to pick up the first and second (pinched") sts, then slip the third (or "held") sts from the Right Needle back to the Left Needle. Knit the stitches as usual in the order that they now appear.
CUFF
Cast on 66 (74, 82) sts using a loose cast-on (the Long-tail or German Twisted castons are good ones) and divide the stitches evenly across both needles → 33 (37, 41) sts per needle. Join sts in the round, being careful not to twist them, and knit all 12 rows of the CUFF Chart.
CUFF CHART
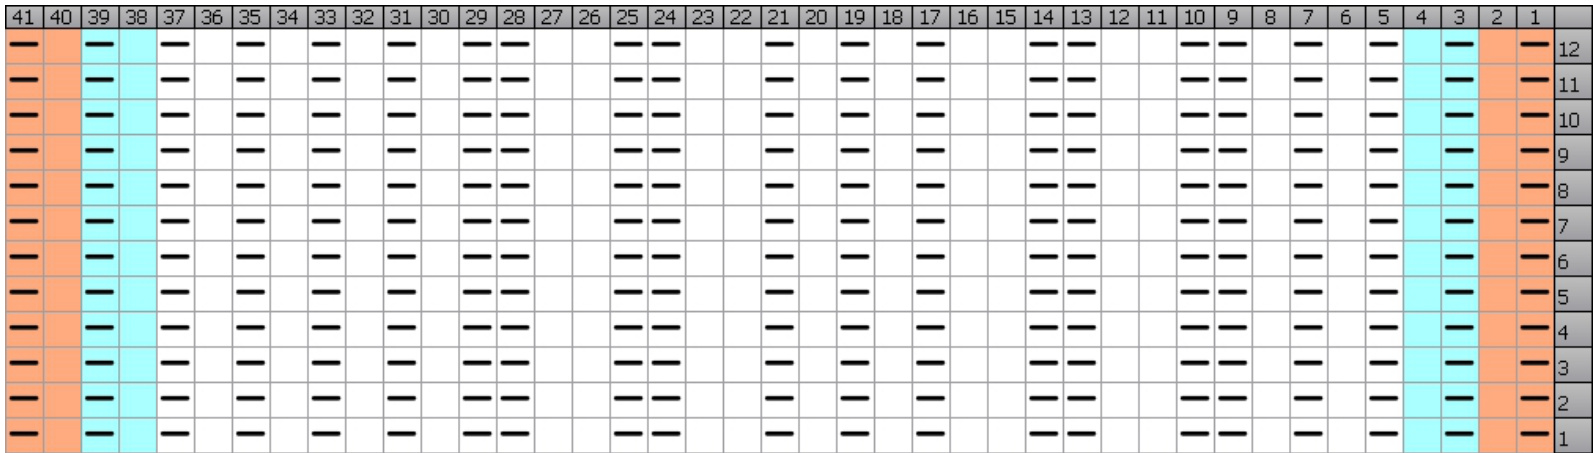
Work Orange sts for size Large only, Blue sts for sizes Medium and Large only, White sts for all sizes
LEG
Work Rows 1-12 of the Leg Chart, repeating once across the sts on N1, and then a second time across the sts on N2. (hart for a total of 5 times (60 rows), then work rows 1-9 once more.
LEG CHART
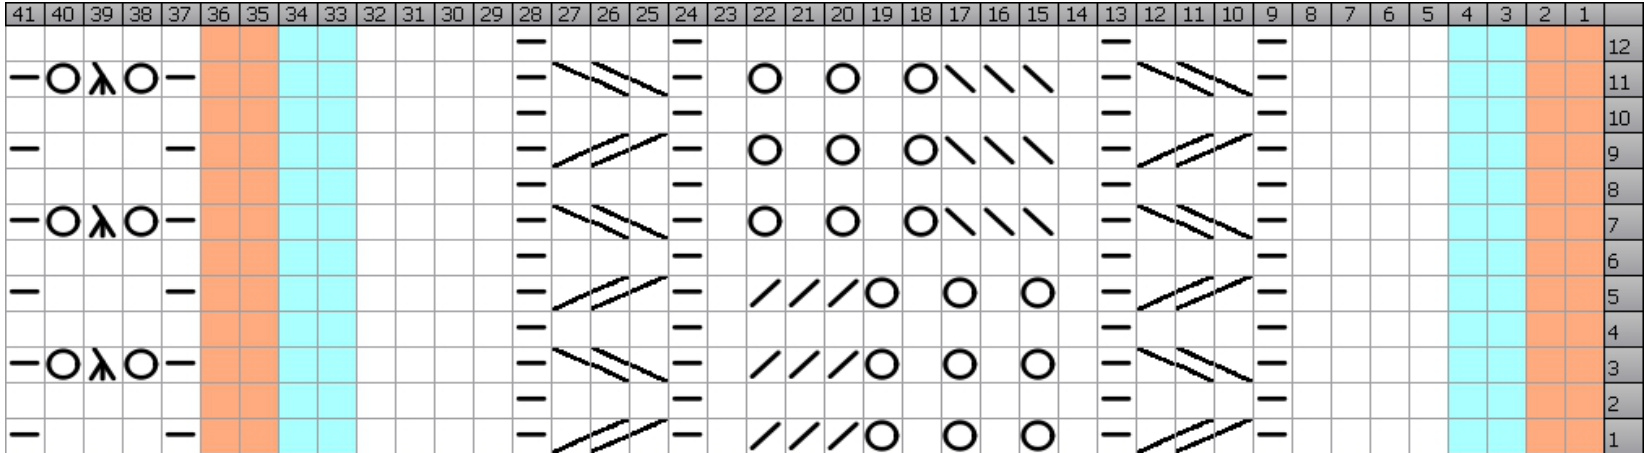
Work Orange sts for size Large only, Blue sts for sizes Medium and Large only, White sts for all sizes
LEG to HEEL TRANSITION
Knit rows 1 and 2 of the Transition Chart, following the same colour coding for sizing as for the Leg => 60 (68/76) sts total. Knit row 3 of the Transition Chart across all but the last 2 sts on N1 only, then slip these last 2 sts from the end of N1 to the beginning of N2.
TRANSITION CHART

Work Orange sts for size Large only, Blue sts for sizes Medium and Large only, White sts for all sizes N1 now holds the INSTEP Sts: 28 (32, 36) sts; which will now remain on hold while you knit the HEEL FLAP. N2 now holds the HEEL FLAP sts: 32 (36, 40) sts.
HEEL FLAP
Note: The HEEL FLAPis knit FLAT, therefore rows are worked back and forth across N2. You should be ready to start working the heel flap on a Right Side row. Set Up Row 1: Sl1, K 5 (7, 9), P1, K3, P1, K10, P1, K3, P1, K6 (8, 10). Set Up Row 2: S11, P5 (7, 9), K1, P3, K1, P10, K1, P3, K1, P6 (8, 10). Repeat rows 1 through 4 of the HEEL FLAP Chart a total of 6 (7, 8) times, then work rows 1 and 2 once more. Each edge of the heel flap will now be lined by 14 (16, 18) chain stitches. End ready to work a RS row.
HEEL FLAP CHART


Work Orange sts for size Large only, Blue sts for sizes Medium and Large only, White sts for all sizes
TURN HEEL
Row 1: Sl1 purlwise wib, K17 (19, 21) sts, ssk, K1, Turn work. Row2:Sl1 purlwise wif, P5, P2tog P1, Turn work. Row3: Sl1 purlwise wib, K6, ssk, K1 Turn work. Repeat Rows 2 and 3, increasing the number of st sts before the decrease by 1 st each row until 18 (20, 22) sts are left on N2. The last two rows of the heel turn will end asfollows: Sl1 purlwise wib, K16 (18, 20) ssk, Turn work Sl1 purlwise wif, P16 (18, 20), P2tog Turn work You should end ready to work a RS row.
PICK UP GUSSETS
Note: You are about to start knitting the foot of the sock. The top of the foot will continue to be patterned, but the sole will switch to plain stockinette st. Knit across the heel stitches, then continuing with N2, pick up and knit the chain sts along the edge of the heel flap, plus 2 sts in the space between the edge and the stitches being held on N1. Work the sts on N1 as follows: K 4(6, 8), Knits sts 11 - 30 of Row 1 of the FOOT CHART, K 4(6, 8).
FOOT CHART
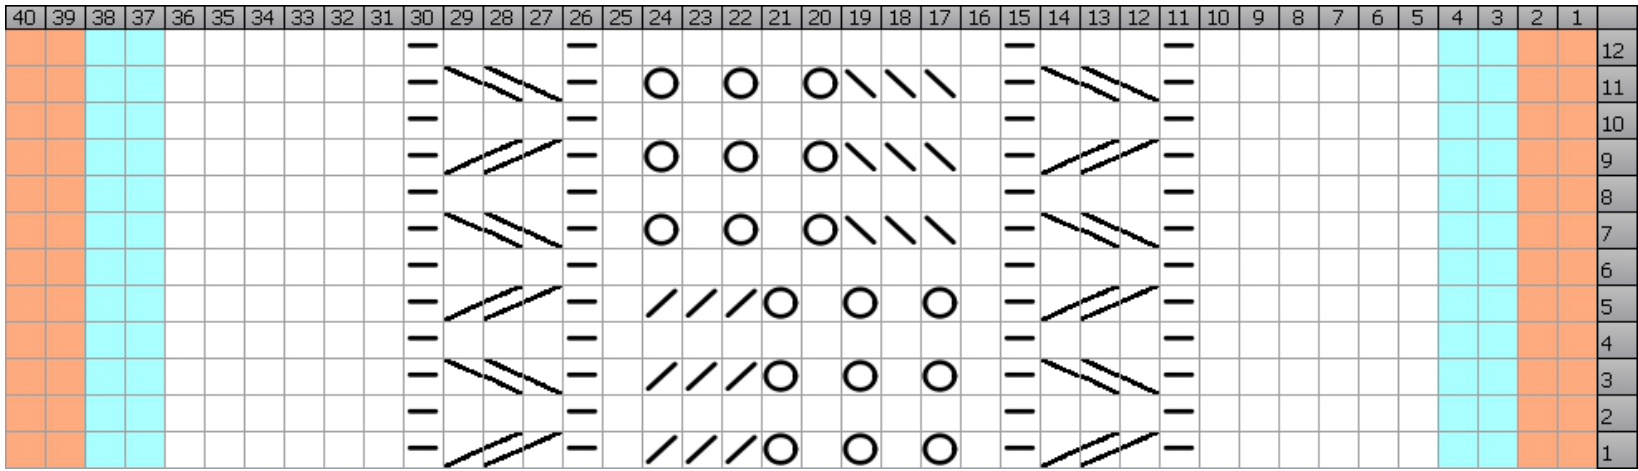
Use N2 to pick up and knit 2 sts in the space between N1 and the edge of the heel flap, then pick up and knit the chain sts along the other edge of the heel flap. Continue knitting across the 18 (20, 22) heel sts and all but the last 2 sts you picked up on the previous round, slipping these last two sts left on N2 to the beginning of N1. Slip the first two sts on N2 to the end of N1 so that you now have: N1 = INSTEP : 32 (36,40) sts and N2 = SOLE : 46 (52, 58) sts. You should be ready to start working the INSTEP sts on N1. Copyright 2011 Laura Jenkins. All rights reserved. For personal, non-commercial use only. Instructions and charts may be photocopied for personal use only.
KNIT GUSSET
Round 1: INSTEP: Knit Row 2 of the FOOT Chart across the 32 (36,40) sts on N1, following the same colour coding as for the Leg SOLE: Knit all sts
Round 2: INSTEP: Knit Row 3 of the FOOT Chart across all sts on N1, following the same colour coding as for the Leg SOLE: K14, K2TOG, pm, K14 (20, 26), pm, SSK, K14 Round 3: INSTEP: Knit next row of the FOOT Chart across the 32 (36,40) sts on N1, following the same colour coding as for the Leg SOLE: Knit all sts, slipping markers as you come to them. Round 4: INSTEP: Knit next row of the FOOT Chart across all sts on N1, following the same colour coding as for the Leg SOLE: K to 2 sts before marker, K2TOG, sm K14 (20, 26), sm, SSK, K to end. Repeat Rounds 3 & 4, decreasing the number of sts at the edges of the sole until you have completed the round that ends with K7, K2TOG, sm, K14 (20, 26), sm, SSK, K7. Note: Repeat rows 1 through 12 of the FOOT Chart as often as necessary to completethegussetsection v have 32 (36,40) INSTEP sts on N1 and 30 (36,42) SOLE sts on N2
KNIT FOOT
Note: Continue repeating rows 1 through 12 of the FOOT Chart as often as necessary to complete the foot section. Shift stitches from the ends of N2 to N1 as needed in order to keep the knitting easy to manage. Round 1: INSTEP: Knit next row of the FOOT Chart across all sts on N1, following the same colour coding as for the Leg SOLE: Knit all sts, slipping markers as you come to them.

Round 2:
INSTEP: Knit next row of the FOOT Chart across all sts on N1, following the same colour coding as for the Leg SOLE: K6, K2TOG, sm, K5 (8, 11), M1R, K4, M1L K5 (8, 11), sm, SSK, K6
Round 3 :
INSTEP: Knit next row of the FOOT Chart across all sts on N1, following the same colour coding as for the Leg SOLE: Knit all sts, slipping markers as you come to them.
Round 4:
INSTEP: Knit next row of the FOOT Chart across all sts on N1, following the same colour coding as for the Leg SOLE: K5, K2TOG, sm, K6 (9, 12), M1R, K4, M1L K6 (9, 12), sm, SSK, K5 Repeat Rounds 3 & 4, decreasing the number of sts at the edges of the sole and increasing the number of sts between the decreases until you knit the round K2TOG, sm, K11 (14, 17), M1R, K4, M1L, K11 (14, 17), sm, SSK. Next Round: INSTEP: Knit the next row of the FOOT Chart across all sts on N1, following the same colour coding as for the Leg SOLE: K1 and then slip st just knit to N1. Remove marker, K to last st. Slip last st to N1 without knitting it, remove marker.
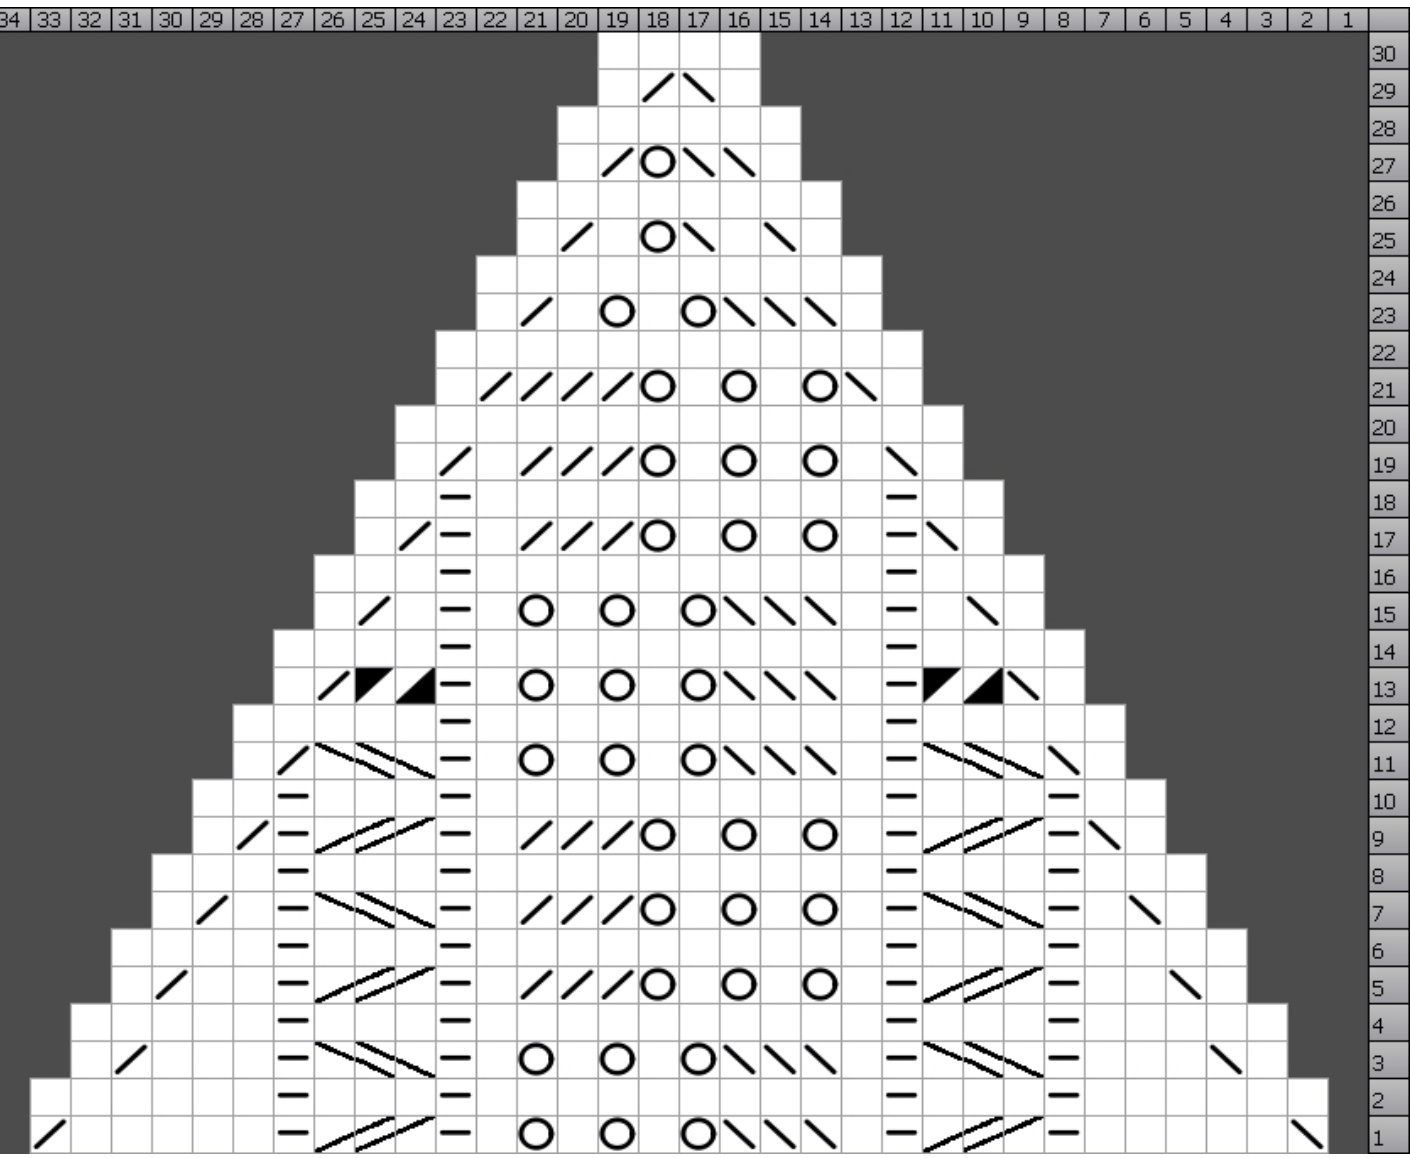
KNIT FOOT DECREASES
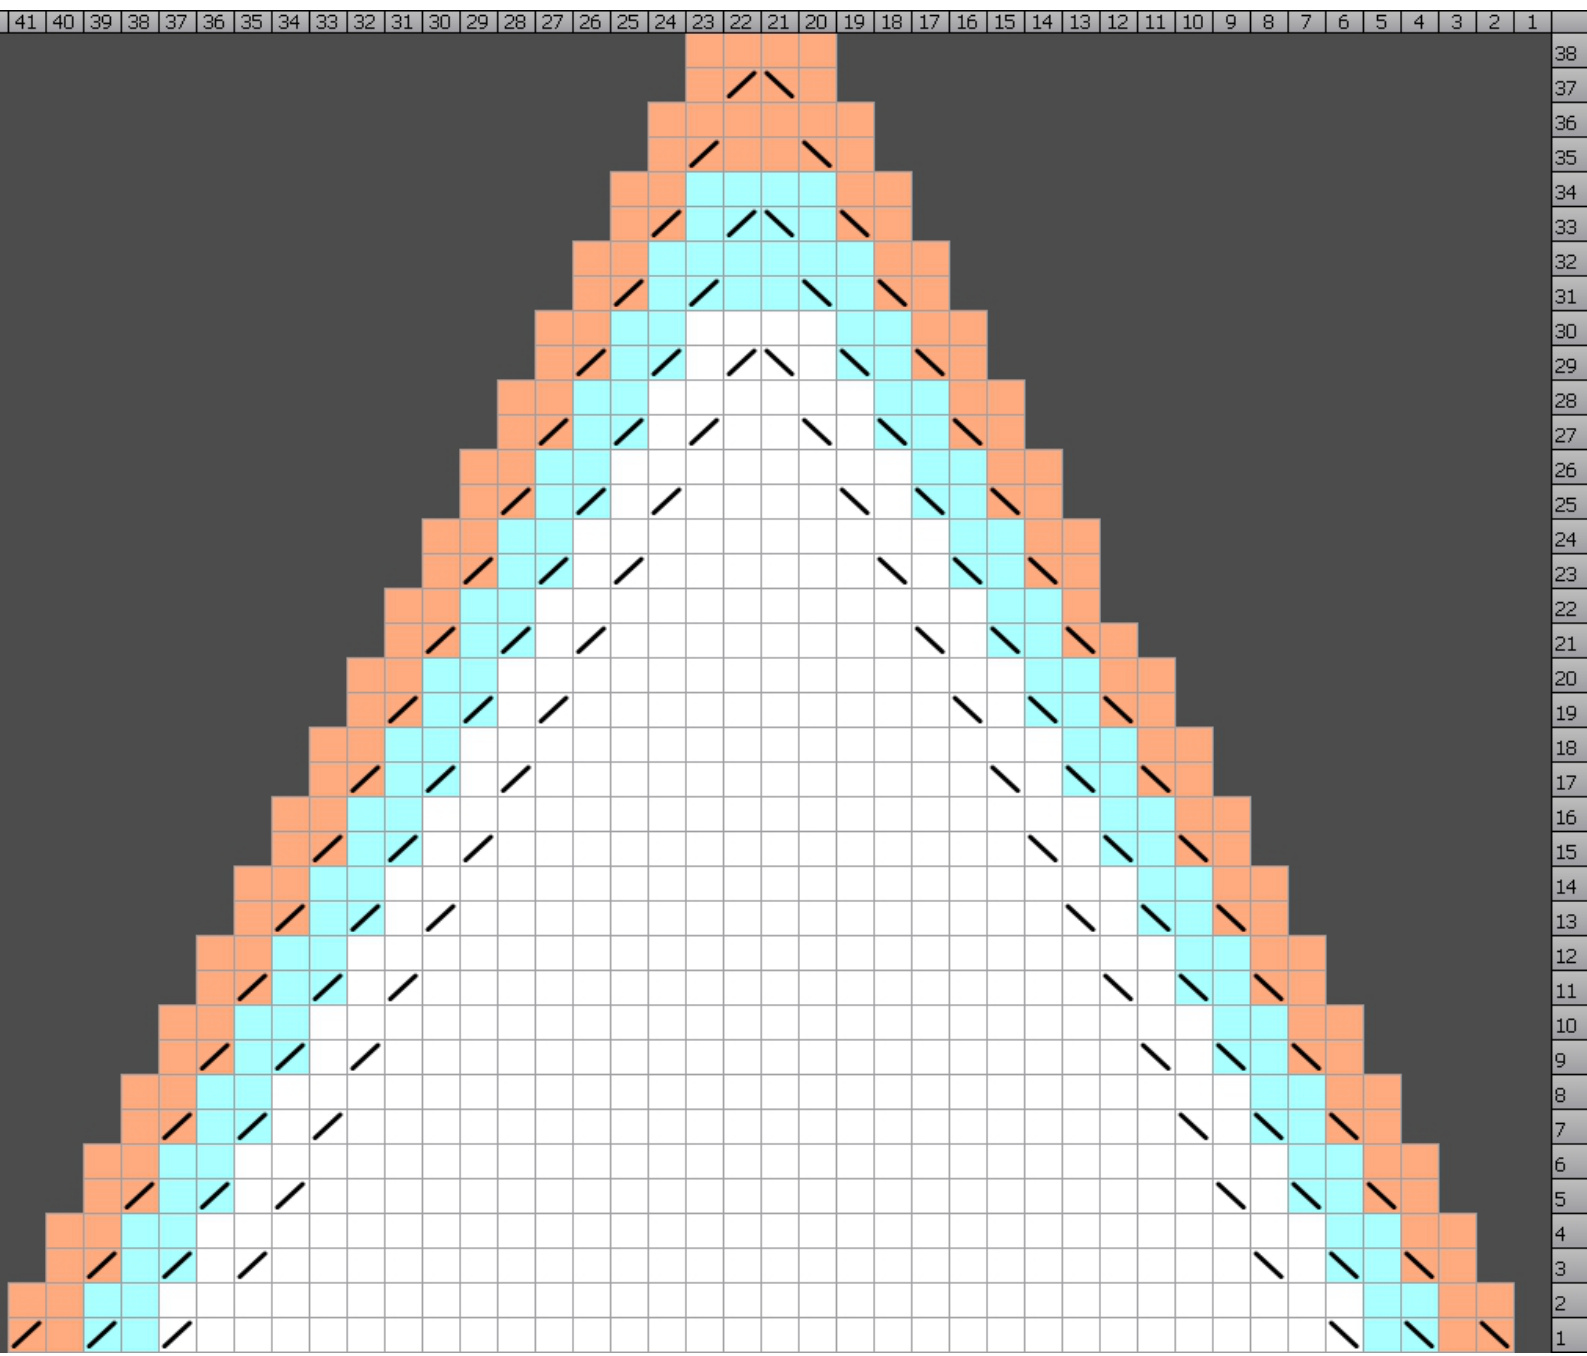
Note: If you added extra stitches to the heel flap so as to make a deeper heel or if you changed the number of stitches picked up for the gusset, your row count when you get to this section will not match up with the appropriate foot decrease chart. This is NOT a problem!! Just use the blank Foot Decreases Chart to create your own, following one of the Charts as an example and making sure that you maintain an equal number of yarn overs and decreases (K2Tog or SSK) through the lace panels. The decreases will now continue across the INSTEP sts on N1, while the increases will continue on the SOLE. Round1 : INSTEP: Work Row 1 of the size-appropriate FOOT DECREASES Chart SOLE: K12 (15, 18), M1R, K4, M1L, K12 (15, 18) Round 2: INSTEP: Work Next Row of the size-appropriate FOOT DECREASES Chart. SOLE: K all sts, Round3: INSTEP: Work Next Row of the size-appropriate FOOT DECREASES Chart. SOLE: K13 (14, 17), M1R, K4, M1L, K13 (14, 17) Repeat Rounds 2 & 3, increasing the number of knit sts on either side of the increases every other round until the decreases meet in the middle of the FOOT.
FOOT DECREASES CHART-SIZE SMALL
TOE Continue knitting all sts in st st until the foot measures approximately 2" less than the total desired foot length. Adjust the sts so that you have 31 (36, 41) sts on each needle. Round 1 N1: K1, SSK, K to last 3 sts on needle, K2TOG, K1. Repeat across sts on N2. Round 2: K all sts Repeat Rounds 1 and 2 until the foot is the desired length, ending with a Round 1. Graft sts of N1 and N2 together using Kitchener St. Copyright 2011 Laura Jenkins.All rightsreserved.Forpersonal,non-commercialuse only. Instructions and charts may be photocopied for personal use only.


