Get Well Soon Socks
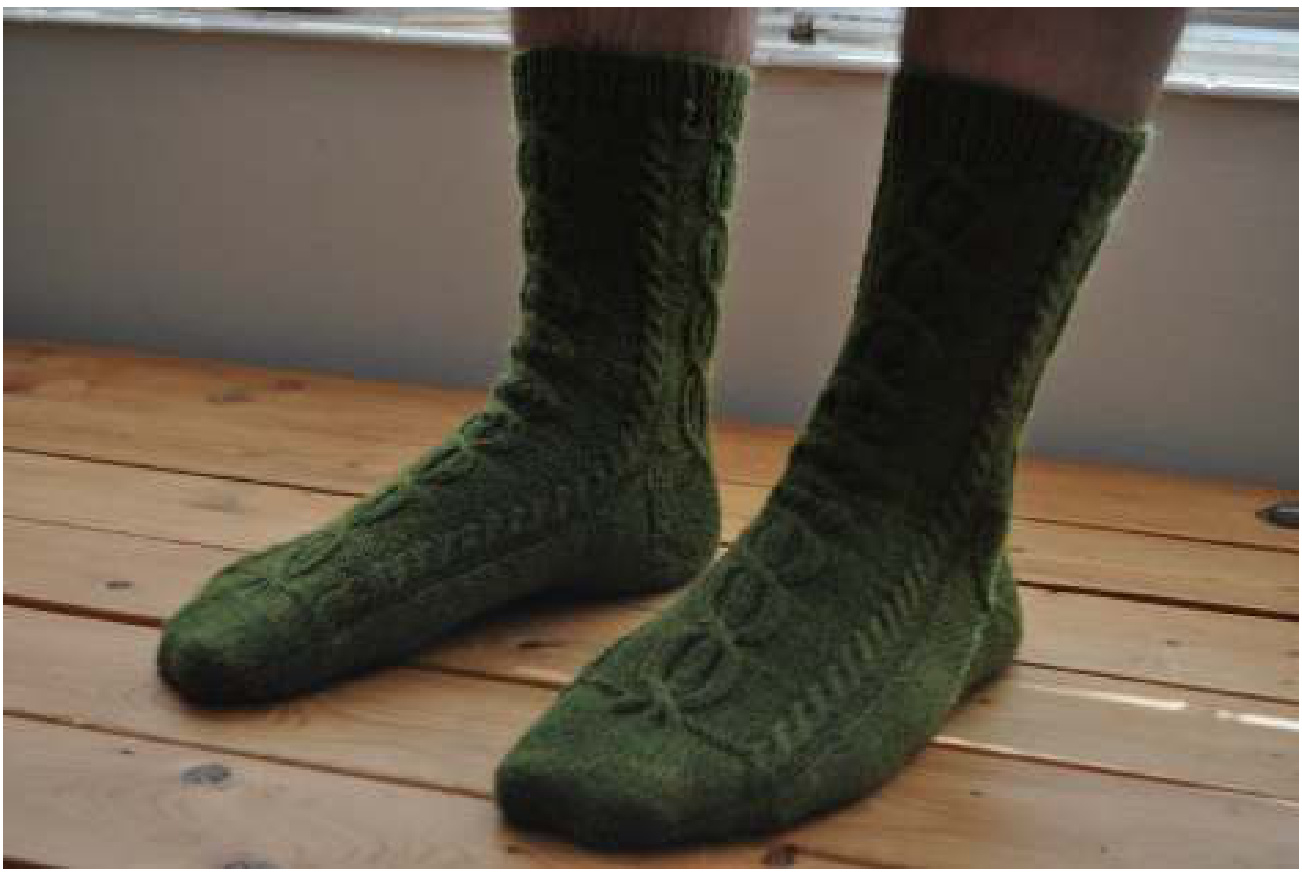
By Janelle Wood When my husband became ill with pneumonia, I wanted to make him as comfortable as possible. In addition to pushing fluids and making him bland meals, I decided to make him a pair of socks. The cables make these man socks cozy, perfect for times when he's under the weather. They are knit toe-up and have Sivia Harding's toe-up heel flap incorporated into them. She has graciously given me permission to use her heel design. I knit them using the magic loop method, which is easily converted to two long circulars. I recommend knitting them 2 at a time so there will be no confusion when the charted cable sequence was stopped for the heel turning. If they are knit one at a time, I would recommend making a note where the gusset increases began while knitting the first sock.
Gauge:
17 sts and 22 rows per 2 inches, in the round, unblocked
You will need.
1 40 inch $2.5\ \mathrm{mm}\ \mathrm{US}\ 1.5$ circular knitting needle or 2 long circular needles (or size needed to obtain gauge) 400-500 yards of Fingering weight yarn (I used 430 yards to make a sock to fit a men's size $8~\%$ Rowcounter Cableneedle Stitch marker Tapestry needle for bind off and weaving in ends
Increases:
LR: Right leaning increase, Insert right needle from back to front into the stitch one row below the first stitch on the left needle, lift the stitch onto the left needle and knit into the front loop of that stitch. LL: Left leaning increase: Insert left needle from back to front into the stitch two rows below the last stitch on the right needle. Lift that stitch onto the left needle and knit into the back loop of that stitch. Increases designed by Sivia Harding
Toe
Using magic cast on, cast on 10 sts onto each needle, 20 sts total. Place marker to indicate beginning of round. Knit the first round. Begin toe increases. Round 1: $^{*}\mathrm{K}1$ , LR, K to last st, LL, K1, repeat on next needle Round 2: K all sts Repeat these 2 rounds until you have 34 sts on each needle, 68 sts total.
Foot
Begin chart 1 of cable sequence on first needle. K all sts on second needle Continue in this manner until the foot measures $3\ 1/4$ inches short of desired foot length. GUSSET Continue charted cable pattern on first needle. On second needle, begin to increase. Round 1: K1, LR, K to last st, LL, K1 Round 2: K all sts Continue knitting in this manner, working through charted cable pattern on the first needle and increasing on the second until there are 54 sts on the second needle, 88 sts total. Make a note of where the charted cable sequence was before the turning of the heel.
Turn Heel
Row 1: (RS) K 44, W&T Row 2:P33,W&T Row 3: K to 1 st before wrapped st, w&t Row $4\,\mathrm{P}$ to 1 st before wrapped st, w&t Repeat rows 3 and 4 until there are 5 wrapped st on each side, ending with a WS row. Next row: K 25, pick up wraps on next 4 sts and knit them together with the sts they wrapped. For the fifth wrapped st, pick up wrap and knit these 2 sts together with the next unwrapped st (3 sts tog), turn. Next row: Sl1 as if to purl, p29, pick up wraps on the next 4 sts and repeat last wrapped st as before (p 3 sts tog with next unwrapped st).
Heel Flap
Continue working back and forth on second needle for the heel flap. Row 1: Sl 1 as if to purl, K 33, Ssk, turn. Row 2: S1 1 as if to purl, P 33, p2tog, turn. Row 3 Sl1 as if to purl, K to last st before gap, Ssk, turn Row 4: S1 1 as if to purl, P to last st before gap, p2tog, turn. Repeat rows 3 and 4 until there are 2 sts left on both sides of the gap, ending with a WS row.
Leg

Resume working in the round and continue working charted cable pattern on first needle. With RS facing and working on needle 2, K to 1 st before gap, Ssk, K1. Resume charted cable pattern on needle 1. On needle 2, K1, K2tog, K to last st before gap, Ssk (69 sts) Next round: Work cable sequence on needle 1, on needle 2, k2tog. Knit to end of round evenly increasing 4 sts (38 sts on needle 2, 72 sts total). Begin working the second charted cable pattern on needle 2 when you are ready. For example, I began my heel turning while I was at the end of row 7 of the first cable chart, so I continued to just knit the sts on the second needle until I finished the charted pattern on needle 1. This way the cables and chart rows were the same on both needles. You could also just start the second chart on the same row of the first. Continue working both charted cable patterns on each side of the leg until the leg measures $1~\%$ inches before desired length, ending with round 7 (before continuing onto round 8).
Cuff
Work 15 rounds of ribbing for the cuff(I used K1 P1, but K2 P2 would look good too, or your preferred ribbing pattern). Finish by using a stretchy sewn bind off. Weave in all yarn ends, wash and block as desired.
Cable Pattern Chart 1

Cable Pattern Chart 2
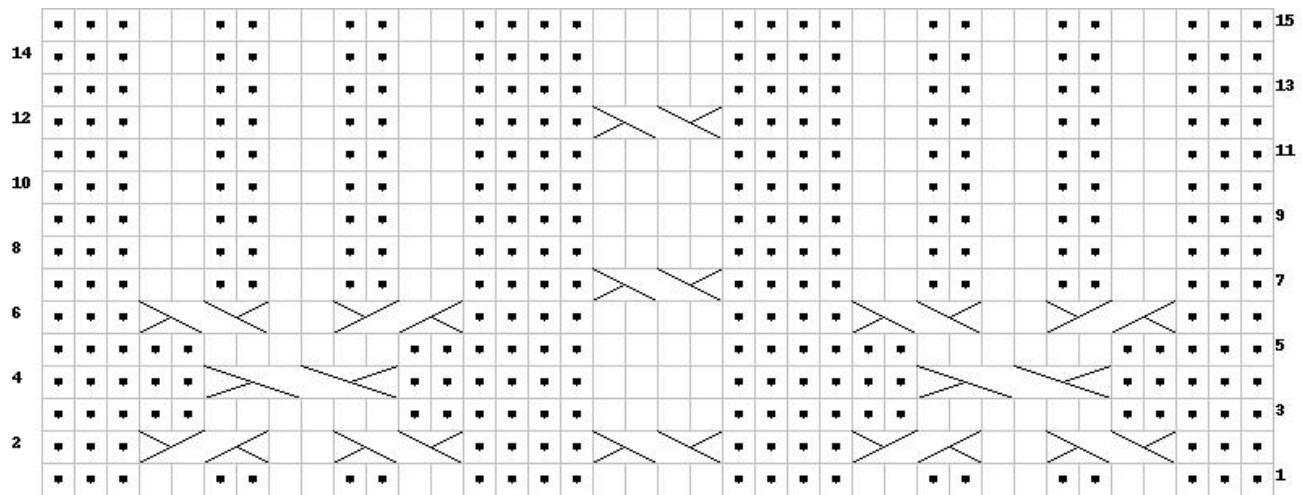
Chart Legend:
I'm new to this charted pattern stuff and couldn't figure out how to write a legend. Since the socks are worked in the round, all the rows are on the right side of the fabric. The black dots are purl sts The white squares are knit sts The cable sts on row 2 in the first chart are as follows: c4f, c4f, c4b, c4b Onrow4:c6f Based on those instructions, you should be able to look at the other cable sts and have an understanding of how to cable them. Links to tutorials about specific techniques can be found on my blog: http://prettystitches.wordpress.com/2010/09/22/get-well-soon-socks/ If you have any questions or want to share project pictures, email me at johnsie4@yahoo.com or find me as johnsie4 on Ravelry. This pattern is intended for personal use only. You may make the socks for yourselfor give them as a gift You may not make the socks and sell them without the writen permission of the designer.


