Clouds Socks
Copyright 2009 by Rebecca A [spockie on Ravelry]
This pattern was part of the Six Sox KAL Yahoo Group. Clouds Socks are worked cuff down, using a short-row stitch pattern, short-row heel, and whirl-pool toe. This pattern can easily be converted to toe-up, see resources section at end of pattern for more information. The stitch pattern for Clouds is based on a stitch pattern from Barbara Walker's "Learn to Knit Afghan Book" called “Square 60: Short-Row Stripes". I have converted this stitch pattern from knitted flat to knitted in the round, and have calculated variations for different numbers of stitches per repeat. You should be able to knit many different sizes of socks using various weights of yarn, gauges, and needle sizes, using this pattern.
Yarn Requirements:
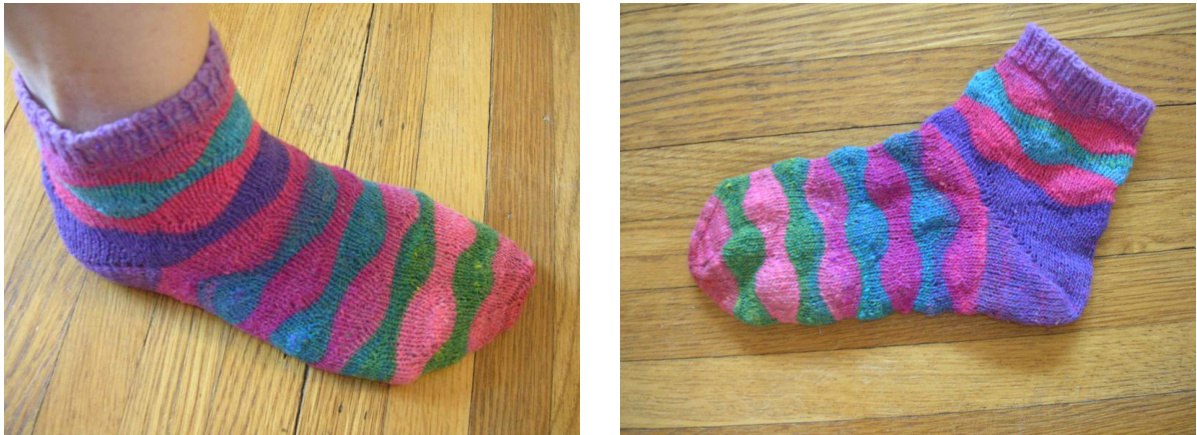
Yarn requirements are given for fingering weight yarn - you can use other weights of yarn, as desired. See part 1 of pattern for notes about yarn selection. 100 g fingering weight - self-striping or with gradual color changes. OR 2 balls each, 50 g fingering weight yarn in two different colors OR Leftover sock yarn scraps - approximately 100 g The socks shown in the pictures above were knit with two different colorways of Noro Kureyon Sock (S102 and S40).
Tools:
Circular needles or DPNs in size to get desired gauge Optional - needles one or two sizes smaller than gauge needles (for working invisible cast-on) Extra circular or DPN, or stitch holders, in same size or smaller size (used to redistribute stitches, as needed) Stitch markers Darning needle A few yards of contrasting scrap yarn and circular needles or DPNs in one or two sizes smaller for cast-on (needed if you are using the invisible cast-on)
Clouds Socks
Copyright 2009 by Rebecca A [spockie on Ravelry] Abbreviations: K Knit P Purl K2tog Knit two together St Stitch W&T Wrap the next stitch with working yarn, from public side of work to back side of work, then turn work.
Pattern Part 1 - Select Yarn and Determine Gauge and Stitch Count
The first step is to determine your gauge, needle size, yarn, and stitch count. If you are using yarn that you have used in the past, you can determine gauge, needle size, and stitch count based on experience. If using unfamiliar yarn, you should knit a test swatch prior to casting on for this pattern. To knit a test swatch, cast on 40 stitches in the round and knit stockinette for a minimum of two inches. Measure your gauge for both stitches per inch and rows per inch. Write these numbers down. You can unravel your gauge swatchand reuse theyarn in thesocks. Next, measure the circumference of your foot at the ball of the foot in inches. Multiply this number times your stitch gauge. Multiply this number by 90% to factor in negative ease. If you like more negative ease, you can use 85%. For example: my foot circumference = 8.5 and my stitch count = 8, using US 1 needles. 8.5 x 8 = 68. I like a snug fit, so I will multiply 68 x 85% = 57.8. Take the number that you calculated and compare it to the stitch count numbers in column A of Chart 1. Select the closest number to your calculation. In my case, the closest number is 56, so I'll be using the row for 56 Total Stitch Count. (l also know from experience, that 56 stitches makes a sock that fits me well with this yarn). You may want to print out Chart 1 and use a highlighter to highlight the row with the sock calculations for your pair of socks. By changing needle size and yarn weights, you can knit socks to fit most people. For example, socks knit on size 1 needles with 42 stitch count and fingering weight yarn should fit a baby. Size 4 needles with worsted weight and 48 stitch count should fit woman'ssizemedium. If using a yarn with gradual color changes, such as Kureyon or Poems, use either two different colorways, OR, rewind your ball of yarn into two separate balls and alternate these balls for MC and CC. OR, don't change colors and have the pattern change color moregradually. If using self-striping yarn, you do not need to change colors, instead, let the stripes create the color pattern.
Pattern Part 2 - Cast-on and Knit Cuff
Cast on the Total Stitch Count from column A of Chart 1 using any stretchy cast-on method and MC yarn. Knit 1 - 2 inches of K1, P1 ribbing. Following is the method that I use. This method produces a very stretchy cast-on edge that looks nice. I knit the first few rows of this cast-on flat, before joining into the round. Later, I use the cast-on tail to sew the seam of the first few rows.
Clouds Socks
Copyright 2009 by Rebecca A [spockie on Ravelry]
Invisible Cast-on:
With needles used to get gauge, cast-on half the Total Stitch Count number of stitches required, using any cast-on method and the contrasting scrap yarn. Work K1, P1 rib for three or more rows - working flat. Cut the scrap yarn. Join MC yarn, leaving a tail about 8 inches long - you will use this tail later to seam the first few rows of the ribbing. Using the smaller needles and the main color yarn, K1, P1 in each stitch, doubling the cast-on stitches. You should now have the Total Stitch Count number from column A of Chart 1 on your needles. Knit the knit stitches and slip the purl stitches with the yarn in front of the work. Repeat for four more rows, then switch to the needles used to get gauge. Work in K1, P1 ribbing, joining in the round. Work 8 more rows of K1, P1 ribbing, or until your ribbing is desired length (not including the scrap yarn.) Carefully remove thescrapyarn. Note - the original directions for the invisible cast-on call for needles two sizes smaller than those used to get gauge. If you don't have needles two sizes smaller, you can use one size smaller, or just use the needles you get gauge with. The cast-on will look neater when the socks are off the leg if you use the two sizes smaller needles, but they will still fit well and look nice on the leg if you don't use the smaller needles. Place markers: Place a marker to mark the beginning of the row. If desired, place markers between each pattern repeat. If using more than one marker, use a different type or color of marker for the beginning of the round so that it is easy to identify.
Pattern Part 3 - Work the Leg
The Clouds stitch pattern is worked over 12 rows, for all stitch counts. Look up your Total Stitch Count in column A of Chart 1 and in the same row, find your Pattern Stitch Count Number in column B and your Repeat Number of Times in column C. For my Total Stitch Count 56 sock, I will be using the 14 stitch pattern repeat and work 4 repeats eachround. Note - for the first pattern repeat, you will already be using the MC yarn. Work the leg using the Clouds Stitch pattern. Consult Chart 2 for rows 4 & 10 for the stitch pattern that corresponds to your Stitch Pattern Number from column B of Chart 1. I.e., if your Stitch Pattern number is 14, you will be working the 14 Stitch Clouds pattern. Work as many 12 row pattern repeats of the Clouds pattern as desired to achieve the leg length you like. \*\* Whenyoucometothelast 12 rowrepeat onthelg, stop working the pattern at row 11, instead of row 12. \*\*\*
Clouds Socks
Copyright 2009 by Rebecca A [spockie on Ravelry]
Clouds Stitch Pattern
For rows 4, 5, 10, and 11, when you come to a wrapped stitch, pick up the wrap and knit it together with the stitch that was wrapped. Change to MC Row 1-3 K Row 4 Work row 4 from Chart 2 for your pattern stitch count number Row 5 - 6 K Change to CC Row 7 -9 K Row 10 Work row 10 from Chart 2 for your pattern stitch count number Row 11 -12 K Note - depending on the number of needles you are using and the number of repeats, you will be working some short rows across two different needles. You may want to use an extra needle to redistribute the stitches while working the short row pattern repeat so that the short rows are all on the same needle. When finished with the repeat, replace the stitches back on the correct needle.
Pattern Part 4 - Turn Heel
You should have stopped knitting at the end of row 11 of the Clouds stitch pattern. You will be working with CC. The rest of the heel is worked with CC.
Last row before heel turn:
Knit number of stitches from column D of Chart 1. Note - you are knitting a partial row prior to knitting the heel. When you finish knitting D stitches, you will have unknit stitches on this row equal to half the number of stitches on your heel. The reason for this is to center the pattern repeat on the sock. The first cast-on stitch will also be at the center of the back of the leg, above the heel.
Set-up for Short Row Heel:
When arranging the stitches, you will want to have the marker that marks the beginning of the pattern repeat in the center of the heel stitches. This will keep the pattern symmetrical on both sides of the heel. The marker should be in the correct place, just take care when rearranging stitches that you keep it in the correct position. Starting with the stitches that have not yet been knit from the last row, arrange the Heel/Sole Stitch Count (column F) number of stitches on the heel/sole needle. The working yarn should be on the right end of the heel/sole needle with the right side of the sole facing you. When you start working the heel, you will be working from right to left across this needle. Arrange stitches so that you have Instep Stitch Count (column E) number of stitches on the instep needle. If using DPNs, divide the instep stitches evenly between two DPNs.
Clouds Socks
Copyright 2009 by Rebecca A [spockie on Ravelry]
Work Short Row Heel:
Row 1: K up to last stitch on heel/sole needle, W&T Row 2: P up to last stitch on Heel/sole needle, W&T Row 3: K up to stitch before last wrapped stitch, W&T Row 4: P up to stitch before last wrapped stitch, W&T Repeat rows 3 and 4 until the Heel Center Stitch Count (column G) are left unwrapped between the wrapped stitches on each side. You should be ready to start a right side row. From this point forward, you will be wrapping stitches that have already been wrapped. These stitches will be referred to as double-wrapped stitches. When working any wrapped stitch, pick up one or both (if there are two) of the wraps, lift the wrap up and over the stitch, and knit or purl the wrap together with the stitch. Row 6: K to first wrapped stitch, K wrapped stitch, W&T Row 7: Slip 1, P to first purled stitch, P wrapped stitch, W&T Row 8: Slip 1, K to first double-wrapped st, K double-wrapped st, W&T Row 9: Slip 1, P to first double wrapped st, P double-wrapped st, W&T Repeat rows 8 and 9 until there is one double-wrapped stitch left at each end of the heel/sole needle. Row 10: Knit to marker that marks the center of the heel.
Change to MC
You will now start working the instep in Clouds Stitch Pattern. For first row of instep, pick up and knit the remaining two wraps (one at each end of heel/sole needle) when you come to them. If desired, rearrange the stitches on your needles as for working the leg.
Pattern Part 5 - Work Foot:
Continue working in Clouds Stitch Pattern until you are ready to work toe. To determine when to work toe, measure your foot length in inches and subtract 1 inch - the result is the instep length. Work in Clouds Stitch Pattern finishing on row 6 or 12 of the stitch pattern, whichever gets you closest to (without exceeding) your instep length. Change color and continue working in knit stitch until you reach the instep length.
Pattern Part 6 - Work Toe and Finish Sock:
Consult Chart 1 for Toe Marker Stitch Count 1 (column J), Number of Toe Markers 1 (column L), Toe Marker Stitch Count 2, (column M), and Number of Toe Markers 2 (column N). If J = 0, start with Set-up row Part 2.
Clouds Socks
Copyright 2009 by Rebecca A [spockie on Ravelry] Set-up row Part 1: [Knit J stitches, PM], repeating between [] for a total of L times Set-up row Part 2: [Knit M stitches, PM], repeating between [] for a total of N times Row 1: [K2tog, K to marker], repeat between [] until end of row Row 2:K You should have a total of 6 markers and will be decreasing 6 stitches per round. Part 1 of the set-up row will adjust for socks with a stitch count that is not divisible by 6. Repeat rows 1 and 2 until there are no more than 2 stitches between each marker (for some stitch counts there will be 2 stitches between some markers and 1 stitch between others). K2tog until only 6 stitches remain. Cut 8 inch tail, thread tail onto darning needle. Run the darning needle through the 6 remaining stitches and pull tight to close up the toe. Turn sock inside out and weave in the end. Weave in all ends. If you used the invisible cast-on method, use the cast-on tail to sew up the short seam at the top of the cuff before weaving in ends. Your finished sock will have a bumpy texture due to the short rows. When you put the sock on, these bumps should even out as the sock stretches over your foot. If desired, you can block your socks on a sock blocker form to remove the bumpiness, but blocking is not required. I personally never block socks.
Resources:
Working Short Rows:
There are many tutorials on the internet for working short rows and short row heels. To find them, go to Google.com and search on "short row knit tutorial". For videos, go to YouTube.com and search on“short row heel" Short Row Toe-up Sock with Short Row Heel For instructions on working a sock toe up with a short row heel, see this article on Knitty.com. http://knitty.com/ISSUEsummer06/PATTuniversalsock.html To convert Clouds Socks to toe-up pattern, work toe, then work Clouds stitch pattern to heel, work short row heel, continue in Clouds stitch pattern, end with 1 inch K1, P1 rib, then bind off loosely.
Chart 1 - Clouds Sock Pattern Stitch Count
Calculate your Total Stitch Count. Compare to numbers in column A and select the row with the closest Total Stitch Count. You will use the numbers in this row for your sock.
| Total Stitch | Use Pattern Stitch | Repeat Number of Times | Last Row Before Heel Turn Stitch Count | Instep Stitch | Heel/Sole Stitch | Heel Center Stitch | Stitches to Wrap Each Side of Heel | Toe Decrease | Toe Marker Stitch | Number of Toe Markers | Toe Marker Stitch | Number of Toe Markers |
| Count A | Count B | C | D | Count E | Count F | Count G | Center H | Rounds | Count 1 J | 1 L | Count 2 M | 2 N |
| 42 | 14 | 3 | 31 | 20 | 22 | 8 | 7 | 14 | 0 | 0 | 7 | 6 |
| 48 | 16 | 3 | 36 | 24 | 24 | 8 | 8 | 16 | 0 | 0 | 8 | 6 |
| 54 | 18 | 3 | 40 | 26 | 28 | 8 | 10 | 18 | 0 | 0 | 9 | 6 |
| 56 | 14 | 4 | 42 | 28 | 28 | 8 | 10 | 18 | 10 | 2 | 9 | 4 |
| 60 | 20 | 3 | 45 | 30 | 30 | 10 | 10 | 20 | 0 | 0 | 10 | 6 |
| 64 | 16 | 4 | 48 | 32 | 32 | 10 | 11 | 22 | 11 | 4 | 10 | 2 |
| 66 | 22 | 3 | 49 | 32 | 34 | 10 | 12 | 22 | 0 | 0 | 11 | 6 |
| 70 | 14 | 5 | 52 | 34 | 36 | 10 | 13 | 24 | 12 | 4 | 11 | 2 |
| 72 | 18 | 4 | 54 | 36 | 36 | 12 | 12 | 24 | 0 | 0 | 12 | 6 |
| 80 | 16 | 5 | 60 | 40 | 40 | 12 | 14 | 26 | 14 | 2 | 13 | 4 |
| 80 | 20 | 4 | 60 | 40 | 40 | 12 | 14 | 26 | 14 | 2 | 13 | 4 |
| 88 | 22 | 4 | 66 | 44 | 44 | 14 | 15 | 30 | 15 | 4 | 14 | 2 |
Clouds Socks
Copyright 2009 by Rebecca A [becbec on Ravelry]
Chart 2 - Clouds Stitch Pattern
For all versions, on rows 4, 5, 10 & 11, when you come to a wrapped stitch, pick up the wrap and knit together with the wrapped stitch. Consult Chart 1 column C for your Total Stitch Count to determine the number of pattern repeats.
| 14StitchCloudsPattern | |
| Row 4 | K11, [W&T, P8, W&T, K7,W&T,P6, W&T, K5, W&T, P4, W&T, K20] |
| Row10 | K4, [W&T, P8, W&T, K7,W&T, P6, W&T, K5, W&T, P4, W&T, K20] Repeat part between [] C times, ending last repeat with K16, instead of K20 |
| 16 Stitch Clouds Pattern | |
| Row4 | K13, [W&T, P9, W&T, K8, W&T,P7,W&T, K6, W&T, P5, W&T, K23] Repeat part between [] C times, ending last repeat with K10, instead of K23 |
| Row 10 | K5, [W&T, P9, W&T, K8, W&T, P7, W&T, K6, W&T, P5, W&T, K23] Repeat part between [] C times, ending last repeat with K18, instead of K23 |
| 18StitchCloudsPattern K15,[W&T, P10,W&T,K9,W&T,P8,W&T,K7,W&T, P6, W&T, K26] | |
| Row4 Row10 | Repeat part between [] C times, ending last repeat with K11, instead of K26 K6, [W&T, P10, W&T, K9, W&T, P8, W&T, K7, W&T, P6, W&T, K26] |
| 20 Stitch Clouds Pattern | Repeat part between [] C times, ending last repeat with K20, instead of K26 |
| Row 4 K17, [W&T, P11,W&T, K10, W&T, P9, W&T, K8, W&T, P7, W&T, K29] | |
| Row10 | Repeat part between [] C times, ending last repeat with K12, instead of K29 K7, [W&T, P11, W&T, K10, W&T, P9, W&T, K8, W&T, P7, W&T, K29] |
| 22StitchCloudsPattern | Repeat part between [] C times, ending last repeat with K22, instead of K29 |
| Row4 K19, [W&T, P12, W&T, K11,W&T, P10, W&T, K9, W&T, P8, W&T,K32] | |
| Row10 | K8, [W&T, P12, W&T, K11, W&T, P10, W&T, K9, W&T, P8, W&T, K32] Repeat part between [] C times, ending last repeat with K24, instead of K32 |


