"MELODY ANGEL"
A Rectangular Lace Shawl Designed By Priscilla White-Tocker
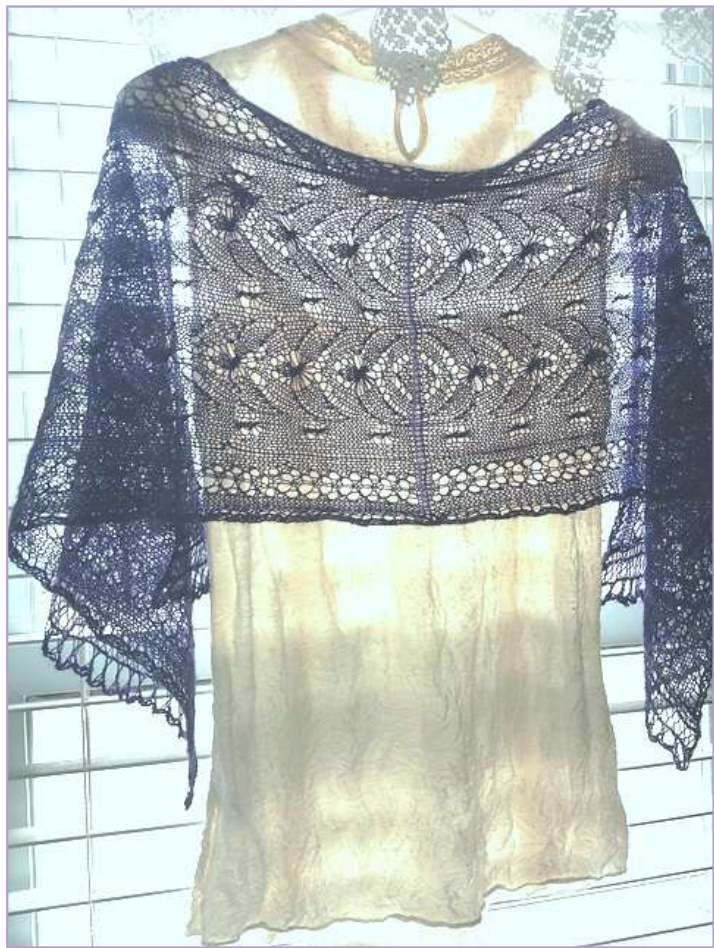
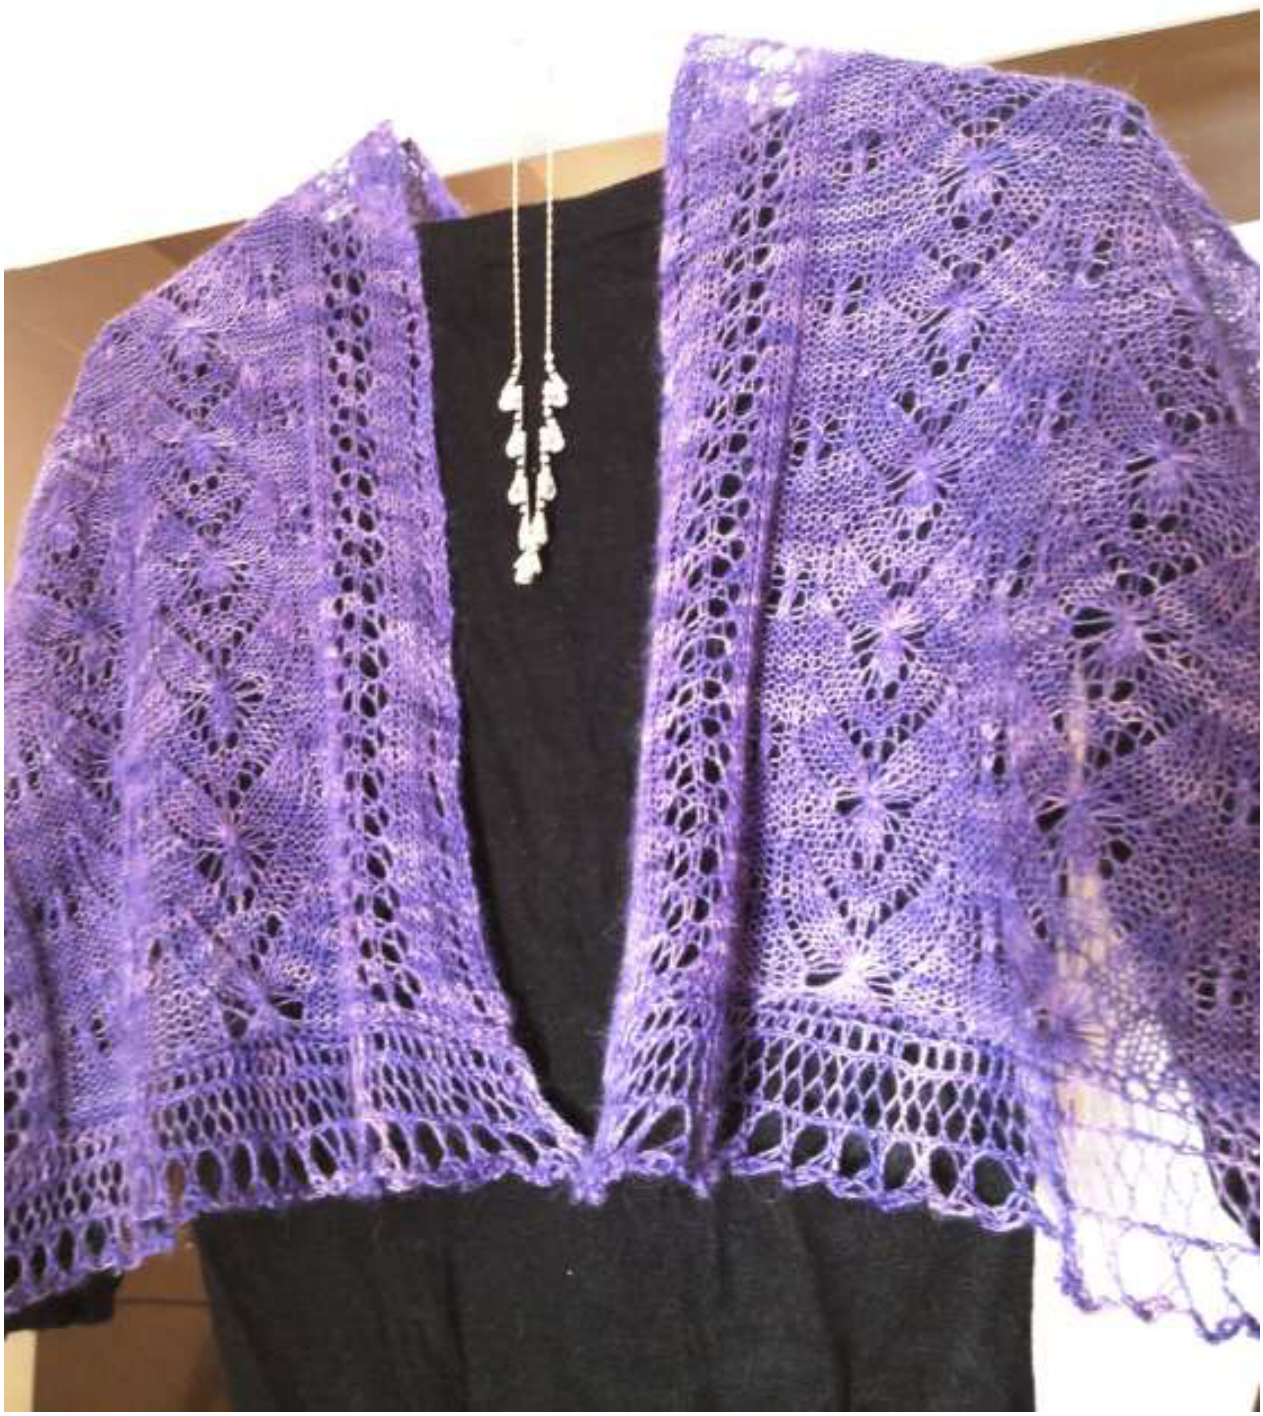
The sixth pattern in my Family of Women series, this shawl is inspired by my stepdaughter, Melody Angel, who is also the mother of Zara who inspired the Little Zara hat pattern. The winged lace patterns I chose for this design (Angel Wings for the center panels and Gull Wings for the side panels) are inspired not only by her middle name, but also by the spectacular wings that she has tattooed on her back! The two halves of the shawl are bound together so that the wings form a circular embrace in the center, thus evoking Melody's love for her children, family, friends and her home and community in Vermont This pattern is designed to be knit with any weight/gauge of yarn and any size needles to whatever measurements you desire. The shawl in the photo is knit with lace weight yarn and a cast-on of 81 stitches, which allows for the shaded area of Chart C to be knit twice as you work your way across the rows. Also, five complete repeats of Chart C are knit for each half of this shawl, which comes out to measure approximately 46" long and 12" wide. If you wish to make a wider shawl, cast on an additional 22 stitches for each repeat of the shaded area you would like to add, and of course you can make the shawl longer or shorter depending upon how many repeats of Chart C you decide to knit. This pattern is written for the intermediate or advanced knitter who has experience working most of the stitches in this shawl, particularly yarn overs, and is also comfortable using charts and blocking finished pieces. It is also helpful if you have some experience with the three needle bind off, although this is actually a simple finishing technique to learn. The Angel Wings lace pattern incorporates an interesting stitch that involves knitting 9 stitches into 7, thus creating the base from which the wings extend. There is no need to be intimidated by this stitch, because it is actually quite easy to execute! The seven stitches that you will be knitting into are created with double yarn overs. so that when you slip them onto the opposite needle to knit the 9 stitches into them, the stitches are very wide and it is very easy to get your needle through all 7 of them at once. Then it is important to keep your yarn tension loose as you alternate knitting front and back to create the 9 stitches. If you would like additional instruction on how to work any of the stitches in this pattern, there are excellent instructional videos on www.knittinghelp.com.
GENERAL INSTRUCTIONS FOR USING THE CHARTS
· Starting with Row 1 of each chart, the right side (RS) odd numbered rows are read from right to left Wrong side (WS) rows of the charts (even-numbered rows) are knit from left to right. Charts are written to show all of the stitches as they appear on the RS, so when you are knitting the WS rows the K stiches are done as P, and vice versa (see Legend). · The blue shaded area in Chart C indicates the set of stitches that can be worked multiple times per row in order to achieve the desired width for your shawl. · The gray shaded areas indicate where there are no stitches, so you will skip across these areas and work the rows as if they were not there.
\*\*Before you start to knit, please note:\*\*
· The shawl incorporates 3 distinct lace patterns which actually create panels down the length of the shawl. I highly urge the use of stitch markers to delineate these panels, and recommend that you place stitch markers after the right edge pattern shown in Chart A and before the left edge pattern shown in Chart B, as well as before and after each repeat of the shaded area in Chart C. Doing this will make it much easier for you to keep track of your stitch count and to identify where any mistakes may have occurred so that you can make adjustments. Keep slipping the markers upward as you knit each row.
INSTRUCTIONS FOR SHAWL
Suggested Materials: (used for shawl in the photo) Yarn: Ball and Skein Ariane Lace, 875 yrs per skein (shawl in photo uses half a skein or 438 yards), shown incolorwayPurple Needles: US#3 circular (I recommend having two circular needles, one for each half of the shawl); One US#3 double pointed (dpn); One US #5 needle (to be used for 3 needle bind off) Round stitch markers to mark off sections of the pattern Waste yarn (optional) - several yards, if you wish to add lifelines Blocking board and rust-resistant T pins
Stitch Abbreviations:
K= knit P= purl YO= yarn over K2TOG=knit 2 stitches together (creates a right-leaning decrease) sSK=slip two stitches knit wise and separately to the right needle, then knit both together through the front of the stitches (creates a left-leaning decrease) K7-tog (or K3-tog) = knit 7 (or 3) stitches together K7-tog-b (or K3-tog-b) = knit 7 (or 3) stitches together through the back loop P2ToG=purl 2 stitches together C=cast on one stitch RS= right side of shawl, or the side meant to be worn outward wS=wrong side of shawl BO=Bind Off Legend for the Charts
| K (P on WS rows) | |
| P (K on WS rows) | |
| 0 | YO |
| K2TOG | |
| SSK | |
| P2TOG | |
| @ | K wrapping the yarn twice for each stitch |
| Make 9/7 | Slip the 7 double wrapped stitches onto the right needle, dropping the extra wraps as you slip them. K these 7 stitches together as follows: K7-tog-b, K7- tog, K7-tog-b, K7-tog, K7-tog-b, K7-tog, K7-tog-b, K7-tog, K7-tog-tb, resulting in 9 stitches being worked into the 7. |
| M3/3 | K 3 stitches together leaving them on your left needle and knitting into them as follows: K3-tog-b, K3-tog, K3-tog-b, then slip these 3 stitches onto your right needle. The three stitches you knit into will be gathered into a small knot. |
| c | Cast on 1 stitch |
· Cast on desired number of stitches for the width of your shawl. If you wish to knit the shawl as it appears in the photo, cast on 81 stitches. Starting in the lower right hand corner of each chart, begin by knitting across Row 1 of Chart A (Righ Edge), then knit across Row 1 of Chart C (Body of Shawl), and then Row 1 of Chart B (Left Edge). The work your way up Chart C while making sure that every right side row of Chart C is preceded by Row of Chart A and ends with Row 1 of Chart B, and that every wrong side row of Chart C is preceded by Row 2 of Chart B and ends with Row 2 of Chart A. · For the second repeat of Chart C and all subsequent repeats, begin with Row 2. Continue to knit full repeats of this chart until you have reached slightly less than half of your desired length, then begin Chart C again and end with row 14. Leave this half of the shawl on the needle and set it aside. Then with your second circular needle, knit the second half of the shawl in exactly the same manner as the first. · Once you have completed both halves of the shawl, you are ready to bind them together with the three needle bind off. Place the shawl halves with the wrong sides together. Take your Size 5 needle and insert it knitwise into the first stitch of each needle. Knit these two stitches together and slip them off the needles onto the Size 5 needle. \*Knit the next two stiches of each needle together in the same way. Then slip the first stitch on your Size 5 needle over the second one and off the needle.\* Repeat the instructions between the \* \* until all of the stitches are bound off, and weave in the ends. CHART A (right edge of shawl)
| - | - | 2 | ||||
CHART B (left edge of shawl)
| - | 2 | |||||
| 0 |
| 0 | 0 | 0 | 29 | |||||||||||||||||||||||||||
| 28 | ||||||||||||||||||||||||||||||
| 0 | 0 | 27 | ||||||||||||||||||||||||||||
| 0 | 26 | |||||||||||||||||||||||||||||
| 0 | 0 | M3/3 | M3/3 | 0 | 0 | 25 | ||||||||||||||||||||||||
| 24 | ||||||||||||||||||||||||||||||
| 0 | 0 | M3/3 | M3/3 | 0 | 23 22 | |||||||||||||||||||||||||
| 0 | 0 | 0 | 0 | 21 | ||||||||||||||||||||||||||
| 0 | 0 | 0 | 0 | 20 19 | ||||||||||||||||||||||||||
| 0 | 18 | |||||||||||||||||||||||||||||
| / 0 | 0 | Make 9/7 | 0 | 0 | 17 | |||||||||||||||||||||||||
| o | 0 | a C | a | a a | a | o | 16 15 | |||||||||||||||||||||||
| 0 | 14 | |||||||||||||||||||||||||||||
| 0 | 0 | 0 | o | 13 12 | ||||||||||||||||||||||||||
| 0 | 0 0 0 | M3/3 M3/3 | 0 a | 0 Make 9/7 a | 0 a | M3/3 M3/3 | 0 0 0 0 0 | 0 0 | 0 0 0 | 11 10 9 8 7 6 5 4 3 2 1 | ||||||||||||||||||||
| 0 0 | 0 0 0 0 |
EDGING
You will now attach edgings to either end of the shawl by picking up stitches along the edges you originally cast on. Begin on one end and with the right side facing you (so that the angel wings are pointing downward, rather than upward) and use your circular needle to pick up and knit an even number of stitches across the edge. You do not have to pick up the same number of stitches that you cast on, as long as the stitches are close together and consistently spaced. For example, I picked up 72 stitches in my cast-on row of 81, and this seemed to work out very nicely. Break off yarn, leaving enough to weave in the ends. Take your Size 3 dpn and cast on 7 stitches. Then with the right side of your shawl facing you, take the left circular needle tip and hold it in your right hand. Begin the edging pattern with row 1, by knitting across the dpn and moving these stitches from the dpn to the circular needle as you knit. Then knit row 2 in the opposite direction. Please note that for rows 2 and 4, the instructions say K1 for the final stitch in these rows, however when you knit this stitch you will actually be knitting it together with one stitch from the shawl body and thus connecting the knitted edging to the shawl. Continue working the 4 row repeat of the edging pattern with your circular needle tip in one hand and your dpn in the other until the entire end of the shawl has been edged.
Edging Instructions:
Row 1 (Rs): Slip one knitwise, k2, yo, k2-tog, yo twice, k2 Row 2 (ws): k2, (k1, p1) in the double loop, k2, yo, k2-tog, k Row 3 (Rs): Slip one knitwise, k2, yo, k2-tog, k4 Row 4 (ws): Bind off 2 stitches, k3, yo, k2-tog, k1 Repeat the instructions above to edge the opposite end of the shawl. Weave in all ends on the wrong side. Block, wear, and enjoy your lovely shawl!