GLADYS
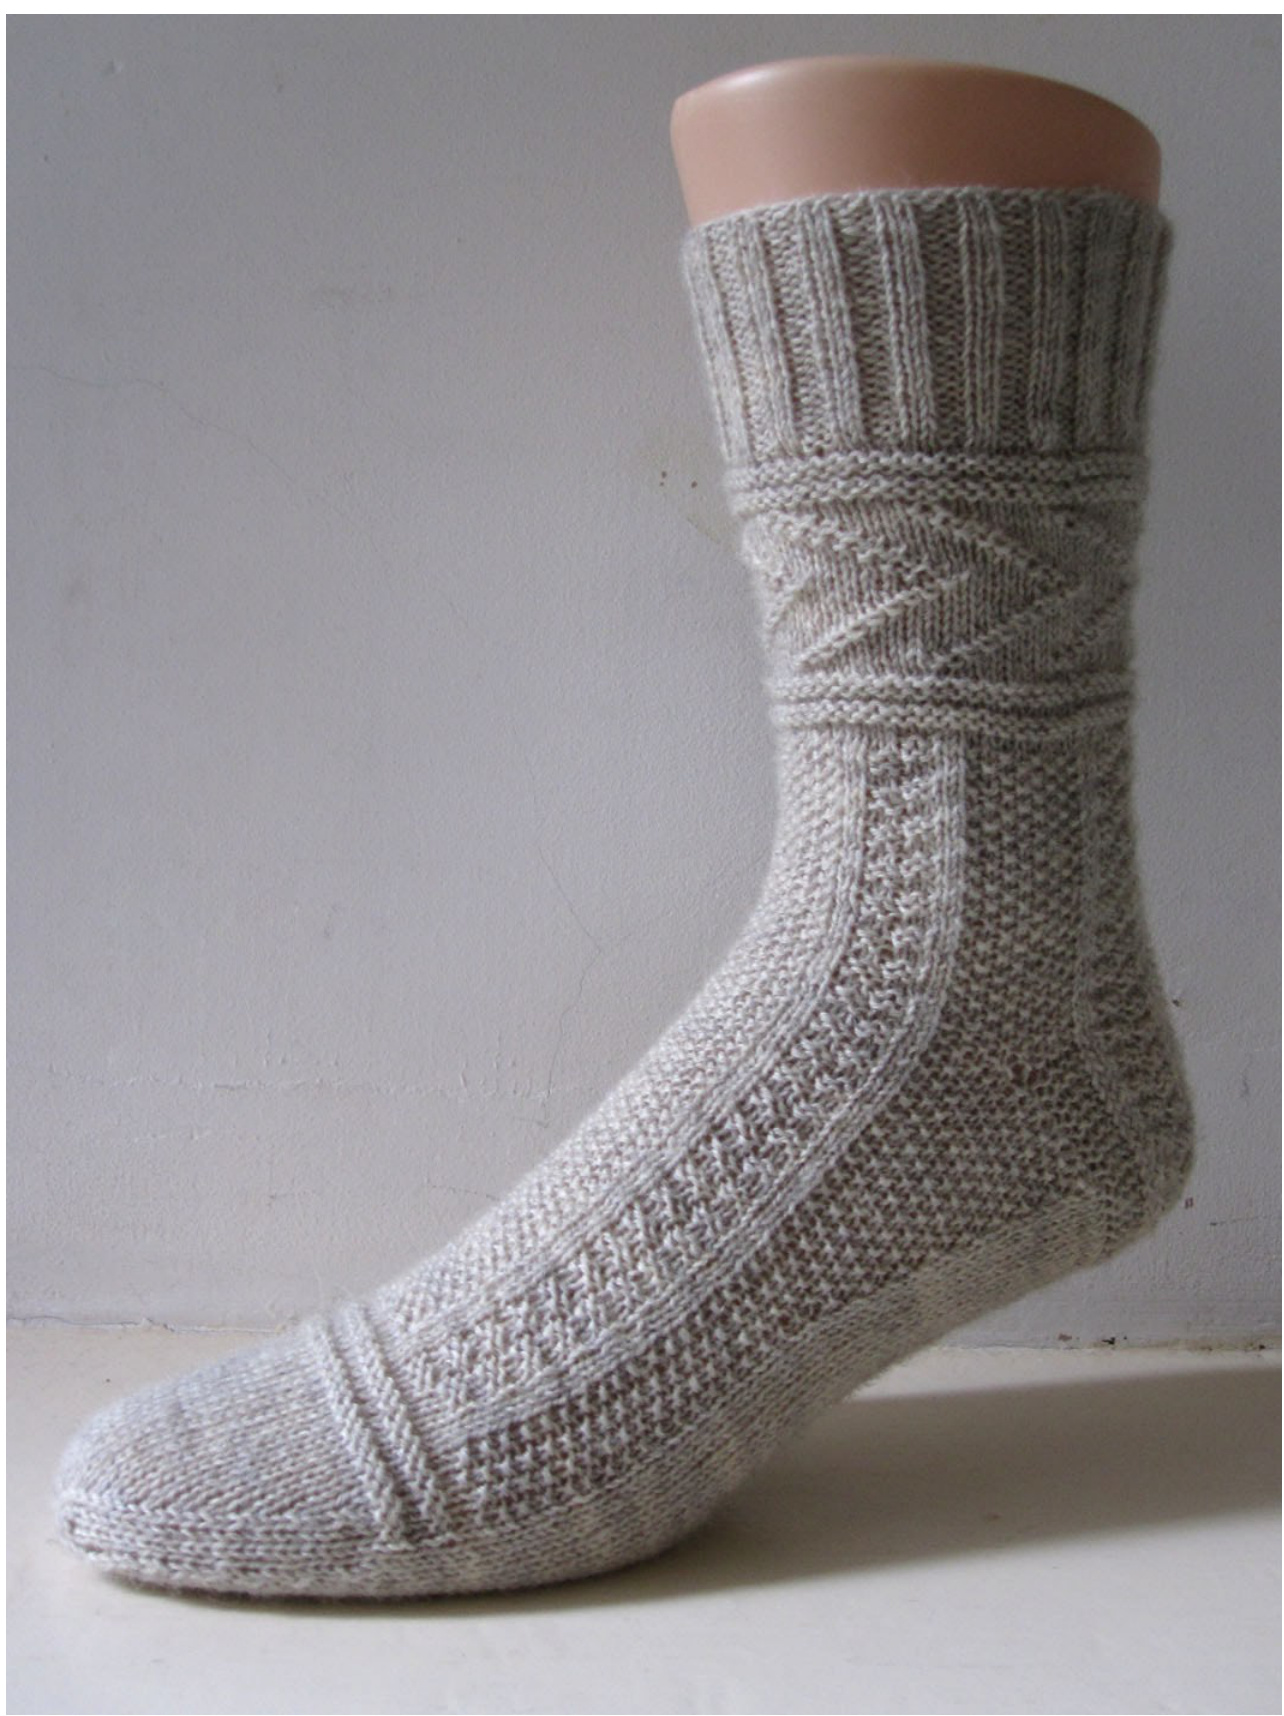
COPYRIGHTOGENERALHOGBUFFER2012 This fairly simple sock pattern is my hommage to Gladys Thompson, who wrote "Patterns for Guernseys and Jerseys" in 1969 and is one of a handful of knitting scholars that strived to preserve the wealth of patterns found in British fishermen's sweaters for future generations. As always, make sure you have read the whole of the instructions before starting to make sure you are aware of what's coming later.
Size:
As the construction of this sock only involves knit and purl sts, there is no additional 'pull in the fabric, so you should choose the same stitch count you would use for a plain stocking stitch sock. However, some people find that this kind of pattern actually comes out bigger than plain knitting, so to be absolutely sure you may want to swatch first. I am giving instructions for 56/64/72/80 sts, but anything outside or in between these sizes could also be achieved by playing with the width of the moss stitch panels. Feel free to message me on Ravelry if you need help with adjusting the size properly.
Material:
Sock wool in 4 ply / fingering weight, amount will depend on your size, but I would say anything but a very big size should be achievable from a standard 100g skein. Usage is more or less like a plain sock, so use that as a guideline if you are not sure. Although traditionally, fishermen's sweaters were mainly knitted in a dark navy, these kind of patterns usually show up better in a lighter coloured yarn, and one that is slightly on the thicker side will have a better stitch definition. I would generally use a solid colour, but yarns with very long colour gradations (like Zauberball or Chroma) can work well, too.
Needle size:
2.5 mm or size needed to get the right dimensions (see sizing above). You will need 2 circulars, which I will call needle 1 and needle 2. These are equally easy to work on DPN's, though, in that case your first and second needle will equal needle1, and your third and fourth will equal needle 2.
Further requirements:
Tapestryneedle Stitch markers (although you could do it without if they irritate you) 2 DPN's will be helpful even if you work on circs, but they are not absolutely essential.
Cuff:
Using your favourite cast-on method, cast on 56/64/72/80 sts and close to a round, taking care not to twist the cast-on. Work K2, P2 rib for as many rounds as you would like your cuff to be, I did 24 rounds for my sample. (On my sample socks, I actually worked the cuff with 80 sts and decreased down to 64 sts in the first plain K round. If you have larger calves and/or don't like tight cuffs, this may be an option to consider.)
Leg:
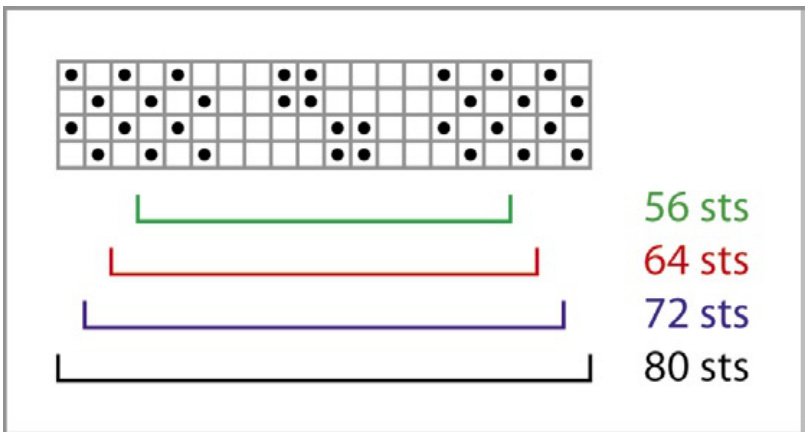
First, we are working what is called 'rig and furrow, and this pattern is traditionally worked on shoulders or to separate pattern bands. \*K 2 rounds, P 2 rounds, K 2 rounds, P 2 rounds, K 2 rounds\* Work all 17 rounds of the herringbone pattern. The pattern has a repeat of 8 sts, so it will be worked 7/8/9/10 times per round. Work another set of rig and furrow (from \* to \* as above). Work the main pattern according to the chart, taking care to observe the repeat outlined for your size. The pattern is repeated 4 times around the leg and is 14/16/18/20 sts wide. Work as long as you would like your leg to be, ending with a round 4.
Heel:
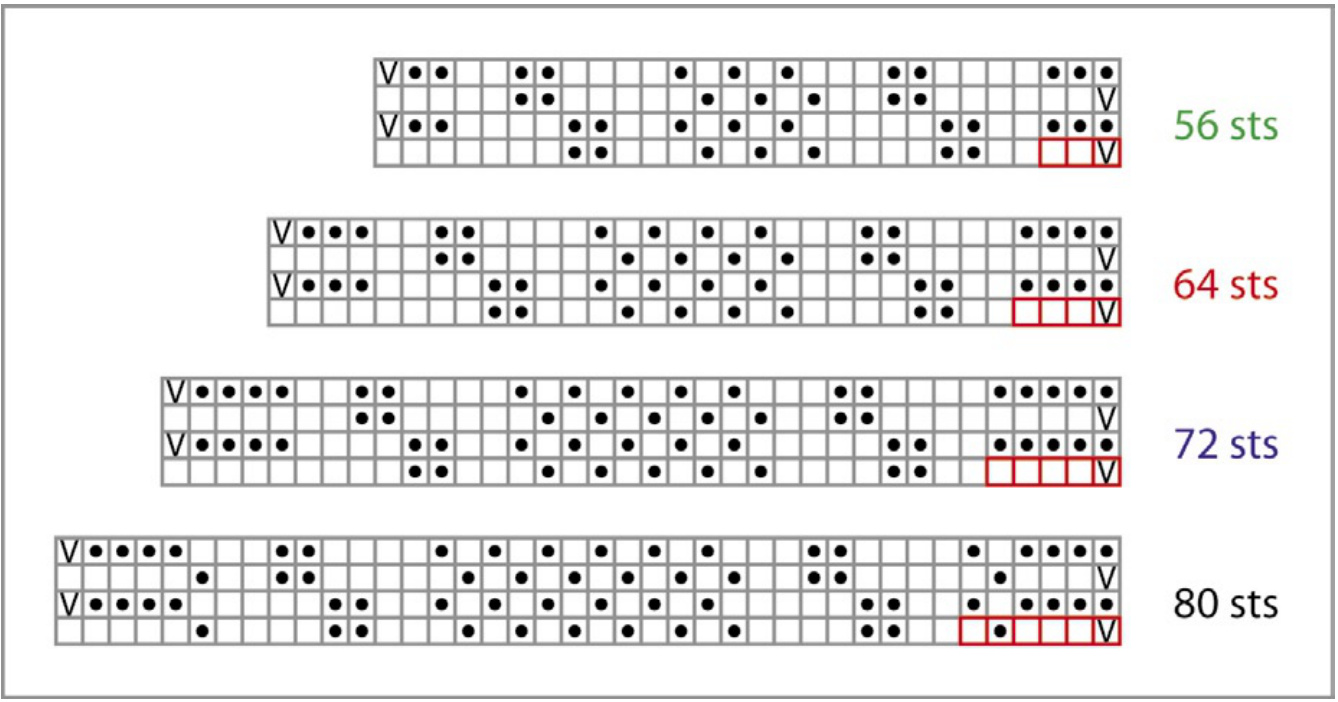
You may have noticed that the pattern is not centred on the needles at the moment, that is to avoid a visible jog in the moss stitch section. To centre the heel properly, the first 3/4/5/6 sts of the heel chart for your size will NoT be worked in the first row. These sts are outlined in red. Keeping this in mind, work the first row of the heel chart (25/28/31/34 sts), turn Work the second and all following rows over 28/32/36/40 sts according to the chart, repeating the 4 rows as needed. A good guideline for heel flaps is to work the same number of rows as you have sts to work, so my sample sock has 32 rows in total over 32 sts. However, you may want to work more or less rows to get a heel flap that will fit you perfectly, depending on whether you have a high instep or not. Turn the heel as follows: Row1: sl1, work as per row 1 of the heel chart for 14/16/18/20 sts, SSK, K1, turn (leaving 10/12/14/16 stsunworked) Row2: sl1, P3, P2tog, P1, turn (again leaving 10/12/14/16 sts unworked) Row3: sl1, K to 1 st before gap, SSK, K1, turn Row4: sl1, P to 1 st before gap, P2tog, P1, turn Repeat rows 3 and 4 until you have used up all the sts either side. You should be ready to work a K row, with 16/18/20/22 sts on your needle. Using needle2, K 8/9/10/11. This is the centre back.
Gusset and Foot:
Using Needle 1, K 8/9/10/11. Pick up and K one st in each of the slipped sts down the side of the heel flap. Whether you followed the guide lines for the depth of the flap or not, you will pick up half the number of sts that you worked rows in the flap. M1 st in the gap between the flap and the instep. Work the instep according to the instep chart. The pattern has not changed from the leg, but as we have centred the heel flap, the pattern is in a different order as well. Take care to follow the section outlined for your size. M1 sts in the gap between instep and heel flap. Pick up and K one st in each of the slipped sts up the other side of the heel flap, taking care that you pick up the same number as previously. K 8/9/10/11 to the centre back and the beginning of the rounds. Round 1: K 13/15/17/19 sts, SSK work moss st (K1, P1) until the instep. (In the first round, you will have to count to see whether you will need to start with a K or a P st, to make sure the pattern flows well into the instep pattern.) Work instep according to chart. Continue in moss st until you have 15/17/19/21 sts left on Needle 2. K2tog, K to end. Round 2: K 14/16/18/20, work moss st gusset as established, work instep as per chart, work moss st gusset, K 14/16/18/20. For a small foot, or a shallow instep, it will be enough to alternate between rounds 1 and 2 until the gusset has been decreased and you are back to your total st count of 56/64/72/80. However, for a higher instep, it is better to work round 1 once, followed by round 2 twice ( thus decreasing only every third row) to make the gusset longer. Again, work in this way until you are back to your original st count. Continue the foot without decreasing, knitting the sole plain and the chart on the instep, until you are about 3 inches / 7.5 cm short of your intended total foot length. Over the next 10 rounds, work the sole plain and work the rig and furrow pattern over the instep sts asfollows: Round 1+2, 5+6, 10+11: K all Round 3+4, 7+8: K 14/16/18/20, P 28/32/36/40, K 14/16/18/20 Re-check your sock length, you should be around 2 inches / 5 cm short of the total length. (measure at the sole side, as the rig and furrow will pull the length in at this stage). If the sock is too short, K more plain rounds.
Toe:
To place your markers for the toe decreases (if you prefer to use them), work first round as fi lows: K 11/13/15/17, K2tog, K1, place marker, K1, SSK, K 11/13/15/17. Repeat on Needle2 Round2: K Round3: K Round4: K Round5: [K to 3 sts before marker, K2 tog, K1, sl marker, K1, SSK, K to end] on each needle Round6: K Round7: K Round8: as Round 5 Round9: K Round10: K Round11: as Round5 Round12: K Round13: as Round5 Round14: K Round15: as Round5 Round16: K Round17: as Round5 Keep working Round 5 until you have a total of 12/16/20/24 sts. With a DPN, K 3/4/5/6 sts from needle1. Move the remaining 3/4/5/6 sts from needle1 and the first 3/4/5/6 sts from needle2 onto a second DPN. Move the last 3/4/5/6 sts from needle2 onto the first DPN. Cut yarn, leaving about 10 inches / 25 cms and graft the toe closed. Turn sock inside out and darn in both loose threads.
Further options:
I think you need a good amount of the main pattern before you start the heel for the sock to look balanced. However, if you prefer a shorter leg, you could omit the herringbone section and start the main pattern after the first rig and furrow. If you have very sensitive feet, you may find the rig and furrow section on the top of the toes uncomfortable. Simply continue the main chart until you are ready to work the toe. Of course, you can easily substitute a short row heel if you wish. In this case, I would sug gest you try and work the first half of the short rows in the heel chart pattern, and the second part plain.
Glossary:
St, sts stitch, stitches K knit P purl SI slip K2tog knit 2 stitches together SSK slip, slip, knit. Slip 2 stitches separately as if to knit, insert left needle into these two stitches from the right and knit onto right needle. P2tog purl 2 stitches together
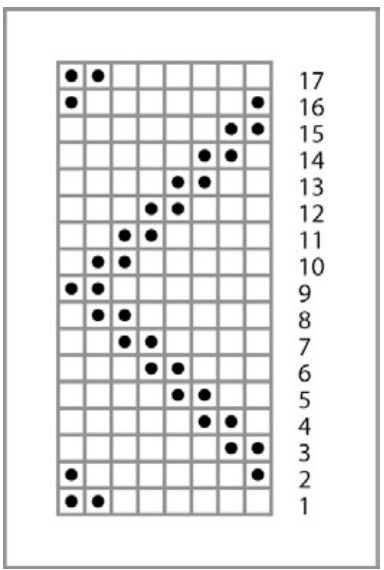
HERRINGBONE CHART
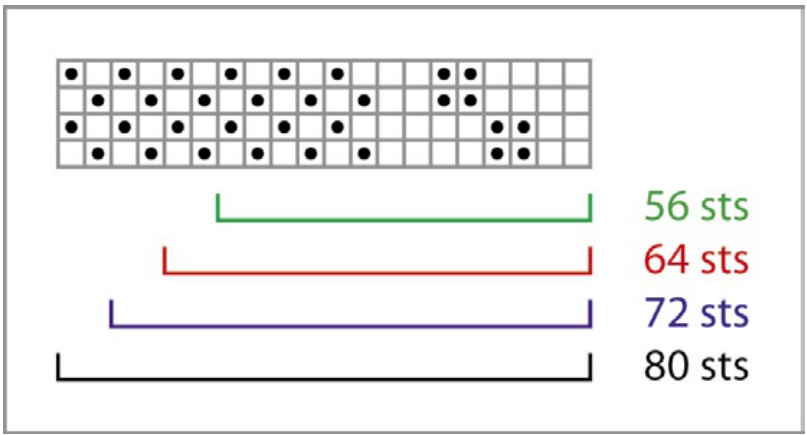
LEG CHART
INSTEP CHART
HEEL CHART
Glossary of symbols used: knit on right side, purl on wrong side

purl on right side, knit on wrong side slip stitch as if to purl