N.B. - this is a massive revision to the existing pattern Cthulhu Bearded Hat as designed by Nichole M Verville, 2008. All rights still belong to Nichole M. Verville since this pattern follows her original intentions. I have revised it to make the final project larger and the pattern easier to use. Materials Needed: 1. Worsted weight yarn [4 medium], approx. 450 yards/ 9 oz. a. I used Caron Simply Soft - Shadows, Opal twist, 3 skeins. This yarn is discontinued, but it gave a nice texture to the hat and tentacles, while still soft enough not to be irritating to the face. 2. Size G hook or hook needed for gauge. 3. Tapestry needle 4.Stitch Markers
Notes:
1. The entire hat except the area near the eye opening is done in a spiral, amiguri style. For this reason you will need a stitch marker to keep track for rounds. 2. Gauge: 7 rounds in hat pattern = 3" 3. the area below the eye-hole (where the tentacles attach) should stop at or just below the tip of the nose. This allows the wearer to breathe easily. a. made the entire thing bigger to accommodate a smaller hook and standard worsted weight yarn. this avoids the “open" look to using a large hook. b. larger eye-hole. c. eyehole is a bit more rounded. d. finishing round added to inside of eyehole. e. stepped-back the area below the nose rather than making it all the same length. This keeps the area covering the ears and upper neck from "curling” away from the face under the tentacles. f. enlarged the tentacles to “match" the enlarged hat. g. My version of the hat uses 9 tentacles, because my husband says that's “ a more harmonious number'. “yes dear,’ says I. 5. Size: 22" diameter at forehead and nose. Eyehole 2" x 5". Tentacles 1 1/4" wide by 8" long. 6" from top of crown to top of eyehole. 10" from top of crown to bottom of nose-piece. All measurements taken while hat is lying flat, and tentacles are uncurled. 6. Whenever possible I crocheted over my loose ends whenever joining a new skein within the body of the hat. This limited the loose ends I had to weave in at the end. Special stitches: 2scTOG - place hook thru next st, YO, pull up a loop, place hook thru next st, YO pull up a loop, YO and pull thru 3 loops on hook. 3scTOG - place hook thru next st, YO pull up a loop, place hook thru next st, YO pull up a loop, place hook thru next st, YO pull up a loop,YO and pull thru 4 loops on hook. Invisible Decrease - insert hook thru front loop only of next st, do not YO, insert hook into front loop only of next st again, YO, pull thru all 3 loops on hook. This stitch takes some practice, but when working in the round,it makes the decreases much smoother. Rd1: 6 sc in magic ring. place stitch marker in last sc Rd2: 2 sc in each sc. move marker (hereafter MM) (12) Rd3: sc in next st, 2 sc in next st. repeat around. MM (18) Rd4: sc in next 2 st, 2 sc in next st. repeat around. MM (24) Rd5: sc in next 3 st, 2 sc in next st. repeat around. MM (30) Rd6: sc in next 4 st, 2 sc in next st. repeat around. MM (36) Rd7: sc in next 5 st, 2 sc in next st. repeat around. MM (42) Rd8: sc in next 6 st, 2 sc in next st. repeat around. MM (48) Rd9: sc in next 7 st, 2 sc in next st. repeat around. MM (54) Rd10: sc in next 8 st, 2 sc in next st. repeat around. MM (60) Rd11: sc in next 9 st, 2 sc in next st. repeat around. MM (66) Rd12: sc in next 10 st, 2 sc in next st. repeat around. MM (72) Rd13: sc in next 11 st, 2 sc in next st. repeat around. MM (78) Rd14: sc in next 12 st, 2 sc in next st. repeat around. MM (84) Rd15: sc in next 13 st, 2 sc in next st. repeat around. MM (90) Rd16: sc in next 14 st, 2 sc in next st. repeat around. MM (96) Rd17: sc in next 15 st, 2 sc in next st. repeat around. MM (102) Rd18: sc in next 16 st, 2 sc in next st. repeat around. MM (108) Rd19 - Rd34: sc in each st around. MM. (108) (i.e., 16 rows.) Rd35: sc in next 16 st, invisible decrease across next 2 st (hereafter only on hat portion, 2scTOG). repeat around. MM (102) Rd36: sc in next 15 st, 2sctog across next 2 st. repeat around. MM (96) Rd37: sc in ea st around. MM (96) Rd38: sc in ea st around. sl st in next st. discard marker until later. ch 1, turn. (96) Rd39: sc in next 74 st. turn (DO NOT CHAIN ONE) (74 sc) Rd40: sk 1" sc, sc in second sc and next 71. ch 1 and turn (72 sc). Rd41 - Rd45: sc in next 72 st. ch 1 turn. (72) (nb - the skipped stitches will become tha eye-hole) Rd46: 2 sc in 1s" sc, sc in ea of next 71, 2 sc in last sc. ch 1 and turn (74 sc). Rd47: (right side should now be facing) sc in each stitch around, ch 22, sl st in first sc (on opposite of eye-hole, stretching the ch22 across the void) ch 1, DO NOT TURN (102 sts). Rd48: continuing to work with right side facing, sc in ea st around, sc in ea ch. Place marker in last sc. (102) Rd49 - Rd52: sc in each st around. MM (102) Rd53: sc in each st around. discard marker. sl st in next st. ch 1 DO NOT TURN. (102sc) Rd54: sl st in next 4 st, sc in next 66 st, sl st in next st. leave remaining st unworked. cl 2 and turn. (66sc). Rd55: sk sl st and 1s 2 sc, sc in next 62 sc, sl st in next st. leave remaining 2 sc unworked. ch 2 and turn (62 sc) Rd56: sk sl st and 1s 2 sc, sc in next 58 st, sl st in next st. leave remaining 2 sc unworked. ch 1 and turn (58 sc) Rd57: sk sl st and 1"t sc, sc in next 56 st. sl st in next st. leave remaining 1 sc unworked ch 1 and turn (56 sc) Rd58: Finishing the bottom of the hat: sc in each st all the way around the base of the hat, including sc in each sl st and ch 1, 2 sc in each ch 2. sl to first sc.finish off. weave in ends. TENTACLES (make 8, although my husband had me do 9 because it's a “more harmonious number'). Ch 43 Row1: sc in second ch from hook and in next 11 (12 total), 3 sc in next ch, sc in next 13 ch, 3 sc in next ch, sc in next 15. ch 1, turn. (46sc) Row2: sc in next 6 st, 3scTOG across next 3 sts, sc in next 6 sts, (2sc in next st) 3 times. sc in next 5 sts, 3scTOG across next 3 sts, sc in next 5 sts, (2sc in next st) 3 times. sc in next 6 sts, (3scTOG across next 3 sts) twice. turn, DO NOT CH 1. (44 sts) Row3: sk 1" st, sc in next 10 sts, (2 sc in next st) twice, sc in next 5 sts, (2scTOG across next 2 sts) twice, sc in next 5 sts, (2sc in next st) twice, sc in next 5 sts, 3scTOG across next 3 sts, 2scTOG across next 2 sts, sc in next 5 sts. ch 1 and turn. (41 sts) Row4: sc in next 4 sts, (2scTOG across next 2 sts) twice, sc in next 5 sts, (2sc in next st) twice, sc in next 5 sts, (2scTOG across next 2 sts) twice, sc in next 5 sts, (2sc in next st) twice, sc in next 7 sts, 2scTOG across next 2 sts, sl st in next st. turn, DO NOT CH 1) (40 sts counting final sl st). Row5: sk 1 st, sc in next 8 sts, (2sc in next st) twice, sc I nnext 5 sts, (2scTOG across next 2 sts) twice, sc in next 5 sts, (2sc in next st) twice, sc in next 5 sts, (2scTOG across next 2 sts) twice, sc in next 4 sts. Finishing the root of the tentacle: ch 2, working along the top/root of the tentacle, 5dc in end of Row 4, sc in end of Row 1. Finish off, leaving a long tail for sewing.
FINISHING:
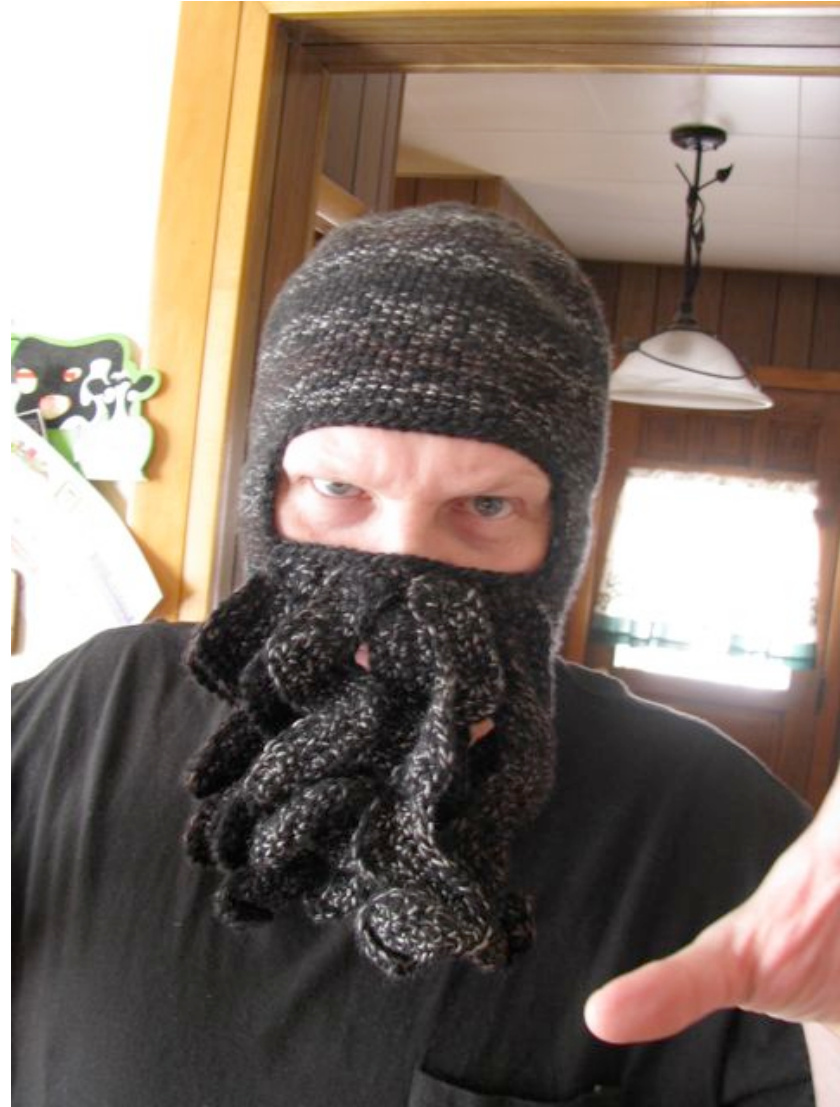
Eyehole: With right side facing, attach yarn w sl st to any point inside eyehole. SC all the way round the eyehole, being careful to make the corners smooth. you may have to 3scTOG at the corners in order to keep the transitions smooth. st in first sc. finish off. weave in ends. Tentacles: attach tentacles, 4 on top of the nose-piece, 4 (or 5 in my case) on the bottom of the nose piece. See illustrations for examples. weave in all ends, and go scare your friends.


