Chunky Ribbed Scoodie
DESCRIPTION
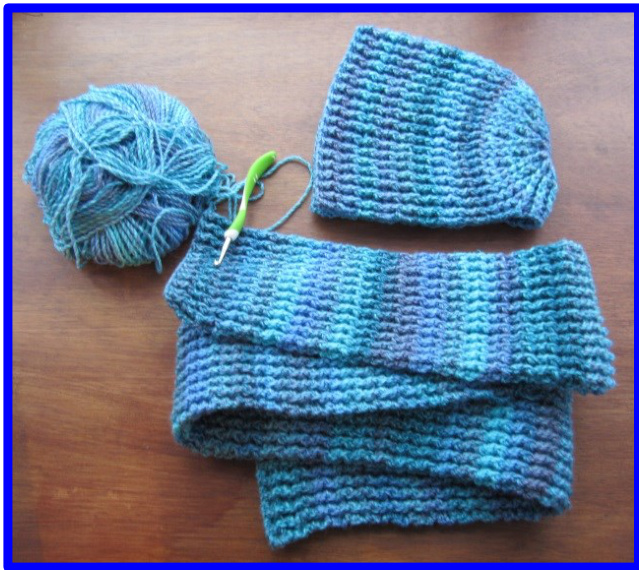
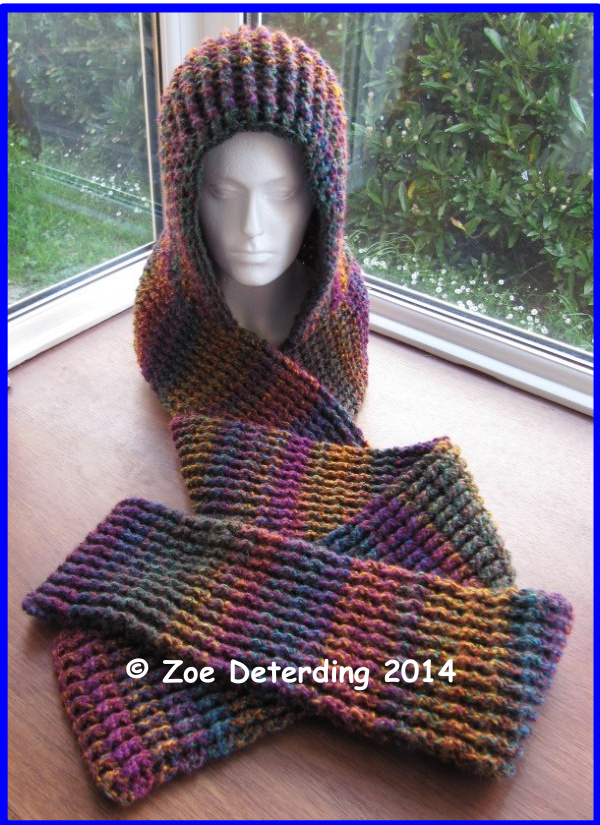
This pattern is for an adult sized scoodie (combined scarf and hood). The pattern can be easily adapted to make different sizes. A different look can be achieved by following the pattern and just substituting the fpdc and bpdc stitches with another type of stitch. Try adding an edge using a different color all the way around the whole finished project for an extra interesting effect. You may also wish to try this project with a thinner yarn (using an appropriate hook size). The yarn used in this picture is James C Brett Marble Chunky in the color MC27.
Free video tutorial
http://youtu.be//kbmjn12FBw
SKILL LEVEL - intermediate
SUPPLIES
Hook size 7mm. Suggested yarn: James C Brett Marble Chunky or equivalent, about 500g (approximately 780m in length). 2 stitch markers. Safety pins or lockable stitch markers maybe useful. Yarn needle. Scissors. The Actual amount of yarn may vary depending how long and wide you wish to make the scarf. The amount quoted here is the amount used for the scoodie in the above photograph with approximately 100g for the hood.
GAUGE
17 stitches in 4 inches (using fpdc and/or bpdc) 9 rows in 4 inches (using fpdc and/or bpdc) Find me on Facebook and YouTube as "24 Carat Crochet"
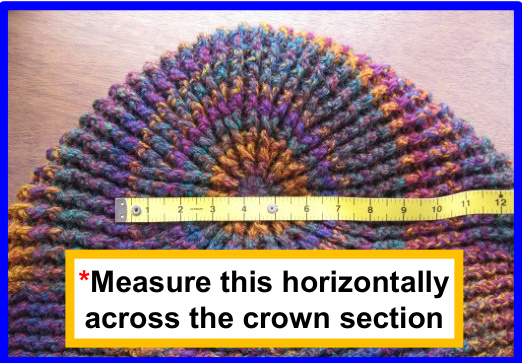
Measurements of Featured Scoodie
Length of scarf: approximately 96 inches Width of scarf: 5.5 inches Diameter of crown section of hood: 8.5 inches \*see right From centre of crown to front of hood: 10.5 inches Measurement around the front of the hood: 12.5 inches
STITCH ABBREVIATIONSKEY
sl st = slip stitch ch = chain sc = single crochet dc = double crochet fpdc = front post double crochet bpdc = back post double crochet bphdc = back post half double crochet fphdc = front post half double crochet

DIRECTIONS
The pattern uses US terminology. The project is worked in two separate parts and sewn together afterwards. The hood is worked in a spiral from round 2 with no chaining up between rounds. Rounds 5 to 8 have increase stitches for only about three quarters of the round. The different stitches for the final section of these rounds help to create a slightly flatter edge to the crown section. When attaching the two parts later, this flatter edge will give a smoother line around the seam. Save enough yarn to sew the two parts together.
HOOD
Magic circle or chain 4 and sl st into first chain.
Round 1
ch3 then dc x 11, sl st into top of ch3. Total 12 stitches.
Round 2
ch1, 2 fpdc into the ch3, 2 fpdc into every dc stitch. No more sl st from now on as the hood will be worked in a spiral. Total of 24 stitches.
Round 3
bpdc in first stitch (start the bpdc by going between the ch1 and fpdc), 2 fpdc in second stitch. \* bpdc in the next stitch, 2 fpdc in the next stitch. Repeat from \* 11 times. A stitch marker placed on the last stitch of each round will be helpful and can be moved up to the last stitch of each round as you progress through the pattern. Total of 36 stitches.
Round 4
\* bpdc infirst stitch, fpdc in second stitch, bpdc in third stitch & fpdc into the same stitch. Repeat from \* 12 times. Total of 48 stitches.
Round 5 (n.b. stitches after \*\* are half double crochet post stitches)
\* bpdc in first stitch, fpdc in second stitch, bpdc in third stitch, fpdc x 2 into fourth stitch. Repeat from \* 9 times. \*\* bphdc in the next stitch, fphdc in the next stitch. Repeat from \*\* 5 times then one more bphdc and finish on a fpdc. Place a stitch marker on 45th stitch (three quarters of the round) and progress it up with each round. Total of 57 stitches.
Round 6
\* bpdc in first stitch, fpdc in second stitch, bpdc in third stitch, fpdc into fourth stitch, bpdc into the fifth stitch, fpdc into the same (fifth) stitch. Repeat from \* 9 times. \*\* bphdc in the next stitch, fphdc in the next stitch. Repeat from \*\* 5 times then one more bphdc and finish on a fpdc. Total of 66 stitches.
Round 7
\* bpdc in first stitch, fpdc in second stitch, bpdc in third stitch, fpdc into fourth stitch, bpdc into fifth stitch, fpdc x 2 into sixth stitch. Repeat from \* 9 times. \*\* bphdc in the next stitch, fphdc in the next stitch. Repeat from \*\* 5 times then one more bphdc and finish on a fpdc. Total of 75 stitches.
Round 8
\* bpdc in first stitch, fpdc in second stitch, bpdc in third stitch, fpdc into fourth stitch, bpdc into the fifth stitch, fpdc into the sixth stitch, bpdc into the seventh stitch, fpdc into the same (seventh) stitch. Repeat from \* 9 times. \*\* bphdc in the next stitch, fphdc in the next stitch. Repeat from \*\* 5 times then one more bphdc and finish on a fpdc. Total of 84 stitches.
Round 9
Alternate bpdc and fpdc stitches until you reach stitch number 72 (a fpdc marked with a stitch marker). No increase stitches. Total of 72 stitches.
Round 10
ch2 and turn your work. Alternate fpdc and bpdc back towards the first stitch marker, finishing with a bpdc where the stitch marker is. Total of 73 stitches (including the ch2).
Round 11
ch2 and turn your work. Alternate bpdc and fpdc until you get to the ch2 at the beginning of round 10 and hdc into the top of the ch2. Total of 73 stitches (including the ch2).
Round 12
ch2 and turn your work. Alternate fpdc and bpdc until you get to the ch2 at the beginning of round 11 and hdc into the top of the ch2. Total of 73 stitches (including the ch2). Odd Numbered Rounds 13 to 25 Repeat round 11. Even Numbered Rounds 14 to 26 Repeat round 12. It is a little difficult at this point to see how the hood will fit or sit on the head as it will shift upwards a little when attached to the scarf, but this should give you a fairly baggy hood.
SCARF
The scarf is worked widthways, alternating bpdc and fpdc stitches. Chain enough stitches to create the desired width of your scarf. The scoodie in the picture on page one has 23 stitches across (21 bpdc/fpdc and the edge stitches) and 213 rows.
Row 1
Make a chain the desired width, ensuring you have an odd number (e.g. 25), dc into the fourth ch from the hook and dc all the way across back to the beginning. Count your stitches and ensure you have an odd number.
Row2
ch2, alternate bpdc and fpdc, ending on a bpdc, hdc into the top of the ch3.
Row 3
ch2, alternate fpdc and bpdc, ending on an fpdc, hdc into the top of the ch:
Row 4
ch2, alternate bpdc and fpdc, ending on a bpdc, hdc into the top of the ch2. Repeat Rows 3 and 4 until you have the desired length of scarf. The number of rows featured in the picture in this pattern has 213 rows. A long scarf which is not too wide works well with this project.
ATTACHINGTHETWOPIECES
(a) Ensure the hood is “right side" out - the ridges created along both sides of the hood should be facing outwards. Look at your scarf and ensure you have the same edge ridges facing upwards, these will be placed up against the hood ridges when sewing them together. (b) Locate the middle gap between rows along one edge of your scarf. Locate the middle point at the back of the hood. Pin these points together and secure the hood to the scarf in some other places too. Ensure you have the same length of scarf on either side ofthe hood. If you find one side is shorter than the other but you have the same number of rows, you may wish to block the shorter side. (C) Cut a workable length of yarn from the yarn you've been using for this project and thread it onto your tapestry needle. Sew the two parts of the project together using the stitches on each piece as a guide to aligning the two pieces. Sew back and forth, not going over the top. This method of sewing should create a ridge or “rib" which will blend in with the overall effect of the finished project.
Feedbackwelcome
I hope you have enjoyed creating a scoodie from this pattern. Feedback is most welcome. Please feel free to let me know what you think and if you happen to find any errors of any sort please let me know so I can ensure the most correct and up to date pattern is available for everyonetodownload. Facebook: 24 Carat Crochet Email: crochetaddictuk@gmail.com