Homestar Runner ("that's bupkis!")
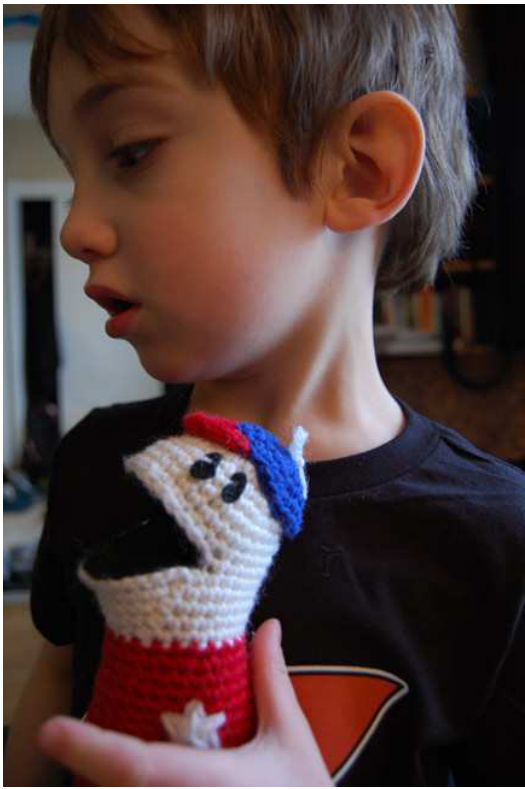
a fan pattern by Aleta Fera Ever since I made Strong_ Bad two summers ago, the unspoken question was always: who would be next? The answer is obvious in hindsight. Time for the star. The Homestar! SIZE one
FINISHED MEASUREMENTS
Width: $2~\!^{1/2}$ inches at bottom of torso/tunic/t-shirt Height: 11 inches
MATERIALS

>Cascade 220 Superwash $[100\%$ superwash wool]; 1 skein each white and red > E.L Mousakis Butterfly 1o [cotton]; 1 skein navy blue. Feel free to substitute worsted or DK weight stash yarns. 3.5 mm crochet hook safety pin or split ring stitch marker 一 Tapestry needle Soft stuffing 2 white pipecleaners black felt/black yarn/black embroidery thread for eyes black felt for mouth lining black thread to match felt white felt for star; matching thread (optional) scrap pieces of thin cardboard (not corrugated) or stiff needlepoint screen fabric glue
GAUGE is unimportant, as long as it's tight enough that the stuffing doesn't show through.
PATTERN NOTES
Instructions on the Magic Ring (and links to a tonne of other crochet tricks) can be found at Planet June: http://www.planetjune.com/blog/magic-ring-for amigurumi/ Nota bene: This is, of course, a fan pattern and not to be sold, manufactured or used for anything that would take money out of the hands of the Brothers Chaps. They own this character. I owe them too much laughter to rip them off, and if you're making this, I bet you do, too. Don't try to sell one and wreck it for the rest of us.
RESOURCES
http://www.homestarrunner.com http://www.hrwiki.org http://www.planetjune.com/
PATTERN
Cap With blue yarn, make a magic ring and crochet 6 stitches into it. Tighten the loop until it disappears. R1: 2 sc into each sc around. (12 st) R2: [sc, 2 sc in next sc] repeat around. (18 st) R3: [2 sc, 2 sc in next sc] repeat around. (24 st) R4: [3 sc, 2 sc in next sc] repeat around. (30 st) Slip st into the next stitch and fasten off. R5: With red yarn and crocheting into the outer leg of the stitch, sl st, sc, hdc, 5dc, hdc, sc, sl st. Turn. R6: Sl st 3, sc, hdc, dc, hdc, sc, sl. Fasten off.
Head and Body
Withwhite ya, make a magicng and crocht 6 stitche ntit Tghten thlpl it disappears. R1: 2 sc into each sc around. (12 st) R2: [sc, 2 sc in next sc] repeat around. (18 st) R3: [2 sc, 2 sc in next sc] repeat around. (24 st) R4: [3 sc, 2 sc in next sc] repeat around. (30 st) R5-9: Sc around. (30 st) Rio: Mark first stitch with safety pin or split ring. Sc 15 stitches, make a chain of 20 stitches, rejoin at marker. (35 st) R11: Sc around. (35 st) R12: Sc 15, dec 1, sc 7, dec 1, sc 7, dec 1 (32 st) R13: Sc 15, dec 1, sc 6, dec 1, sc 5, dec 1 (29 st) R14: Sc 15, dec 1, sc 4, dec 1, sc 4, dec 1 (26 st) R15: Sc 15, dec 1, sc 7, dec 1 (24 st). Change to red yarn. R16: Sc around. (24 st) R17: [2 sc in next sc, sc 11] repeat once. (26 st) R18 & 19: Sc around. R20: [2 sc in next sc, sc 12] repeat once. (28 st) R21 & 22: Sc around. R23: [2 sc in next sc, sc 13] repeat once. (30 st) R24 & 25: Sc around. R26: [2 sc in next sc, sc 14] repeat once. (32 st) R27 & 28: Sc around. R29: [2 sc in next sc, sc 15] repeat once. (34 st) R30: [2 sc in next sc, sc 16] repeat once. (36 st) Take a break! Pick a side for Homestar's face. At this point you should have a reference picture open to make sure the face and body come together in the way you want them to. I like this one from the Homestar Wiki, below.

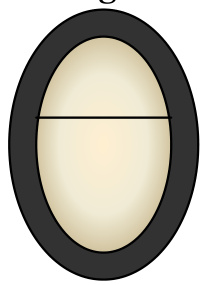
Cap: Sew cap to head on a rakish angle. For the spinner, I ran a short piece of white yarn through the centre of the head & cap, tied it a small bow and ran the ends back into the body. Surprisingly effective. Eyes: Yes, I know they're backwards. It's too late for my guy; correct your own. I used felt to make the "6" eyes, but it was tricky and not really recommended as the felt wants to disintegrate when you cut it finely. Next time I'd use black yarn or black embroidery thread to embroider the eyes. French knots, ahoy! Mouth: For the mouth you want an oval of black felt roughly 3 inches long by 2 inches wide. First cut yourself a rectangle, then round the corners. But! I would measure your mouth before you start cutting, as your gauge (and therefore the size of Homestar's mouth) may differ in a tiny but frustrating way. Before you sew it in, use scrap cardboard or another stiff, flat material to cut a slightly smaller oval. Cut in 2 pieces, wherever you want your mouth to hinge open, and glue to the felt oval. a rough idea of what it should look like.) This will give the mouth some much-needed definition when you stuff the head. Using black thread and matching the centre top of the oval with the centre of Homestar's lower lip, sew the mouth lining onto Homestar's lips. (Don't think about $\mathbf{H}^{*}\mathbf{R}^{\prime}\mathbf{s}$ lips too much.) You can also baste the lining in place and sew it properly after stuffing, depending on your comfort level with that sort of thing.
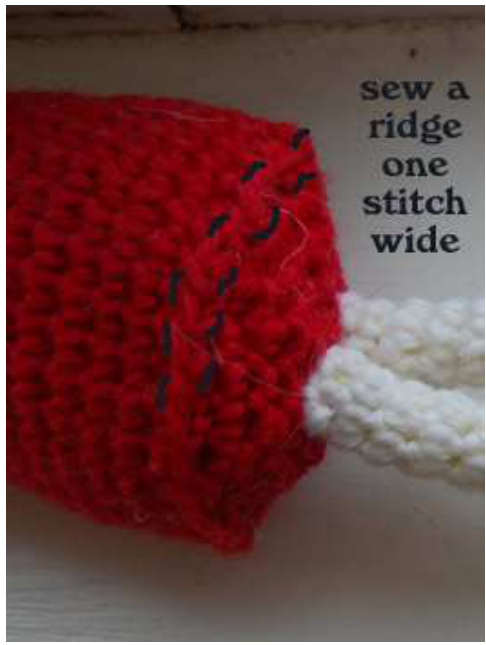
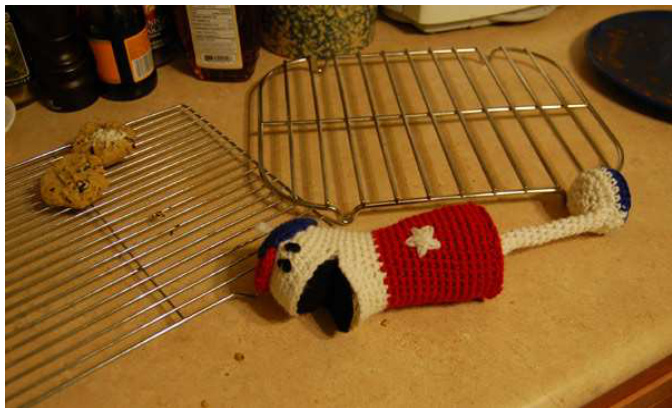
Star: embroider onto the tunic freehand with white yarn, or cut a five pointed star out of white felt and use matching yarn to sew it onto the tunic. I embroidered and ended up with a raised centre, which I love. Also my star came out a little small but I don't actually care. Stuff head and torso firmly. R31: Using back loops, [dec 1, sc 4] repeat around. (30 st) R32: [dec 1, sc 3] repeat around. (24 st) R33: [dec 1, sc 2] repeat around. (18 st) R34: [dec 1, sc 1] repeat around. (12 st) R35: [sk 1, sc 1] repeat around. (6 st) Fasten off. Using a short length of red yarn, reinforce bottom edge of tunic/torso/t-shirt with running stitch, creating a ridge around the bottom (see photo right). Fasten off and weave in ends.
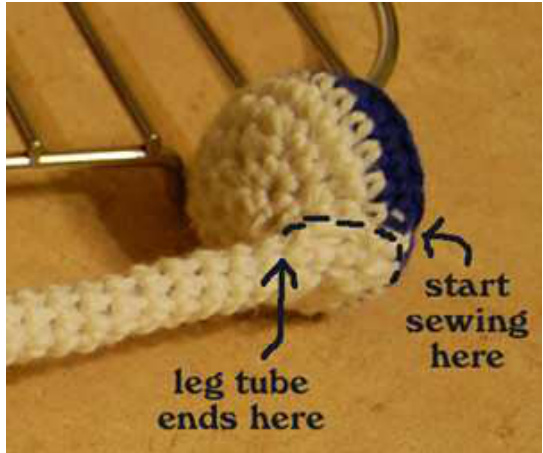
Foot (make 2) Withblue yarn, make a magic rng and crohet stitches intit. Tightn thloputilt disappears. R1: 2 sc into each sc around. (12 st) R2: [sc, 2 sc in next sc] repeat around. (18 st) R3: [2 sc, 2 sc in next sc] repeat around. (24 st) R4: Using back loops, sc around. Change to white yarn. R5 & 6: Sc around. R7: [dec 1, sc 2] around. (18 st) R8: [dec 1, sc 1] repeat around. (12 st) Stuff foot firmly (perhaps with lentils or something else weighty). R9: [sk 1, sc 1] repeat around. (6 st) Fasten off. Leg(make 2) With white yarn, ch 6. Beginning with first st, sc around for 16 rounds. This forms a tube. Now for the ankle. Turn. R1: ch1, sc 5. Turn. R2: ch1, sc 4. Turn. R3: ch1, sc 3. Turn. R4: ch1, sc 2. Fasten off. Starting at the blue sole, sew the ankles to the back of Homestar's foot (see photo to right). Bend a pipecleaner in half and stuff it down the leg, into the foot. You should have a centimeter or so left sticking out of the leg. Jam that pipecleaner extension into the torso, make sure Homestar's foot is turned the right way, and sew that leg onto the torso. (Before you sew on the second leg, pretend Homestar is weeping to Li'l Brudder. Take pictures & laugh.)
Now he can interrupt the Strong Bad you already made! Be sure to send pictures. There are more of mine on ravelry [name: Rocketbride].

ABOUT THE DESIGNER
Aleta is a long-pants woman. Her six-year-old recites alliterative odes to Marzipan. Her boyfriend cautions all you crafty types: no paint daubs. Send pictures and suggestions on how the Cheat works in 3-dimentional space to rocketbride@gmail.com


