Tangerine/Clementine Nyan Nyan Nyanko Crochet Amigurumi

Written by KatyYellen catzillacrafts.etsy.com
Abbreviations:
Ch(s) chain(s) Rnd round Inc increase Dec decrease Sc single crochet S1 st slip stitch St(s)stitches
Materials:
One ball of white yarn (I used a DK light weight acrylic yarn) One ball of orange yarn (DK light weight acrylic yarn) Size F $(3.75\mathrm{mm})$ crochet hook Yarn needle 2 plastic black safety eyes 6mm Small dark green felt circle roughly $^{1}\!/\!_{4}^{\,,}\!\!>$ round Black embroidery floss Brown thread Fiberfill
Special Instructions:
Do not jonat end ofrus. Ue a stitch markertokeepplace at thebgining f rounds, and move up after each round is completed. I use the magic ring method to start a round. Here's a great tutorial on how to make one: http://www.crochetme.com/Dec_Jan_0405/reads_round.html Of course you can use whatever method you prefer, that's just how I do it. The Nyanko Kitty is my own pattern that that Ibased off of San-X's design. Please use the pattern and/or finished toy for personal use only, not for retail or commercial purposes. Thanks! $\neg\neg$ Now let's get crocheting!
Nyanko Head:
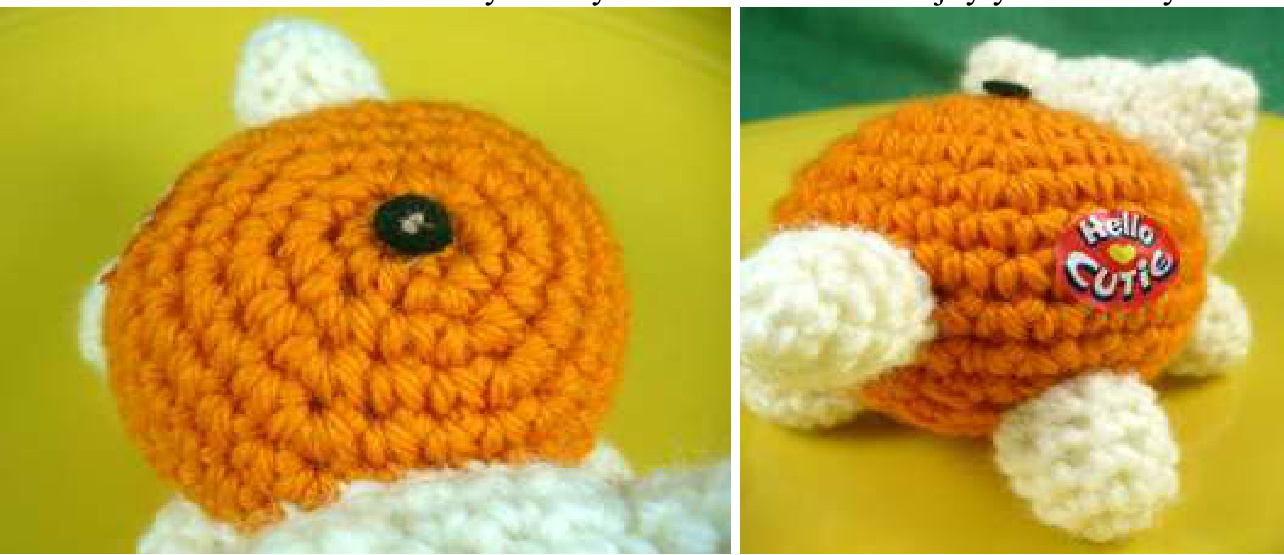
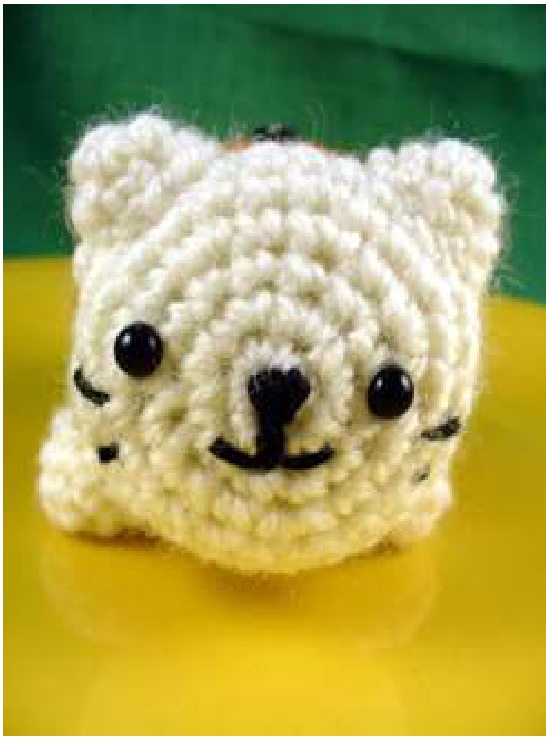
Form the magic ring Rnd 1: 6 sc in ring (6 st) Rnd 2: Inc every sc around (12 st) Rnd 3: Inc, 5 sc, inc, 5 sc (14 st) (This row makes the face oval shaped.) Rnd 4: $^*1$ sc, inc; repeat from \* around. (21 st) Rnd 5: $^{*}2$ sc, inc; repeat from \* around (27 st) Rnd 6-8: Sc around (27st) Rnd 9: $^*\,\,2$ sc, dec; repeat from \* around (21 st) Rnd 10: \*1sc, dec; repeat from \* around (14 st) Firmly stuff with fiberfill and gently smush the face to make it horizontally oval. Pop in safety eyes in between rounds 3 & 4 on both sides. Embroider nose, mouth, and whiskers with black floss according to photo. Rnd 11: Dec around until closed. Finish, leaving tail for sewing
Ears: (make 2) Form the magic ring Rnd 1: 4sc in ring (4 st) Rnd 2: Inc every sc around (8 st) Rnd 3: $\bf{*}2\bf{s c}$ , inc; repeat from \* around (10 st) Finish, leaving tail for sewing.
Feet and Tail (make 5)
Form the magic ring Rnd 1: 4sc in ring (4 st) Rnd 2: Inc every sc around (8 st) Rnd 3-5: Sc around (8 st) Finish, leaving long tail for sewing on one of them.
Tangerine Body:
Form the magic ring Rnd 1: 6 sc in ring (6 st) Rnd 2: Inc every sc around (12 st) Rnd 3: $^*1$ sc, inc; repeat from \* around. (18 st) Rnd 4: $^{*}2$ sc, inc; repeat from \* around. (24 st) Rnd 5: $*_{\mathrm{~3~sc}}$ , inc; repeat from \* around (30 st) Rnd 6-9: Sc around (30 st) Rnd 10: $^{*}3$ sc, dec; repeat from \* around (24 st) Rnd 11: $^{*}2$ sc, dec; repeat from \* around (18 st) Rnd 12: $^*1$ sc, dec; repeat from \*around (12 st) Firmly stuff with fiberfill Rnd 13: Dec around until closed. Finish, weave in ends.
Assembly:
Using yarn needle, sew the head, ears, legs, and tail onto the tangerine body, referencing photos. Using brown thread, sew the little scrap of green felt onto the top of the tangerine. Make a french knot in the middle, imitating the stem. Another fun detail is gluing a real sticker orange sticker. I glued a “Hello Cutie” sticker I found on a Clementine on the kitty's body! You're done! Go enjoy your new Nyanko!