Flowers in winter
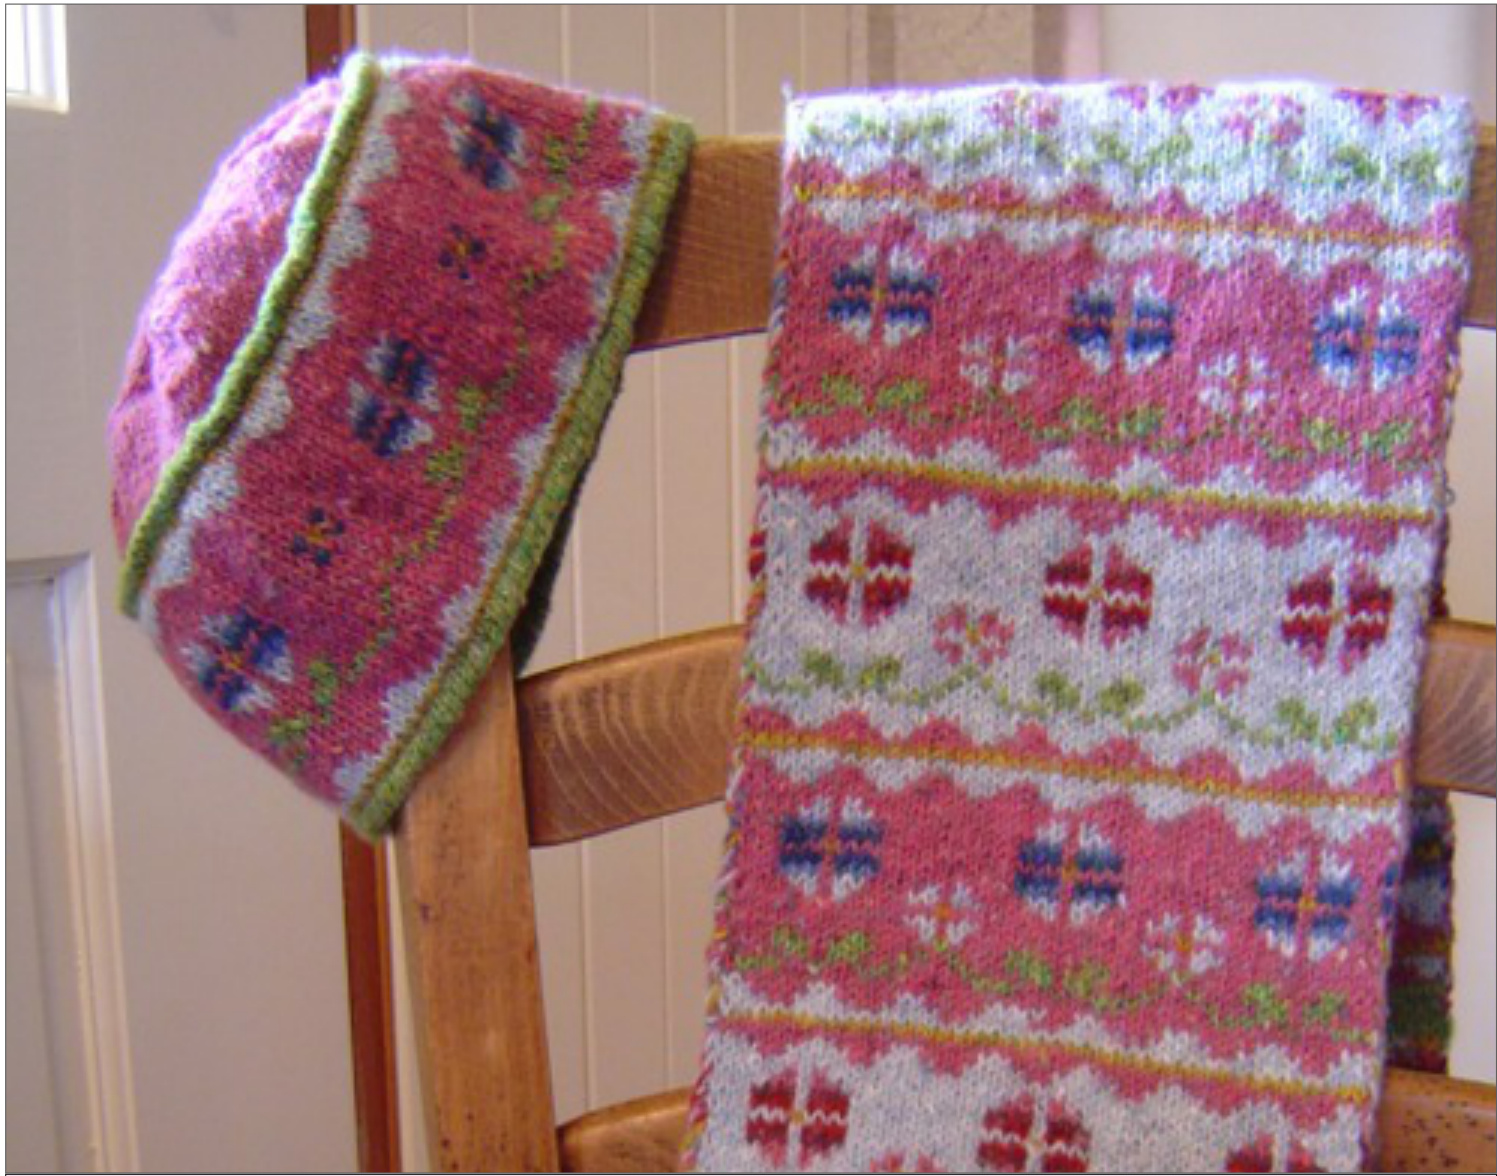
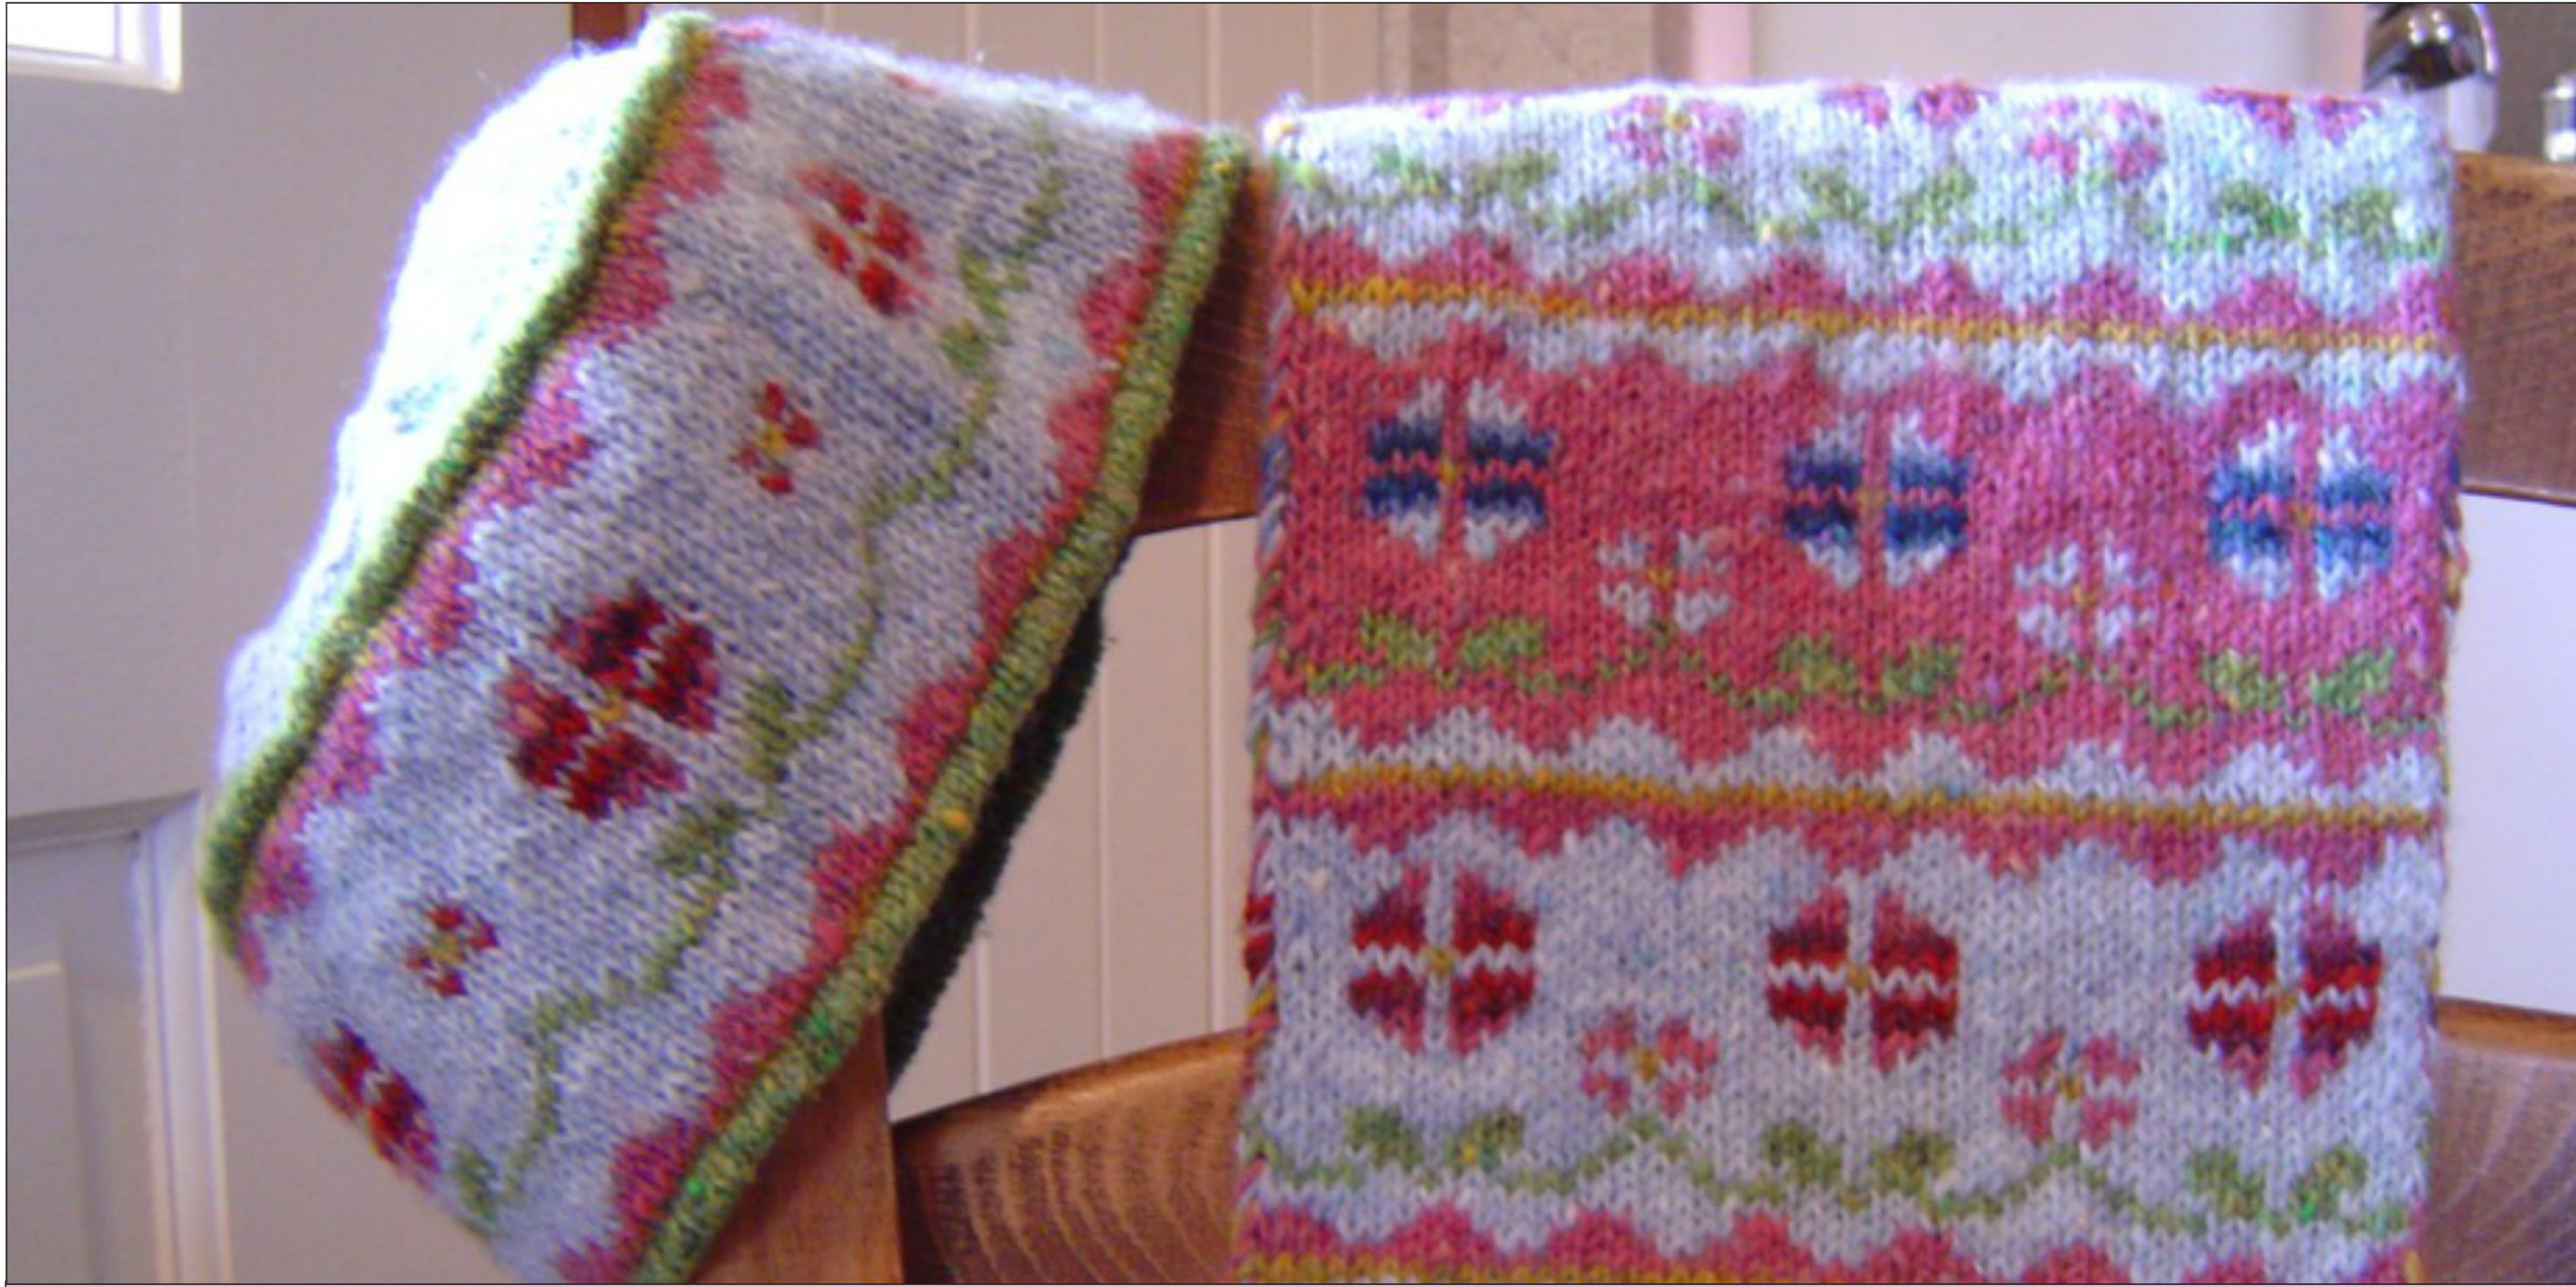
A thick, colourful scarf with matching hat in two colourways to remind you that spring is coming. Constructed using the double knitting technique, it has a flowery right' side and α 'wrong' side of abstract shapes and stripes. LOOPENZELOOP KNITS
You will need
Needles
l pair 3.25 mm needles (UK 10, US 3) 1 tapestry needle for weaving in ends and adding fringe Tension 24 sts and 35 rows over l0 centimetres (approximately 4 inches) of double knitting using 3.25 mm needles Yarn See page 2 Abbreviations K = knit P = purl RS, WS = right side, wrong side st = stitch sts = stitches tog = together Finished sizes: one size fits all Scarf: 145 centimetres (57 inches) long by 18.5 centimetres (71/4 inches) wide
Hats A and B: 16 centimetres (61/4 inches) diameter and 13 centimetres (5% inches) high
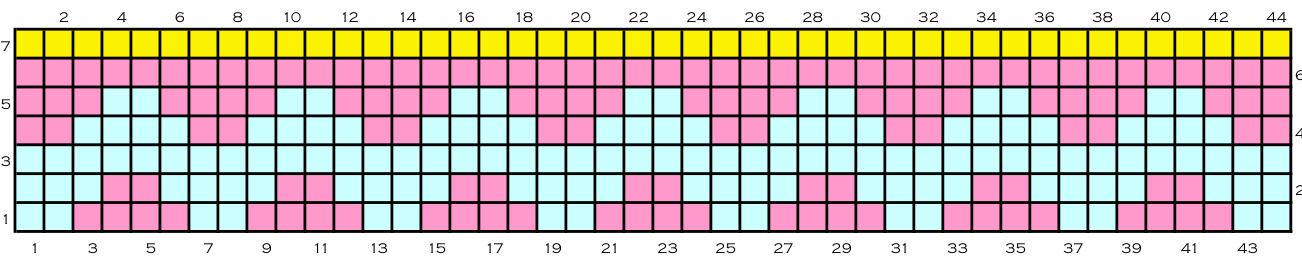
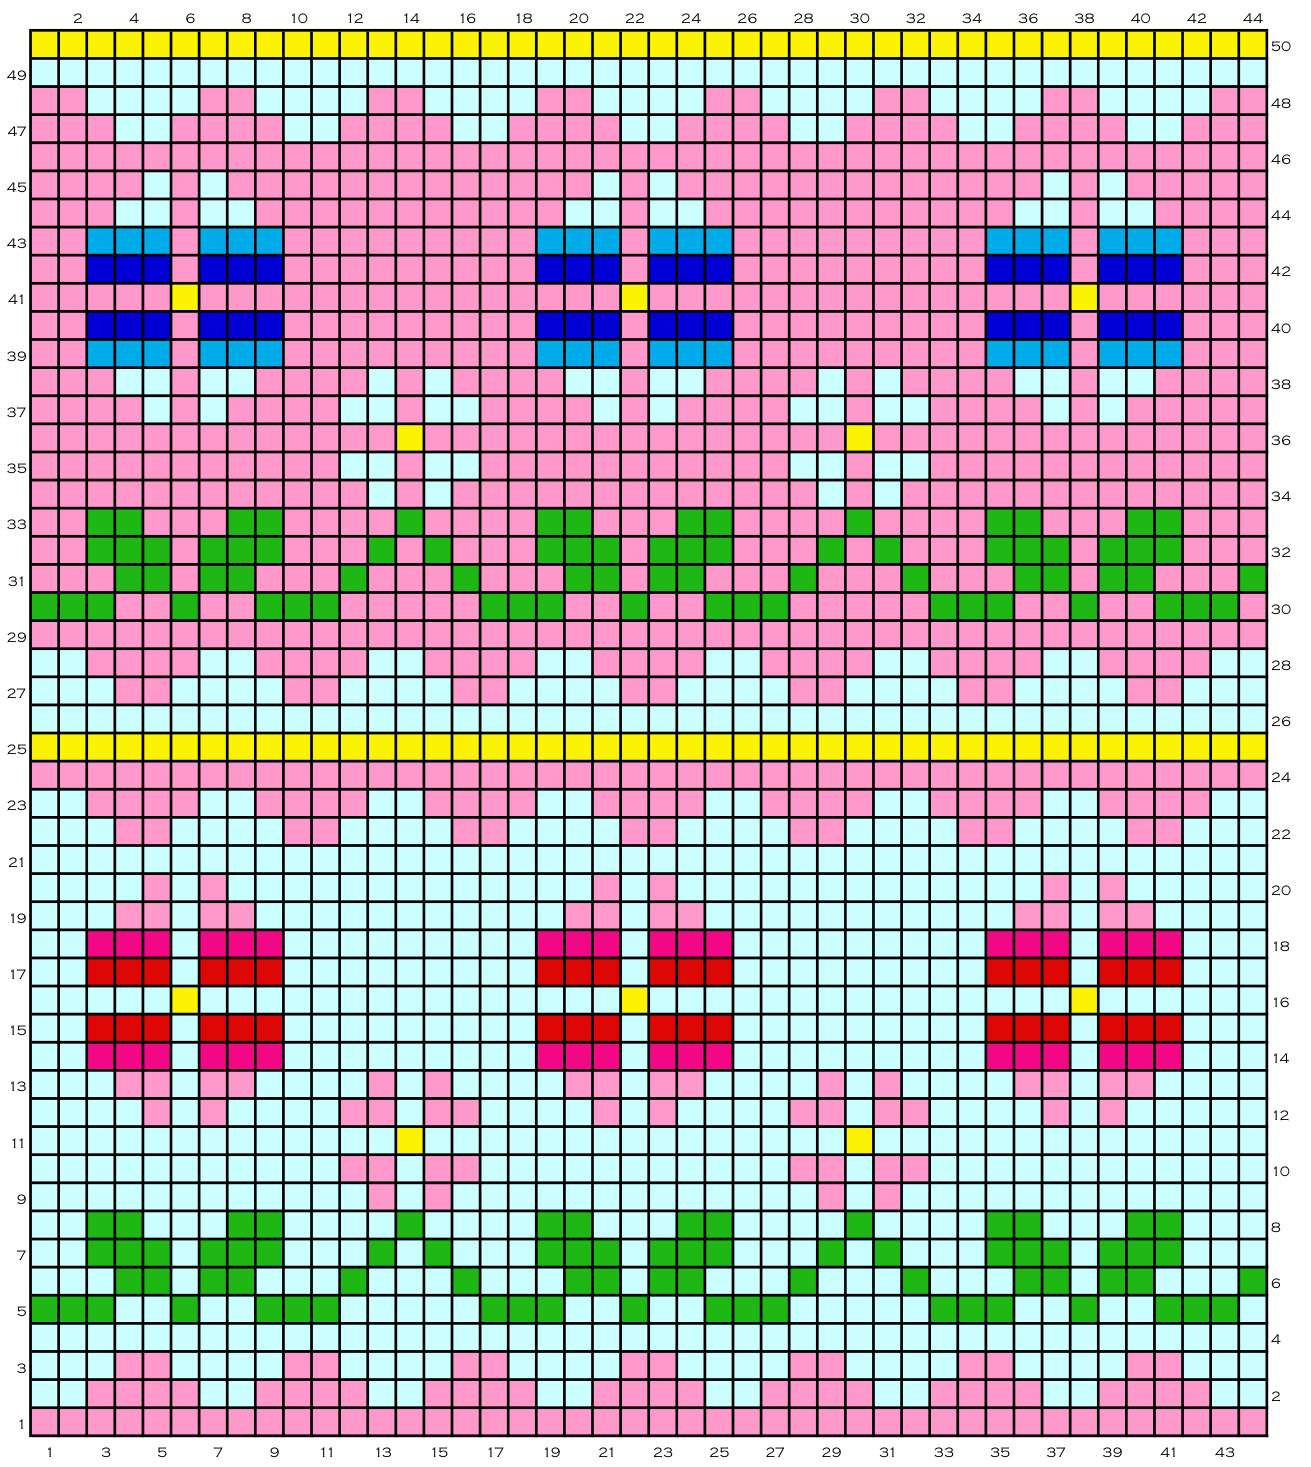
GRID B

lls of Rowan Fine Nordic Tweed in the following colours and quantities. \* If you're not adding the fringe you'll only need l ball for both the scarf and either hat A or B.
| Colour | Scarf Hat A | Hat B | Scarf & Hat A | Scarf & Hat B |
| Nappa (380) - pale blue | 3 | 十 | Colour chart 3 | |
| Hawes (362) - pink | 3 | 3 | ||
| Richmond (38l) - green | 2* | 2 | 2 | |
| Settle (374) - deep pink | ||||
| Bainbridge (369) - red | ||||
| Skipton (379) - mid-blue | ||||
| Nidd (382) - dark blue | ||||
| Leyburn (383) - yellow |

Cable cast on pairs of sts holding both yarns together. It is easier to knit the first row if you ensure that the colours alternate correctly as you cast on, but if the st you need to knit is second in the pair, carefully use the right needle to lift it up and over the other st of the pair then onto the right needle, then put it back on the left needle ready to knit. On every row, slip the first pair of sts together purlwise and K the last pair together - this creates a neat selvedge. For stocking stitch: with both strands of yarn at the back of the work, K the first st of a pair in the colour you want to appear on the facing side; move both strands of yarn to the front of the work and P the second st of the pair in the colour you want to appear on the other side. To cast off, hold both strands together and cast off pairs of sts at a time. Other points to note: · Apart from the end pairs of sts, the sequence is always Kl Pl. . The K st in α pair is always a different colour from the P st in the same pair (unless both sides are the same colour, in which case it is virtually impossible to keep track of which strand is which!). . Whenever you change colours, the P st of one pair and the K st of the next pair will be the same colour (this is useful when You're counting back). · Always remember to reverse the colours on the grid when knitting the WS (i.e. on a WS row the P sts are the ones indicated on the grid). · For the best method of joining yarns, follow the excellent advice of the legendary Jean Greenhowe here. · If you need to unpick your knitting at any stage to correct an error, I strongly recommend unpicking st by st rather than removing the needle and ripping back - because the pairs sit in different planes, it is difficult to get them back on the needle . The contrast colour you need at the beginning of each row is indicated in the standalone strip to the right of each grid. When you use a colour for an even number of rows, you'll be able to weave it up within the end st when you're not using it, but if you use a colour for an odd number of rows, you'll have to break it off and join it again when you need it. . On rows 14, 15, 39 and 40 of Scarf grids B and C, join the new yarn with a long tail (the length of your outstretched arm plus some slack - just over l metre [4O inches]), then weave this up within the end st until you use it for rows 17, l8, 42 and 43. · Sew in the ends on the WS by weaving the yarn in and out of the loops between knit columns of the same colour, taking care not to go through to the RS. Then run the thread between the two layers and bring it out somewhere else to cut off (this leaves a long thread between the layers, which is very unlikely to unravel).
Note If you've never done double knitting before, read Special Methods: Double Knitting carefully before you begin, and start with the scarf rather than the hat, so you get some practice in before it gets tricky
Scarf
A reminder: on every row, slip the first pair of sts purlwise together and K the last pair together to create a neat selvedge. Using 3.25 mm needles and Richmond (green) and Nappa (pale blue) together, cable cast on 44 sts. Each pair of sts should be in the sequence Nappa then Richmond. Ist row: K all Richmond sts using Richmond and P all Nappa sts using Nappa. 2nd row: K all Nappa sts using Nappa and P all Richmond sts using Richmond. Rpt these 2 rows twice more (6 rows). 7th row (RS): Break off Richmond and join Hawes (pink) then K all Richmond sts using Hawes and P all Nappa sts using Nappa 8th (WS) to 14th rows: Complete Grid A once. Following rows: Change to Grid B and complete twice; change to Grid C and complete 5 times; then change back to Grid B and complete twice. Complete Grid D once. Next row (RS): Break off Nappa (blue) and join Richmond (green) then K all Nappa sts using Richmond and P all Hawes (pink) sts using Hawes. Next row (WS): K all Hawes sts using Hawes and P all Richmond sts using Richmond. Complete 4 more rows with Richmond on RS and Hawes on WS. Cast off.
FRINGE
Using Richmond (green), cut 6O × 3O-40 centimetre (12-153/4 inch) strands. Fold each strand in half twice then thread onto a tapestry needle. With the RS facing, insert the needle in the middle of the first st (not the selvedge) just above the cast-on or cast off edge of the scarf. Pull the loop through to the other side, remove the needle, pull the ends (there should be two raw ends and one folded end) through the loop and pull tight. After blocking (see below), trim the fringes to even lengths (about 6 centimetres [2V3 inches]).
BLOCKING
Gently press the front and back of the scarf using a warm iron over α clean damp cloth. Don't worry too much about getting the dimensions exactly right. It doesn't really matter with a scarf!
GRID E
GRID D

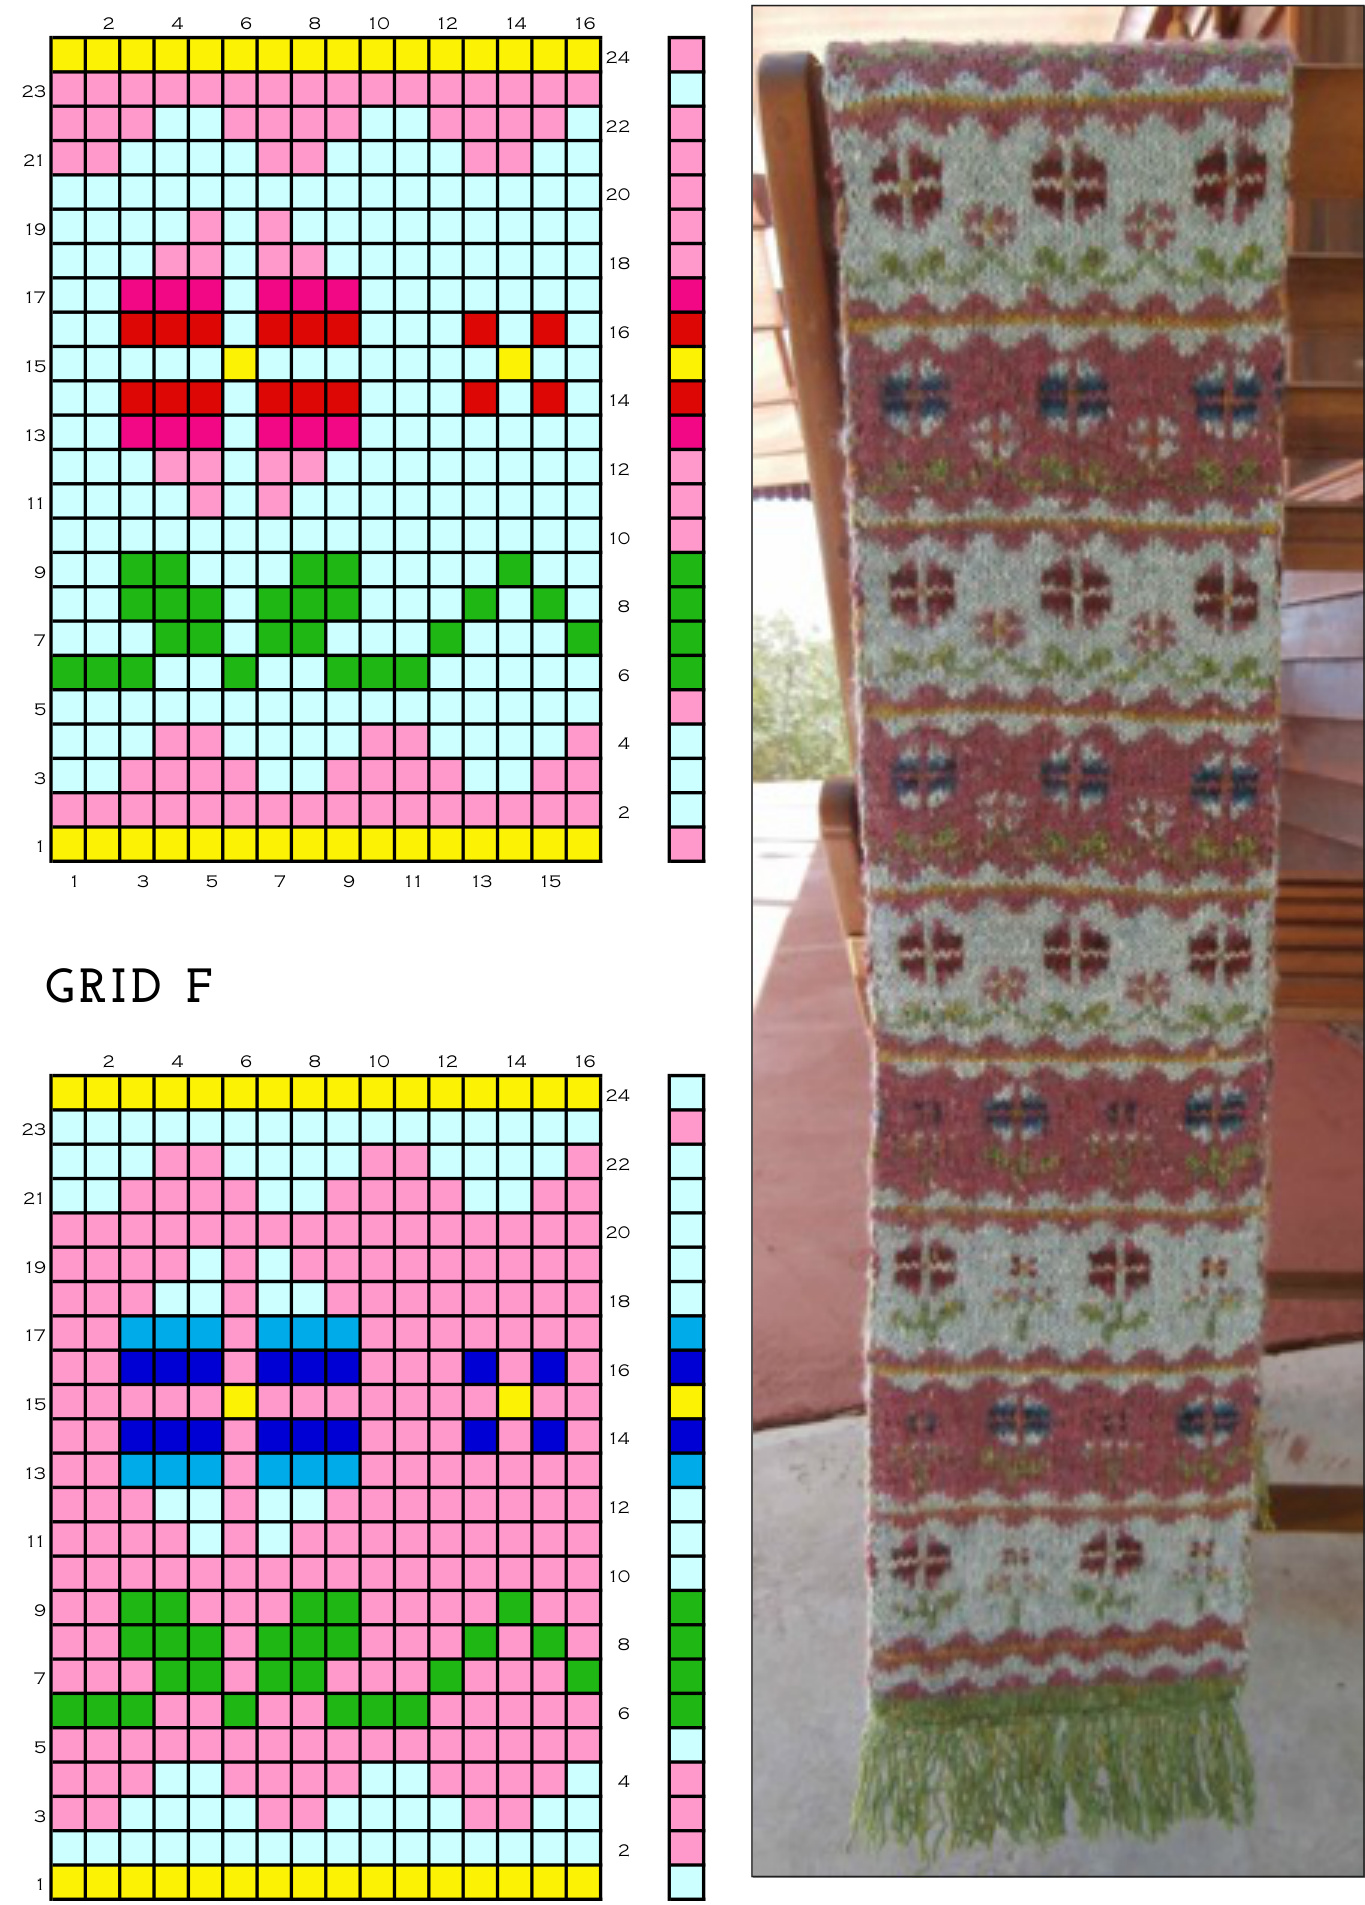
Using 3.25 mm needles and Richmond (green) only, cable cast on 122 sts. St st 6 rows, ending on a purl row. Next row (RS): Break off Richmond and join Nappa (blue) and Leyburn (yellow) together. With both yarns at the back of the work, slip the first st knitwise onto the right needle, then bring up the cast-on edge at the back of the work and slip the first cast-on loop onto the right needle. Pass the left needle through the front of both loops at the same time and K the sts together using both Nappa and Leyburn. Repeat to the end of the row. Next row (WS): Break off Leyburn and attach Hawes (pink). Slip the first pair of sts purlwise then K the Nappa (blue) st of each pair using Hawes (pink) and P the Leyburn (yellow) st of each pair using Nappa (blue) until the last pair. K the last pair together. This completes the first row of the chart. (To get your sts in order colour-wise, see Special Methods: Double Knitting.) Follow Grid E for the next 23 rows, using the colour indicated in the separate right-hand column as the contrast colour (i.e. the colour of the first P st on α RS row), making sure to slip the first pair of each row purlwise and K the last pair of each row together. Next row: Break off Leyburn and Nappa and reattach Richmond (green). K the first pair together using Richmond. Separately slip each st of the next pair knitwise onto the right needle, then pass the left needle through the front of both sts and K them together using Richmond. Repeat to the last pair, then K the last pair together using Richmond. St st 5 more rows in Richmond, ending on a purl row. Next row (RS): Break off Richmond and join Nappa (blue). Slip the first st knitwise onto the right needle, then pick up the Hawes loop from the row you rejoined Richmond, pass the left needle through the front of both loops and K them together using Nappa. (Note: there will be two loops at the back, Nappa and Leyburn (yellow), but leave the Leyburn loop otherwise the Leyburn row will be invisible on the right side of the hat.) St st 9 rows in Nappa, ending on a purl row. Ist decrease row: (K17, K3 tog) 6 times, K2. 2nd decrease row: P to end. 3rd decrease row: (K15, K3 tog) 6 times, K2. 4th decrease row: P to end. 5th decrease row: (K13, K3 tog) 6 times, K2. Keep decreasing in this way, reducing the number of K sts between each decrease by two each time, until you have l4 sts. K2 tog 7 times (7 sts). Break the yarn with a long thread, pass it through the remaining sts (anticlockwise, twice) and pull up to close. Don't break off the thread - use it to sew up the side seam (see below).
MAKING UP
Use the remaining thread and mattress st to join the back seam of the crown down to the first Richmond ridge. Use the Richmond thread to join this ridge, then use remaining matching threads to join the rest of the seam as invisibly as possible using mattress st. Sew in any remaining ends. Using 3.25 mm needles and Richmond (green), cable cast on 122 sts. St st 6 rows, ending on a purl row. Next row (RS): Break off Richmond and join Hawes (pink) and Leyburn (yellow) together. With both yarns at the back of the work, slip the first st knitwise onto the right needle, then bring up the cast-on edge at the back of the work and slip the first cast-on loop onto the right needle. Pass the left needle through the front of both loops at the same time and K the sts together using both Hawes and Leyburn. Repeat to the end of the row. Next row (WS): Break off Leyburn and attach Nappa (blue). Slip the first pair of sts purlwise then K the Hawes (pink) st of each pair using Nappa (blue) and P the Leyburn (yellow) st of each pair using Hawes (pink) until the last pair. K the last pair together. This completes the first row of the chart. (To get your sts in order colour-wise, see Special Methods: Double Knitting.) Follow Grid F for the next 23 rows, using the colour indicated in the separate right-hand column as the contrast colour (i.e. the colour of the first P st on α RS row)., making sure to slip the first pair of each row purlwise and K the last pair of each row together. Next row: Break off Leyburn and Hawes and reattach Richmond (green). K the first pair together using Richmond. Separately slip each st of the next pair knitwise onto the right needle, then pass the left needle through the front of both sts and K them together using Richmond. Repeat to the last pair, then K the last pair together using Richmond. St st 5 more rows in Richmond, ending on a purl row. Next row (RS): Break off Richmond and join Hawes (pink). Slip the first st knitwise onto the right needle, then pick up the Hawes loop from the row you rejoined Richmond, pass the left needle through the front of both loops and K them together using Hawes. (Note: there will be two loops at the back, Hawes and Leyburn (yellow), but leave the Leyburn loop otherwise the Leyburn row will become invisible on the right side of the hat.) St st 9 rows in Hawes, ending on a purl row. Ist decrease row: (K17, K3 tog) 6 times, K2. 2nd decrease row: P to end. 3rd decrease row: (K15, K3 tog) 6 times, K2. 4th decrease row: P to end. 5th decrease row: (K13, K3 tog) 6 times, K2. Keep decreasing in this way, reducing the number of K sts between each decrease by two each time, until you have l4 sts. K2 tog 7 times (7 sts). Break the yarn with a long thread, pass it through the remaining sts (anticlockwise, twice) and pull up to close. Don't break off the thread - use it to sew up the side seam (see below).
MAKING UP
Use the remaining thread and mattress st to join the back seam of the crown down to the first Richmond ridge. Use the Richmond thread to join this ridge, then use remaining matching threads to join the rest of the seam as invisibly as possible using mattress st. Sew in any remaining ends.
Copyright notice
Nela Young, Lopenelop Knits For more Lopenelop pattens,pls visit Ravelry and lopenzeloopknits.blogspotcomau in the coming months. This patten is for personal and non-profit use only: you can knit it for yourself as a gift or for charity but you may not sell a garment made from this pattern. You may not reproduce this pattern on, or distribute it from, a website or elsewhere. Unless operating under the Ravelry in-store sales agreement, merchants may not download or print this pattern for sale, distribution or class use without prior written permission from me. This pattern may not be translated reproduced or circulated in another language. Downloading or printing the patern constitutes agreement within these terms. If You find an error in this patern, please contact me at loopenzeloop@gmail.com. Thank you for choosing Loopenzeloop Knits!


