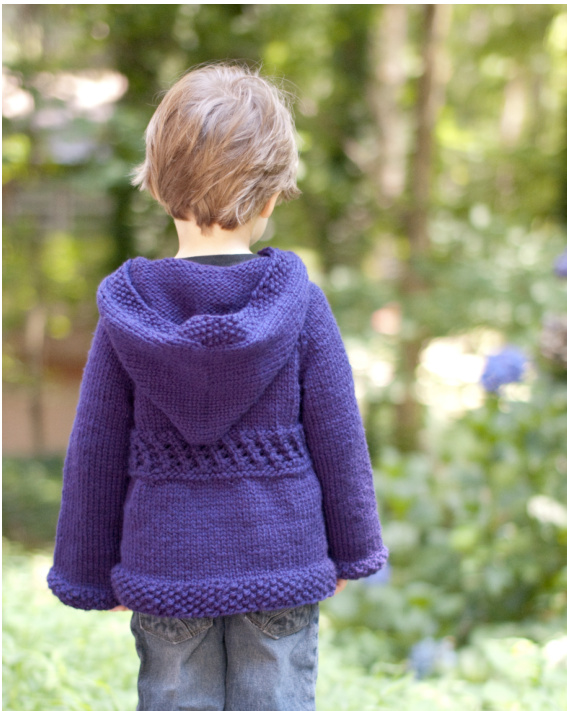
Jeffrey Coat
by Laura Savastinuk
sizes Gm (12m,2, 4, 6) Measurements chest -19.5 (21, 26, 28, 30)" Length - 13.5 (15, 17,19, 21)" Arm - 6 (7,9, 11, 13)" Hood- 8 (9, 10, 11.5, 12.5)" Gauge 14 sts / 20 rows = 4" usiwg US 10.5 weedles The Jeffrey Coat is an adorable sweater coat that will keep your little one warm and stylish for the winter. Knit top down raglan style with heavy worsted/bulky yarn on large needles, it is a fairly quick knit with a fun, easy to follow twisted band pattern. The coat can be knit with or without a hood.
Requirements
US 9 - 24” or longer circular; US 10.5 - 24" or longer circular; US 10.5 DPNs; [16" circulars may be used for sizes 4 & 6 in place of DPNs] Bulky weight yarn - generous approximates - 360 (420, 520, 580, 640) yards Examples, listed quantity should be an ample amount to knit the hooded version: Malabrigo Twist - 3 (3, 4, 4, 5) skeins Cascade 128 Superwash - 3 (4, 5, 5, 5) skeins Knit Picks Swish Bulky - 3 (4, 4, 5, 5) skeins 2 - 1" buttons Stitch markers Stitch holders or spare yarn
Stitch Guide
I recommend http://www.knittinghelp.com for videos and explanations for the stitches used in this pattern. In addition to the stitches listed below, you will also need to know how to cable cast on, pick up stitches, and graft stitches together using the Kitchener stitch. KFB - Knit into the front and back of the stitch. LT - Left Twist as described here. Placing the right needle behind the left needle, knit into the back of the 2nd stitch leaving it on the left needle, then knit into the front of the first stitch, pulling both stitches off of the needle. I have provided more detailed information about this stitch in the Twisted Band Pattern section. M1L - Make 1 Left. Lift the strand between the needles from the front, knit into the back of it. Also known as MIF: Make 1 Front. M1R - Make 1 Right. Lift the strand between the needles from the back, knit into the front of it. Also known as MIB: Make 1 Back. Seed Stitch - R1: \*K1P1\* repeat; R2: Knit the purls and purl the knits
A Note on Sizing
I strongly recommend measuring the child the coat is intended for before picking a size to knit. As this is a sweater coat, it is designed to be slightly large around to accommodate wearing winter clothes underneath. As for arm, hood, and body length, suggested lengths based on age are provided, however for the best fit knit to the child's particular measurements and check your gauge!
cast Ow and shoulders
Using US 10.5 circular needles, C0 30 (34, 40, 44, 48) stitches using the long tail method. yersion ONLY: Work in seed stitch for 5 rows before beginning R1 below.\*: The first row will set up for your raglan increases. The 4 middle markers placed will be used for increasing for the arms, back, and chest. R1 (WS): P 3 (3, 5, 5, 6), PM, P 6 (7, 7, 8, 9), PM, P 12 (14, 16, 18, 18) PM, P 6 (7, 7, 8, 9) PM, P3 (3, 5, 5,6) R2 (RS): Knit R3:Purl R4: \*K to 1 stitch before marker, KFB, SM, KFB\*, repeat \*\* for each marker, knit to the end of the row. Repeat R3 and R4 until you have 28 (32, 40, 44, 46) back stitches. Work R3 one more time such that you are set up to knit the right side. You will now split the sleeves from the chest.
Splitting the Sleeves
Next Row:
Knit to the first marker. Place the following 22 (25, 31, 34, 37) arm stitches onto a stitch holder or spare yarn. Cast on 6 stitches. I prefer to use the cable cast on method (Turn your work and use the last 2 stitches you just finished knitting to begin this cast on method. When you are finished, turn back and continue). Knit the 28 (32, 40, 44, 46) back stitches (connecting them to the front panel by the 6 stitches you just cast on under the arm). Place the 22 (25, 31, 34, 37) stitches for the second arm (between markers 3 & 4) onto a stitch holder or spare yarn. Cast on 6 stitches. Knit the remaining front stitches. You now have 62 (68, 86, 92, 98) live stitches on your needles. Beginning with a purl row, work 3 rows in stockinette stitch.
Twisted Band Pattern
I have written out each line of the twisted band pattern for you. You may find it helpful to mark off as you go along. Because this pattern will only form correctly if knitted over a specific number of stitches, double check your stitch count to be sure you have the correct number of stitches before beginning. You should have 62 (68, 86, 92, 98) stitches on your needles. As you knit, pay close attention to be sure that the twisted band pattern is forming correctly. Left Twist (LT) - The Left Twist stitch creates a twist over 2 stitches without using a cable needle. Place the right needle behind the left needle and knit through the back of the 2"d stitch. Leave the 1"t and 2"d stitches on the left needle. Knit into the front of the 1"t stitch on the left needle (basically a regular knit stitch). Now slide both stitches off of the left needle. If you're at all confused or unfamiliar with the LT, I highly recommend checking out this wonderful video that beautifully demonstrates this lovely stitch: http://knitpurlhunter.com/blog/?p=264
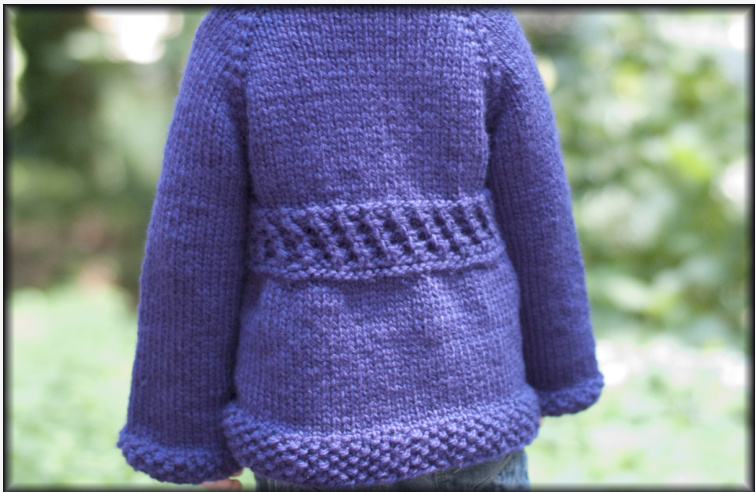
\*TIP\*: If you are kniting the twisted band pattern in a contrasting color to the rest of your coat, switch to CC for R1, and switch back to MC on R13. R1 (RS): Knit R2 (WS): Knit R3: K1, \*P1, K1, P1\* repeat to last stitch, K1 R4: P1, \*K1, P1, K1\* repeat to last stitch, P1 R5: K1, \*P1, LT\* repeat to last stitch, K1 R6: P1, \*P1, K2\* repeat to last stitch, P1 R7: LT, \*P1, LT\* repeat R8: \*P1, K2\* repeat to last 2 stitches, P1, K1 R9: K1, \*LT, P1\* repeat to last stitch, K1 R10: P1, K1, \*P1, K2\* repeat to last 3 stitches, P1, K1, P1 R11: Knit R12: Knit R13: Knit R14: Purl R15: K1, M1L, \*K6, M1L\*, K1 You now have 73 (80, 101, 108, 115) stitches on your needles.
Waist
Work in stockinette stitch until the coat measures 12 (13.5, 15.5, 17.5, 19.5) inches from the top of the shoulder (R1 under Cast On section), or to 1.5 inches from desired length of the coat, ending after a knit row. Work in seed stitch for 7 rows. Bind off in pattern.
Arws
To knit each arm, transfer 22 (25, 31, 34, 37) arm stitches from waste yarn to DPNs. Pick up 6 stitches under the arm along the cable cast on you did earlier and join the work in the round. Work in stockinette stitch until piece measures 5 (6, 8, 10, 12) inches from the underarm, or to 1 inch from desired arm length. For sizes 6m and 4 ONLY, knit one more round, decreasing by K2tog the first 2 stitches of the round. For all sizes, Work in seed stitch for 5 rows. Bind off in pattern. You may wish to use spare yarn to close any gaps under the arm from the inside of the coat.
Hood
10se to knit a hood, complete this section before knitting the button band trim \*TIP\*: Loosely measure your child's head from the top of one shoulder over the head to the top of the other shoulder to get a general idea of how big the hood should be. Divide this measurement in half to determine how long to make the hood. The pattern includes suggested lengths for the hood based on the size knit. Using your circular needles pick up each stitch from the RS of the neck band for a total of 30 (34, 40, 44, 48) picked up stitches. Note that your picked up stitches will equal one stitch picked up for each stitch that was cast on at the beginning of the pattern. R1 (WS): P 15 (17, 20, 22, 24), PM, P 15 (17, 20, 22, 24) R2 (RS): Knit R3:Purl R4: K 14 (16, 19, 21, 23), M1R, K1, SM, K1, M1L, K 14 (16, 19, 21, 23) R5: Purl R6: Knit R7: Purl R8: K 15 (17, 20, 22, 24), M1R, K1, SM, K1, M1L, K 15 (17, 20, 22, 24) Beginning with a purl row, work even in stockinette stitch until the hood measures 8 (9, 10, 11.5, 12.5) inches from the picked up stitches. Cut a long tail that you can use to graft the hood together. Place one half of the stitches on a spare needle. Beginning with the front edge, graft the two sides of the top of the hood together using Kitchener stitch.
Button Band Trim
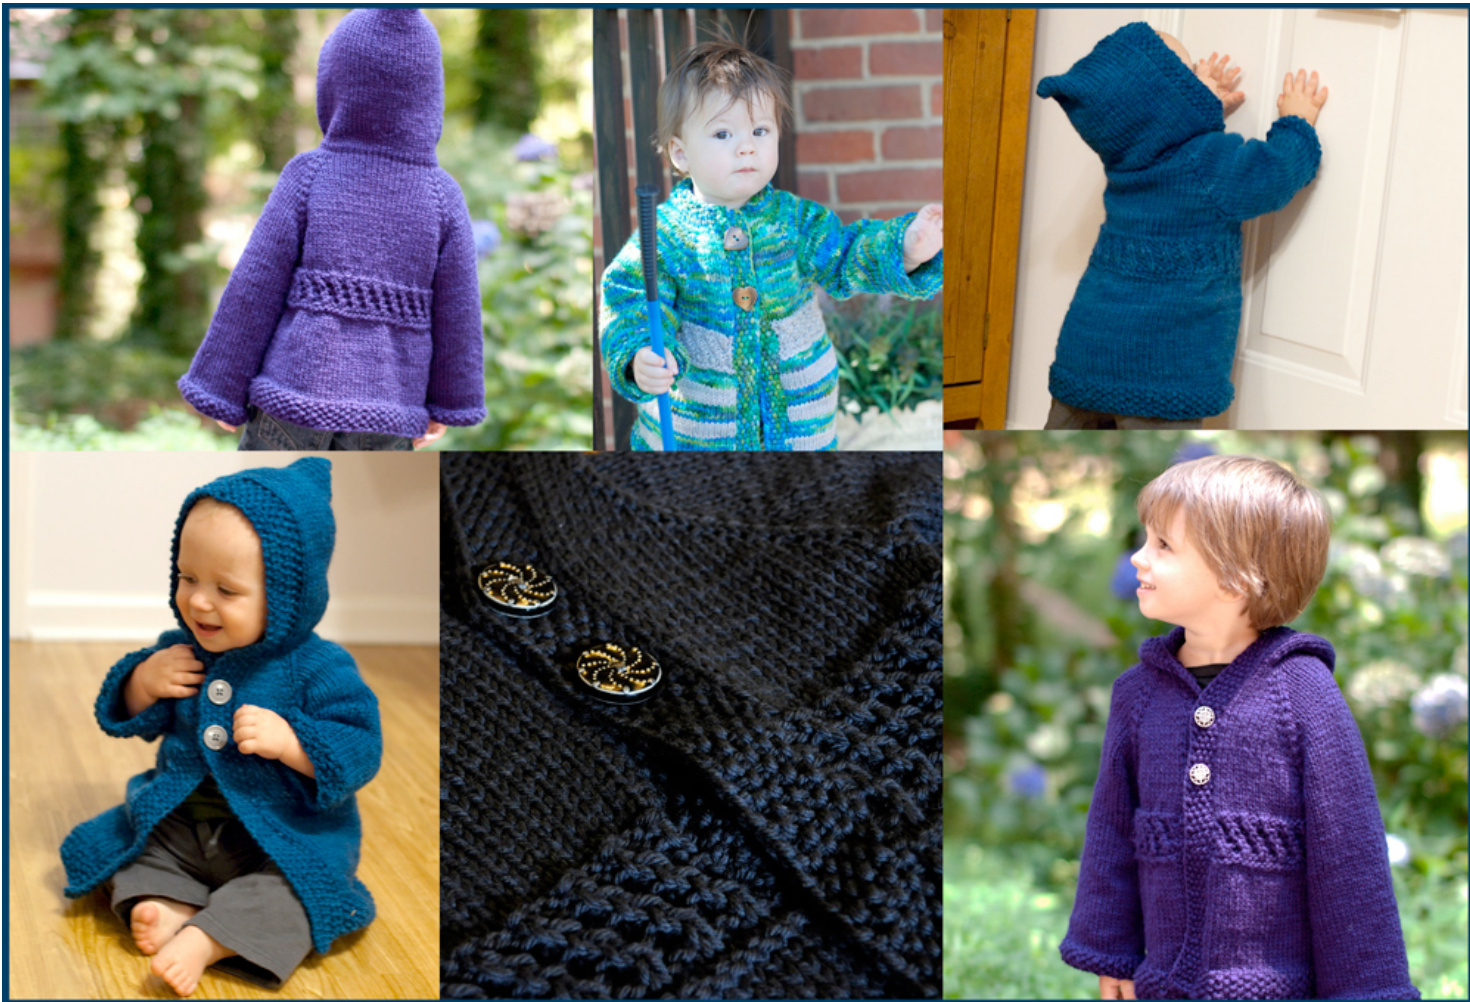
Using US 9 circular needles, pick up 3 out of 4 stitches along the front right side of the coat, continuing along the front edge of the hood, and down the left side of the coat. If you did not knit a hood you will work two separate trim bands, one for each front panel. Work in seed stitch for 3 (3, 3, 4, 4) rows. On your next row you will create your buttonholes on one side of the jacket. I recommend the holes go on the left side, but it is a matter of personal preference. Place them at least a 1"' below the neck/cast on edge to allow for an adequate opening around the face for the hood. Space the buttons as you see fit. I recommend 2 buttonholes about 2” apart, however you can add as many buttons as you wish! Create buttonholes as follows: Work in seed stitch to desired spot for first buttonhole. After a purl stitch do the following: YO, P2tog, K1P1 to next buttonhole spot, YO, P2tog, continue with seed stitch pattern to end of row. Work 3 (3, 3, 4, 4) more rows of seed stitch. Bind off loosely in pattern. Sew on buttons, weave in ends, block lightly, and enjoy!
Final Thoughts
I would like to extend a huge Tha wk You! to the wonderful knitters who generously donated their time and energy to testing this pattern. Photo credits belong to Genevieve Weleck, Shannon Wiggins, and Laura Savastinuk. I am happy to provide support and answer any questions you may have about the pattern. I can be reached at rhinoknits@gmail.com.