SpiderCorn Halloweenie Beanie
A deceptively easy knit, this hat makes a fun addition to your fall wardrobe. A ribbed brim, some stockinette kniting, simple crown decreases, and a band of colorwork all adds up to the cutest Halloween hat on the block! Baby and Child sized
Materials:
- Sport weight yarn in purple, yellow, orange, white and black (sample was knit with Knit Picks Shine Sport Yarn, Sport Weight. Less than 110 yards total.) - Size 2 (2.75 mm) circular needles (16" or 47" if using magic loop), or size needed to obtain gauge. Optional size2 DPNs - Tapestry Needle - 6 Stitch Markers
Gauge and Sizing:

Gauge - 24 stitches and 16 rows per 4 inches (10 cm.) in stockinette stitch. Sizing - Newborn- 14" (35.56 cm) Baby - 17" (43.18 cm) Toddler - 19" (48.26 cm) Child - 20" (50.80 cm) The stitch count will vary based on the size of the hat. Numbers of stitches are noted as follows: N (B, T, C), so for casting on it would look like this: 85 (102, 114, 119)
Terms:
CO-Cast On K - Knit P-Purl K2tog - Knit 2 together K2, P2 ribbing (in the round) - \*K2, P2\* around Stockinette stitch (in the round) - Knit every round
Techniques:
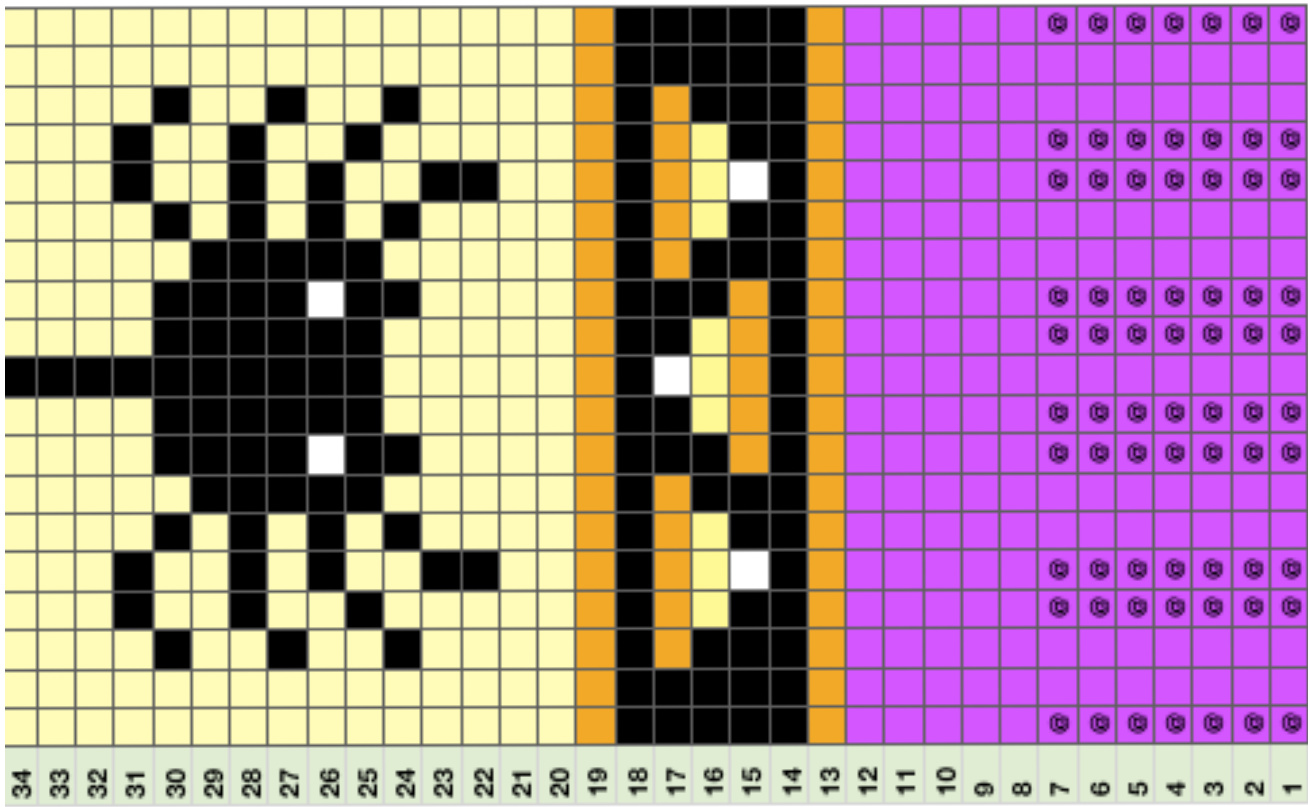
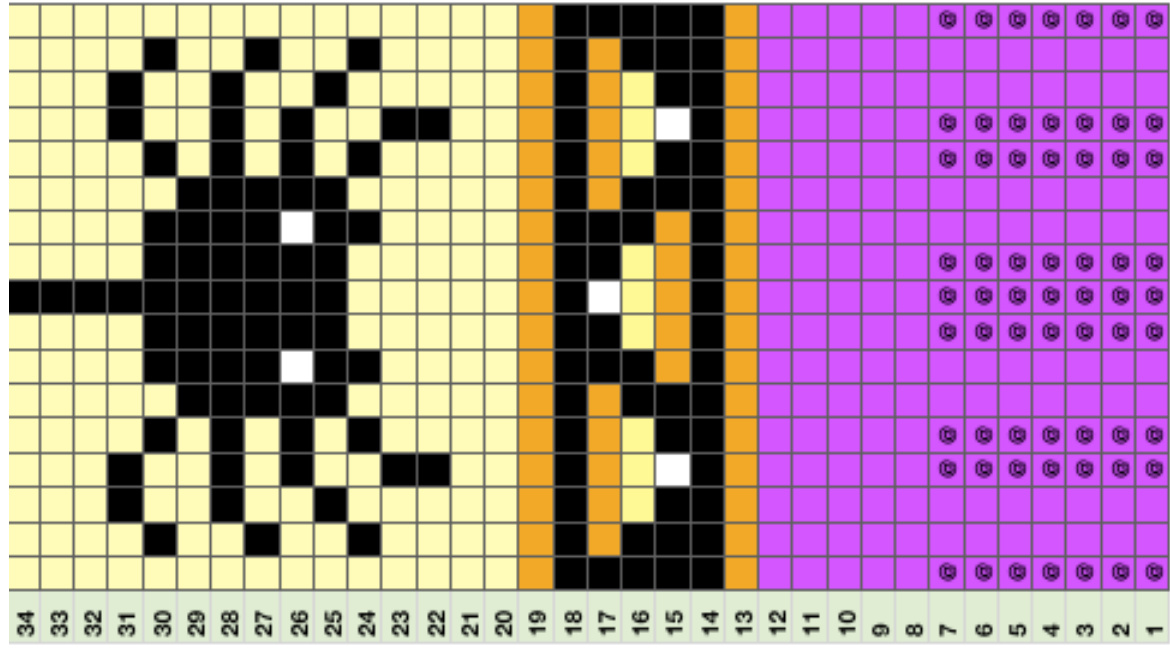
Magic Loop or DPNs - When it is time to decrease stitches for the crown, either switch to double pointed needles (DPNs) or use the Magic Loop technique, in which you use a long circular needle, pulling a loop of cable from the middle of your work to decrease the diameter of your circle. German Twisted Cast On -This method of casting on produces a neat, stretchy edge that pair well with a ribbed cuff, and is a variation of the long tail cast on with an extra twist. Stranded Knitting - Similar to Fair Isle, this technique allows you to work in two or three different colors across the row. Read the chart from left to right on each row, and carry your non-working yarn loosely to avoid puckering the fabric. "Catching Floats" - When working the charted section of this hat, you will want to occasionally wrap your yarn to avoid long “floats" on the reverse side by knitting the first few stitches normally in your working color, then twisting both yarn colors, and then continuing to knit with the working color. The twist will trap the non-working yarn against the wrong side of the piece. Catch floats every 4 or 5 stitches. There are many wonderful and informative tutorials online and in print that further explain these techniques.
Tips:
Blocking - If you are using natural yarn such as wool, block the hat when you are done for better stitch definition and evenness. To block, gently swish hat in warm water, carefully roll hat and press all water out. Do not wring or twist hat. Lay flat on towel, smoothing into desired shape, and allow to dry undisturbed for a day or two. Duplicate Stitch - Because so little white is used in this hat, you may simply want to add those stitches afterwards, with the duplicate stitch technique. Simply knit black when the pattern calls for white, and once the hat is finished, go over these stitches with white yarn. Life Lines and Weaving in Ends - You may want to place life lines at the end of each section (ribbing, stockinette, chart A, chart B, chart C, stockinette and crown) in case a mistake is made. Take a piece of floss or crochet thread, longer than the hat's circumference, and run it through the live stitches after your last row. Tie floss or thread loosely. If you need to rip back, you will only have to rip as far as the lifeline. When weaving in ends, you may want to pair up tails, tying a small overhand knot before weaving. These are unnoticeable but give your hat a little extra security, just in case!
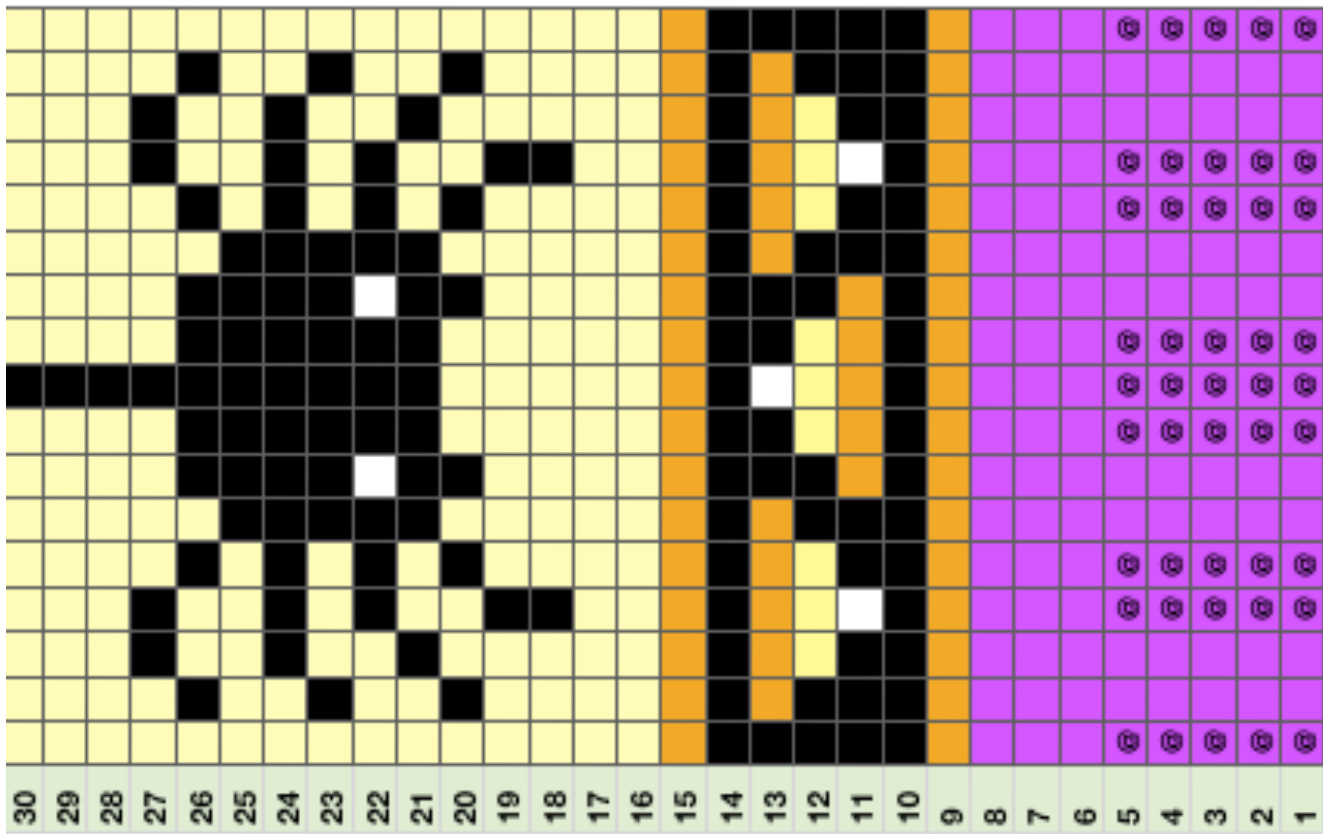
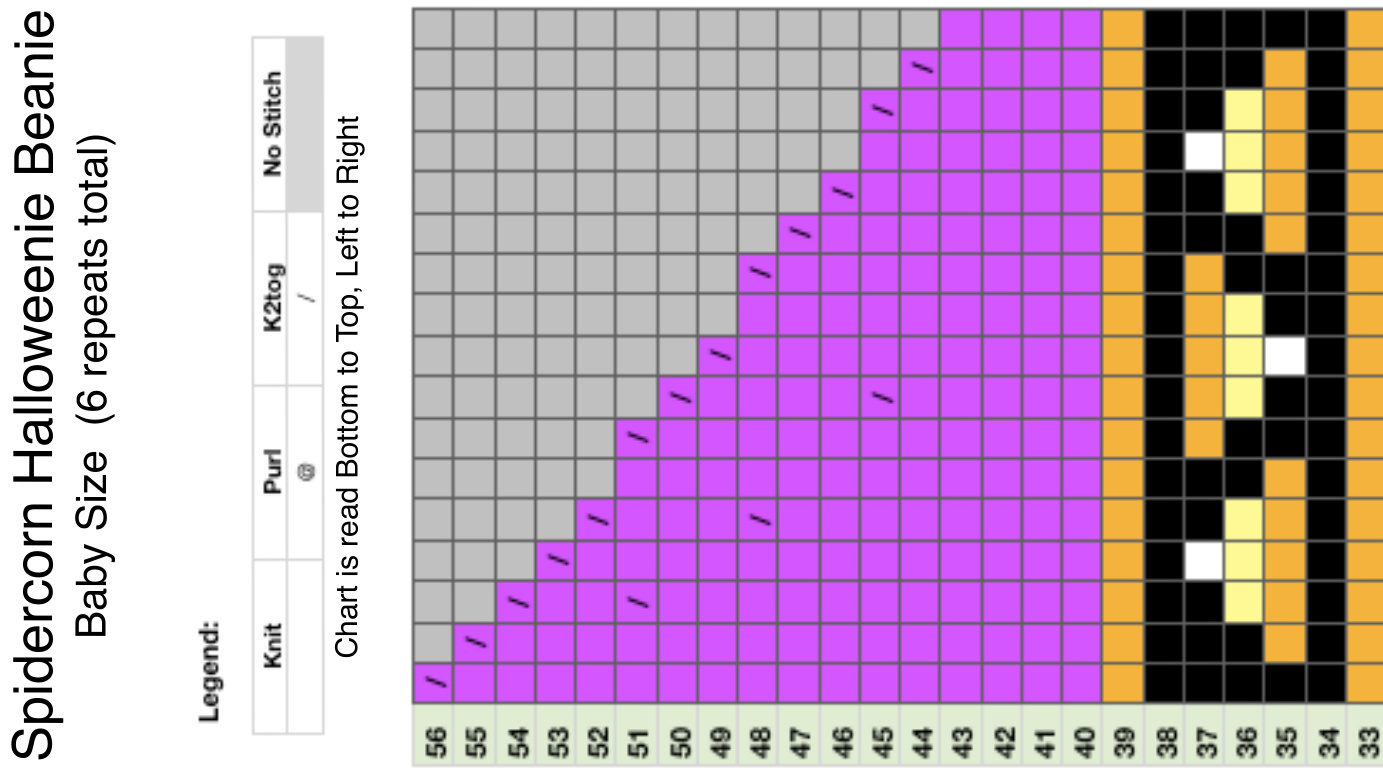
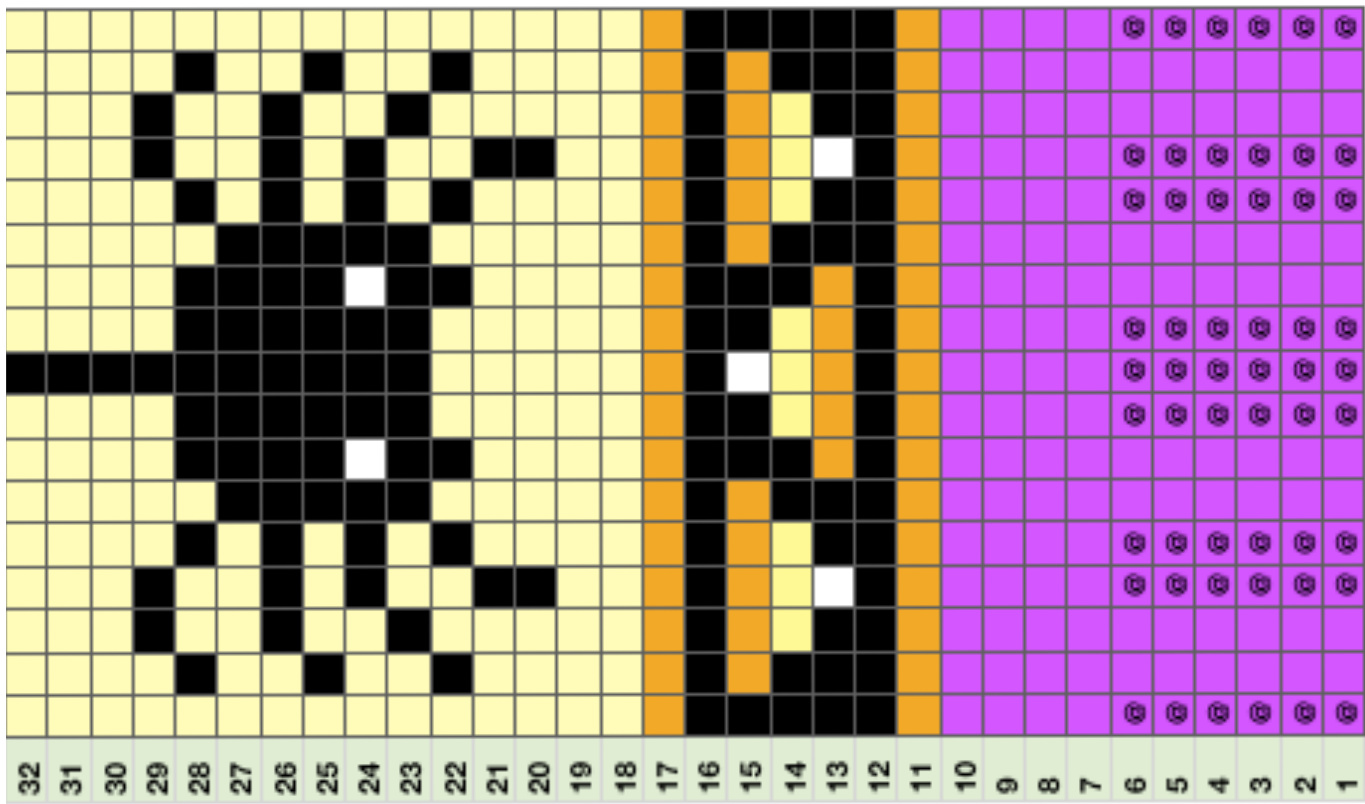
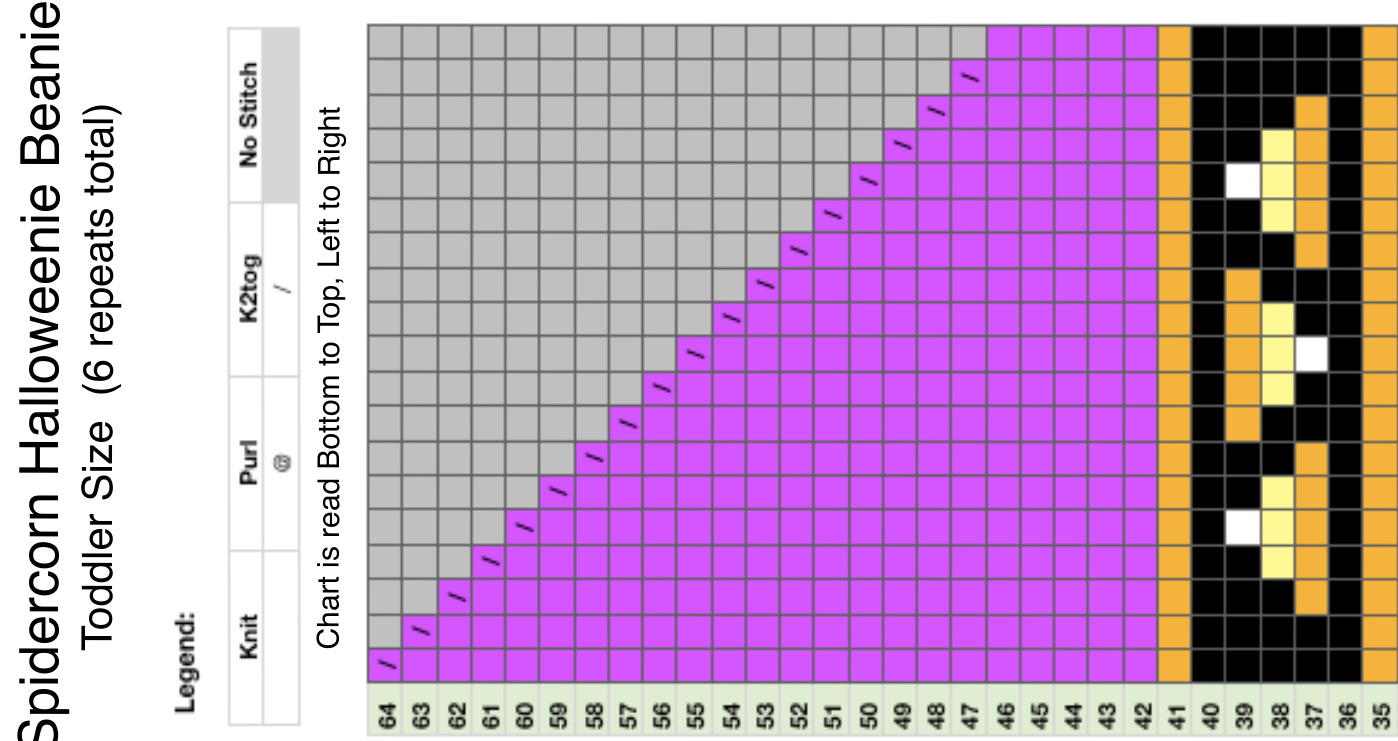
SpiderCorn Halloweenie Beanie Pattern
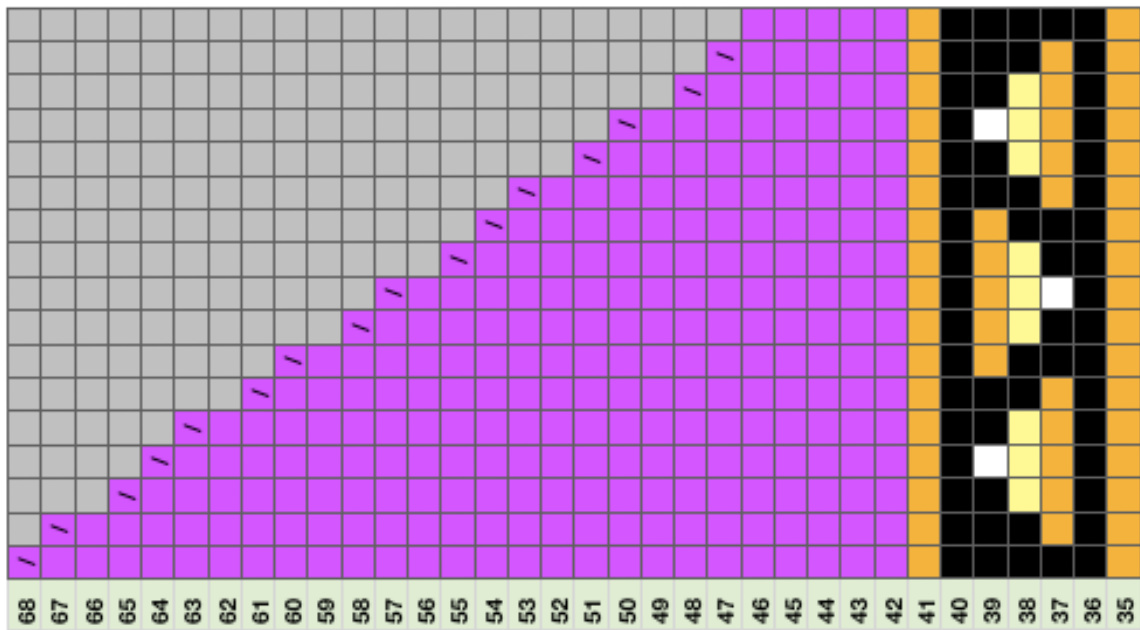
The pattern charts for each size begin on the next page, along with a note on how many repeats are used in each row. Remember to read chart from bottom to top, left to right.
Casting On:
Using German Twisted Cast On and Purple yarn, Cast on 85 (102, 114, 119) stitches, Join, being careful not to twist.
Body:
The body of the hat consists of a few sections, which vary in row count, depending on size. The brim is ribbed, followed by a stockinette stitch section in purple, the stranded knitting colorwork, and another section of purple stockinette. To avoid confusion, place stitch markers at the end of each repeat, with a different marker at the end of the row.
Crown:
The crown is knit according to the individual chart. For the crown, you will divide the stitches evenly into wedges, repeating the pattern for each wedge until only a small number of stitches remain on the needles. You may want to mark each wedge with a stitch marker.
Casting Off:
After the last row you will cut yarn and pull through remaining stitches to cinch top closed. Weave in all ends.