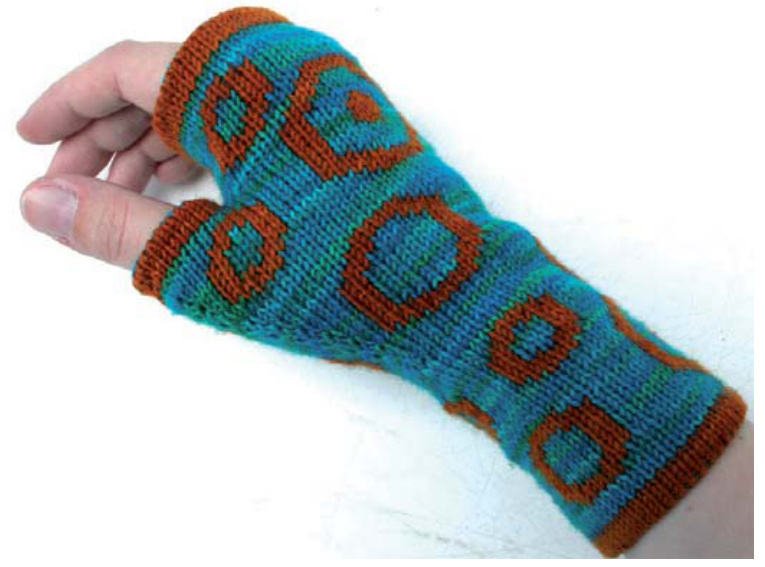
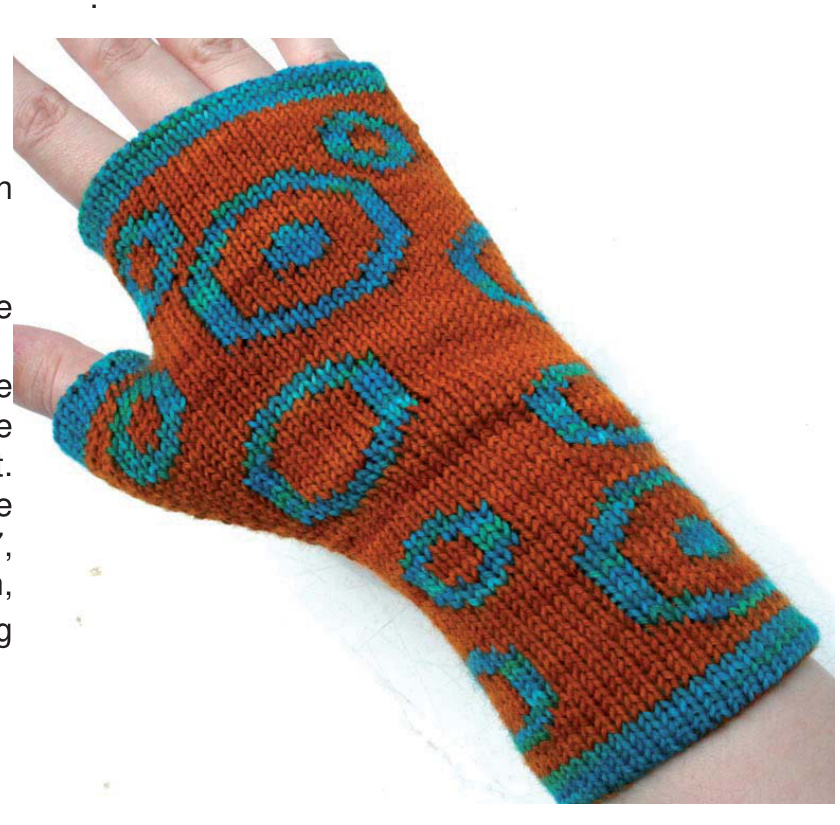
Cheesehands
Materials:
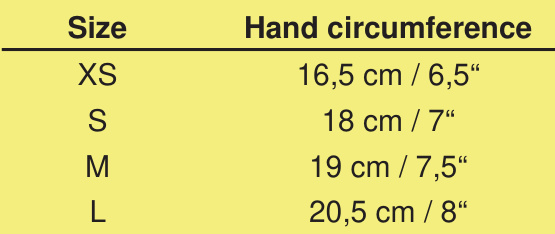
210 meters / 230 yards of fingering weight yarn (shown in Wollmeise $100\%$ super wash, colorway Pfefferminz Prinz), about 60g / 2 oz. (=color A) 210 meters / 230 yards of fingering weight yarn (shown in Wollmeise $100\%$ super wash, colorway Honigtopfchen), about 60g / 2oz. ( $\overset{\cdot}{=}$ color B) Two 2 mm circular needles (long enough for magic loop) or size to get the given gauge. Two $_{2,5\mathsf{m m}}$ circular needles or one size bigger than the needles you needed to get gauge. Tapestry needle
Gauge:
32 stitches and 42 rows on 10 cm / 4" in stockinette stitch. IMPORTANT: You need to make a doubleknitted swatch as this technique alters the gauge!
Notes:
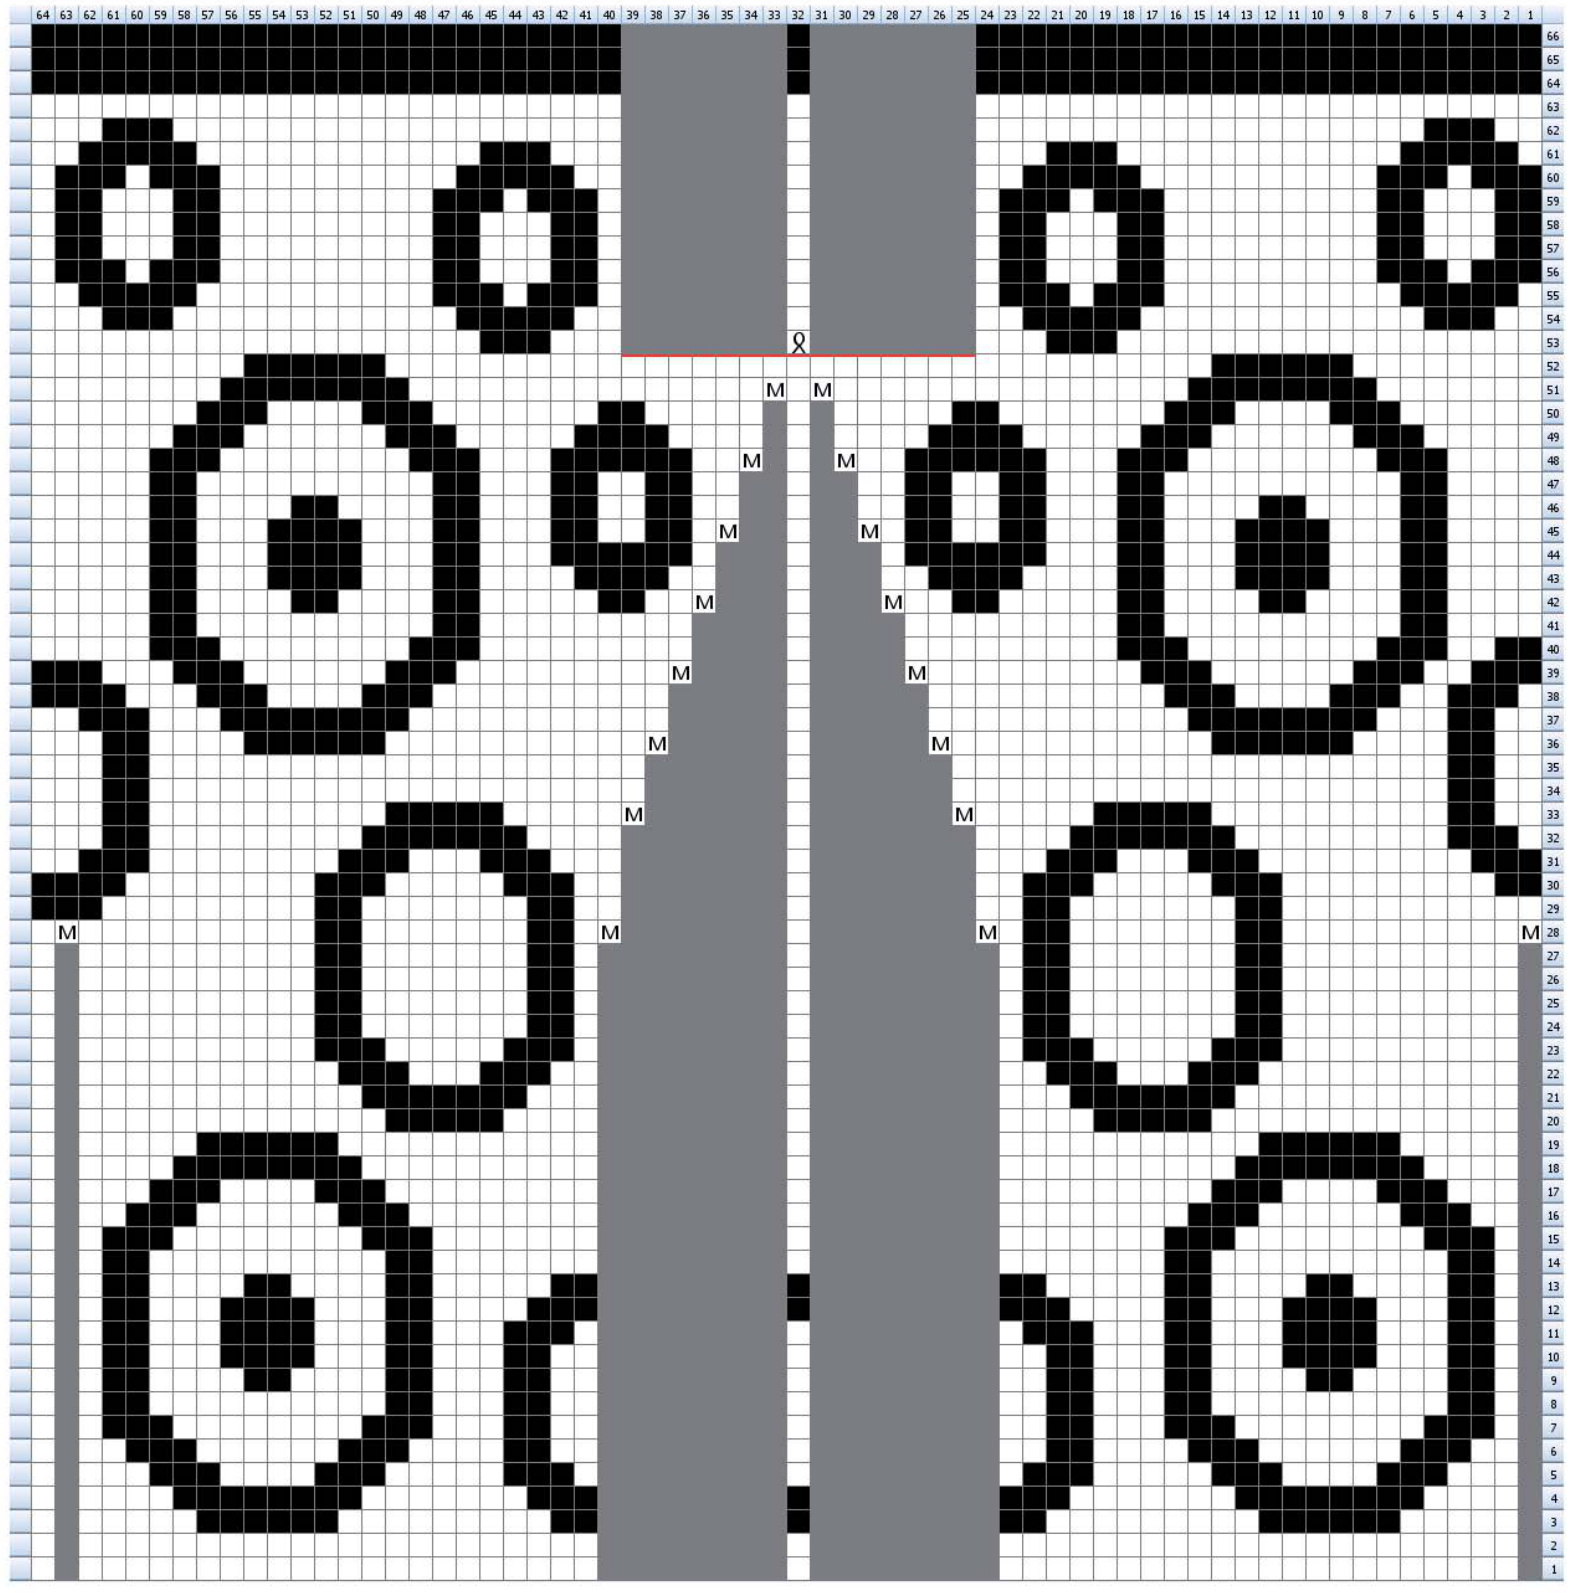
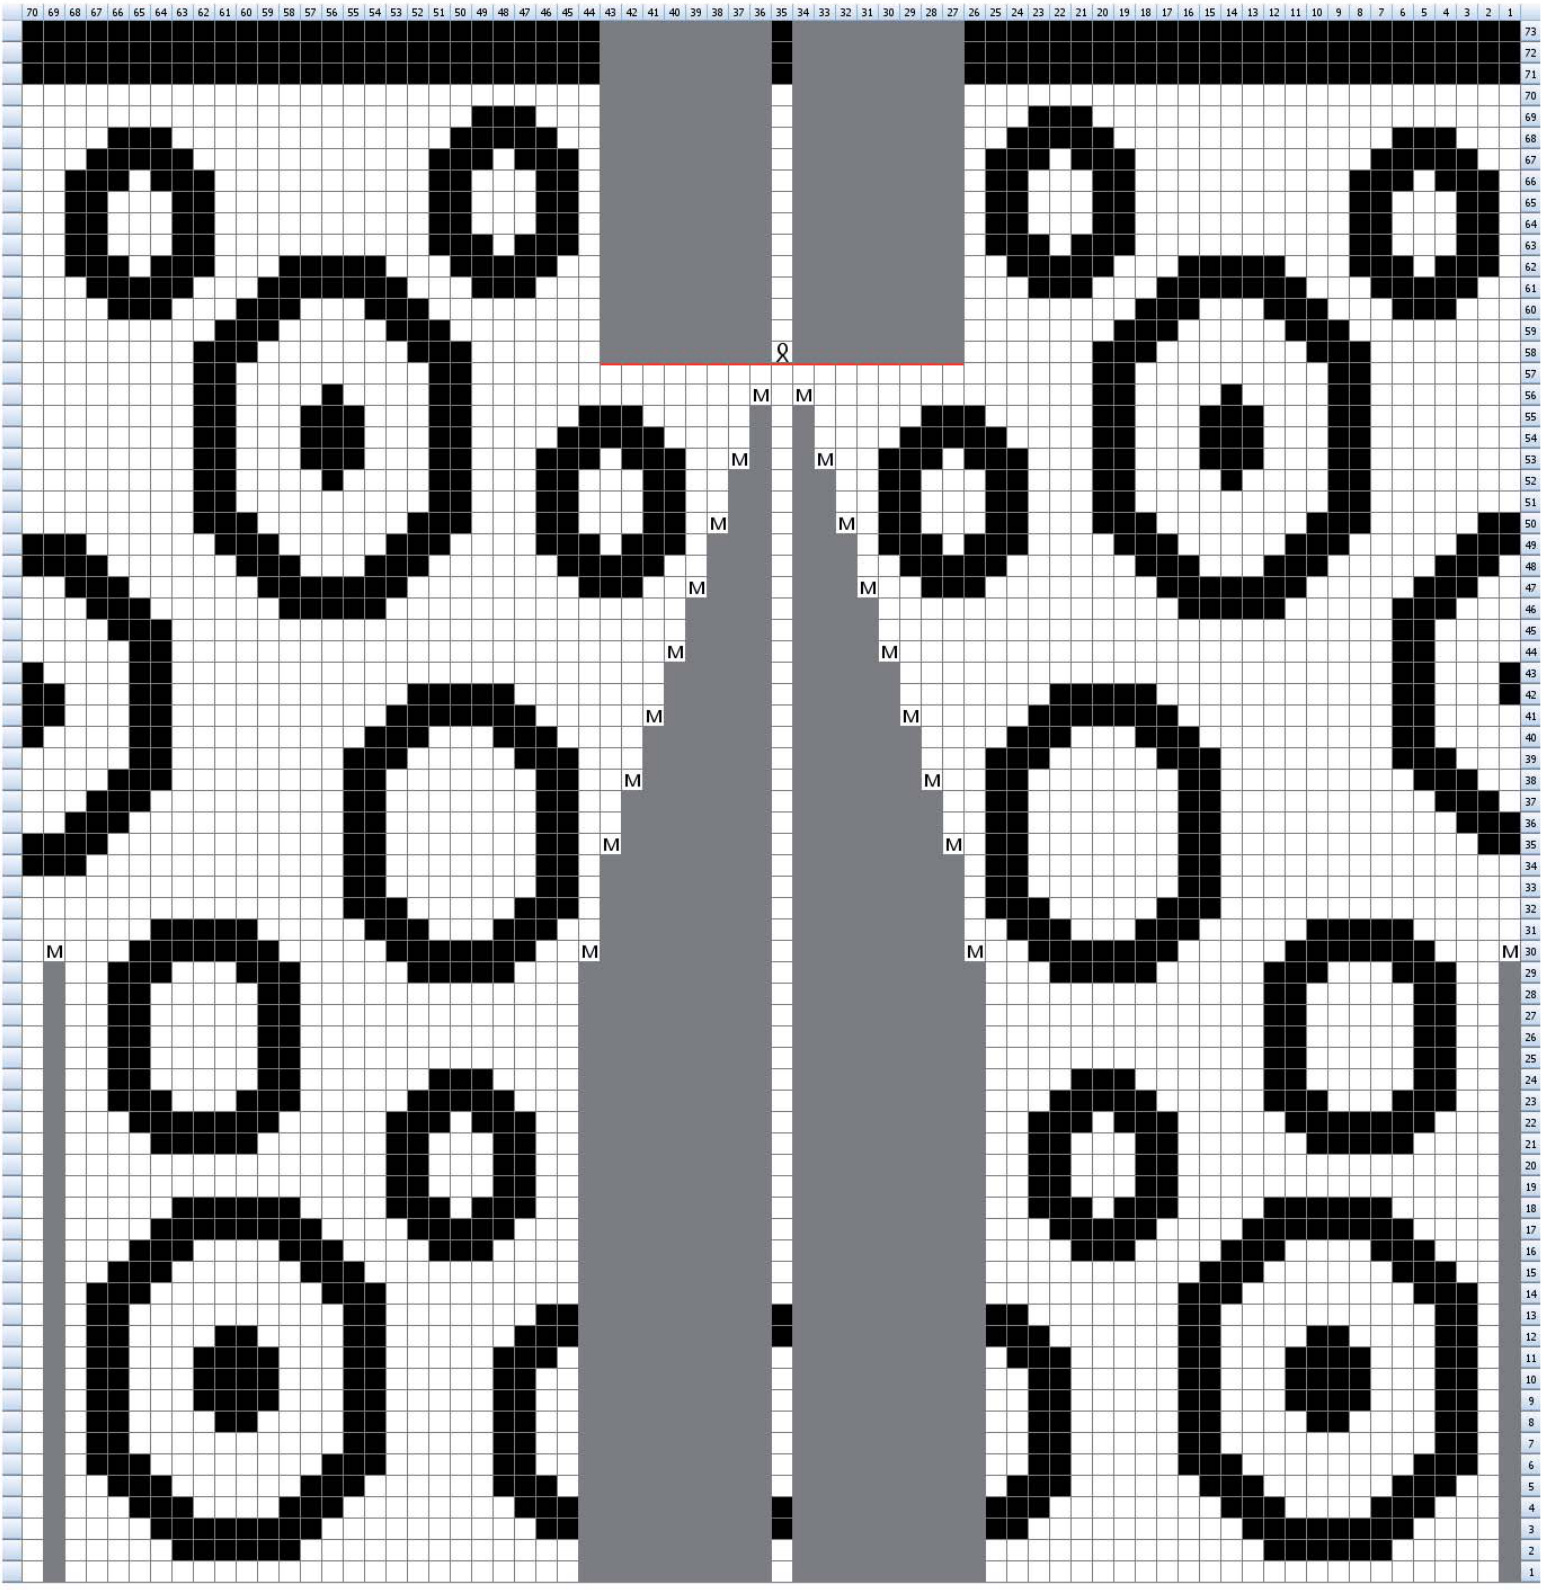
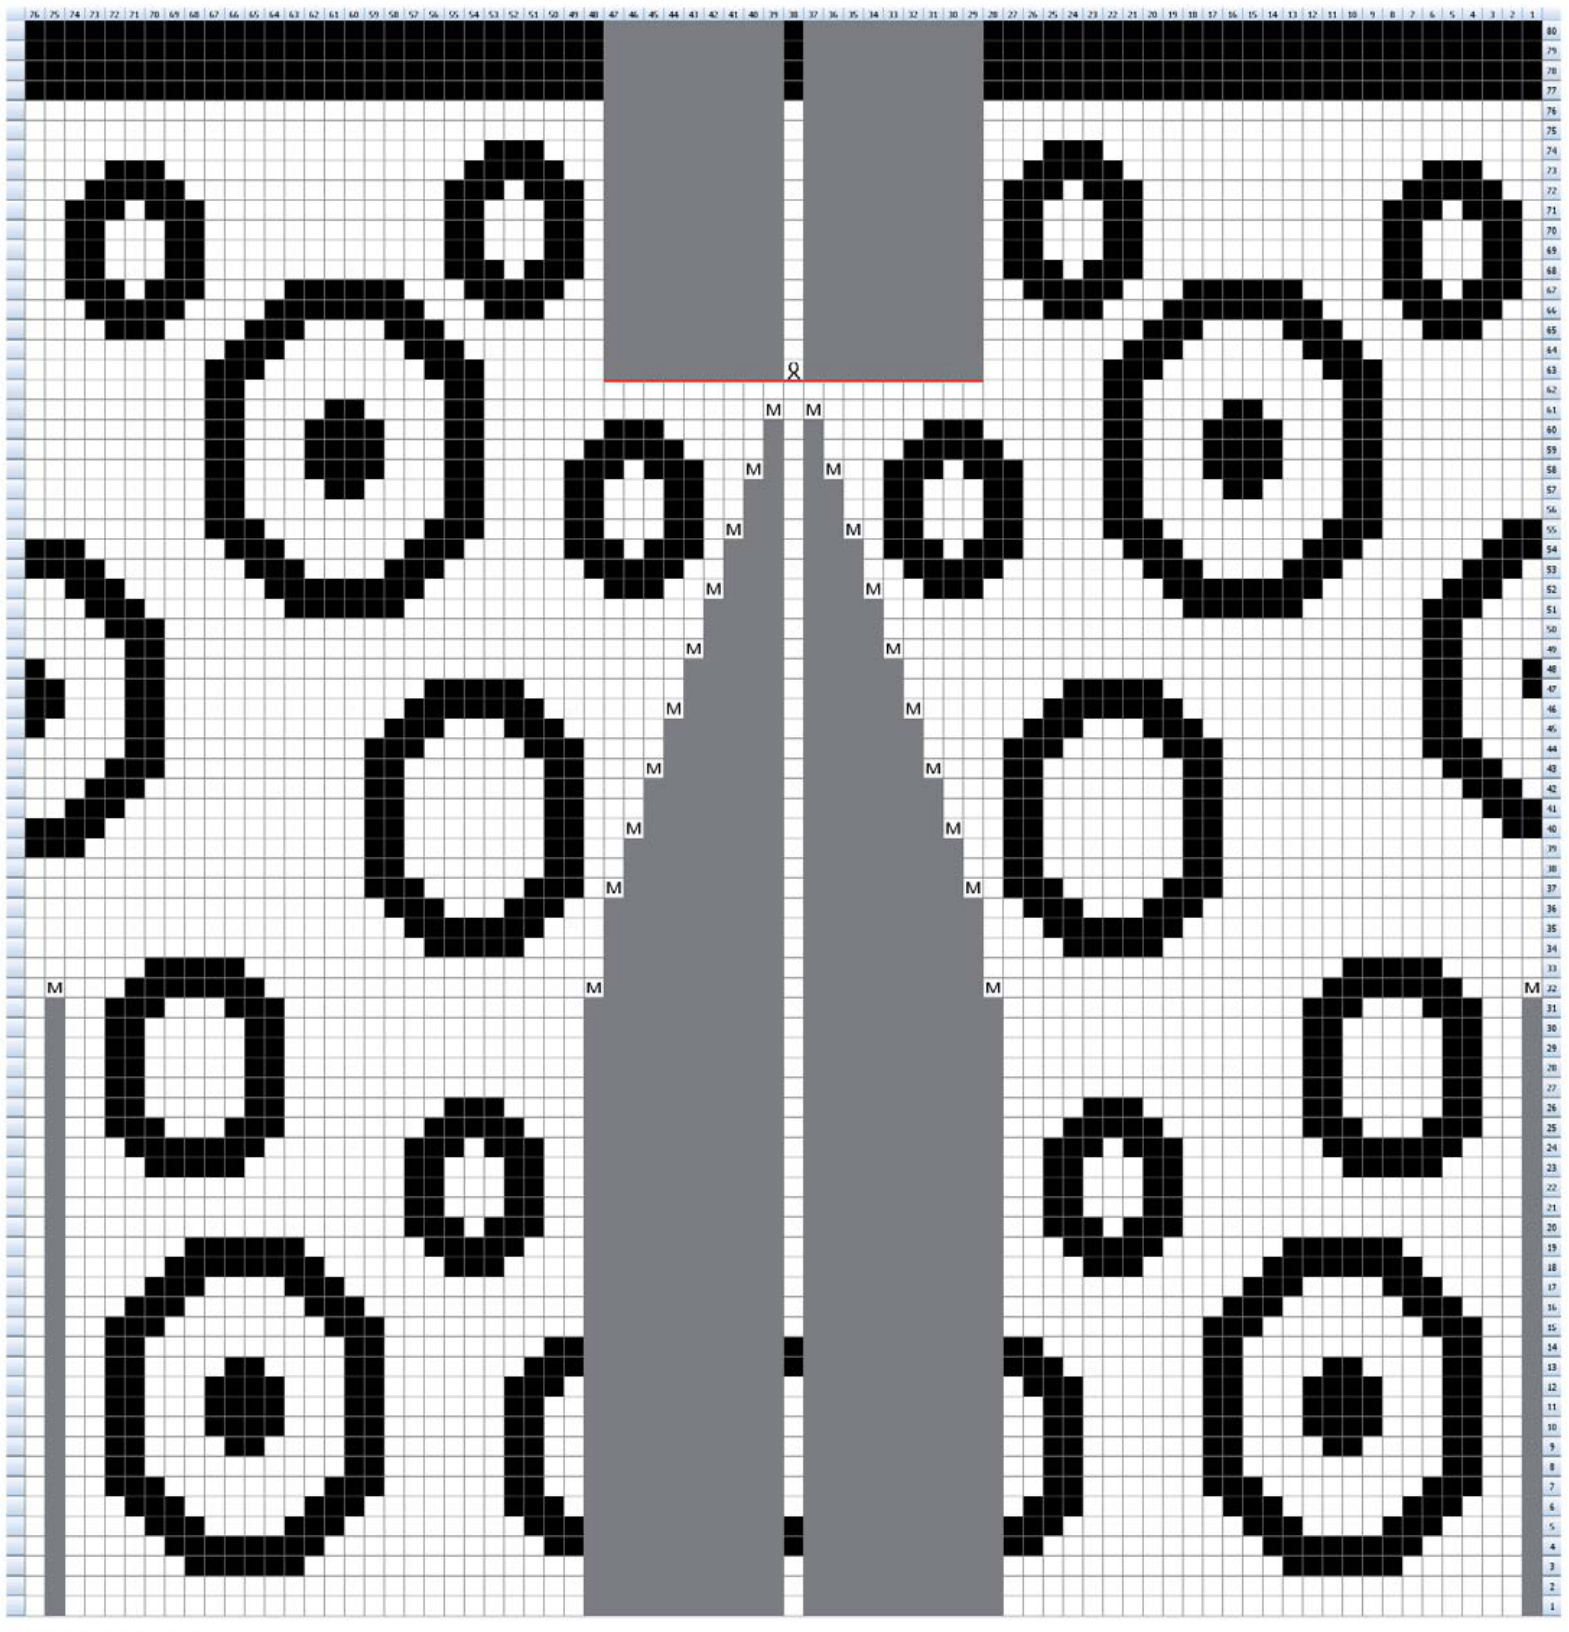
These mittens are knit using the “magic loop" method, however you can use double pointed needles or two circular needles if you prefer. Just be aware that the instruction often refers to needle 1 and 2 (meaning each half of the total stitch count). Where stitch counts vary depending on the size, the following format is used: XS [S, M, L]. READ THE WHOLE PATTERN BEFORE YOU START KNITTING! SEPARATECHARTSAREPROVIDEDFOREACH SIZE.BE SURE TO USETHE CORRECT CHART CORRESPONDING TO THE SIZE BEING KNIT.
About Doubleknitting:
In doubleknitting, two layers of fabric are created on one needle (think of it as two layers of stockinette with wrong sides facing each other), resulting in twice as many stitches on the needle as you would normally need to knit a piece of plain stockinette. Every part of this project, from cast-on to bind-off, will feature detailed instructions on how this technique works.
Part 1: The Cast-On
Using the provisional crochet cast-on and the 2,5 mm needle, cast on 46 [50, 54, 58] sts in color A. Join in the round and work in stockinette (starting with a knit round) for 4 [4, 5, 5] rounds.
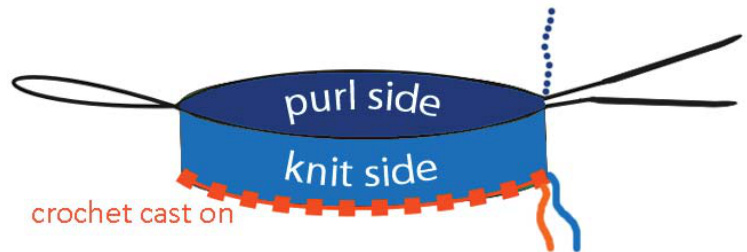
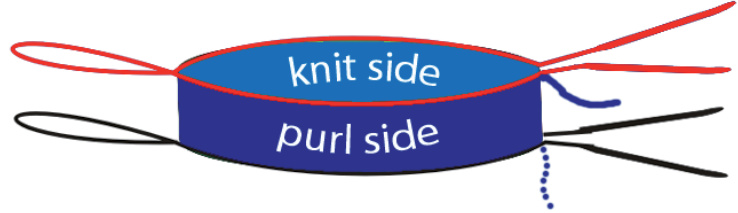
(line $=$ cast-on yarn tails / dotted line $=$ working yarn) Turn the tube inside out so the purl side faces you with the working yarn (color A) hanging down.
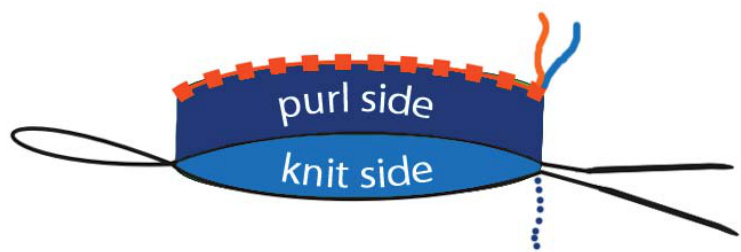
Put the 46 [50, 54, 58] loops from the provisional cast on back on the second circular (marked red in the following graphic).
Starting at the beginning of the round (tail of color A from the cast-on), begin working reverse stockinette in color B for 6 rounds. Make sure that you work in the same direction as you have done on the previous rounds when using color A.
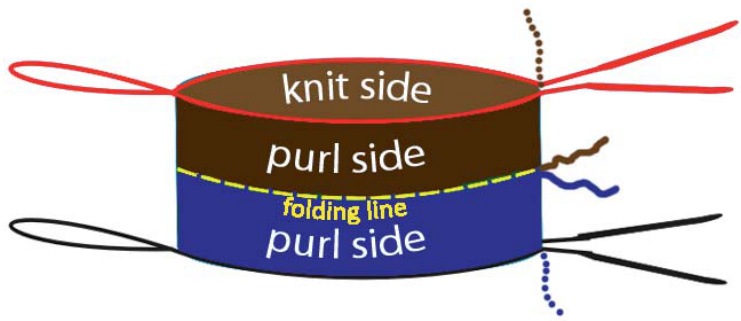
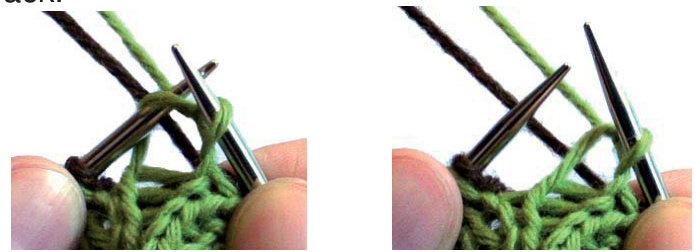
Thread the tails of both A and B on a tapestry needle and pullthem on the purl side (if they aren't already there). Weave in the ends. Mark the beginning of the round using a split ring marker. Fold the piece of knitting so that the needles are side by side and the purl sides are facing each other (folding line is marked in the graphic above). Using a 2 mm needle, transfer all stitches from both needles onto one needle, alternating one stitch from A and one stitch from B. Start with a stitch from the needle which is next to you (slip as if to purl), then take a stitch from the other needle. Continue until all stitches have been transfered (see the following picture. 2 mm needle shown in green)
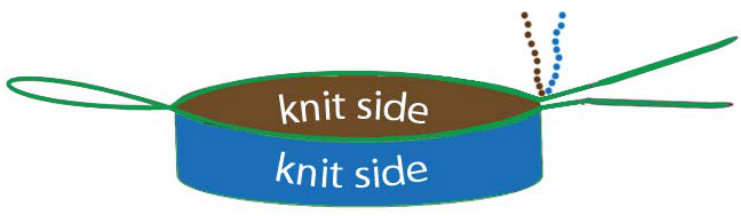
Separate them into two times 46 [50, 54, 58] stitches to be ready for working in the round using magic loop.
Part 2: Doubleknitting 101
In plain doubleknitting (without colorwork) you will go on like this (starting with a stitch in color A): knit this stitch using color A with both strands of yarn in back.
The next stitch (color B needs to be purled using color B while holding both yarns in front.

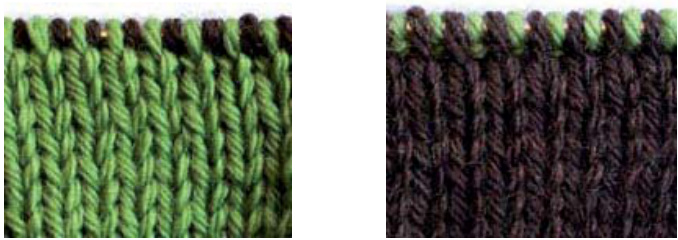
This will result in a fabric having one side in color A and the other side in color B.
It is of great importance always to move BOTH yarns to the front or back! The colorwork motif is achieved by reversing the colors (knit with B and purl with A). This pattern is based on a chart, where each square represents (in contrast to fair-isle) not only one stitch but TWO stitches (one from the front layer which needs to be knitted and one from the back layer which needs to be purled). The charts are read from right to left and from bottom to top. Return to the right hand side of the chart after finishing each round. To get you used to the system, I will give you a small example chart and explain how every stitch needs to be worked (this isn't part of the mittenpattern! Just read through it to get the hang of the technique):
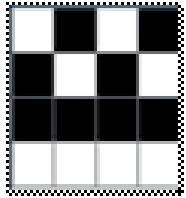
This would translate to: Round $1:^{\star}k1$ in white holding both yarns in back, p1 in black holding both yarns in front\* repeat 3 more times Round $2!\,^{\star}\!\mathsf{k}\,^{\star}$ in black holding both yarns in back, p1 in white holding both yarns in front\* repeat 3 more times Round $3!\,^{\star}\!\mathsf{k}\mathsf{1}$ in white holding both yarns in back, p1 in black holding both yarns in front, k1 in black holding both yarns in back, p1 in white holding both yarns in front\* repeat one more time. Round $4;\,^{\star}\,\mathsf{k}\,^{\mathsf{1}}$ in black holding both yarns in back, p1 in white holding both yarns in front, k1 in white holding both yarns in back, p1 in black holding both yarns in front\* repeat one more time.
Charting Symbols
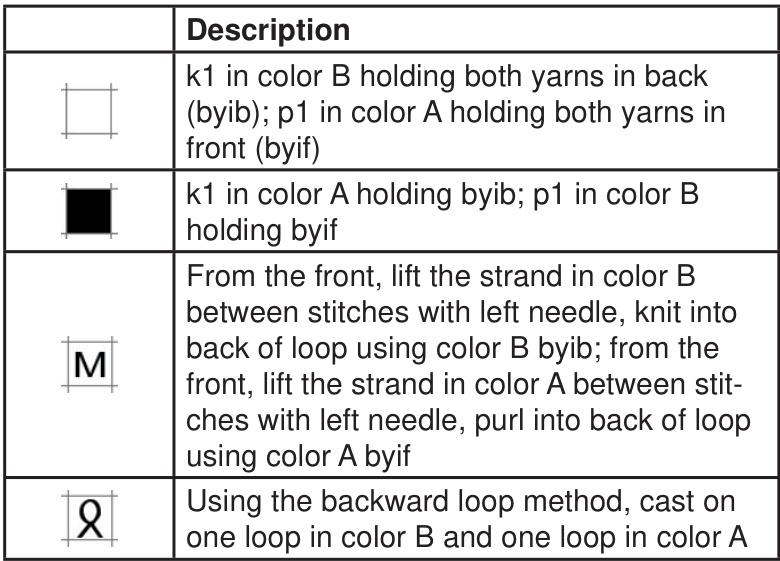
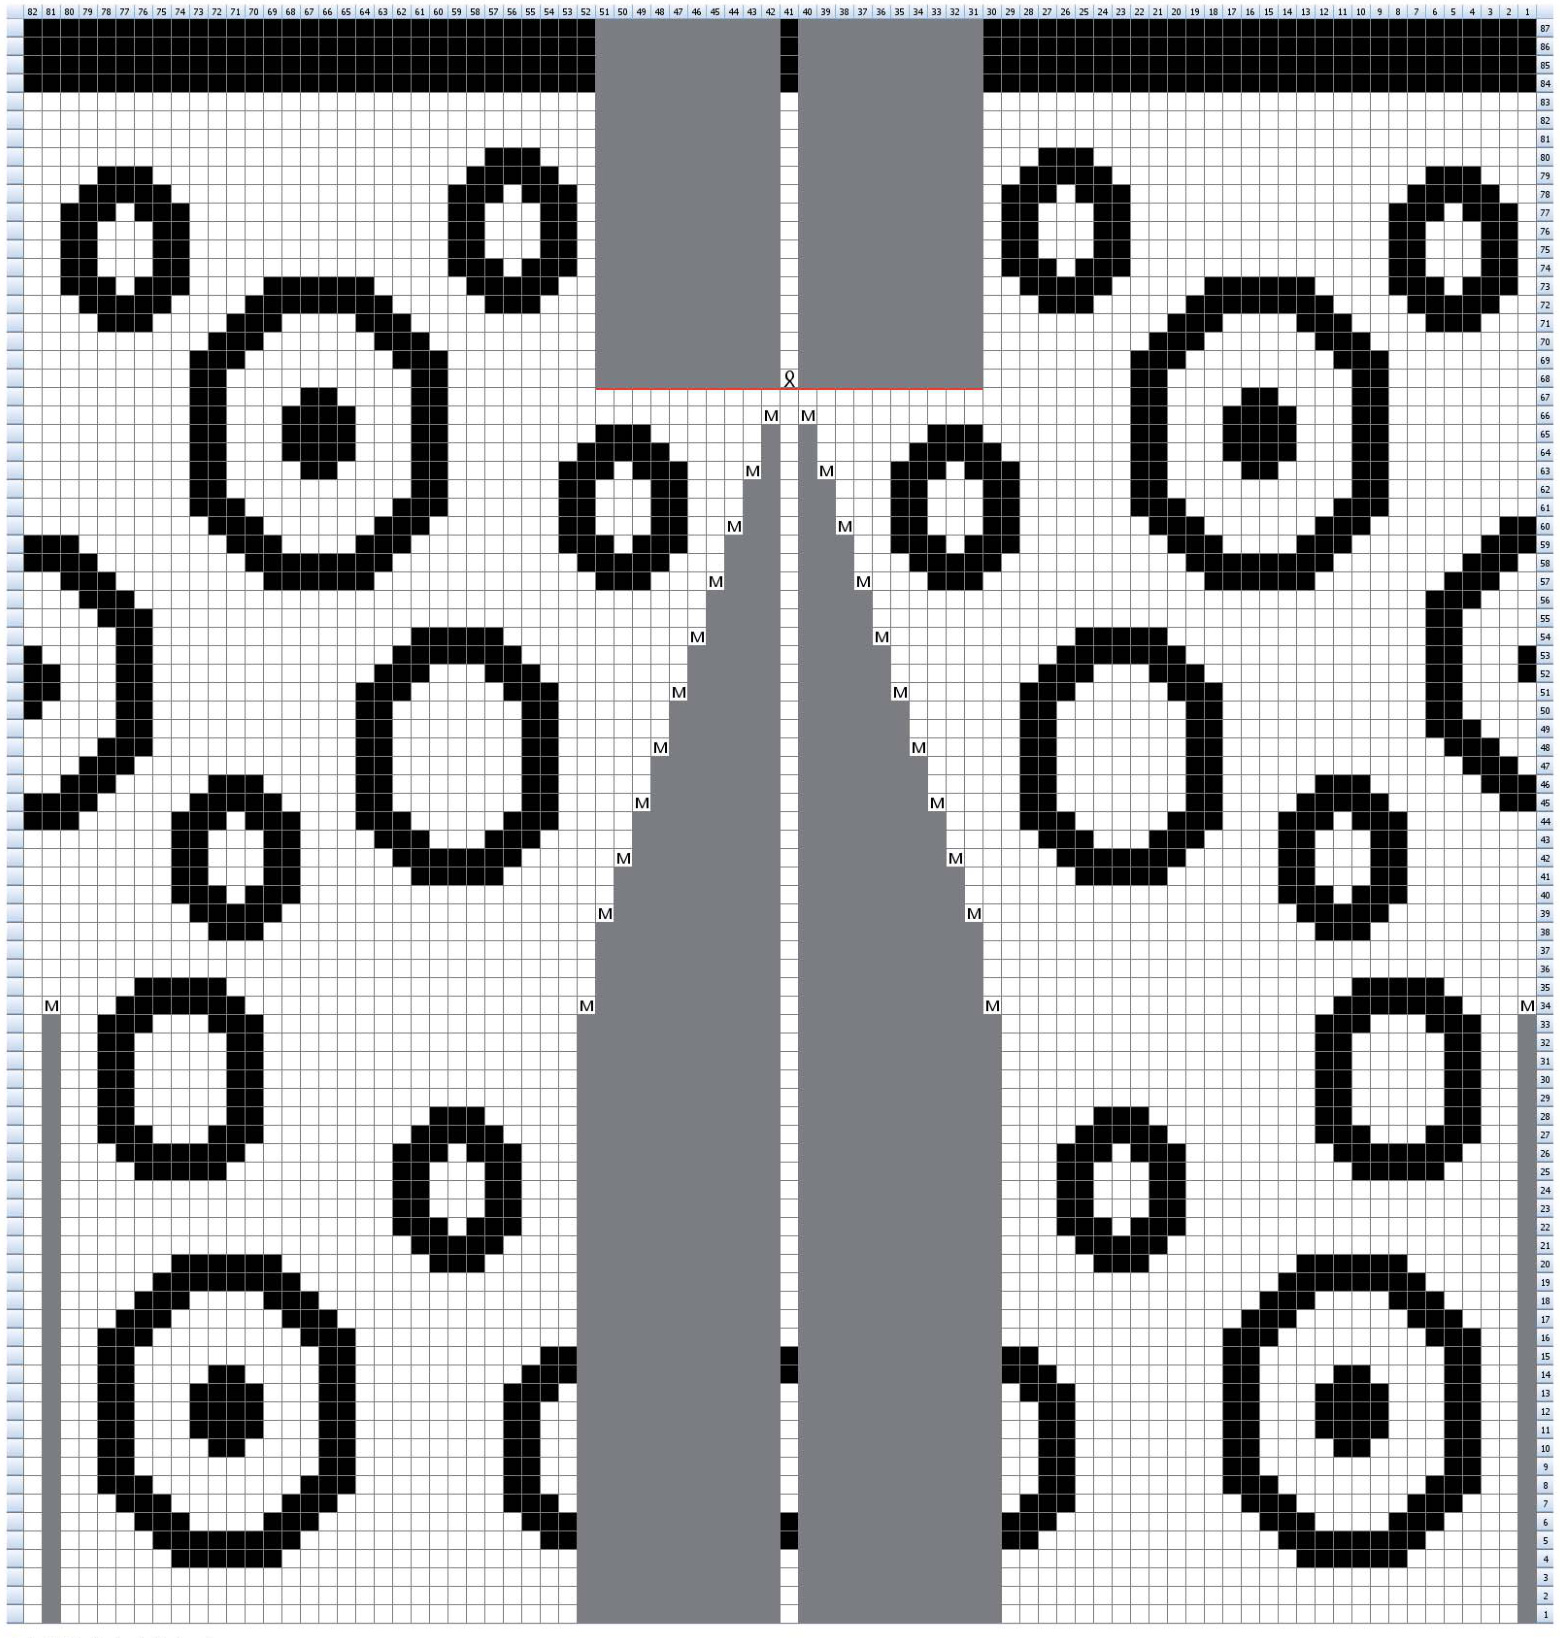
Part 3: Working the cuff and hand
This pattern includes one chart for the whole mitten (both for the left and the right one). The following symbols are used in the charts: Start working the chart. Place a marker to indicate. the beginning of the round. After you have created the thumb gusset you havel to transfer the stitches for the thumb onto waste yarn. This is indicated by a red line in the chart. When you reach this line go on as follows: place the next 30 [34, 38, 42] stitches, alternating 15 [17, 19, 21] in A and 15 [17, 19, 21] in B on waste yarn, cast on one ( 8l) and go on knitig the remaining stitches according to the chart. After you worked the last round, take the second 2 mm circular needle and divide the sts as follows: thread sts in color A on one circular and sts in color B on the other. This will result in 46 [50, 54, 58] sts on each circular. Work one round in color B using the color B sts only. Break the yarn of color A leaving a 50 cm / $20^{\ast}$ long tail and graft the sts from both circulars together. Break the yarn in color B. Weave in both ends between the layers so that they are invisible on both sides. Place the 30 [34, 38, 42] stitches which were held on waste yarn back on the needle carefully, in the proper order, and work the first round as follows: $^{\star}\mathsf{k}\,^{\star}$ in color A holding both yarns in back (byib), p1 in color B holding both yarns in front (byif)\* till you reach the gap, then pick up a total of 6 sts (3 in each color): One of each color in both gaps between the cast on edge and the stitches now on your needle and one from the cast on edge. Continue $\ ^{\star}{\sf k}\,^{\sf1}$ in color A holding both yarns in back (byib), p1 in color B holding both yarns in front (byif)\* for 2 [2, 3, 3, 4] rounds. Seperate the sts as described before, work one round in color B on the color B sts, then graft\*\* the sts together with color A. Weave in both ends between the layers so that they are invisible on both sides.
\*\*If you don't know what grafting is, please have a look at http://www.knitty.com/ISSUEsummer04/FEATtheresasum04. html
Please note: This pattern is for personal use only. Any commercial use is strictly prohibited. If you have any questions, suggestions or corrections, please get in contact with me (Larisknit@gmx.de / Laris on Ravelry)


