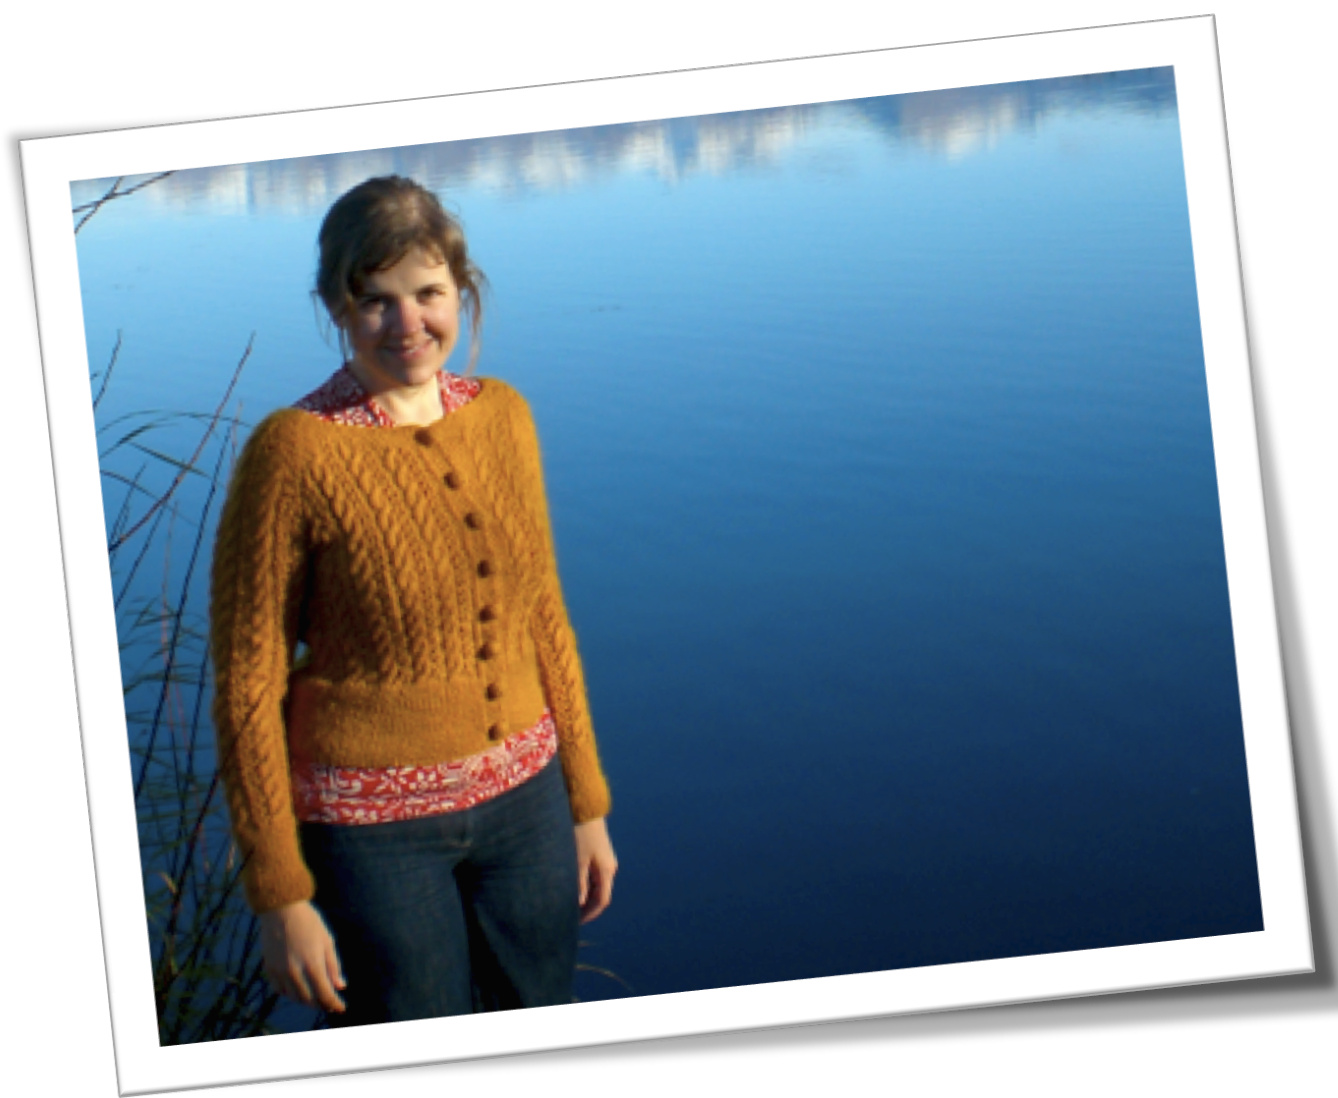
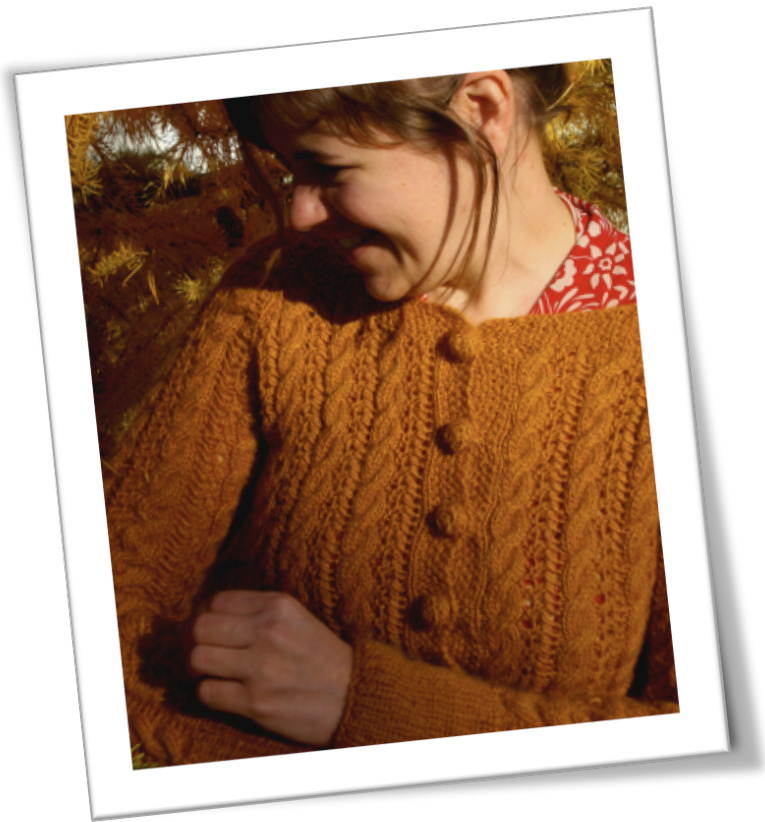
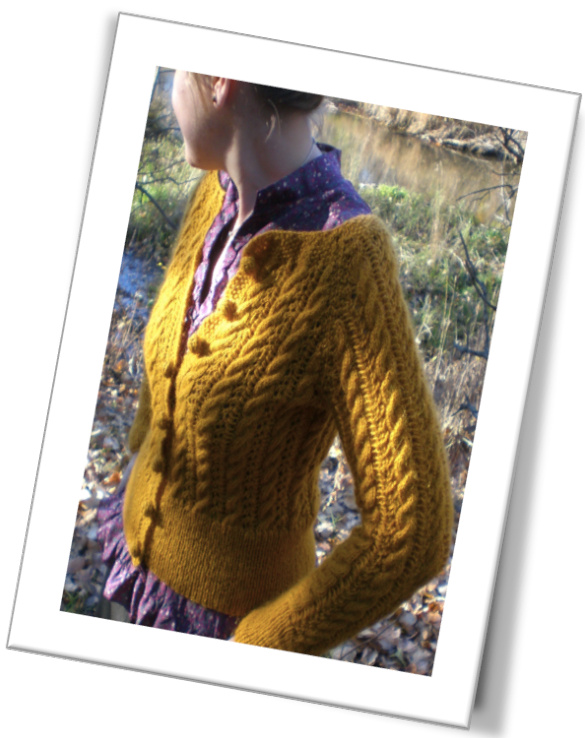
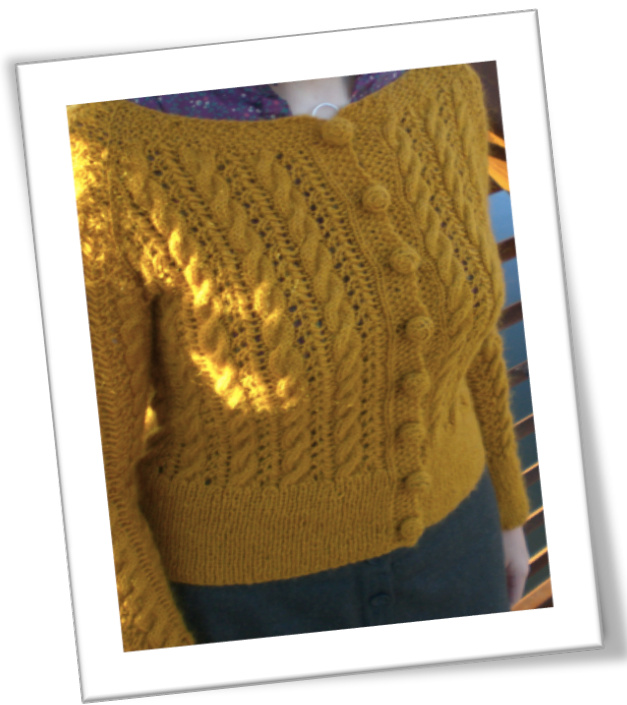
Tamarack Cardigan
A sweater design by Liza Root Copyright @ 2010, Liza Root. All rights reserved.
Beginning
The tamarack cardigan is an ode to my favorite tree. The lace work reflects the shape of the needles and the yarn over's make up the needle knobs on the tree that are most visible in the winter time after it has shed all of its needles. The cardigan is a seamless design knitted from the bottom up. The button band and collar are integrated into the pattern as you work your way up. And, the sleeves are directly worked into the sweater from the top down. It is my hope that you will enjoy knitting this as much as I enjoyed designing it.
Sizing:
XS, S, M, L, 1X, 2X, 3X
Bust Size:
XS (28-30), S (32-34), M (36-38), L (40-42), 1X (44-46), 2X (48-50), 3X (52-54)
Materials:
-- 7, (8, 9, 11, 12, 13, 15) Brown Sheep Lanaloft Sport 100% wool 145yds (133 meters) Unit weight 50 grams (1.76 ounces), (or any sport weight / 5ply yarn). --Size 4 (3.5mm) 26inch circular (or size needed to obtain gauge) --Size 4 (3.5mm) 6inch DPN (or size needed to obtain gauge) -- 7, (8, 9, 10, 11, 12, 13) Buttons. --Stitch Markers and Stitch Holders --Cable needle
Gauge:
15sts and 15 rows = 2inches in both 1x1 rib and lace & cable patterns.
Lace & Cable Pattern:
| 0 = yarn over | = purl = knit | 8.WS | ||||||||||||||
| 0 | p | 夫 | 7.RS | |||||||||||||
| 6.WS | ||||||||||||||||
| N | N | N | V | V | V | 0 | 夫 | 0 | 5.RS | |||||||
| ¥ = slip 1st 4.WS | ||||||||||||||||
| 0 | 夫 | 3.RS | ||||||||||||||
| / = K2tog 2.WS | ||||||||||||||||
| ossd = U | 0 | 夫 | O | 1.RS |
| v | y | |
| N | N | N |
= Slide 3 stitches hold in back = K 3 stitches, then knit the 3stitches held in the back
Pattern Beginnings:
CO: 217, (229, 241, 253, 265, 277, 289) using long tail cast on method.
Ribbing Edge:
Row 1: K5 stitches, Begin working in ribbed pattern (K 1, P1) until last 5 stitches, knit to end. Row 2: P5 stitches, work in ribbed pattern until last 5 stitches, purl to end. (The 5 stitches at each end of the row are establishing the button band.) Row 3 (and all subsequent rows): Work in seed stitch (k1, p1) for the first 5 stitches. Continue working in established ribbed pattern until the last five stitches work in seed stitch to the end. Repeat the rib and seed stitch pattern for 3 more rows. (Edging length should measure 2cm.)
\*Establishing the button hole pattern:
Row 1: Work 2 stitches in seed stitch BO the next 2 st and work 1 more stitch in seed stitch pattern, then continue working in established rib pattern making sure to work the last five stitches in established seed stitch. Row 2: Work in established seed and rib patterns until the BO of stitches. CO 2 stitches and work to end. From now on, insert buttonholes into pattern button band every \~2in. Continue working in established rib and seed pattern until piece measures 3in (7.5cm), ending with a WS row. Repeat the \*2 button hole rows and insert your second buttonhole. Continue working in established rib and seed pattern for four more rows or until piece measures 4 in or 10cm, ending on a Ws.
Begin Establishing Lace and Cable Pattern (please refer to the lace and cable chart listed above for assistance):
Row 1: Work first 5 stitches in seed stitch, K1 work lace and cable pattern [P1, YO, Sl1, K2tog, psso, K1, YO, P1 K6,] repeat to last 7 stitches P1, K1 and work the 5 remaining stitches in established seed stitch. Row 2 and all remaining WS rows: Work first 5 stitches in established seed stitch, K1 P1 work lace and cable pattern [P6, K1, P4, K1] repeat to last 6 stitches P1 and work 5 remaining stitches in established seed stitch. Row 3: Work first 5 stitches in established seed stitch, K1 work lace and cable pattern [P1, YO, Sl1, k2tog, psso, YO, K1, P1, K6] repeat to last 7 stitches P1, K1 and work 5 remaining stitches in established seed stitch. Row 4,WS row: (Repeat row 2). Row 5: Work first 5 stitches in seed stitch, K1 work lace and cable pattern \*[P1, YO, sl1 K2tog, psso, K1, YO, P1, Sl3 hold in back, k3, K3 from back] repeat to last 7 stitches P1, K1 and work 5 remaining stitches in established seed stitch. Row 6, WS row: (Repeat row 2). Row 7: (Repeat row 3). Row 8, WS row: (Repeat row 2).
Establishing the Body Shaping:
Continue working in established lace/cable pattern as well as the seed stitch button band until row 5 of pattern. (Remembering at row 5 repeat of the cable row of the lace pattern remember to insert your button hole (or \~2in from last button hole), and refer to the establishing button hole instructions.) Work the rest of Row 5 as follows:
--Repeat the lace cable pattern for 3 (4, 4, 5, 5, 6, 6) repetitions. \*\*-- Work the next five stitches (+YOs) of lace/cable pattern [P1, YO, Sl1, k2tog, psso, YO, K1] PM. Increase 1 stitch in beginning of cable part of pattern and increase another stitch at end of cable (2stitches increased) work the first stitch from the lace pattern [P1] and PM. --Continue working in lace cable pattern for 9 (8, 9, 8, 9, 8, 9) repetitions. --Repeat the pattern listed above to increase 2 more stitches.\*\* --Work in lace/cable and seed stitch pattern to end. You should now have increased 4 stitches, 221, (233, 245, 257, 269, 281, 293) total. Continue working in established lace/cable and button band pattern. At every 5th row (the cable round) repeat the increase 2 stitches between each of the markers pattern as established above.\*\* At each increase row, rotate between adding purl stitches to the side of the cable and increasing knit stitches into the cable itself. For example, at the next 5th round you will increase 2 purl stitches on both sides of the cable and the following 5th round you will increase 2 knitted stitches into the each edge of the knitted cablestitches. emembering to insert button holes into button band every \~2 in.) Work in the body-shaping pattern until entire piece measures 11 % (13 %, 15 %, 17 %, 19 %, 21 %, 23 %) inches 0r 29.21 (34.29, 39.37, 44.45, 49.53, 54.61, 59.69) cm ending on row 4 (ws) of lace and cable pattern.
Preparing for Shoulder Shaping:
Work in row 5 of established lace cable pattern until the first stitch marker. Purl across all stitches between the markers and place these stitches on a stitch holder. Continue working in row 5 of lace and cable pattern until the next stitch marker. Purl all stitches between makers and place them on a stitch holder. Work in established pattern until the end. You now should have 3 separated parts; 1 back panel and 2 front panels (referred to as the front right panel and the front left panel) all held on one circular needle. From now on, the 3 panels are knit at the same time working from three different balls of yarn. (Again, don't forget to insert your button holes every \~2 in.) Work in row 6 (ws) of established pattern across the left front panel until the last 2 stitches. Work last 2 stitches in seed stitch: K1, P1. Working with a new skein of yarn, begin working the back panel in Row 6 of established pattern. Work the first 2 stitches in seed stitch (K1, P1) and continue working in established pattern until the last 2 stitches of back panel. Work remaining stitches in seed stitch, (K1, P1). Working with a new skein of yarn work the right front panel being sure to work the first two stitches in seed stitch (P1, K1) and work the remaining stitches in established pattern. Next row (7): work all panels in established pattern making sure to work in seed stitch pattern at the edges of every panel. (If complete lace pattern can not be worked evenly before the seed stitch edge don't work the 2 tog stitch just knit one and psso the yo stitch. Or if you can only knit the last two stitches of the lace pattern still do the YOs but make sure not to increase you total number of stitches.) ue working in established pattern until row 1 of lace/cable patter
Shoulder Shaping:
Row 1: Work in established pattern over the right front panel until the last 4 stitches, k2tog and work the last 2 stitches in seed stitch. Work over the back panel making sure the first 2 stitches are worked in seed stitch pattern. Then, the next 2 stitches are k2tog work in established pattern to last four stitches, K2tog and work the last 2 stitches in seed stitch. On the left panel knit 2 stitches in seed stitch, K2tog work in established pattern to end. A total of 4 stitches have been decreased. Repeat the established lace and cable pattern decreasing 4 stitches on every 1't and 5th round to create the shoulder shaping (as described above) until entire piece measures14, 16, 18, 20, 22, 24, 26 inches 0r 35.56, 40.64, 45.72, 50.8, 55.88, 60.96, 66.04 cm. Ending on a WS and on row 6 of the lace and cable pattern.
Collar Shaping:
(The first two rows of this shaping is an ideal time to insert the last buttonhole). Row 7 (of lace and cable pattern): --Right front panel: Work across first 5 stitches in seed stitch (remembering to BO stitches for inserting your last button hole). Continue working in seed stitch for the next 7 stitches working as follows: P1, k2tog, P1, K2tog, P1, PM (2 stitches decreased). Work the remaining stitches of the right front panel in established patterns to the end. --Back Panel of cardigan: First, determine the location of the center six stitches on the back panel. (For all sizes with an even number of repetitions of the lace and cables, the center 6 stitches will fall on the lace pattern. For all uneven numbers of lace and cable reps, the center stitches will fall over 6 cable stitches.) Work in established pattern until the center six stitches. Work in seed stitch over these stitches as follows: PM, P1, K2tog, P1, K2tog PM (2 stitches decreased). Work in established pattern to end. --Front Left Panel: Work in established pattern until last 13 stitches. Work in seed stitch as follows: PM, P1, K2tog, P1, K2tog, P1 and work remaining 5 stitches in seed stitch. Row 8 (ws): Work in established pattern remembering to work in seed stitch over the newly constructed seed stitch portions of the panels. Use the stitch markers on the back panel as a guide to know when to use seed stitch. On the right front panel remember to CO stitches for the buttonhole. \*\*Row1: (Continue workin shoulder decreases onallofthe panelson and 5 row). Front Right Panel: Work in established seed stitch pattern until marker (being sure to keep the first marker in the same place as you work along). Work in seed stitch over the next 6 stitches as follows: P1, K2tog, P1, K2tog, PM. Continue working in established pattern decreasing in shoulder pattern at the end of the panel. (Make sure to keep the placement of all stitch markers, as they are necessary for finishing the collar Bo). Back Panel: Work in established shoulder decrease and cable lace pattern until 6 stitches before marker in the center of the panel. PM, P1, K2tog, P1, K2tog, slide marker work in seed stitch until 2nd marker work next six stitches in seed stitch as follows: P1, K2tog, P1, K2tog, PM work in established pattern and shoulder decrease at end of panel. Front Left Panel: Work in established shoulder decrease and cable lace pattern until 6 stitches before marker, PM, P1, k2tog, P1, K2tog slide marker work in seed stitch pattern to end. Row 2 ws: Work in established patterns (seed, lace and cable) and the respective decreasings. Over the next 6 Rows, work in established collar decreasing pattern\*\*\* -- working 6 more stitches in seed stitch while decreasing 2 stitches in the described pattern and placing a marker on each of the front right and left panels. And, working 12 more stitches in seed stitch and decreasing 4 stitches on the back panel. (Continue to work shoulder decreases on the 1st and 5th row of the lace/cable pattern). And, WS rows work in established patterns (seed, lace and cable).
Preparing for Collar BO:
(Continue to work edging decreases every 1st and 5th row of lace cable pattern and collar shaping as established in pattern).

Right Front Panel: Work in seed stitch over the first 10 stitches. Then place all 10 stitches on stitch holder (being sure to transfer the stitch markers as well). Work remaining stitches in established seed stitch until last stitch marker on panel. Work collar shaping over the next 6 stitches as explained above. (If all stitches have all ready been worked through the collar shaping just work across all stitches in established pattern). Back Panel: Work in established patterns until 6 stitches before first marker— PM and work collar-shaping decrease over the 6 stitches. Work in established seed stitch until the marker of the center four stitches. Place these four stitches on a stitch holder. Using a new skein of yarn, work remaining stitches of back panel in established patterns to end. (You now have two different skeins for working the back panel. These two different skeins will be called the left back panel and the right back panel.) Left Front Panel: Work in established shoulder decreasing until six stitches before last marker place marker and work collar shaping (decreasing) over the next six stitches. Work to end in established pattern. (lf all stitches have been worked through collar shaping seed stitch decrease just work as established to end).
Next Row (WS):
Left Front Panel: Work the first 10 stitches in established pattern and transfer to stitch holder. Work remaining stitches in established pattern. Left Back Panel: Work stitches in established pattern until 1 stitch before the held stitches S1 (slide stitch). Right Back Panel: S1 work stitches in established pattern to end. Right Front Panel: Work in established pattern until the last stitch on the rowS1. \*\*\*\*Following Row: Right Front Panel: S1 Work 3 stitches and transfer the 4 stitches to stitch holder. Work the rest of the panel in seed stitch established pattern (Collar and shoulder shaping as necessary). Back Right Panel: (Work shoulder and collar shaping according to established pattern) Work in established pattern until four stitches before the held stitches. Place these stitches on a holder. Back Left Panel: (Using the other skein) S1, work 3 stitches in established pattern and place all four stitches on stitch holder. Work the remaining stitches in established pattern to end. (Working collar and shoulder shaping as necessary). Left Front Panel: Work in established pattern until last stitch, S1. (Working collar and shoulder shaping as necessary). WS Row Left Front Panel: S1, work 3 stitches and transfer stitches to a stitch holder. Work to end of panel in established seed stitch pattern. Left Back Panel: Work stitches in established pattern to the last stitch before the held stitches, S1. Right Back Panel: S1 work stitches in established pattern to end. Right Front Panel: Work in established pattern until the last stitch on the row,S1. Continue to repeat the stitch holding pattern (listed above)\*\*\*\*until all stitch have been placed on stitch holders ending on the Ws. (As you are working BO shaping, continue establishing seed stitch collar decreases and shoulder shaping decreases as previously instructed). At last repeat if less than four stitches remain just work in established pattern and place the remaining stitches on a stitch holder.
Finishing the Collars:
Transfer all stitches back on the needles making sure to keep the stitch markers in the correct spot. Knit in seed stitch pattern across all remaining stitches on all panels, knitting or purling the two stitches on either side of the stitch markers together. (One stitch is decreased for each stitch marker). Remove stitch markers as you work along the row. WS: Working in seed stitch BO all stitches.

Casting on for the Sleeves:
Right Sleeve: Pick up one stitch from the top shoulder BO edge on back right panel and cast on (using long tail cast on) 10, 16, 22, 28, 34, 40, 46 stitches, then pick up one stitch from the top corner BO row of the right front panel. Total stitches should now be 12, (18, 24, 30, 36, 42, 48). \*\*\*\*\*Next 2 Rows: Work across all stitches working in seed stitch. WS Row: Pick up one stitch lower on the shoulder edge of the right front panel and work the rest of the stitches on the row in seed stitch picking up one stitch at the end of the row on the other shoulder edge of the back right panel. (Be sure to pick up stitches that are even on both sides of the shoulder as you work your way down.) RS Row: Work all stitches including picked up stitches in seed stitch. Continue working in this pattern for 7 more rows ending with a Ws row. Next Row (Rs): Work the first 2 stitches in seed stitch and begin working stitches in lace and cable pattern until the last 2 stitches, work in seed stitch. (Don't worry if lace and cable pattern don't work out evenly across the stitches. Stitches will be continually added to the pattern as you increase stitches along the shoulders edges.
All following rows along the shoulder shaping:
--On all wS rows continue evenly picking up two stitches on each edge of the front and back sweater panels (2 stitches increased) as you work downward (and working the picked up stitches into the following rows pattern). --The last two stitches on both right and back of the sleeve should be worked in seed stitch. --As stitches are added on each row integrate them first into the two stitch seed pattern then on the RS integrate the stitches into the lace and cable pattern repeats. Work in this pattern until you reach the held stitches on the underarm ending on a ws. Next Row (RS): Transfer all stitches to 4 DPNs including the held stitches. Work in established pattern until the stitch marker of previously held stitches purl across all stitches until marker (leave markers in place) prepare for working in the round therefore don't turn to work a WS row and use the stitch marker as a guide to mark your rows. Next Row: Begin working in the round. At this stage all of the WS rows of the cable and lace chart pattern will be worked in the front. Therefore the purls and knits will be reversed for the Ws rows--Simply knit the purls and purl the knits. When you get to the stitch markers knit across all stitches. All Following Rows: Continue work in the round in the established lace and cable pattern. At every 5th row work in pattern until first stitch marker, slide marker and decrease 1 stitch at the beginning of working the cable and at the end of working the cable (2 stitches decreased). Work in decreasing pattern until sleeve measures 12 %, (14 %, 16 %, 18 %, 20 %, 22 %, 24 %) inches 0r 31.75, (36.83, 41.91, 46.99, 52.07, 57.15, 62.23) from the underarm to the end of sleeve. Next Row: Begin working on the sleeve edging K1xP1 rib for 4 inches or 10.16 cm.B0. Left Sleeve: Pick up one stitch from the top shoulder BO edge on front right panel and cast on (using long tail cast on) 10, 16, 22, 28, 34, 40, 46 stitches, then pick up one stitch from the top corner BO row of the back right panel. Total stitches should now be 12, (18, 24, 30, 36, 42, 48). Work the remaining left sleeve by following the instructions for the right sleeve.\*\*\*\*\*

Finishing:
Weave in ends, block and add buttons.


