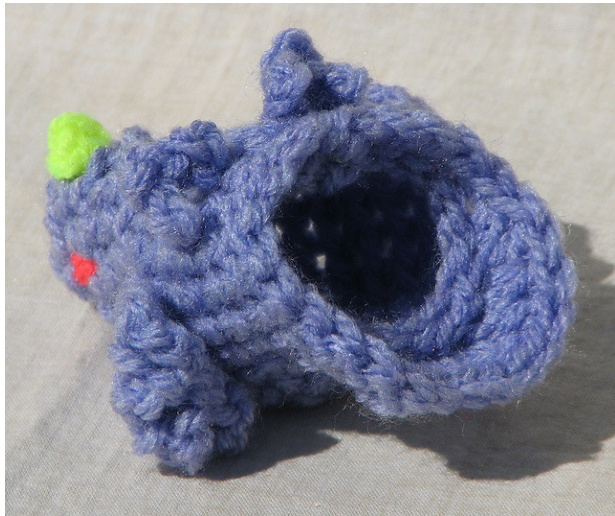
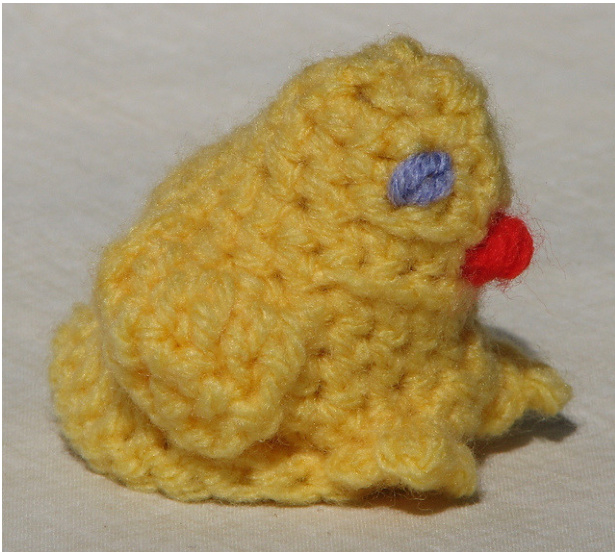
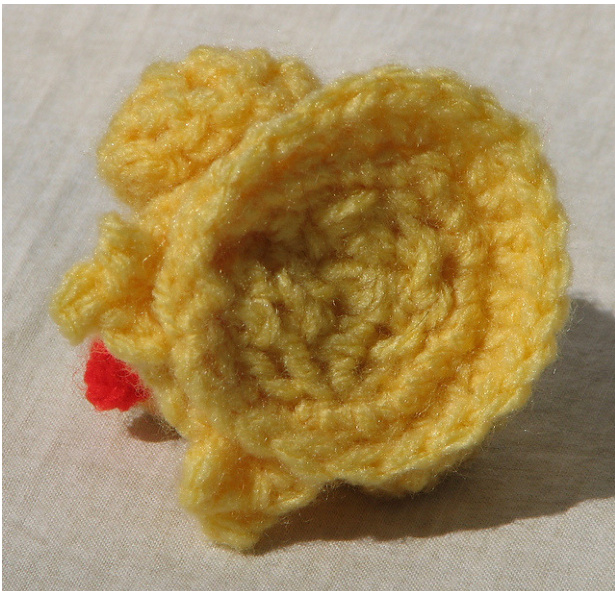
The chick that lays a creme egg !
It's simple and quick to make and, although originally designed to hold creme eggs,the same basic pattern also - with minimal modifications - makes either a slightly dumpy but very cute stuffed chick or an egg cosy. Please note that before the egg is inserted, the feet may appear to be “up in the air". Once the egg is inserted, the chick will tilt forward, its feet will then touch the ground and its slightly ruffled tail will rise. Printing - you can save paper and ink by selecting the pages to be printed 1 Photos 2-3 Written instructions 4-5 Charts / visual guides 6 Chart symbols, abbreviations and glossary
Copyright
Copyright @ R.C. and P.A. Horsham, Bray, Co Wicklow, Republic of Ireland. All rights reserved. Any unauthorised reproduction, distribution or transmission of this pattern or its contents constitutes an infringement of copyright. This pattern may not be used for large-scale commercial manufacture and sale without prior permission fromthecopyrightholders
Head
1 Magic loop, ch 1 (locking chain), dc 6 = 6 2 ss, ch 1, dc 1 to same stitch, (dc 2>1) x 5 = 12 3 sS, ch 1, dc 11 = 12
Neck and Upper Body
4 sS, ch 1, ss 2, dc 8, ss 1 = 12 5 ss, ch 1, dc 3, (dc 2>1) x 6, dc 2 = 18 6 sS,ch 1, ss 3,dc 5,(dc 2>1)x 2,dc 5, ss 2 = 20
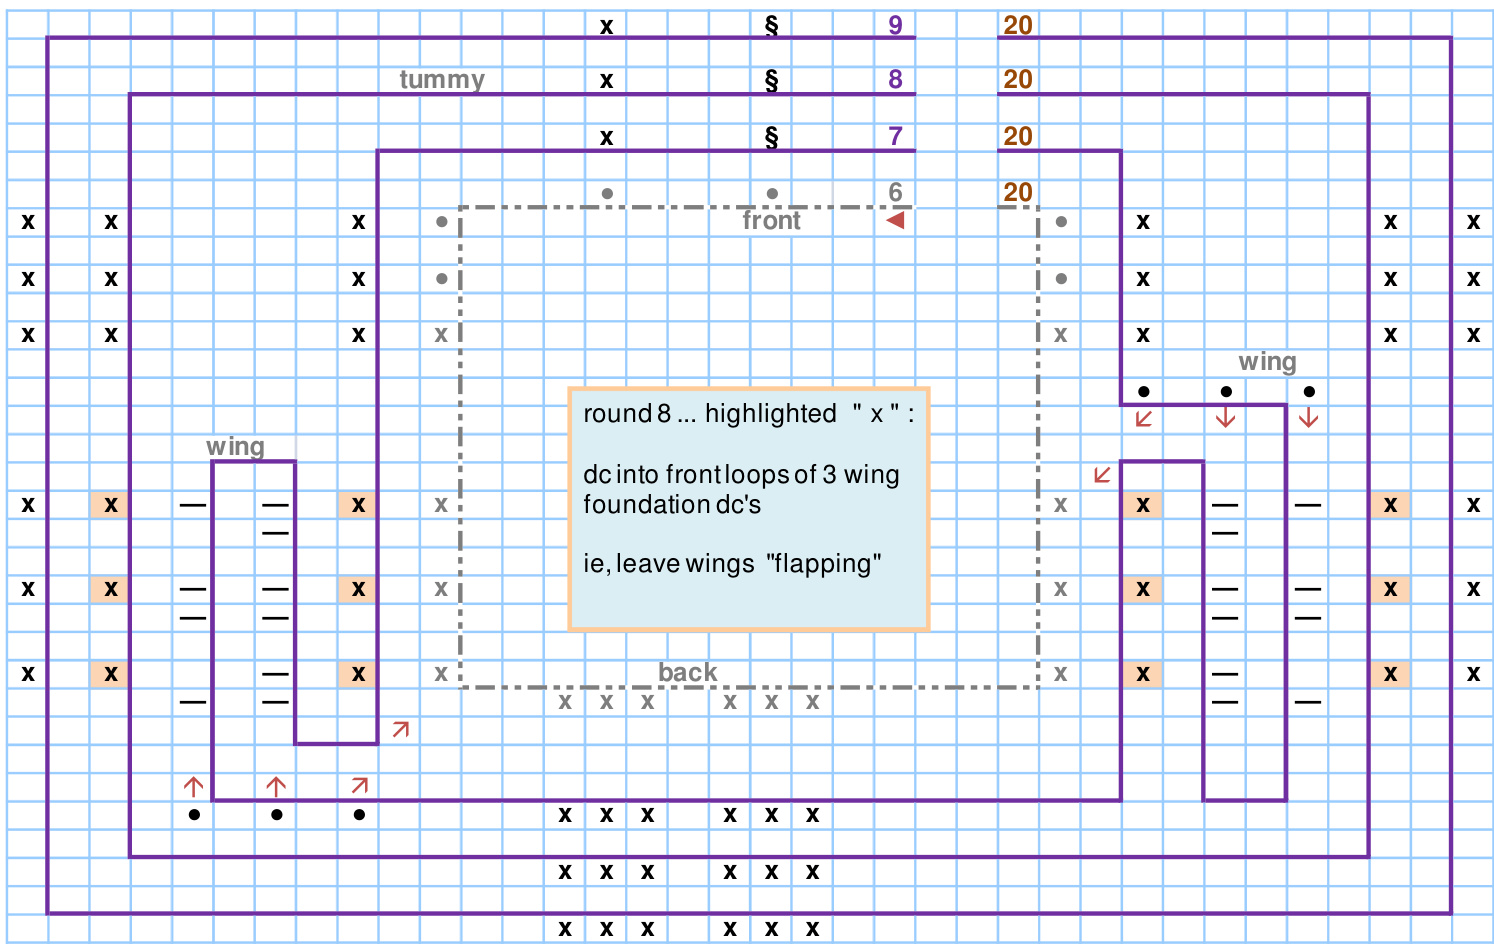
Wings
ss, ch 1, dc 7, turn thru both loops thru both loops thru back loop dc 9, turn thru both loops thru both loops thru back loop wing ch 2, tr 1 to same stitch, (tr 2>1) x 2 = 6, turn ch 2, (tr 2 tog) x 2, tr 1 = 4 ss 2 down sides of 2 tr's ss 1 into 3rd of 3 wing foundation dc's wing ch 2, tr 1 to same stitch, (tr 2>1) x 2 = 6, turn ch 2,(tr 2 tog) x 2, tr 1 = 4 ss 2 down sides of 2 tr's ss 1 into 3rd of 3 wing foundation dc's
Lower Body and Feet
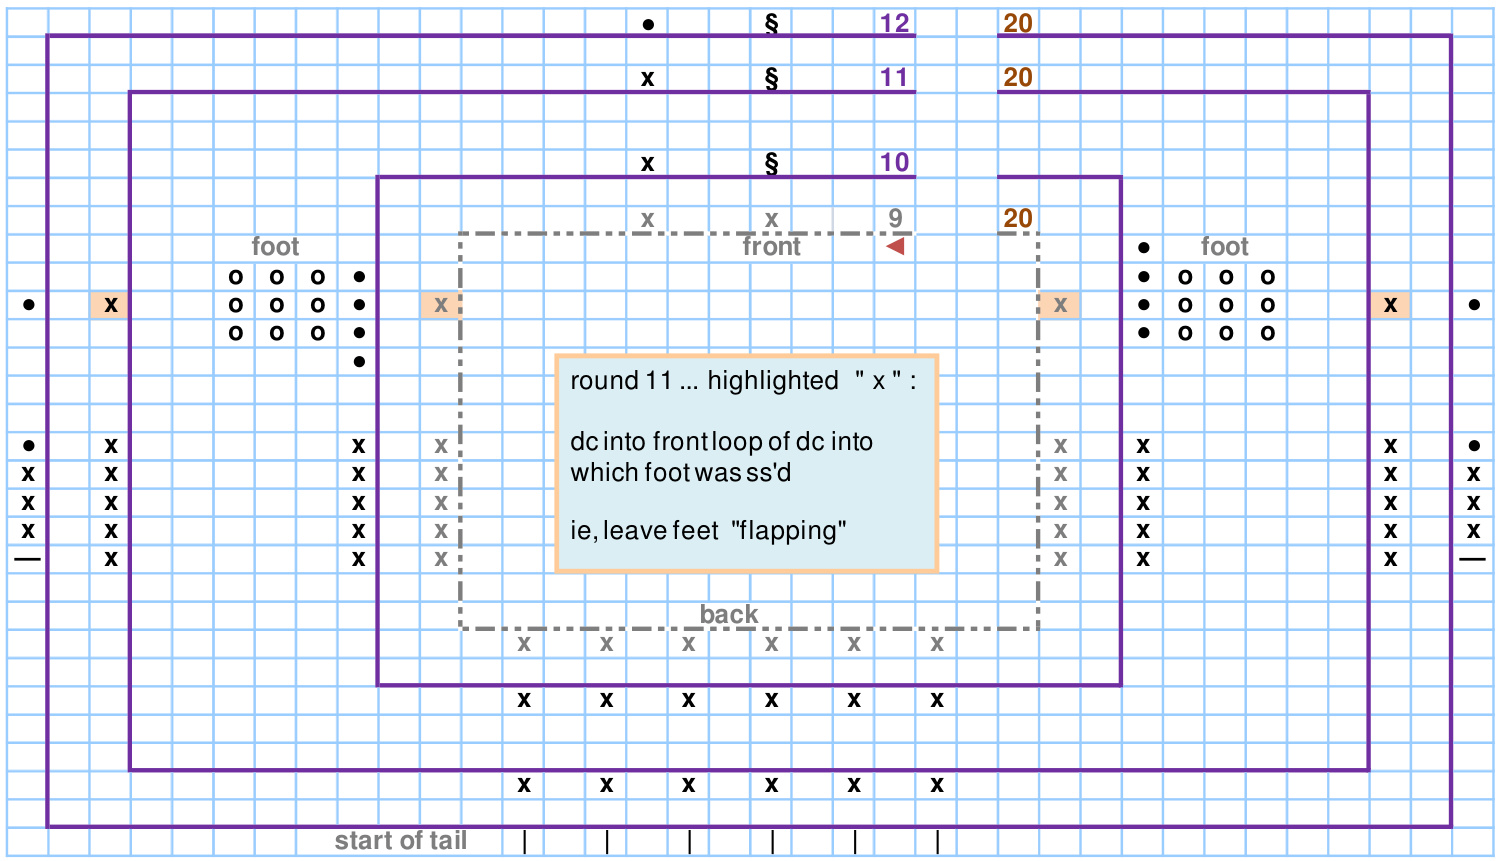
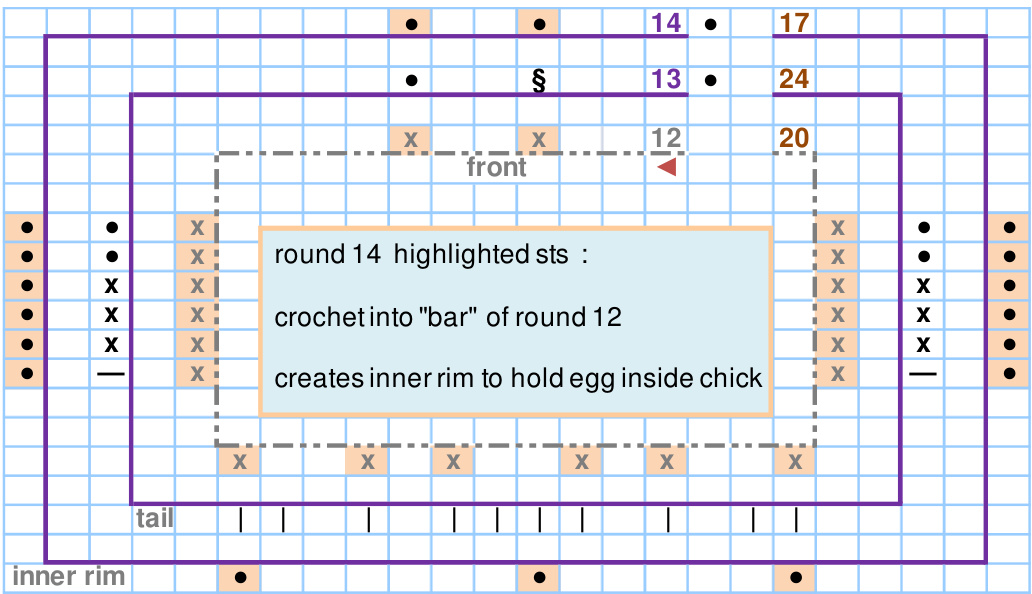
8 ss, ch 1, dc 19 = 20 9 ss, ch 1, dc 19 = 20 10 ss, ch 1, dc 1, ss 1 dc 16, ss 1 foot ch 3, ss 1 into same dc ch 3, ss 1 into same dc ch 3, ss 1 into same dc foot ch 3, ss 1 into same dc ch 3, ss 1 into same dc ch 3, ss 1 into same dc note ... thru front loop of each foot's foundation dc 11 ss, ch 1, dc 19 = 20 Tail 12 ss, ch 1, ss 3, dc 3, tr 8, dc 3, ss 2 = 20 13 sS, ch 1, ss 3, dc 3, tr 1, (tr 2>1, tr 1, tr 2>1) x 2, tr 1, dc 3, ss 2 = 24 ss into the front loop of the"start of round" stitch to join round 13 Inner rim - to hold egg and create a slight “ruffle" in the tail 14 All stitches thru the bar of round 12 SS 8,(ss 2 tog)x 3, Ss 6 =17 ss into the front loop of the "start of round" stitch to join round 14
Weave in tails
Copyright
Stuffed Toy - alrounds thru both loops (otherwise stuffing may either show through or escape) Rnd 1-11 as pattern Rnd 12 as pattern but replace all trebles with double crochets Rnd 13-14 as pattern Stuff Rnd 15-end dc 2 tog until the hole has been closed Weave in tails
Egg Cosy
Rnd 1-13 as pattern The tail in this version will not be ruffled. If you wish to create a ruffled tail, refer to round 14 for the stitch positions and - working into the top of round 12 stitches - use one of the following techniques : either starting at stitch 9 of round 12, (ss 2 tog) x 3 Oor starting at stitch 9 of round 12, sew through the back of 6 stitches and tighten the yarn to Create a slight gather. Weave in tails Beak - note, when tilted forward the top of the head willbe at round 2, ie, not the centre of the magic loop 1 Cut a 10-12" length of yarn and fold it in half 2 Fold chick in half and select a double-stranded centre stitch about half to two-thirds down head 3 Insert hook from side A to side B. Loop folded yarn over hook and pull through = 1 loop on hook 4 ch 1 with the double-strands = 2 loops on hook 5 Turn chick 6 Insert hook from side B to side A. Loop double-strands over hook and pullthrough = 4 loops on hook 7 Pull double-strands through 4 loops = 2 tails 8 Gently tighten the 2 tails and twitch the beak into shape 9 From inside the chick, pull one tail through side A of the same stitch and one through side B of the same stitch 10時 Check that the beak is sitting correctly then turn chick inside out and tie off (or weave in) the tails note For a slightly cheekier chick, position the beak 1 stitch to the right or left of the vertical centre line. This gives the impression that the chick has his head cocked to one side. Eyes 1 Cut a 10-12" length of yarn and fold in half 2 Select a double stranded stitch 1 round higher than the beak stitch. Ideally, the top of the stitch will be closer to the centre of the head than the bottom, thus slightly slanting the eye (ie, eye beak eye /丨\) 3 insert hook, from bottom to top of the eye stitch and pull thru loop = 1 loop 4 Pull both strands thru loop = 2 tails 5 Gently pull both tails to position the loop at top of eye 6 From inside the chick, insert the hook into the top of the eye-stitch and pull through one tail to lock the loop into position (it will look like a chain stitch) 7 From inside the chick, insert the hook into the bottom of the eye-stitch and pull through the other tail 8 Slide a darning needle under the eye stitches and gently even them out and ease them into shape 9 Turn chick inside out and tie off (or weave in) the tails
Copyright
Copyright R.C. and P.A. Horsham, Bray, Co Wicklow, Republic of Ireland. All rights reserved. Any unauthorised reproduction, distribution or transmission of this pattern or its contents constitutes an infringement of copyright. This pattern may not be used for large-scale commercial manufacture and sale without prior permission fromthecopyrightholders
| S | 6 | 20 | ||||||||||||||||||||||||||||
| 5 | ||||||||||||||||||||||||||||||
| neck | 4 | |||||||||||||||||||||||||||||
| S | 3 | 1821212 | ||||||||||||||||||||||||||||
| X | 2 | |||||||||||||||||||||||||||||
| head | 6 | |||||||||||||||||||||||||||||
| front | ||||||||||||||||||||||||||||||
| X | X x X | X X | X | X X X X X | X | back | X X X X | X | X X | X | X | X X | x X | x x x | ||||||||||||||||
| X X | x x x | X |
Copyright
Copyright
Chart symbols, Abbreviations and Glossary - UK terminology used throughout
| o | ch | chain | |
| . | SS | slip stitch | |
| S | SS, ch 1 | slip stitch, chain 1 | used to“create"ssor dc at the start of rounds |
| X | dc | doublecrochet | no initial yarnover |
| |&— | tr | treble | oneinitialyarnover |
| ss 2 tog SS 2>1 | decrease two stitches into one stitch, using a slip stitch | ||
| dc 2 tog | decrease two stitches into one stitch, using a double crochet | ||
| dc 2>1 | increase by double crocheting twice into one stitch | ||
| tr 2 tog | decrease two stitches into one stitch, using a treble | ||
| tr 2>1 | increase by treble crocheting twice into one stitch when working in rounds and crocheting through the back loop, the chick will have | ||
| inside bar | "bumps" on the outside and circles of "bars" or “ridges" on the inside. The “bars" are the unused front loops of stitches made in previous rounds. | ||
| note | if making a stuffie, instead of a creme egg cover, you will be crocheting through both loops - to avoid the stuffing showing through - so will have “bumps" both inside and outside. At round 14 - since there will be no “inside bar" - you will crochet into the top | ||
| ofthestitchmadeinround12. | |||
| = s n s | |||
| ss 2 tog | insert hook through second stitch, yarnover and bring back hook = 3 loops pull 3' loop through first two loops | ||
| insert hook through first stitch, yarnover and bring back hook = 2 loops | |||
| dc 2 tog tr 2 tog | insert hook through second stitch, yarnover and bring back hook = 3 loops yarnover and take off all 3 loops = 1 loop oi = u s yarnover, insert hook through second stitch, yarnover and bring back hook = 5 loops yarnover and take off 3 loops = 3 loops yarnover and take off remaining 3 loops = 1 loop | ||
Using the Charts and Written instructions
The charts are a “visual guide". They were primarily designed to give me a better indication of the wing and feet positions and are included to illustrate the written instructions. They do, however, serve the same purpose as a conventional chart and can be used as such if that happens to be your preference. The rounds are shown anti-clockwise and a block arrow () marks the start position. The number of stitches per round is marked at the end of the round (ie, 6 in round 1).


