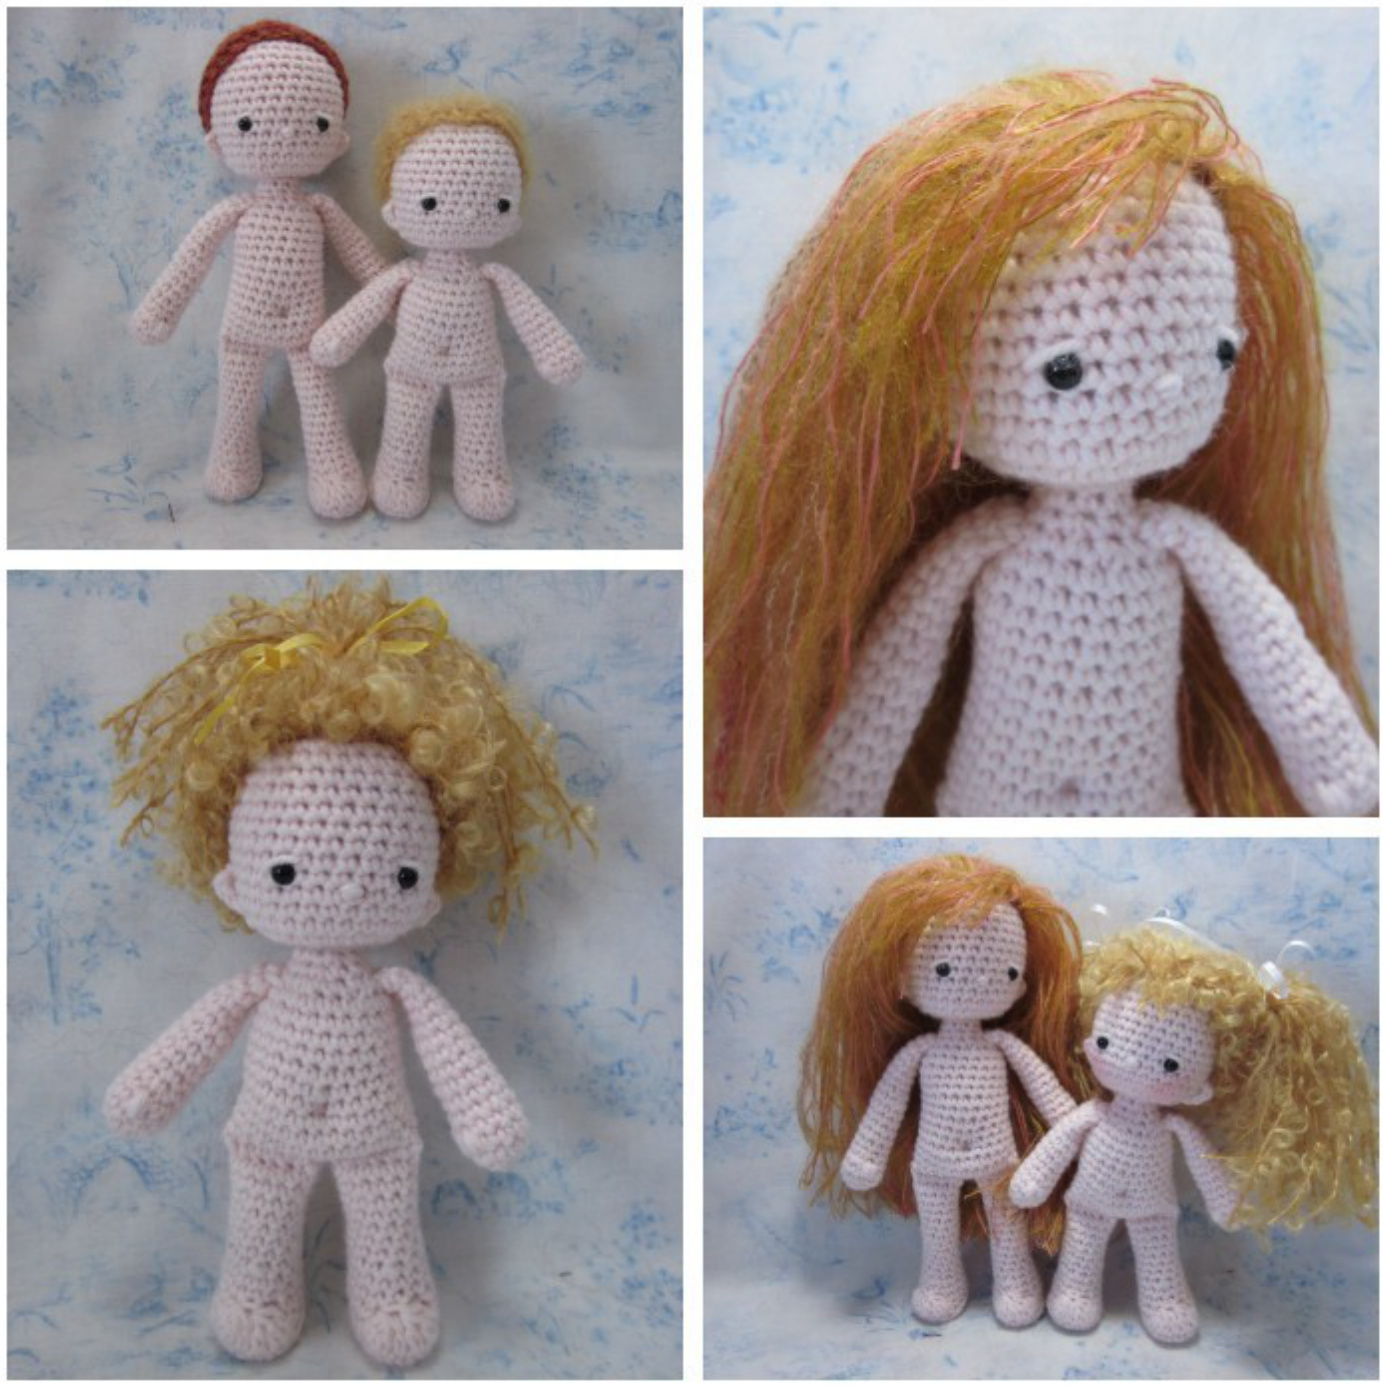
Simply Ami's; crochet friends Mignonette & Violette
Two crochet amigurumi friends. Ami is not only short for amigurumi, but also French for Friend :-) Mignonette is 7 inches tall, and Violette 8.5 inches
Materials:
-Worsted yarn. Models used Berrocco Vintage -Size E crochet hook for body, size F hook for wig cap. - 6mm acrylic eyes, or 1/4 inch buttons, or black floss for eyes. -Dollmaking and Tapestry needles Design by Beth Webber. Please do not copy or sell this free pattern. -Stitch markers to keep track of rounds. - Craft or buttonhole thread for jointing the head -Polyester fiberfill -Plastic yogurt carton lid (to stabilize foot) compression (do not wring or twist). Roll in a clean towel 2. Gently squeeze excess water from the shawl by and compress to squeeze out additional water.
Construction Notes:
Work begins at the foot. Crochet the first leg and cut the yarn. Crochet the second leg and DO NOT cut the yarn. Crochet the legs closed by working across the top of the second leg, then the first leg. This will join the legs to the body without the need to sew them separately, and it will allow them to swing freely. Continue the torso by working in the front loops of the stitches that closed the legs, all around the body. As the body turns as you stitch the first row of the torso, you will be stitching into the stitches that face you. This doll has a move-able head. The torso is crocheted up to the neck, then continued as a neck stub that will be inserted into the separately crocheted head. struction photos are for the taller doll, but both dolls are constructed the same Design by Beth Webber. Please do not copy or sell this free pattern.
Ami Mignonette. 7 inches tall with worsted yarn. A short, slightly stocky doll
Leg: begins at the foot. Work in rounds and DO NOT join rounds. Use a stitch marker to help you keep track of each round. 1: Ch2, six sc in the second ch from the hook. 2: 2sc in each sc around. 12 sc 3: (Sc in the first st, two sc in the next st) around. 18 sc 4: In the back loops only, sc in each sc around. 18 sc. 5: Sc in the next six sts, (dc the next three sts tog) twice, sc in the last six sts. 14 sts. Cut a piece of clear plastic from the yogurt lid to fit the sole of the foot. Place it inside the foot. When you stuff the foot and leg it will be held in place and help to flatten the bottom of the foot. 6: Sc in each sc around. 14sts 7: Sc in the next twelve sts, sc the last two sts tog. 13 sts. 8: Sc in the next six sts, sc the next two sts tog, sc in the last five sts. 12 sts. Stuff the foot, but make sure the stuffing does not show through the stitches. 9-15: Sc in each sc around. Stuff the leg. 16: Sc in the next five sts. sl st in the next st and fasten off the first leg. Repeat rows 1 thru 15 for the second leg, but DO NOT fasten off.

Leg joining images
Join legs:
Second leg round 16: sc in the next six stitches. Flatten the top of the leg and crochet the opening together with six stitches across the top of the leg. Chain 1, flatten the top of the first leg and crochet the opening closed with six stitches across the top of the leg. You now have 12 single crochet stitches, and one chain between the legs. Reference the above images.
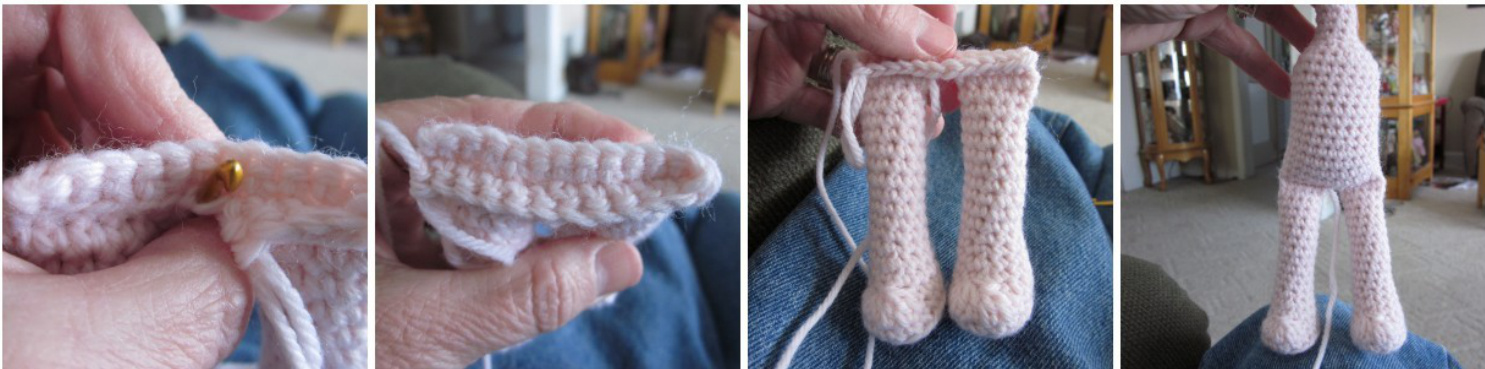
Torso construction Torso: You now have the legs joined..make sure the feet both are pointing toward you! Working in the loops facing you, single crochet all around the legs in each stitch and chain. You will have 26 stitches total in the first round. Reference the image above for this step. 2: Sc in the next two sc (2sc in the next sc) three times, sc in the next three sts, (2sc in the next sc) three times, sc in the remaining 15sts. 32 sts total. These increases make the butt cheeks of your dolls. 3: Sc in each sc around. 32 sts 4: Sc in the next three sts (Sc next two sts tog) three times, sc in the next three sts, (sc next two sts tog) ree tmecinthrmaining 14st. 6sts total.Thedereasefinish thbt shapinfyou 5: Sc in each sc around. 26 sts 6: Sc in the next seven sts, sc next two sts tog, sc in the next 11sts, sc next two sts tog, sc in the last four sts. 24 sts total. 7-11: Sc in each sc around. 24 sts. 12: (Sc in the next two sts, sc next two sts tog) around. 18 sts. 13: (Sc in the next st, sc next two sts tog) around. 12 sts. Stuff the body firmly, but make sure the stuffing does not show through the stitches. 14: (Sc in the next four sts, sc next two sts tog) around. 10 sts.
Neck stub:
15-18: Sc in each sc around to create the neck stub. 10 sts. Continue to stuff the body and up through the neck, making a noticeable shoulder area. 19: (Sc next two sc tog) around. 5 sts. Fasten off and stitch the opening closed. The neck stub will fit up into the bottom opening of the head, allowing you to make a doll with a move-able head.
Head:
1: Chain 11, sc in the second ch from the hook and each ch across. 10 sc 2: Working into the first sc, 2sc in each sc around. Work in rounds and do not join. 20 sc. 3: (Sc in the next st, 2sc in the next st) around. 30 sc 4-15: Sc in each sc around. 30 sts. If using acrylic eyes, attach them now between rows 7 and 8, about five or six stitches apart. I like the eyes of my dolls to be positioned in the lower half of the head, for a more childlike look. 16: (Sc in the next st, sc next two sts tog) around. 20 sts 17: (Sc next two sts tog) around. 10 sts 18: (Sc next two sts tog) around. 5 sts. Finish off and close the top opening. Leave a long tail. Design by Beth Webber. Please do not copy or sellthis free pattern.
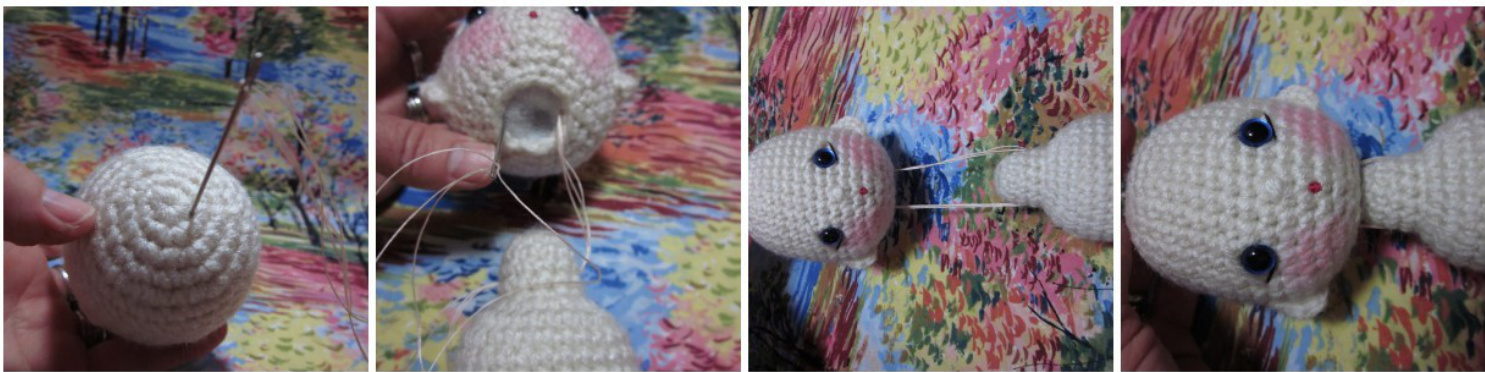
Head stringing construction. Images are from Crochet Bleuette instructions, but are identical to these dolls.
Head Stringing:
Stuff the head through the neck opening, firmly but do not allow the stuffing to show. Make a tunnel into the neck area to allow the neck stub to be inserted into the head. Thread a dollmaking needle with two strands of craft or buttonhole thread; double and knot the ends together. Insert the needle at the top of the head and run it out of the bottom opening, being careful not to catch any of the crochet at the neck opening. Run the needle through the neck stub and back into the head. Pull the threads at the top of the head to draw the neck stub into the head cavity. Pull this down until the threads in the neck stub are covered by the head, then tie off the threads at the top of the head with a double knot. Bury the ends into the head. Reference the image above for this step.
Arms: begin at the hand
1: Ch2, five sc in the second ch from the hook. Leave a long tail to embroider the thumb if you like. 2: 2sc in each sc around. 10 sc 3-5: Sc in each sc around. 10 sc 6: Reduce by one st around. 9sc 7-11: Sc in each sc around. 9 sc Stuff the arm lightly. 12: Reduce by one st around. 8 sc 13-14: Sc in each sc arond. 8 sc. 15: (Sc in the next two sts, sc the next two sts tog) twice; fasten off leaving a long tail. Sew the end of the arm closed, leaving the top half of the arm unstuffed. Stitch the arm to the body a couple rows below the neck. Use the long tail at the beginning to stitch the thumb with five straight stitches toward the inside front of each hand.
Ear construction. Lots of pictures, but actually quite simple. Ears: I like ears on my dolls, and they are very simple. You want the ears to be low in the head.the top of the ear to be no hight than the bottom of the eye. Stitch the ears on the sides of the head in line with the shoulders, taking three sc stitches along the side. If you don't like the placement, take the stitches out and start a little lower or higher to make the ears. Leave long tails at the beginning and the end of the ear to shape them. You can make any number of interesting ears with just a few stitches :-) Reference the image above for ear construction.
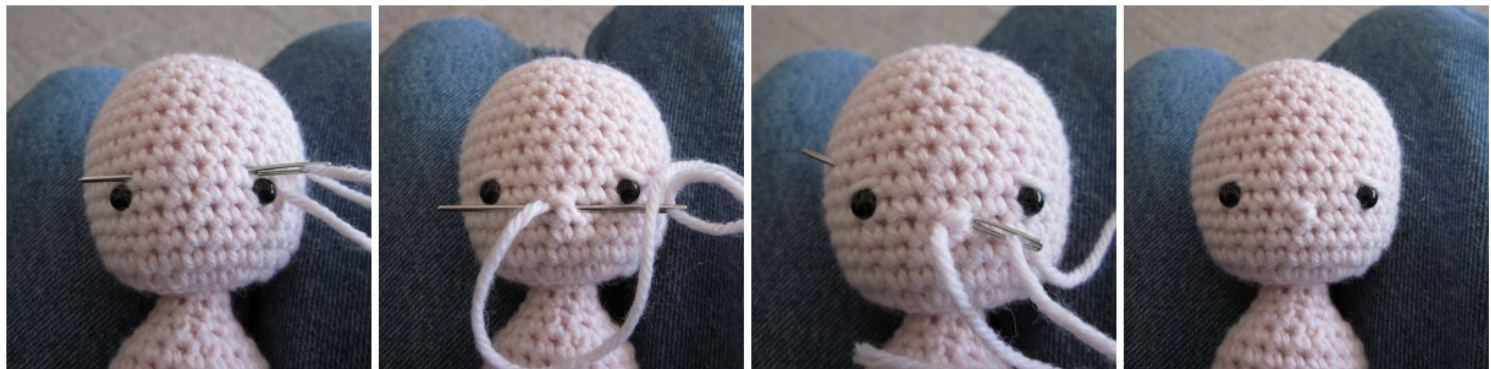
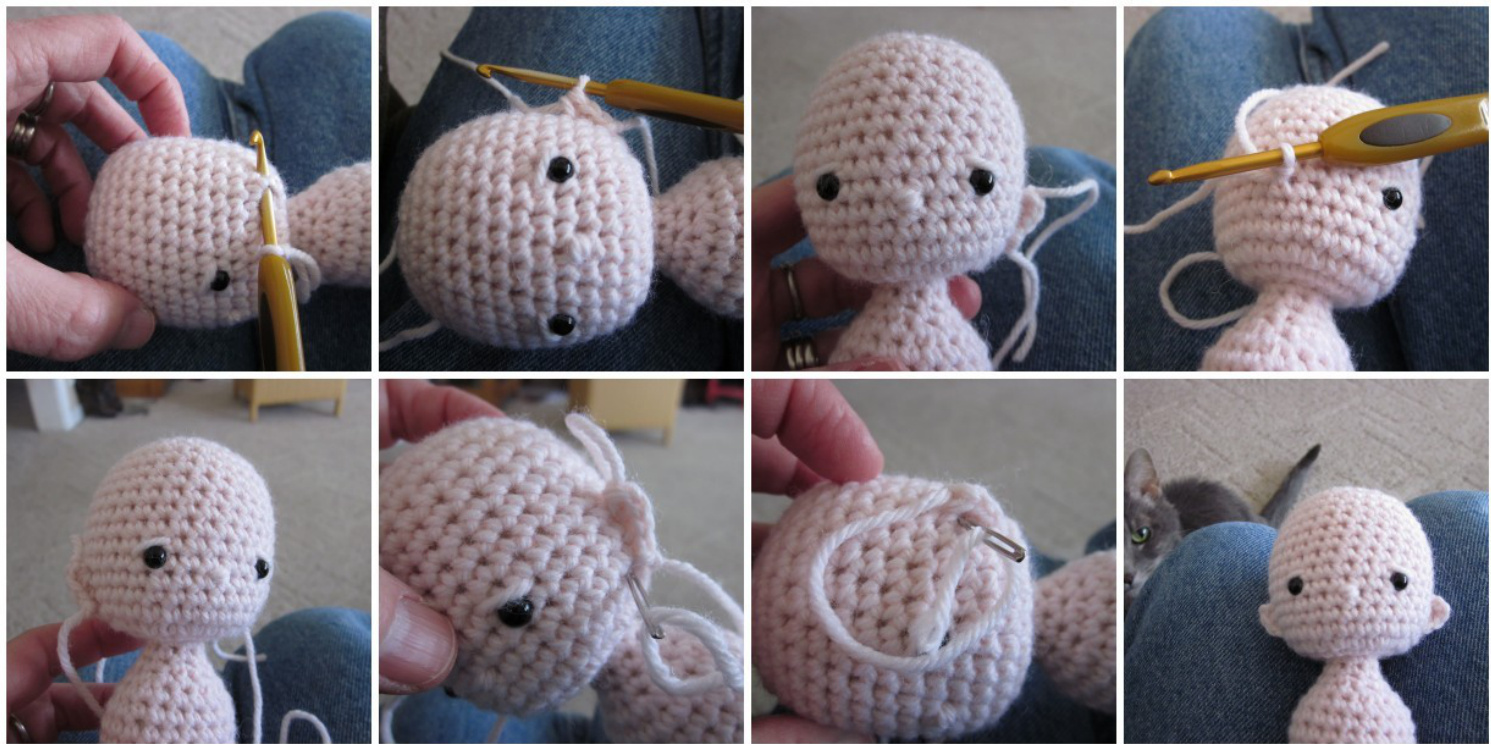
Facial feature detailing
Facial Features.
This doll has very simple facial features. I used 6mm acrylic eyes with collar attachment, applied before the doll's head is stuffed. You can use buttons (apply them after the doll head is stuffed and before you attach the wig cap), or embroider eyes with a French knot or several straight stitches. For eyelids and nose, I use the tail at the top of the head. Thread it onto a tapestry needles, then insert into Design by Beth Webber. Please do not copy or sell this free pattern. the head and come out at the corner of one of the eyes. Make a straight stitch slanted across the eye, and come out at the top of the other eye. Insert into the corner of the second eye, then come out where you want the nose to be (it helps to mark this spot with a pin). Take two or three small, straight stitches at the nose position, then insert the needle into the head and come out at the back, taking a couple of stitches to secure the yarn, and cut off. Reference the above image for facial details.
Wigs!
My favorite yarns for dolls wigs have wool or mohair in them. Good sources for yarns like this are from Waldorf dollmaking sites. Eyelash yarns make great wigs, and even though they are hard to crochet, all your mistakes are hidden in the eyelashes :-) Brushed nylon gives a similar look to mohair, and is less expensive. Any yarn, in fact, will work for hair! Use the larger hook for crocheting the cap. I make wig caps of crochet for all of my dolls. With worsted or sport yarn in your hair color start with ch2, work eight sc in the second ch from the hook. Work all of the subsequent rounds in the front loops only. This will leave a free loop that you can use to hook your hair strands into. Next round work 2sc in each sc (16sc). Next round work (sc in next, 2sc in the next) around (24sc). Next round work (sc in next three sts, 2sc in the next) around (30 sc). Check the fit of this to the top of your doll's head, and if necessary work another round of increases. The wig cap should fit snug. Continue to work evenly until the cap covers the head. Stitch the cap to the head, then create your hair style! If you used a boucle or eyelash yarn, you may be done. These make really cute and simple wigs for dolls. You can hook long strands all around the edge of the cap and pull these strands into a ponytail. Add bangs to the front if you like. Make a center parting for pigtails or braids by crocheting a chain that runs from the front forehead to the center back of the wig. Cut yarn strands and hook them into both sides of the chain, then stitch this to the wig cap. Hooks some strands around the edge, then pull the strands into two ponytails at each side of the head. For a full styling wig, use a thin, mohair yarn and hook into every other stitch of the wig cap until you get to the last two rows, then hook into every stitch. This takes a couple of hours to do, but it is easy (watch a favorite movie!) and looks pretty cool when finished.
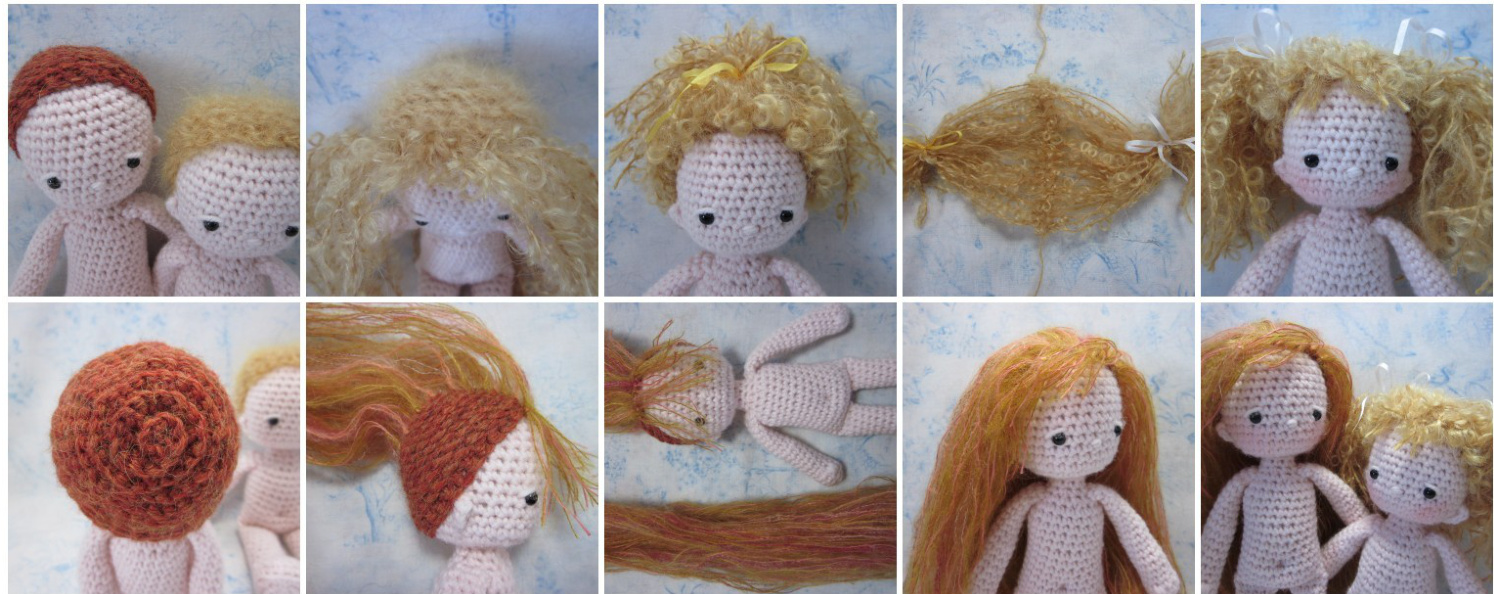
Wig caps and hair options for your doll Design by Beth Webber. Please do not copy or sell this free pattern.
Ami Violette. 8.5 inches tall. A little taller, a little thinner than Mignonette Same construction as Mignonette.
Leg: begins at the foot. Work in rounds and DO NOT join rounds. Use a stitch marker to help you keep track of each round. 1: Ch2, six sc in the second ch from the hook. 2: 2sc in each sc around. 12 sc 3: (Sc in the first st, two sc in the next st) around. 18 sc 4: In the back loops only, sc in each sc around. 18 sc. 5: Sc in the next six sts, (dc the next three sts tog) twice, sc in the last six sts. 14 sts. Cut a piece of clear plastic from the yogurt lid to fit the sole of the foot. Place it inside the foot. When you stuff the foot and leg it will be help in place and help to flatten the bottom of the foot. 6: Sc in each sc around. 14sts 7: (Sc next two sts tog, sc in the next five sts) twice. 12 sts 8: (Sc next two sts tog, sc in the next four sts) twice. 10 sts Stuff the foot, but make sure the stuffing does not show through the stitches. 9-19: Sc in each sc around. Stuff the leg. 20: Sc in the next 6 sts. sl st in the next st and fasten off the first leg. Repeat rows 1 thru 19 for the second leg, but DO NOT fasten off.
Join legs:
Second leg round 20: sc in the next 7 stitches. Flatten the top of the leg and crochet the opening together with five stitches across the top of the leg. Chain 2, flatten the top of the first leg and crochet the opening closed with five stitches across the top of the leg. You now have 10 single crochet stitches, and two chain between thelegs. Torso: You now have the legs joined..make sure the feet both are pointing toward you! Working in the loops facing you, single crochet all around the legs in each stitch and chain. You will have 24 stitches total in the first round. 2: Sc in the next two sc (2sc in the next sc) three times, sc in the next 2 sts, (2sc in the next st) three times, sc in the remaining 14sts. 30 sts total. These increases make the butt cheeks of your dolls. 3: Sc in each sc around. 30 sts 4: Sc in the next three sts (Sc next two sts tog) three times, sc in the next 2 sts, (sc next two sts tog) three times, sc in the remaining 13 sts. 24 sts total. These decreases finish the butt shaping of your doll. 5: Sc in each sc around. 24 sts 6: Sc in the next six sts, sc next two sts tog, sc in the next 10sts, sc next two sts tog, sc in the last four sts. 22 sts total. 7-14: Sc in each sc around. 22 sts. 15: (Sc in the next two sts, sc next two sts tog) six times (this will take you slightly past the beginning of the next round). 17 sts. 16: (Sc in the next st, sc next two sts tog) six times. ( this will take you slightly past the beginning of the next round). 11 sts. Stuff the body firmly, but make sure the stuffing does not show through the stitches. 17: Sc next two sts tog, sc in the next four, sc next two sts tog, sc in the last three sts. 9 sts. Design by Beth Webber. Please do not copy or sell this free pattern.
Neck stub:
18-23: Sc in each sc around to create the neck stub. 9 sts. Continue to stuff the body and up through the neck, making a noticable shoulder area. 24: (Sc next two sc tog) around to close the neck stub. Fasten off and stitch the opening closed. The neck stub will fit up into the bottom opening of the head, allowing you to make a doll with a move-able head.
Head:
1: Chain 11, sc in the second ch from the hook and each ch across. 10 sc 2: Working into the first sc, 2sc in each sc around. Work in rounds and do not join. 20 sc. 3: (Sc in the next st, 2sc in the next st) around. 30 sc 4-15: Sc in each sc around. 30 sts. If using acrylic eyes, attach them now between rows 7 and 8, about five or six stitches apart. I like the eyes of my dolls to be positioned in the lower half of the head, for a more childlike look. 16: (Sc in the next st, sc next two sts tog) around. 20 sts 17: (Sc next two sts tog) around. 10 sts 18: (Sc next two sts tog) around. 5 sts. Finish off and close the top opening. Leave a long tail. Stuff the head through the neck opening, firmly but do not allow the stuffing to show. Make a tunnel into the neck area to allow the neck stub to be inserted into the head.
Head Stringing:
Stuff the head through the neck opening, firmly but do not allow the stuffing to show. Make a tunnel into the neck area to allow the neck stub to be inserted into the head. Thread a dollmaking needle with two strands of craft or buttonhole thread; double and knot the ends together. Insert the needle at the top of the head and run it out of the bottom opening, being careful not to catch any of the crochet at the neck opening. Run the needle through the neck stub and back into the head. Pull the threads at the top of the head to draw the neck stub into the head cavity. Pull this down until the threads in the neck stub are covered by the head, then tie off the threads at the top of the head with a double knot. Bury the ends into the head. Arms: begin at the hand 1: Ch2, five sc in the second ch from the hook. Leave a long tail to embroider the thumb if you like. 2: 2sc in each sc around. 10 sc 3-5: Sc in each sc around. 10 sc 6: Reduce by one st around. 9sc 7-12: Sc in each sc around. 9 sc Stuff the arm lightly. 13: Reduce by one st around. 8 sc 14-18: Sc in each sc arond. 8 sc. 19: (Sc in the next two sts, sc the next two sts tog) twice; fasten off leaving a long tail. Sew the end of the arm closed, leaving the top half of the arm unstuffed. Stitch the arm to the body a couple rows below the neck. Use the long tail at the beginning to stitch the thumb with five straight stitches toward the inside front of each hand. Ears: I like ears on my dolls, and they are very simple. You want the ears to be low in the head..the top Design by Beth Webber. Please do not copy or sell this free pattern. of the ear to be no hight than the bottom of the eye. Stitch the ears on the sides of the head in line with the shoulders, taking three sc stitches along the side. If you don't like the placement, take the stitches out and start a little lower or higher to make the ears. Leave long tails at the beginning and the end of the ear to shape them. You can make any number of interesting ears with just a few stitches :-)
Facial Features.
This doll has very simple facial features. I used 6mm acrylic eyes with collar attachment, applied before the doll's head is stuffed. You can use buttons (apply them after the doll head is stuffed and before you attach the wig cap), or embroider eyes with a French knot or several straight stitches. For eyelids and nose, I use the tail at the top of the head. Thread it onto a tapestry needles, then insert into the head and come out at the corner of one of the eyes. Make a straight stitch slanted across the eye, and come out at the top of the other eye. Insert into the corner of the second eye, then come out where you want the nose to be (it helps to mark this spot with a pin). Take two or three small, straight stitches at the nose position, then insert the needle into the head and come out at the back, taking a couple of stitches to secure the yarn, and cut off.


