Generic Mittens - Getting Started
One of the comments to my Olympic Mini Mittens offers a pattern for sale for adult sized Olympic Mittens. I kind of prefer the one's for sale at HBC and Zellers: something about the color work in that pattern just doesn't have the detail that is my personal preference. I think if I were to make a pair of Olympic Red Mittens for myself, I'd probably embroider the rings and slap on a felt maple leaf as I did for the Minis. I just like the look better. That, and I have never really felt the need to buy a mitten pattern. A want perhaps - Eunny's Anemoi's for example, but then they are some pretty, special mittens. I usually just wing it with the generic mitten pattern that I found bouncing around in my brain. For those of you who weren't born with mitten patterns ricocheting of the inside of your skulls, I thought I'd share my process. Because it really is more of a process than a pattern for me.
step 1: pick your yarn
I've used fingering weight sock yarn, sport weight yarn, worsted weight yarn, handspun, bulky weight yarn. If you like it, use it. The only thing I try to stay away from are yarns that will pill too quickly.
step 2: choose your needles
Check the ball band for your chosen yarn. Note the needle size suggested. Go down a few sizes. I like my mittens to be a bit wind resistance. I use dpns for my mittens; if you prefer another method of knitting in the round, feel free to use that. When I use worsted weight yarn, I usually use US 3/3.25mm needles. For fingering weight: US 0/2.0mm needles.
step 3: knit a gauge swatch
I know, I know - I hate knitting gauge swatches too. But this will really help your mitten to fit your intended recipient. Cast on enough stitches to make a 4 inch wide square. Knit in your intended stitch pattern for 4 inches. For the most basic mitts, I usually use stockinette stitch. If you're already familiar with the gauge you'd get using your chosen yarn, the needles you decided on in Step 2, and the stitch pattern you intend to use, you can skip this step.
step 4: measure your row and stitch gauge
If you're printing these instructions out, grab a pencil and record your measurements here. Stitches per Inch: Rows per Inch :
step 5: trace your hand
Use the back of your printout if you'd like to have everything in one place.
step 6: measure your hand
Note the spots on my hand sketch above. Use a tape measure and record your (or the recipient's) measurements on the same spots of your tracing.
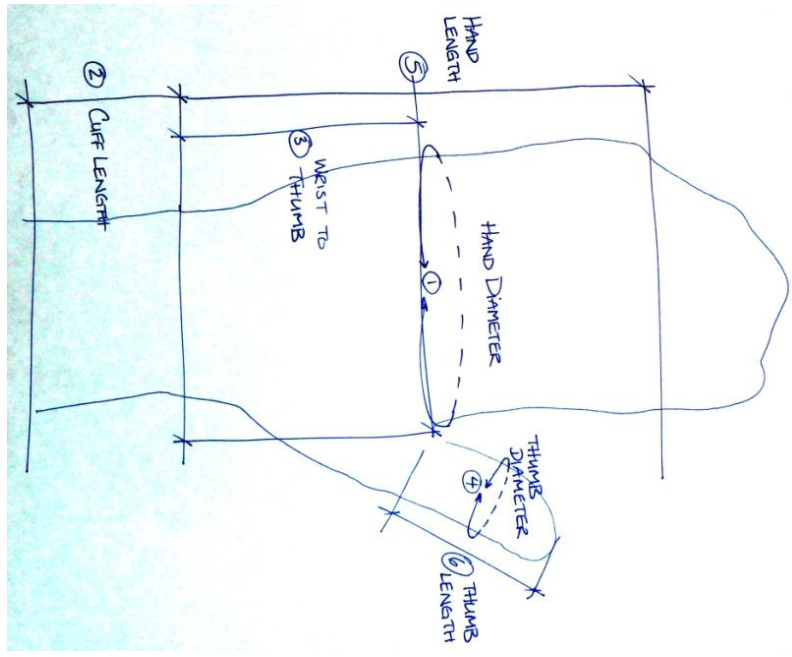
My measurements are:
1: 8.25 inches 2: 3 inches - I like a long cuff! 3: 3 inches 4: 2.5 inches 5: 6.5 inches 6: 2.25 inches Tomorrow, we cast on. A few things to think about before tomorrow... What kind of cast on would you like to use? Tubular, long tail, knitted? How long do you like your cuffs? Do you prefer K1P1 ribbing, K2P2 ribbing, cabled ribbing, corrugated ribbing?
Generic Mittens - The Cuff
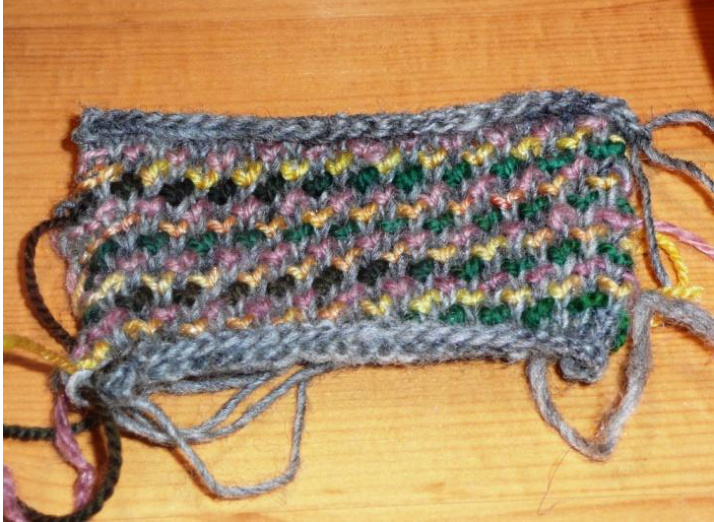
long. It's more like $4\times2.5$ . But it's my swatch and I was getting tired of it. So I stopped and measured. I used 2.25mm (US #1) needles. I usually use $2.0\mathsf{m m}$ (US #O) needles for fingering weight yarn, but all my gajillion sets of $2.0\mathsf{m m}$ dpns are deeply involved in other projects. Stitches per Inch: 6.5 Rows per Inch : 14 This stitch pattern really sucks up the row gauge. I'm hoping that will translate into very warm mittens. I have no idea what the stitch pattern is called. If you know the name, let me know in the comments! It's a 4 round repeat: Round 1: With MC (in my case the recycled gray sock yarn) \*knit into the stitch below, k1\* repeat from \* to \* for the entire round Round 2: With CC1 (various warm Phat Fiber Samples) purl Round 3:With MC $\ast\mathsf{k1}$ , knit into the stitch below\* repeat from \* to \* for the entire round Round 4: With CC2 (various cool Phat Fiber Samples) purl Before we begin with the cuff...
step 1: what type of cast-on
Have you decided on what cast on to use? When I make mittens it's usually a case of my-handsare-so-cold-I-need-mittens-right-now. I've only done a tubular cast-on once, and that was on something I frogged, although not because of the cast-on. So I'd find it takes me a lot of mental power to do a tubular cast on when I want the knitted object Now. But I do want the cast on to be stretchy, so I use a long tail cast-on, using a needle approximately 3 times the diameter of the needles I'll use for the mitten.
step 2: ribbing decisions
Have you decided on ribbing? I love the way a K1tbl,P1 ribbing looks, although I find K1,P1 to hug my wrist a little bit tighter. Strange, I've always thought. I would have guessed that the twisted knit ribbing would be more elastic, but it seems to stretch out more quickly, although that may be due to a number of factors. I haven't been all that scientific about it. My twisted knit ribbed mittens are made of different yarn that the other pairs I wear and I also wear them more often, so don't take my observations as fact. I like K2P2 ribbing too, but like the knitting rhythm of K1P1 better. So when I want mittens fast, K1P1 it is!
step 3: how many stitches
Finally we are ready to figure out how many stitches to cast on. If your stitch pattern is heavily cabled or pulls stitches together like cables would, you will want to base your cast-on sts on a stockinette stitch swatch. Just remember to make some increases after the cuff, so that you'll have enough stitches once you begin your cabling. Look back at your sketch where you recorded your measurements. Or you can use my measurements from yesterday - I'd love it if you knit me mittens! Take measurement #1, Hand Diameter, and multiply it by your stitches per inch. For the stitch pattern and needles I'm using, I get 6.5 stitches per inch. So I will cast on: 8.25inches x 6.5sts/inch $=$ 53.625 sts Obviously it will be pretty tough to cast on 53.625sts, so I round up to the nearest even number for K1P1 ribbing. If your making K2P2 ribbing, make sure you can divide your number by 4. If we rounded this up to 54sts, it would work for K1P1 but you'd need to cast on 56sts for K2P2 ribing. How many will you cast on? #1 Hand Diameter Your sts/inch Cast-on sts Round up to the nearest even number and you're ready for some K1P1 ribbing! Make your cuff as long as you like cuffs to be. For me that's 3 inches. Once I have two cuffs that measure 3 inches from the cast on edge, Ill post "Generic Mittens: From Wrist to Thumb". So I've reached a common stage in my mitten making process. The frogging and restarting stage. I've knit two cuffs and was nicely progresing on the Wrist to Thumb section (instructions still inthe-works), when I realized a few things.
I believe I mentioned that this particular stitch pattern really sucks up row gauge. I had thought to myself that it also comes out wider than my typical stitch gauge for fingering weight yarn. As with many a trip to the frog pond, this realization failed to fully register. You may recall that I cautioned that you should base your cuff sts on a stockinette stitch gauge if you're using a cabled pattern. This would prevent your cuff being too wide. Even after that tidbit that I passed on to you, I failed to notice that if a stitch pattern is wider than the typical stockinette stitch gauge, and you base your cuff sts on that number, you will get a cuff that is tighter than you might expect. So while I have two cuffs knit to my preferred length of 3 inches, they are a bit too tight for my liking. I was going to ignore it. So I carried on and began working on the wrist to thumb section of my mitten, including the increases for the thumb gusset. I love how this pattern is looking. I love how colorful it is, but I messed up on the pattern in a few spots and have noticed that a few things I typically do with the increases for the thumb gusset won't work as well with this stitch pattern. So it's being frogged. New Cast-on Math: My typical stockinette stitch gauge: 7.5 sts/inch My hand diameter measurement: 8.25 inches 8.25inches x 7.5sts/inch $=$ 61.875sts So I'll be casting on 62 sts for my new K1P1 cuffs. I'll post "Generic Mittens: From Wrist to Thumb" as soon as I have my cuffs knit to my preferred $3"$ long. Boy that sounds like déja vu! Now I just have to remember to decrease back down to 54 sts before I begin my patterned section!
Generic Mittens - From Wrist to Thumb
step 1: what kind of thumb
I know of three. Feel free to chime in if you know of others - I love learning new things. There's the thumb with a gusset kind of thumb, and the thumb that just sticks out of the mitten. With both of these, when you get to the part where the thumb stitches are, you put the sts on a holder and cast new sts on to replace them. Later you go back and knit the sts on the holder and some new stitches that you pick up in the same place as the cast on sts. The third kind is an afterthought thumb. You knit your mitten happily until it's time to decrease and close the top. Then you decide where to put your thumb. You snip the yarn in the centre of that spot, carefully unravel just the right amount of sts for the thumb, place them onto some needles and knit to your thumbs size. I like making a thumb gusset - I find the mittens just fit me better that way. I do have some that have the other kind of thumb, too - they are my Bayerische mittens and I just couldn't figure out how to make the thumb gusset blend nicely with Eunny's beautiful cables so I didn't make a gusset. But before we go on from Wrist to Thumb, we need to know what kind you want to make. I'm making one with gussets, but Ill give instructions for both.
step 2: setting up for the thumb gusset
This might be a good place to discuss a phenomenon known as finger claustrophobia. I believe Grumperina coined the term and I agree whole heartedly with her that mittens should be just right. I think this may vary for each person. I usually get the right amount of stitches for my fingers when I'm working in stockinette if I stick to my hand diameter measurement. But if I'm doing something with lots of ribbing, or cables I might add 0.5 to 1.0 inches worth of stitches to ensure my fingers don't feel cramped. For the pattern I'm using for this tutorial, I'm not adding any sts. Feel free to add some (or not) to yours! I'll assume you've already increased, if needed, (or in the case of my mitten, decreased) to the right amount of stitches for your hand. If you're making the gusset-less mittens, you can skip this step and just knit happily along in your chosen pattern instead. Depending on the type of top decrease I'm planning for my mitten, I'll sometimes make the left and right mitten identical - I like to call them ambidextrous mittens. Other times, I need to make sure the thumb of the mitten lays just to the inside of the palm, rather than sticking out to the side. To accomplish this, I'l knit a certain amount of stitches before beginning my thumb gusset. For the right mitten, I knit this amount at the beginning of the row; for the left, at the end of the row. Below, where it says "knit .." and then for the left mitten ". knit 4", these 4 sts are the magic number for my typical worsted weight mitten. If you're using a heavier or lighter yarn, you'll need to decrease or increase this amount a bit - approximately 3/4 of an inch's worth of sts.
For the Right mitten
Round 1: Knit 4, pm, m1, pm, knit to the end of the round. The sts between the markers will be the thumb gusset sts. Round 2: Knit Round 3: Knit to the marker, slip marker, m1, k1, m1, knit to the end of the round. (For the left mitten, round 1 would look like this: Round 1: knit to the last 4 sts, pm, m1, pm, knit 4) I find with kids' mittens, it's best to make your thumb gusset increases every second round. For adults, I increase every third round. For this stitch pattern, I'm increasing every 6th round, since the row gauge is quite tight.
step 3: knitting the thumb gusset
Continue knitting your mitten hand in pattern, increasing for the thumb gusset on the inside of the markers when it's appropriate for the size and gauge of mitten you're making. If you wish to include your thumb gusset in the pattern you might have to fiddle with things a bit. For the stitch pattern I'm using, I've found that it's best to have an even number of sts between the markers, so I omitted the m1 in Round 1 above. If you're making the other kind of thumb, continue knitting happily along in pattern Remember your measurements from "Generic Mittens: Getting Started"? Look back at Measurement 4: thumb diameter and Measurement 3: wrist to thumb. Calculate the number of sts you would need to make your thumb diameter $^+$ plus a bit for comfort - I'm adding 0.25 inches:

$(2.5+0.25)$ inches x 6.5sts/inch $=17.875$ , so 18sts. This works wellfor me, since I want an even number of sts between my markers. When I make a plain mitten, I'd likely round this down to 17. Figure out the number of gusset sts you need and then meet me at step 4. step 4: setting aside the thumb sts Once you have the right amount of sts between your markers for your thumb gusset, measure the length of your work from the end of the ribbing. You are aiming to get Measurement 3: wrist to thumb. If it's way too long, unfortunately you'll need to rip back and increase for your thumb gusset more frequently. If it's too short, that's ok - continue knitting without increasing until you have the right measurement. If you're making a mitten without the gussets, simply knit until the distance from the ribbing equals this measurement. Get a stitch holder, or a waste piece of yarn ready. Knit to one sts before your first marker, transfer one st on either side of the gusset and the gusset sts to a stitch holder or onto a waste piece of yarn. Using the knitted cast-on, cast on 2 sts to replace the ones that were on the outside of the markers. Continue knitting in pattern to the end of the round. If you're making a gusset-less mitten:
For the right mitten
Knit 4, slip half the stitches needed for your thumb onto a stitch holder or waste piece of yarn. Using a knitted cast-on, cast-on the same number of sts. Knit to the end of the round.
For the left mitten
First a little math: 1/2 thumb sts $+\ 4=...$ . In my case that number would be $9{+}4\,=\,13$ Knit until that number of sts remain, slip half the stitches needed for your thumb onto a stitch holder or waste piece of yarn. Using a knitted cast-on, cast-on the same number of sts. Knit 4. Once I have both my mittens to this point, Ill post the next instalment of this tutorial, "Generic Mittens: From Thumb to Pinkie Tip"
Generic Mitten: From Thumb to Pinkie Tip
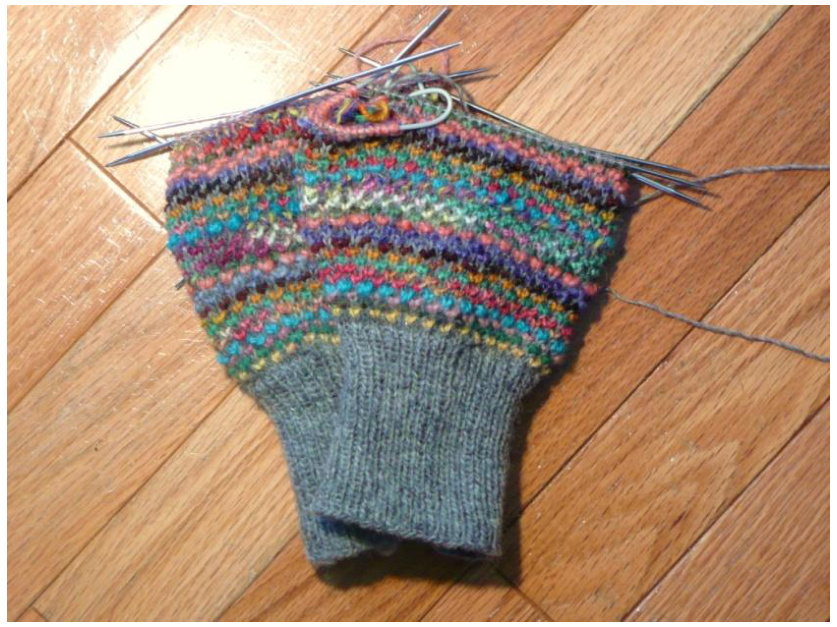
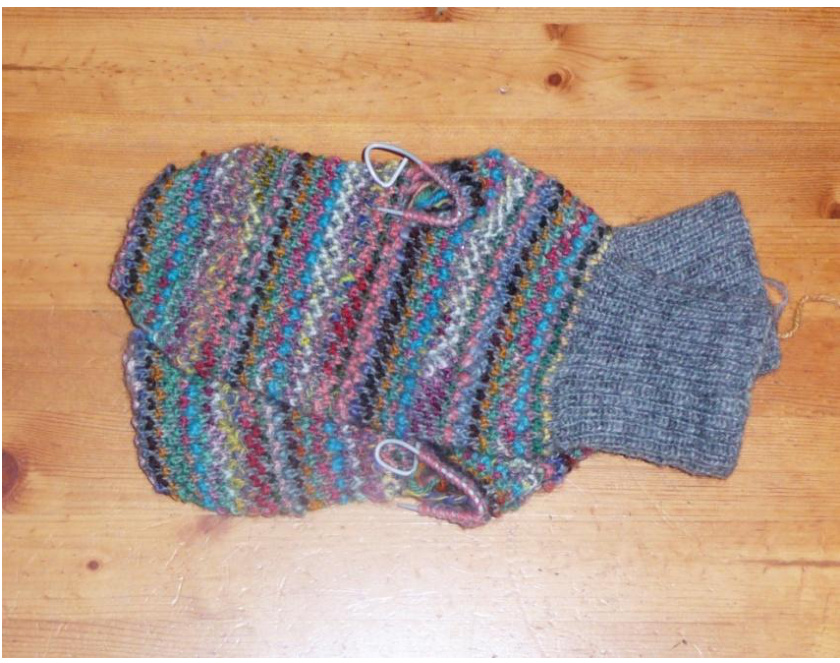
Ok! So here are my mitts with the thumb stitches snuggled onto a stitch holder. You may notice that I've knit a few rows past the thumb sts already. From "Thumb to Pinkie Tip" is most likely the easiest part of the mitten, depending of course, on whether the stitch pattern you are using is simpler than the ribbing you chose for your cuff.
step 1: count your sts
You should have the same amount ot sts that you calculated you'd need for your hand diameter. If it's off by a stitch or 2 this may be ok. If your stitch pattern needs a certain amount of sts, or if you're using super bulky yarn and a single stitch might make your mitten 1/2 inch smaller, you might want to consider increasing for the needed sts evenly across the first row after the thumb sts have been set aside. I counted mine: I have 54 on the left mitten. I needed 54 - this makes me quite happy as that rarely happens. Sometimes I rip back to where I messed up, sometimes I just leave it. Like on the right mitten. I have 52. I fudged it a bit. I think it will work out ok.
step 2: knit happily
Carry on knitting in your chosen pattern until your mitten Measurement #5 (Hand Length) from "Generic Mittens: Getting Started" equals the length of your mitten when measured from the end of the ribbing.
Generic Mitten: Decreasing the Top
There are two different ways I typically decrease for my mitten top - depending on which way works best with the pattern I'm using.
Side Decreases
Sometimes I decrease only on the sides of the mitten: decreasing 4 sts for each decrease round. This is my personal favorite: and my friend's mom recently asked me "Why do you do it that way?" She thought it was quite different. Me, I love how it looks! Please feel free to do the decreases for the top of your mitten in whatever manner makes you happy!
Evenly Distributed Decreases
These decreases can be either stacked to make a nice swirling line from the beginning of the decreases to your mitten tip, or staggered to be less visible (apparently, my friend's mom's approach!). If you're planning on using this decrease, knit another 0.5 inches in pattern before beginning your decreases.
Here's my mittens with the Thumb-to-Pinkie-Tip portion and the top decreases finished.
Side Decreases
step 1: where to decrease
I like to have a column of four sts starting when my decreases do and running up to the top of the mitten. It looks nice with a 2sts column too, and that's actually what I'm doing with my sample mitten, since that works better with the stitch pattern. You won't be able to get a column smaller than 2 sts, since it's the left and right leaning decreases that help to define the column. I'd strongly suggest placing a marker at the halfway point. When I don't - I always mess up and have to rip back. So you'll decrease somewhere near the start of your round, twice near the middle of your round and once near the end. The exact place, depends on how many sts you'd like running up the side of the top.
step 2: do it!
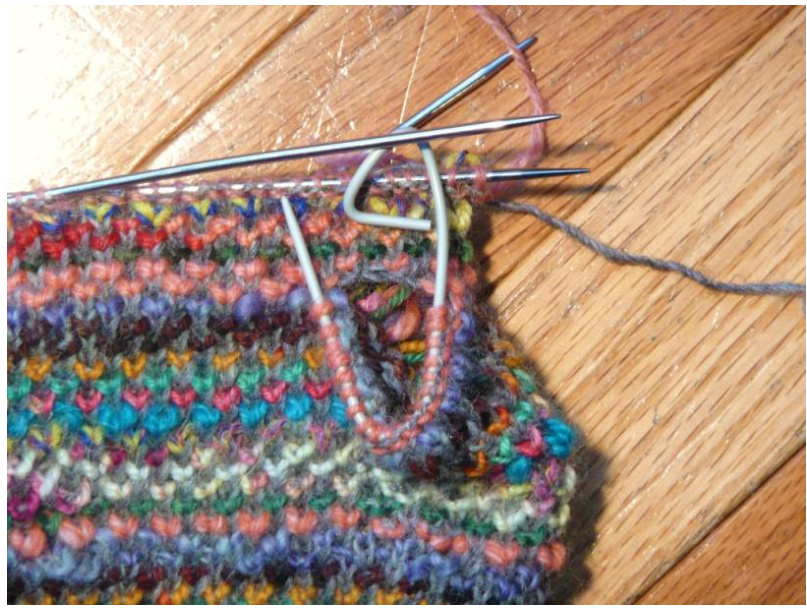
This will make a 4sts column Round 1: $\ast\mathsf{k1}$ , ssk, knit to 3 before marker, k2tog, $k1^{*}$ repeat once more Round 2: knit repeat these two rounds until you have half of your original sts. For my sample that would be 54 $/\ 2\ =\ 27$ sts. In order to bind-off using a three-needle bind-off or to close the mitten tip by grafting you will need to have an even number of sts. I've decided to go with 30 sts: 15 sts on each needle. And I used a three-needle bind-off. I'm quite happy that I ended up with 30 sts. Usually I'd get 31 or something, indicating that I'd missed a decrease somewhere. It's probably good you couldn't see me grinning to myself just after I'd finished counting - you might have thought I was just a bit too easily amused!
Even Decreases
step 1: where to decrease
I usually use 6 sts per round for this type of decrease. If you'd like to have a more rapidly decreasing mitten top, throw in a few more per round. Divide your total number of sts by 6: in mycase $54\ /\ 6\ =\ 9$ . This means that I should place a marker every 9 sts on the last round of knitting before the decreases. I should tell you, I don't normally do this. I can usually tell where to place the decreases without placing markers. You know yourself best, put markers in if needed.
step 2: do it!
This will make nicely stacked decreases. For staggered decreases, follow the instructions in the [] as well. Round 1: $\ast\mathsf{k}7$ , k2tog\* repeat from \* to \* to the end of the round Round 2 and all following even rows: knit Round 3: [k3, k2tog] $\ast_{\mathsf{k6}}$ , k2tog\* repeat from \* to \* to the end of the round [k3] Round 5: $\ast_{\mathsf{k5}}$ , k2tog\* repeat from \* to \* to the end of the round Round 7: [k2, k2tog] \*k4, k2tog\* repeat from $^*$ to $^*$ to the end of the round [k2] Round 9: $\ast\mathsf{k}3$ , k2tog\* repeat from \* to \* to the end of the round Round 11: [k1, k2tog] \*k2, k2tog\* repeat from \* to \* to the end of the round [k1] Round 13: \*k1, k2tog\* repeat from \* to \* to the end of the round Round 14: k2tog around Break yarn, leaving tail long enough to thread onto a darning needle. Pass the needle through each of the remaining sts and pull tight. Secure end and trim. Next: "Generic Mittens: The Thumb." We're on the homestretch! I hadn't realized when I started these mittens how long this stitch pattern would take. I can normally zap off a pair of worsted weight mittens in 2 or 3 nights. It's a good thing I'm completely in love with this pair or I might have given up and started a worsted weight pair just to finish the tutorial!
I can't wait to finish these mittens - I love them so much I want to wear them now! I've finished one thumb and just have the other one to go. I had said to my dd that I only had one more thumb to finish. "How many thumbs have you knit?" she asked.
step one: how many sts
Remember your calculation for Thumb Gusset Sts from step 3 of "Generic Mittens: from Wrist to Thumb"? I had 18 sts - you might have an odd number. Add two to this number - these are the sts on the outside of your markers. Now add two more - these are the sts you'll be picking up. That would bring me to 22. Sometimes I pick up more sts if I feel the gap looks too big - maybe 4 sts, like I did this time. I had planned to decrease back down to 22 sts for the thumb, but I forgot. If you're doing the other kind of thumb, the one without the thumb gusset, you'll need to refer back to your calculations too. Pick up an equal amount of sts as you have on your stitch holder. You might also like to pick up an extra sts on each "end" to help close any gaps that may form there.
step two: transfer sts from stitch holder
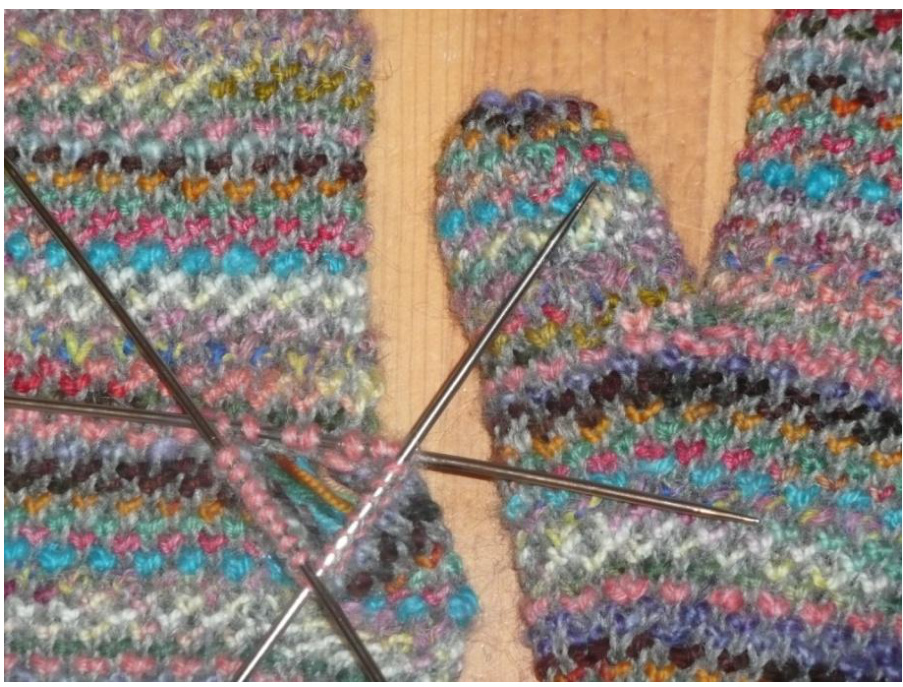
I put 8 sts on each of 2 needles and 4 on the last of the three dpns. I picked up 4 sts and put them on the needle too. For either type of thumb, once you've transferred your sts from the holder to your needles and picked up the required number of sts, you'll knit even until your thumb is long enough. Here's my thumb sts ready for knitting
step three: start knitting the thumb
I usually start knitting my thumb at the top left point (see photo above), starting with the sts I picked up. This time I didn't trust myself to get the st pattern right if I started there, so I started at the bottom point, where I could read the pattern from the previous rows. Knit in your chosen pattern until the thumb length equals Measurement #6: Thumb Length from "Generic Mittens: Getting Started". If you're knitting for yourself, you can also just try the mitten on at this point and stop knitting when your knitted thumb is as long as your flesh-and-blood thumb.
step four: decreasing the thumb tip
Do a round of k2tog. Then break your yarn, thread the end onto a darning needle and pass the tail through each of the remaining sts. Pull tight, draw tail to the inside of the work and secure the end. Depending on your pattern you may need to adapt this decrease row. For my mitten pattern, I needed to do the decrease row using my CC, so I ended up having a MC patterned row as my final row. Other patterns might require you to (k3tog, k1) instead of k2tog around. Do what looks best!
step 5: finishing
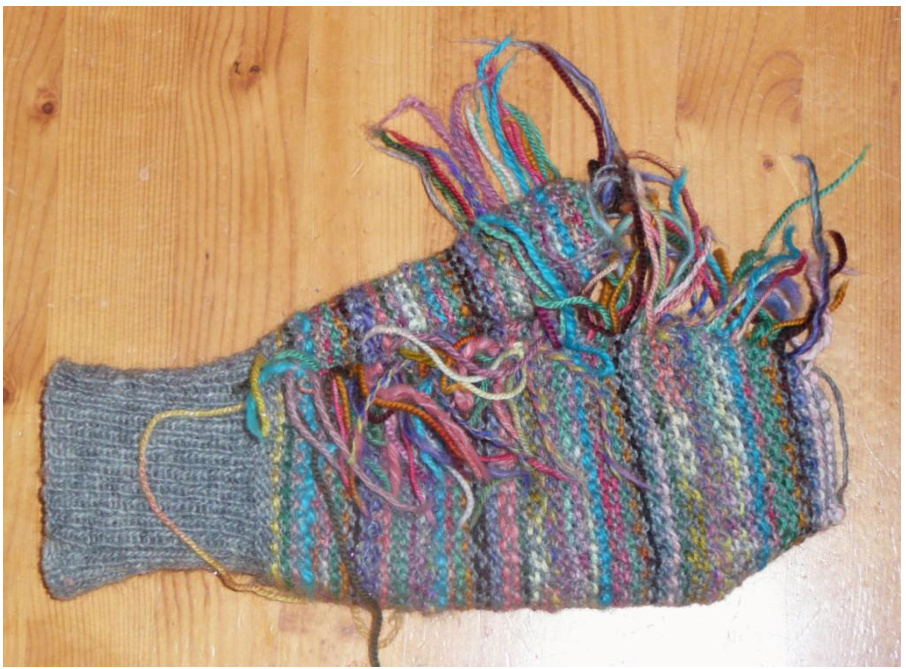
Weave in and trim all your ends - in my case there are 232 ends to weave in. It may take me a while. Block your mittens if you'd like to, or if you're like me and have problems waiting, wear them immediately! I may do that even before I weave in all the ends. I'm trying to convince myself they are just like thrummed mittens this way.


