Gansey Girl Socks Designed by Debbie O'Neill An SKA Mystery Sock Design
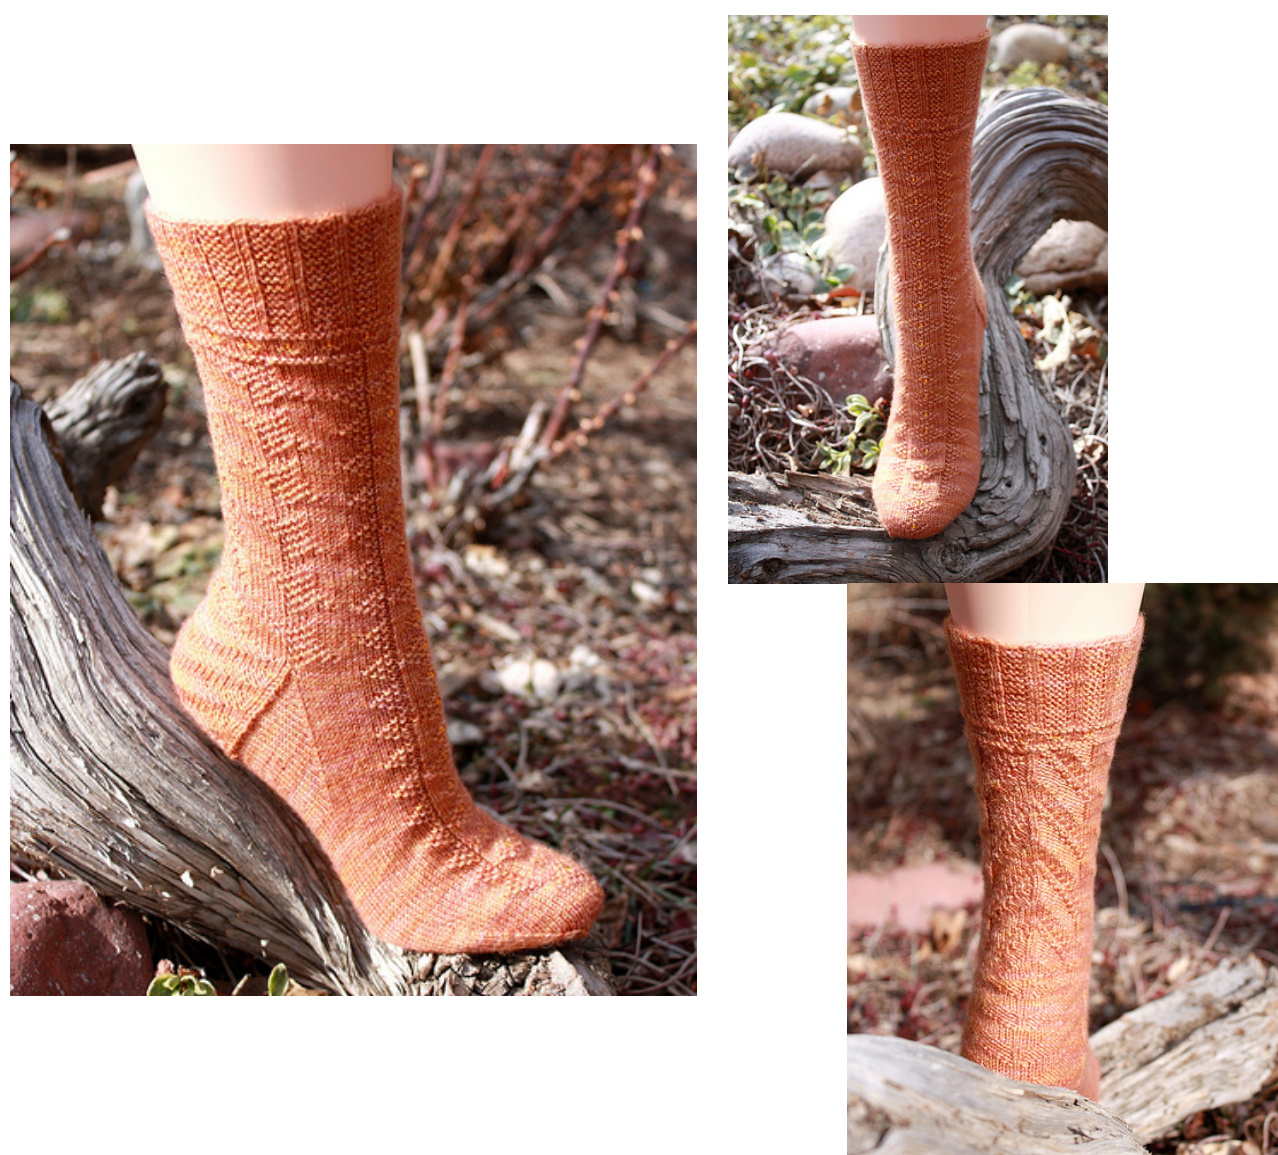
Experience Level: Advanced Beginner. Size: Women's small(medium, large)-7.25 (8.25, 9.25) leg circumference. Sample sock shown in medium.
Materials:
·1 skein Brooklyn Handspun Signature (480yds, 4oz), color Pumpkin Pie, or simila fingering weight yarn. ·1 set of size US0 (2.omm) double point kniting needles(or size required for gauge) US12 (1.0mm) or smaller crochet hook for placing beads (Optional) Approximately 150 size 6 or size 8 seed beads (Optional) Gauge: 9 sts/inch in stockinette stitch
Note:
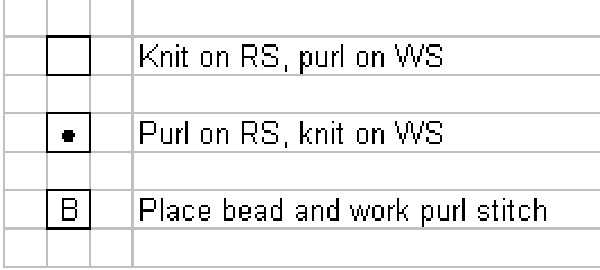
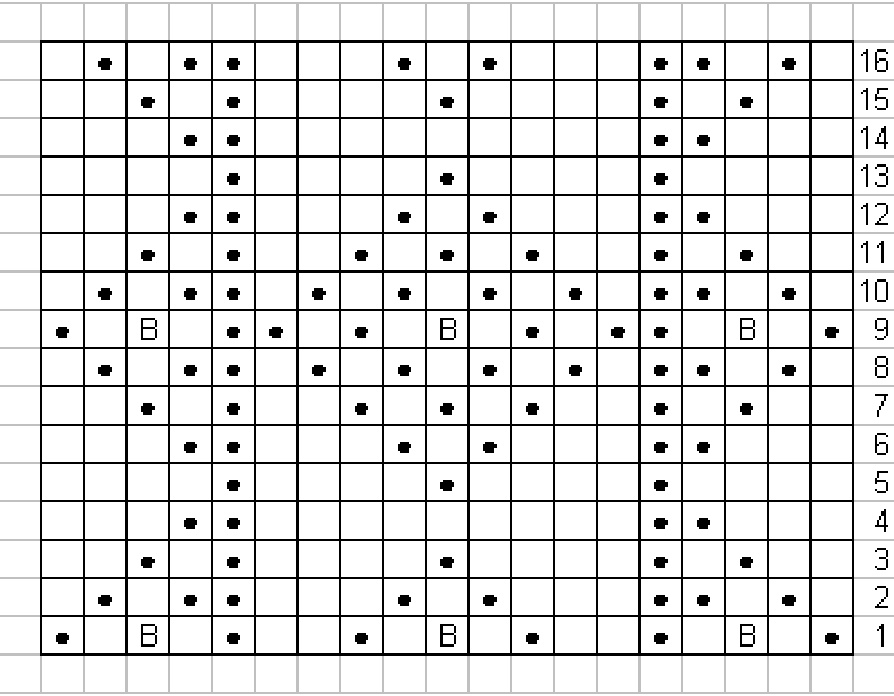
This pattern will show best when knit firmly in a solid or semi-solid yarn. Additional sizes canbe achieved by kniting the sock at 8 or8.5 sts/inch with a slightly heavier fingering weight yarn than used for the sample sock. You have two chart choices for the Gansey Band and Chart C - one with just knit-purl stitches and one with beads in place of some of the purl stitches. The charts show suggested bead placements. However, any purl stitch in the charts can be replaced with a bead as desired! I recommend using the crochet hook method of placing the beads. A good description can be found at: http://www.knitty.com/ISSUEspring06/FEATseducedbybeads.html.
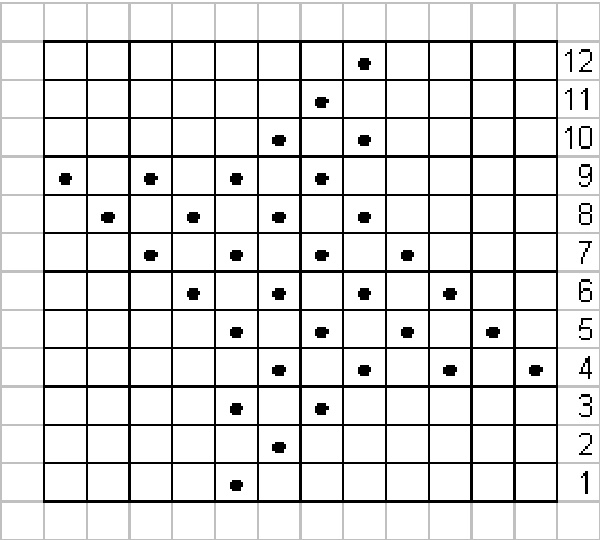
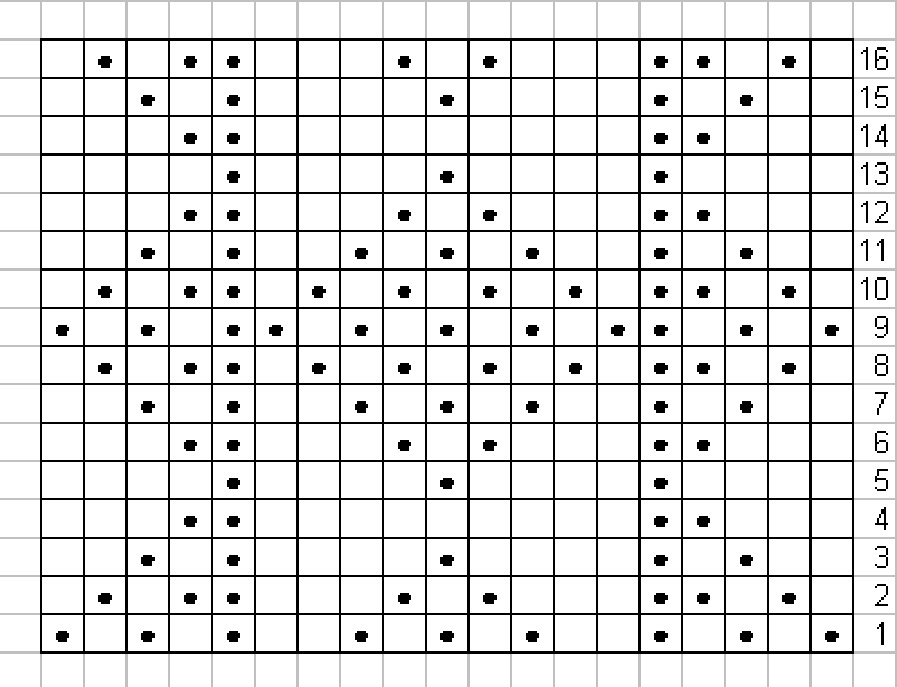
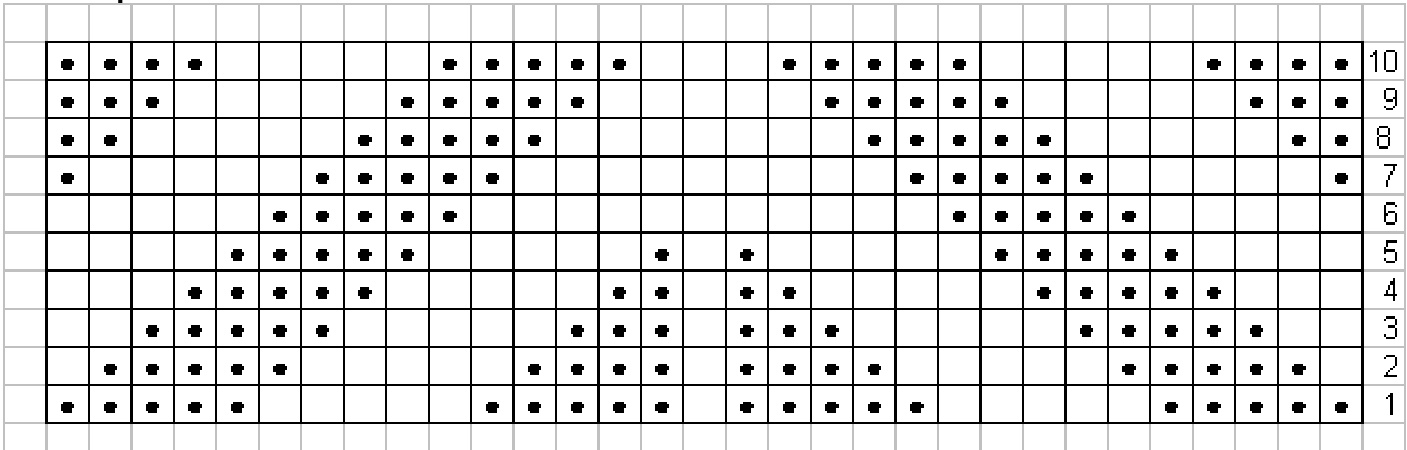
Gansey Girl Charts
K2tog: Knit two stitches together. RS: Right side of work. Sl: Slip as if to purl. Sl1, k1, psso: Slip 1 stitch as if to knit. Knit 1, pass the slipped stitch over as if to bind off. Ssk: Slp tw stitches, oeata tim, as iftoknit. Knithe 2stitchestogether thrugh thebackls. WS: Wrong side of work.
Garter Stitch Ribbing
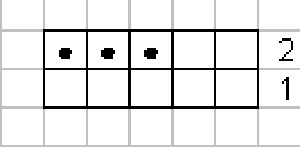
Gansey Band
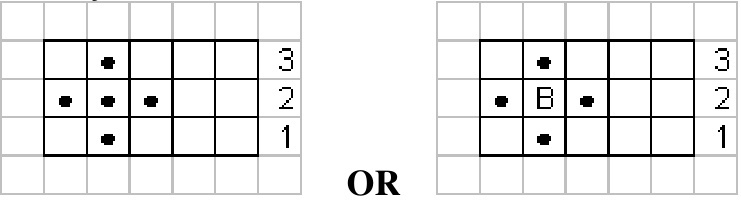
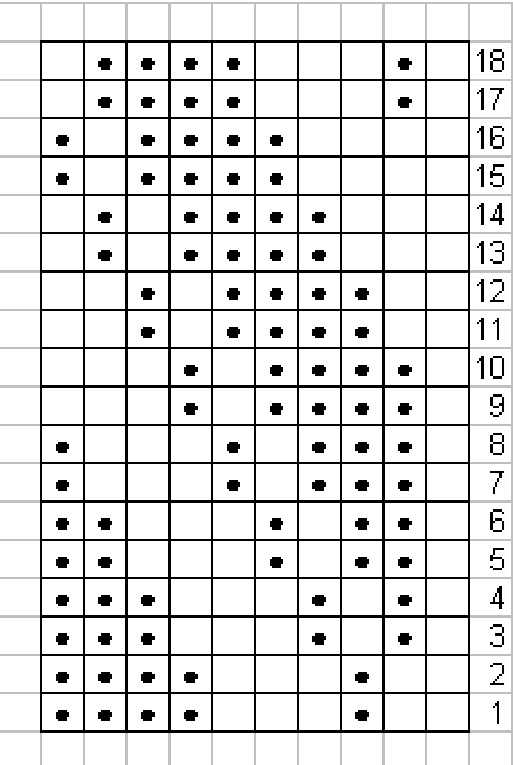
Chart B
OR
Chart D
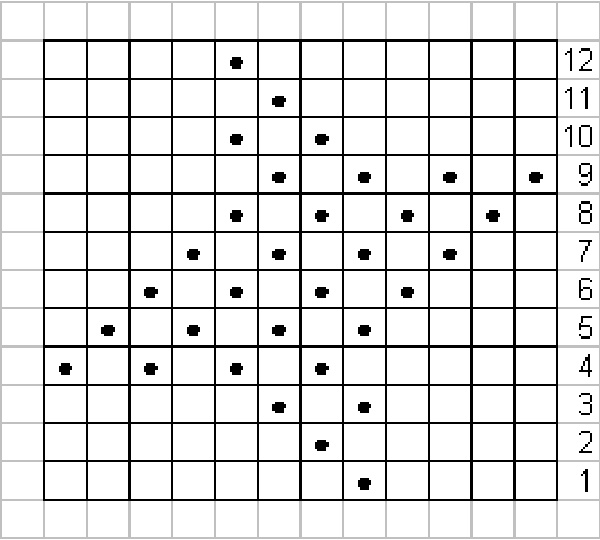
Chart E
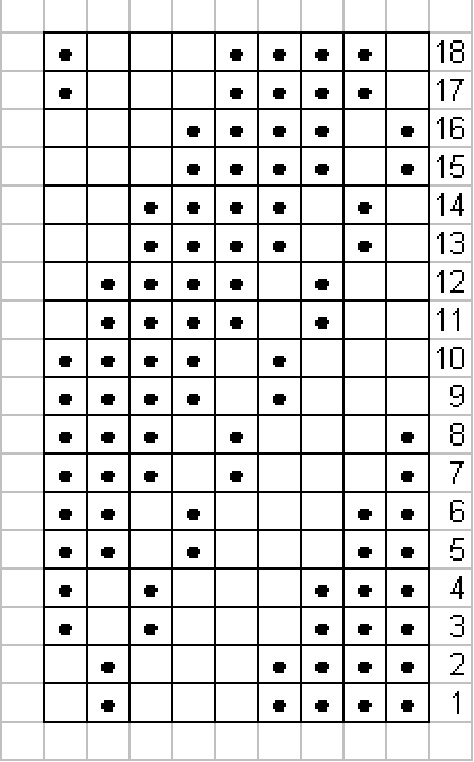
Heel Flap Chart
Instructions
Cuff: Cast on 65 (75, 85) sts loosely. Divide the stitches on to 3 needles as follows: 25 (25, 25) sts on needle 1, 15 (25, 35) sts on needle 2, and 25 (25, 25) sts on needle 3. Join in the round. Work in the garter stitch ribbing pattern as shown in the Garter Stitch Ribbing chart for 2 inches, or desired ribbing length, ending after working round 1. le uumy is ioweu by a llalow uau. vuin ue uau as iows. Purl 1 round. Knit 1 round. Work the Gansey Band chart over 3 rounds. Knit 1 round. Purl ro.Whilewring thsrud, adjust yourstith cout asfollow.Fr the mal creae sth -66 sts total. Forthe medium, decrease 1stitch (k2tog)-74 sts total. For the large, decrease3 stitches (k2tog) evenly over the round - 82 sts total. Leg: Begin working the leg as follows, beginning with round 1 of each chart: Work Char A, k1 (3, 5), work Chart B, k1 (3, 5), work Chart C, k1 (3, 5), work Chart D, k1 (3, 5), work Chart E. You may wish to place stitch markers in between each chart to help keep track of each motif. Continue working in the established pattern, repeating each chart as you comlete it, until the leg measures approximately 7/2 long, or desired iength, and you have just completed round 12 of Charts B and D. Note that each chart has a different number of rounds init. After the first 12 rounds of the leg, you wil be on a different round of each chart. It is helpful touse a Post-lt note to indicate where you are in each chart as you work. Heel: Work 17 (19, 21) sts from needle 1, continuing only the patterning for Chart A. The remaining stitches are worked in stockinette stitch. Turn work. The next 33 (37, 41) sts will be the heel flap. The remaining 33 (37, 41) sts can be slipped to needle 2 and will be the instep sts. Work the heelflap as follows, beginning on row 1 of the HeelFlap Chart: Row 1 (WS): Sl 1, p0 (2, 4), work Heel Flap Chart, p 1 (3, 5). Row 2 (RS): SI 1, k0 (2, 4), work Heel Flap Chart, k1 (3, 5). Repeat these 2 rows 17 (17, 19) more times - 18 (18, 20) times total. Work one more WS row, so that the next row is a RS row. Note that you will not necessarly complete the last repeat (rows 1-10) of the chart. Just stop when the heelflap is the right length. You should have 18(18, 20) chain stitches along each edge of the heel flap. Turning the heel: Row 1: Knit 19 (21, 23), sl 1, k1, psso, k1. Turn work. Row 2: Sl 1, p 6, p2tog, p1, turn. Row 3: Sl 1, kto 1 st before gap, sl 1, k1, psso, k1, turn. Row 4: Sl 1, p to 1 st before gap p2tog, p1, turn. Repeat rows 3 and 4 untilallstitches from the hee flap have been worked. Gusset: You will have an odd number of heel stitches left. Knit the first half of the heel stitches onto one needle. Knit the second half plus one onto another needle. With this second needle, pick up and knit 18 (18, 20) sts along the right side of the heel. With an empty needle, work across the 33 (37, 41) instep stitches as k7 (9, 11), continuing at the next row of Chart C for the next 19 sts, k7 (9,11). With the remaining needle, pick up and knit 18 (18, 20) sts along the left side of the heel, then work across the remaining heel sts. You should now have half of the heel stitches plus the right gusset stitches on needle 1, the instep stitches on needle 2, and the left gusset stitches plus the rest of the heel stitches on needle 3. Round 1: Knit the sts on needle 1 to the last 3 sts. End k2tog, k1. Work across the instep sts on needle 2 in the established pattern (stockinette stitch on either side of Chart C). At the beginning of needle 3, k1, ssk, knit to end. Round 2: Knit the stitches on needles 1 and 3 and work the established pattern stockinette stitch on either side of Chart C) on neede 2. Repeat thee2 rounds until you have 66 (74,82) sts remaining -17(19, 21) sts on neede 1, 33 (37,41) sts on needle 2, and 16 (18, 20) sts on needle 3. Foot: Continue working the established pattern on the instep stitches (needle 2)and stockinette stitchon the remaining stitches(needles 1 and 3) until fot measures approximately $1\%\,(2,2\%)^{\mathfrak{p}}$ less than the desired length. Toe: The toe is worked in stockinette stitch, except for the center 9 sts on needle 2. These stitches should be worked by continuing the center 9 sts (diamonds) of Chart C. If desired, place markers to indicate these 9sts. Round 1: Knit to 3 sts away from the end of needle 1. End k2tog, k1. Begin needle 2 with k1, ssk. Knit to the center9 sts, work the center of Char C, knit to the last 3 sts and end k2tog, k1. Begin needle 3 with k1, ssk. Knit to end of needle. Round 2: Knit the sts on needle 1. Knit to the center 9 sts, work the center of Chart C, knit to the end of needle 2. Knit the sts on needle 3. Repeat these two rounds until you have 26 sts remaining - 13 heel sts and 13 instep sts. Knit the heel sts onto one needle. Grat the toe closed using the Kitchener stitch. Weave in the ends. Make a second sock to match the first.


