Yokohama Shawl
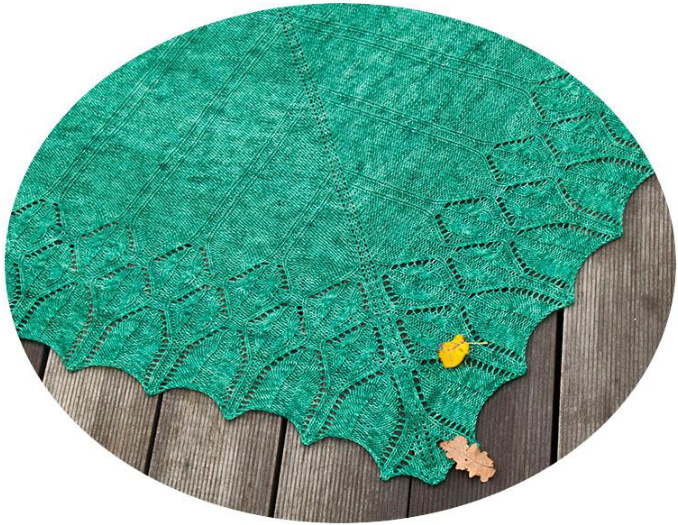
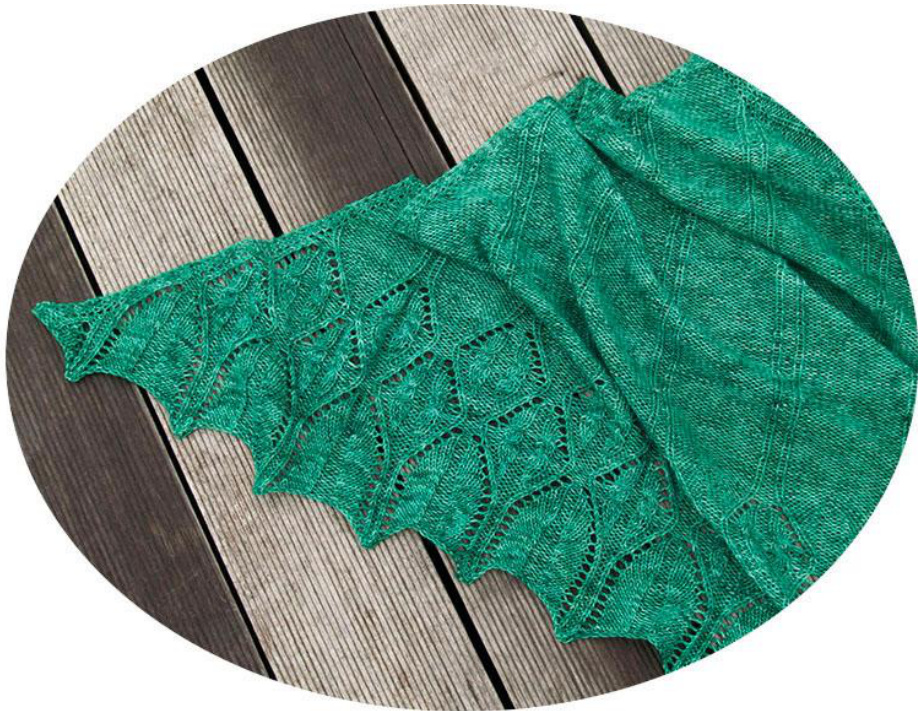
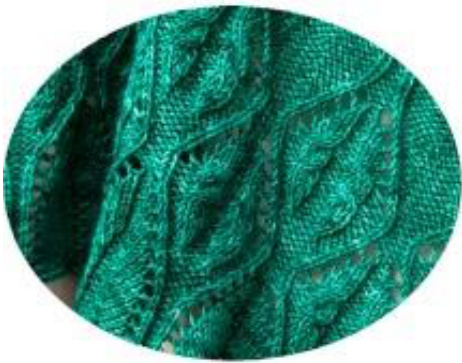
This shawl was inspired by the Japanese Magnolia tree just before the leaf buds open and the tree stands beautiful with long leafless branches carrying these incredibly beautiful tulip-like flowers. It's so beautiful... delicate but strong at the same time. These trees and flowers, for me, have always been a symbol of true love. The Japanese Magnolia tree can be found throughout Japan and also in and around Yokohama. And since I was born in Yokohama, this city has always had a very special place in my heart - therefore this shawl is named Yokohama Shawl . I've really enjoyed designing and knitting this shawl, and I hope you will enjoy knitting it as well.
Regarding the pattern:
I always recommend a quick read through of the whole pattern to get a bit familiar with it before casting on.
Materials needed:
Mosaic Moon Superwash Merino Sport in a solid or semisolid colour. Yardage needed: 1020 - 1100 meter (1115 - 1203 yards) Needles: 4.0 mm + 8.0 mm (the 8.0 mm needles are only used for the bind off). · 4 stitch markers for marking the border stitches and the center stitch. Optional but recommended: 24 additional stitch markers for marking the pattern repeats.
Please note!
The sample shawl was knitted using approximately 1020 meters (1115 yards). If you have a different gauge than mine, if you use a different yarn or a different needle size, then you may end up running out of yarn. So please make sure you have enough yarn available.
Gauge:
ockinette on needles size 4.0 mm, measured after washing and gentle blockin! (relaxed): 4 x 4 inches = 21 stitches x 32 rows. Caiiaoic notcriticnlhitndifforontaniiao ical - but a different gauge might impact on the amounts of yarn needed for tl Please also see "Helpful hints" on page 9 for my interpretation of gentle blocking of the gauge swatch.
Abbreviations:
st = stitch yo = yarn over sts = stitches k2tog = knit 2 together (right leaning decrease) RS = Right Side ssk = slip, slip, knit (left leaning decrease) ws = Wrong Side p2tog = purl 2 together pm = place marker ssp = slip, slip, purl together through back loop (also see k = knit (Helpful hints' on page 9) p = purl m1l = make 1 right (these are worked the same way on the WS as they are on the RS - please also see'Helpful hints' on page 9) m1r = make 1 left (these are worked the same way on the WS as they are on the RS - please alsc see 'Helpful hints' on page 9) 2/2 RC = Slip next 2 stitches to cable needle and place at back of work, k2, then k2 from cable needle. 2/2 LC = Slip next 2 stitches to cable needle and place at front of work, k2, then k2 from cable needle.
Measurements:
Finished sample shawl size after blocking: Length from neck down approximately 102 cm (40.2 inches). Width/wingspan approximately 203 cm (79.9 inches). Please use these measurements only as a guide - the finished size of your Yokohama Shawl might vary depending on gauge and yarns used for the shawl.
HOW TO READ THE INSTRUCTIONS
In the following description the sts between the border sts and the center sts are also named triangle sts. The instructions are the same for both sides/both triangular halves of the shawl, so when you knit this you simply repeat the same
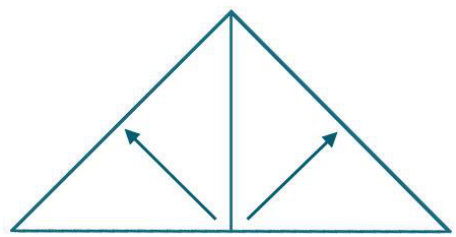
Knit the first 3 border sts, work the written/charted instructions for the first set of triangle sts, work the two center sts, then work the written charted instructions again for the next set of triangle sts., knit the last 3 border sts. All odd numbered rows in the pattern (both written instructions and charts) are RS rows, and all even numbered rows are ws rows.
Border and center sts:
There are 3 border stitches on each side of the shawl (6 border sts total) and 2 center sts. To keep the written instructions and the charts as simple as possible the instructions only includes the triangle stitches - and not the border sts + the center sts. Therefore: Please keep in mind to add the border sts and center sts when reading the charts and the writteninstructions. All border sts and center sts are knit on both RS and wS rows.
Shaping increases/increase rows:
I've always found that the shaping increases (m1 increases) are easier to make on knit rows instead of purl rows. And since the main part of this shawl is knit in reverse stockinette, I have 'moved' the shaping increases to the WS rows instead in two sections of the pattern mentioned below: "Section A - Setup". "Section B - Body". For the rest of the sections in the pattern the increase rows are all RS rows - with a couple of WS additions: · "Section C - Body to Border Transition". "Section D - Border Body" + additional shaping increases on WS row 12. "Section E - Border Edge" + additional shaping increases on WS row 12. In the charts the shaping increases are all marked with a light aqua colour, so that they are easy to identify.
INSTRUCTIONS
· Follow instructions/chart for "Cast on" and "Section A - Setup" once each. Follow instructions/chart for "Section B - Body" - work this section a total of 4 times. Follow instructions/chart for "Section C - Body to Border Transition" once. Follow instructions/chart for "Section D - Border Body" once. Follow instructions/chart for "Section E - Border Edge" once. Follow instructions for "Bind off".
BODY SECTIONS
Cast on:
Cast on is done via a garter tab. Cast on 3 stitches. Knit 12 rows. Turn knitted piece 90 degrees and pick up 6 sts in the garter ridges, turn knitted piece 90 degrees again and pick up an additional 3 sts in the cast on row. You should now have a total of 12 sts on the needles.
Section A - Setup (the triangle sts):
For charted version please follow instructions in chart "Section A - Setup". For written instructions please see below. Helpful hint: To help keep track of the center sts and border sts I recommend placing stitch markers for those while knitting first row of Section A. Row 1 (RS): Purl. Row 2 (WS): M1l, k2, M1r. Row 3: Purl. Row 4: M1l, k4, M1r. Row 5: Purl. Row 6: M1l, k6, M1r. Row 7: Purl. Row 8: M1l, k8, M1r. Row 9: Purl. Row 10: M1l, k10, M1r. Row 11: Purl. Row 12: M1l, k12, M1r. Row 13: Purl. Row 14: M1l, k14, M1r. Row 15: K, p14, k. Row 16: M1l, p, k14, p, M1r. Row 17: P, k, p14, k, p. Row 18: M1l, k, p, k14, p, k, M1r. Row 19: P2, k, p14, k, p2. Row 20: M1l, k2, p, k14, p, k2, M1r. Row 21: K, p2, k, p14, k, p2, k. Row 22: M1l, p, k2, p, k14, p, k2, p, M1r.
Section B - Body (the triangle sts):
For charted version please follow instructions in chart "Section B - Body". For written instructions please see below. The pattern repeats are marked with \* \*. Row 1 (RS): P, k, p, \*p, k, p14, k, p ; work from \*, p, k, p. Yokohama Shawl by Ann Thomsen, copyright 2014, allrights reserved. For personal use only. Version 1.0, December 2014. Row 2 (WS): M1l, k, p, k, \*k, p, k14, p, k; work from \*, k, p, k, M1r. Row 3: P2, k, p, \*p, k, p14, k, p ; work from \*, p, k, p2. Row 4: M1l, k2, p, k, \*k, p, k14, p, k ; work from \*, k, p, k2, M1r. Row 5: P3, k, p, \*p, k, p14, k, p ; work from \*, p, k, p3. Row 6: M1l, k3, p, k, \*k, p, k14, p, k ; work from \*, k, p, k3, M1r. Row 7: P4, k, p, \*p, k, p14, k, p ; work from \*, p, k, p4. Row 8: M1l, k4, p, k, \*k, p, k14, p, k ; work from \*, k, p, k4, M1r. Row 9: P5, k, p, \*p, k, p14, k, p ; work from \*, p, k, p5. Row 10: M1l, k5, p, k, \*k, p, k14, p, k ; work from \*, k, p, k5, M1r. Row 11: P6, k, p, \*p, k, p14, k, p ; work from \*, p, k, p6. Row 12: M1l, k6, p, k, \*k, p, k14, p, k ; work from \*, k, p, k6, M1r. Row 13: P7, k, p, \*p, k, p14, k, p ; work from \*, p, k, p7. Row 14: M1l, k7, p, k, \*k, p, k14, p, k ; work from \*, k, p, k7, M1r. Row 15: P8, k, p, \*p, k, p14, k, p ; work from \*, p, k, p8. Row 16: M1l, k8, p, k, \*k, p, k14, p, k ; work from \*, k, p, k8, M1r. Row 17: P9, k, p, \*p, k, p14, k, p ; work from \*, p, k, p9. Row 18: M1l, k9, p, k, \*k, p, k14, p, k ; work from \*, k, p, k9, M1r. Row 19: P10, k, p, \*p, k, p14, k, p ; work from \*, p, k, p10. Row 20: M1l, k10, p, k, \*k, p, k14, p, k; work from \*, k, p, k10, M1r. Row 21: P11, k, p, \*p, k, p14, k, p ; work from \*, p, k, p11. Row 22: M1l, k11, p, k, \*k, p, k14, p, k ; work from \*, k, p, k11, M1r. Row 23: P12, k, p, \*p, k, p14, k, p ; work from \*, p, k, p12. Row 24: M1l, ki2, p, k, \*k, p, ki4, p, k ; work from \*, k, p, k12, M1r. Row 25: P13, k, p, \*p, k, p14, k, p ; work from \*, p, k, p13. Row 26: M1l, k13, p, k, \*k, p, k14, p, k ; work from \*, k, p, k13, M1r. Row 27: P14, k, p, \*p, k, p14, k, p ; work from \*, p, k, p14. Row 28: M1l, k14, p, k, \*k, p, k14, p, k ; work from \*, k, p, k14, M1r. Row 29: K, p14, k, p, \*p, k, p14, k, p ; work from \*, p, k, p14, k. Row 30: M1l, p, k14, p, k, \*k, p, k14, p, k ; work from \*, k, p, k14, p, M1 Row 31: P, k, p14, k, p, \*p, k, p14, k, p ; work from \*, p, k, p14, k, p. Row 32: M1l, k, p, k14, p, k, \*k, p, k14, p, k ; work from \*, k, p, k14, p, l Row 33: P2, k, p14, k, p, \*p, k, p14, k, p ; work from \*, p, k, p14, k, p2. Row 34: Mil, k2, p, k14, p, k, \*k, p, k14, p, k ; work from \*, k, p, ki4, p, Row 35: K, p2, k, p14, k, p, \*p, k, p14, k, p ; work from \*, p, k, p14, k, p Row 36: M1l, p, k2, p, k14, p, k, \*k, p, k14, p, k ; work from \*, k, p, k14,
BORDER SECTIONS
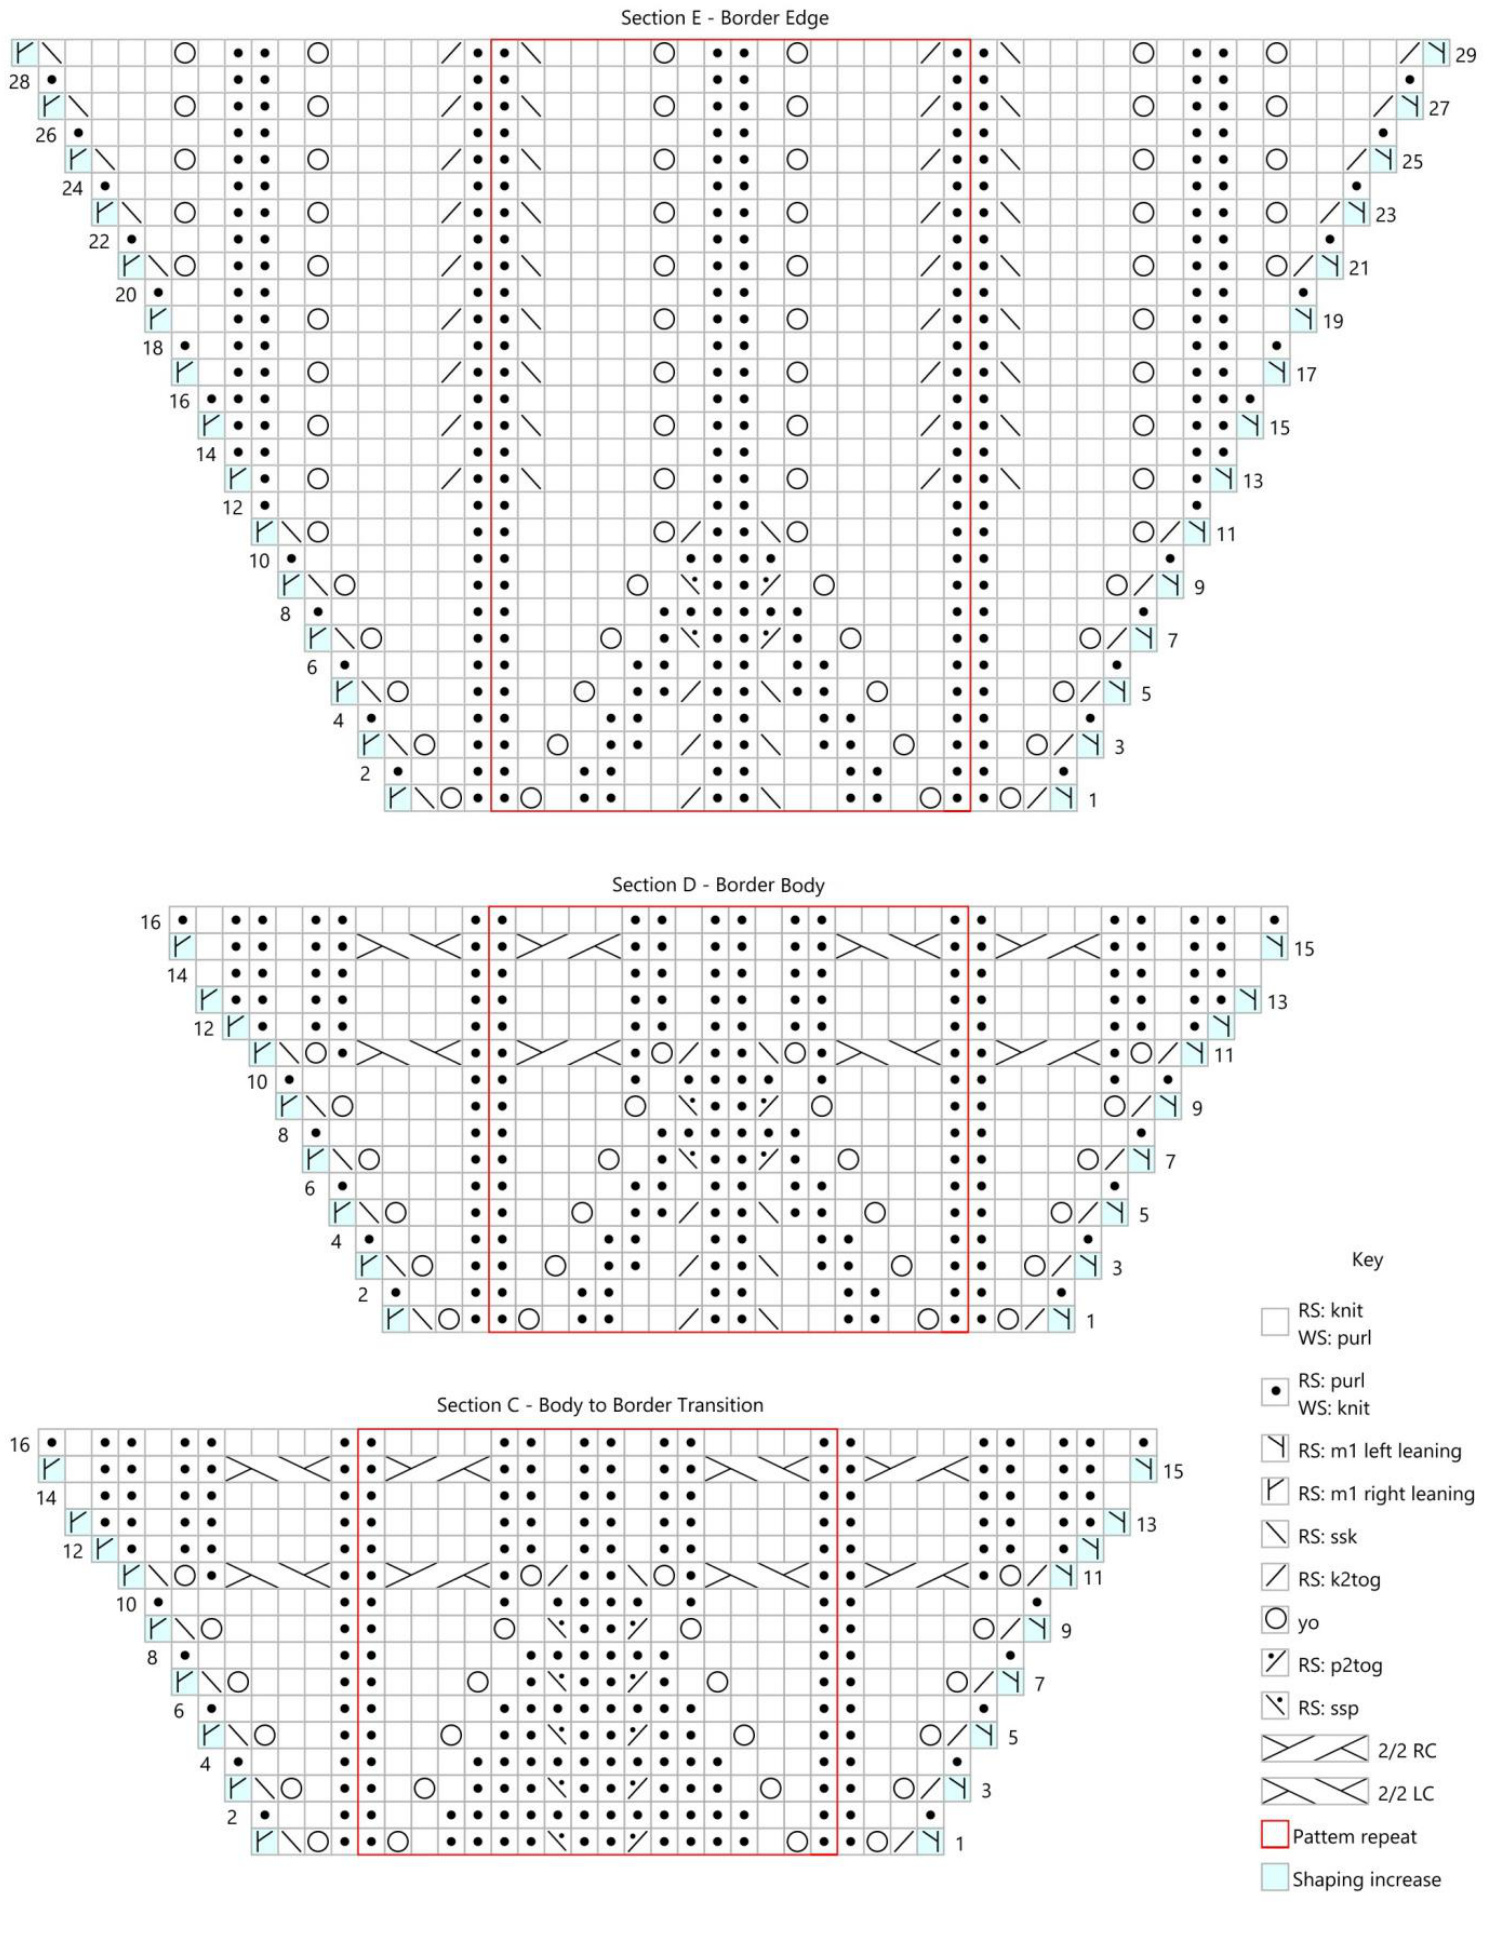
ction C - Body to Border Transition (the triangle sts)
For charted version please follow instructions in chart "Section D - Body to Border Transition". For written instructions please see below. The pattern repeats are marked with \* \*. Row 1 (RS): M1l, k2tog, yo, p, \*p, yo, k, p4, p2tog, p2, ssp, p4, k, yo, p ; work from \*, p, yo, ssk, m1r. Row 2 (WS): K, p2, k, \*k, p2, k12, p2, k ; work from \*, k, p2, k. Row 3: M1l, k2tog, yo, k, p, \*p, k, yo, k, p3, p2tog, p2, ssp, p3, k, yo, k, p ; work from \*, p, k, yo, ssk, m1r. Row 4: K, p3, k, \*k, p3, k10, p3, k; work from \*, k, p3, k. Row 5: M1i, k2tog, yo, k2, p, \*p, k2, yo, k, p2, p2tog, p2, ssp, p2, k, yo, k2, p ; work from \*, p, k2, yo, ssk, m1r. Row 6: K, p4, k, \*k, p4, k8, p4, k ; work from \*, k, p4, k. Row 7: M1l, k2tog, yo, k3, p, \*p, k3, yo, k, p, p2tog, p2, ssp, p, k, yo, k3, p ; work from \*, p, k3, yo ssk, m1r. Yokohama Shawl hv Ann Thomsen. convriaht 2014. allriahts reserved. For nersonal use onlv. Version 1.0. Decemher 2014. Row 8: K, p5, k, \*k, p5, k6, p5, k; work from \*, k, p5, k. Row 9: M1l, k2tog, yo, k4, p, \*p, k4, yo, k, p2tog, p2, ssp, k, yo, k4, p ; work from \*, p, k4, yo, ssk, m1r. Row 10: K, p6, k, \*k, p4, k, p, k4, p, k, p4, k ; work from \*, k, p6, k. Row 11: M1l, k2tog, yo, p, 2/2 RC, p, \*p, 2/2 LC, p, yo, ssk, p2, k2tog, yo, p, 2/2 RC, p ; work from \*, p, 2/2 LC, P, yo, ssk, m1r. Row 12: Mii, k, p, k2, p4, k, \*k, p4, (k2, p) x 2, k2, p4, k ; work from \*, k, p4, k2, p, k, M1r. Row 13: M1l, p2, k, p2, k4, p, \*p, k4, (p2, k)x 2, p2, k4, P ; work from \*, p, k4, p2, k, p2, m1r. Row 14: (P, k2) x 2, p4, k, \*k, p4, (k2, p) × 2, k2, p4, k ; work from \*, k, p4, (k2, p) x 2. Row 15: Mil, (k, p2) × 2, 2/2 RC, p, \*p, 2/2 LC, (p2, k) × 2, p2, 2/2 RC, p ; work from \*, p, 2/2 LC, (p2, k) x 2, m1r. Row 16: K, (p, k2) x 2, p4, k, \*k, p4, (k2, p) x 2, k2, p4, k ; work from \*, k, p4, (k2, p) x 2, k.
Section D - Border Body (the triangle sts):
For charted version please follow instructions in chart "Section D - Border Body" For written instructions please see below. The pattern repeats are marked with \* \*. Row 1 (Rs): M1l, k2tog, yo, p, \*p, yo, k, p2, k2, ssk, p2, k2tog, k2, p2, k, yo, p ; work from \*, p, yo, ssk, m1r. Row 2 (ws): K, p2, k, \*k, p2, (k2, p3) x 2, k2, p2, k ; work from \*, k, p2, k. Row 3: M1l, k2tog, yo, k, p, \*p, k, yo, k, p2, k, ssk, p2, k2tog, k, p2, k, yo, k, p ; work from \*, p, k, yo, ssk, m1r. Row 4: K, p3, k, \*k, p3, (k2, p2) x 2, k2, p3, k ; work from \*, k, p3, k. Row 5: Mii, k2tog, yo, k2, p, \*p, k2, yo, k, p2, ssk, p2, k2tog, p2, k, yo, k2, p ; work from \*, p, k2, yo, ssk, m1r. Row 6: K, p4, k, \*k, p4, (k2, p) x 2, k2, p4, k; work from \*, k, p4, k. Row 7: Mii, k2tog, yo, k3, p, \*p, k3, yo, k, p, p2tog, p2, ssp, p, k, yo, k3, p ; work from \*, p, k3, yo, ssk, m1r. Row 8: K, p5, k, \*k, p5, k6, p5, k ; work from \*, k, p5, k. Row 9: M1l, k2tog, yo, k4, p, \*p, k4, yo, k, p2tog, p2, ssp, k, yo, k4, p ; work from \*, p, k4, yo, ssk, m1r. Row 10: K, p6, k, \*k, p4, k, p, k4, p, k, p4, k ; work from \*, k, p4, k, p, k. Row 11: M1i, k2tog, yo, p, 2/2 RC, p, \*p, 2/2 LC, p, yo, ssk, p2, k2tog, yo, p, 2/2 RC, p ; work from \* p, 2/2 LC, P, y0, ssk, m1r. Row 12: M1l, k, p, k2, p4, k, \*k, p4, (k2, p) x 2, k2, p4, k ; work from \*, k, p4, k2, p, k, M1r. Row 13: M1l, p2, k, p2, k4, p, \*p, k4, (p2, k) x 2, p2, k4, p ; work from \*, p, k4, p2, k, p2, m1 Row 14: (P, k2) x 2, p4, k, \*k, p4, (k2, p) x 2, k2, p4, k ; work from \*, k, p4, (k2, p) x 2. Row 15: M1l, (k, p2) × 2, 2/2 RC, p, \*p, 2/2 LC, (p2, k) × 2, p2, 2/2 RC, p ; work from \*, p, 2/2 LC. (p2, k) x 2, m1r. Row 16: K, (p, k2) x 2, p4, k, \*k, p4, (k2, p) x 2, k2, p4, k; work from \*, k, p4, (k2, p) x 2, k.
Section E - Border Edge (the triangle sts):
For charted version please follow instructions in chart "Section E - Border Edge" Forwritten instructions pleasesee below. The pattern repeats are marked with \* \*. Row 1 (Rs): M1l, k2tog, yo, p, \*p, yo, k, p2, k2, ssk, p2, k2tog, k2, p2, k, yo, p ; work from \*, p, yo, ssk, m1r. Row 2 (Ws): K, p2, k, \*k, p2, (k2, p3) x 2, k2, p2, k ; work from \*, k, p2, k. Row 3: M1l, k2tog, yo, k, p, \*p, k, yo, k, p2, k, ssk, p2, k2tog, k, p2, k, yo, k, p ; work from \*, p, k, yo, ssk, m1r. Yokohama Shawl by Ann Thomsen, copyright 2014, allrights reserved. For personal use only. Version 1.0, December 2014. Row 4: K, p3, k, \*k, p3, (k2, p2) x 2, k2, p3, k ; work from \*, k, p3, k. Row 5: M1i, k2tog, yo, k2, p, \*p, k2, yo, k, p2, ssk, p2, k2tog, p2, k, yo, k2, p ; work from \*, p, k2, yo, ssk, m1r. Row 6: K, p4, k, \*k, p4, (k2, p) x 2, k2, p4, k ; work from \*, k, p4, k. Row 7: Mii, k2tog, yo, k3, p, \*p, k3, yo, k, p, p2tog, p2, ssp, p, k, yo, k3, p ; work from \*, p, k3, yo, ssk, m1r. Row 8: K, p5, k, \*k, p5, k6, p5, k ; work from \*, k, p5, k. Row 9: M1i, k2tog, yo, k4, p, \*p, k4, yo, k, p2tog, p2, ssp, k, yo, k4, p ; work from \*, p, k4, yo, ssk, m1r. Row 10: K, p6, k, \*k, p6, k4, p6, k ; work from \*, k, p6, k. Row 11: M1i, k2tog, yo, k5, p, \*p, k5, yo, ssk, p2, k2tog, yo, k5, p ; work from \*, p, k5, yo, ssk, m1r. Row 12: K, p7, k, \*k, p7, k2, p7, k ; work from \*, k, p7, k. Row 13: M1l, p, k, yo, k4, ssk, p, \*p, k2tog, k4, yo, k, p2, k, yo, k4, ssk, p ; work from \*, p, k2tog, k4, yo, k, p, mir. Row 14: K2, p7, k, \*k, p7, k2, p7, k; work from \*, k, p7, k2. Row 15: M1l, p2, k, yo, k4, ssk, p, \*p, k2tog, k4, yo, k, p2, k, yo, k4, ssk, p ; work from \*, p, k2tog, k4, yo, k, p2, m1r. Row 16: K3, p7, k, \*k, p7, k2, p7, k ; work from \*, k, p7, k3. Row 17: Mil, k, p2, k, yo, k4, ssk, p, \*p, k2tog, k4, yo, k, p2, k, yo, k4, ssk, p ; work from \*, p, k2tog, k4, yo, k, p2, k, m1r. Row 18: K, p, k2, p7, k, \*k, p7, k2, p7, k ; work from \*, k, p7, k2, p, k. Row 19: M1l, k2, p2, k, yo, k4, ssk, p, \*p, k2tog, k4, yo, k, p2, k, yo, k4, ssk, p ; work from \*, p, k2tog, k4, yo, k, p2, k2, m1r. Row 20: K, p2, k2, p7, k, \*k, p7, k2, p7, k ; work from \*, k, p7, k2, p2, k. Row 21: M1il, k2tog, yo, k, p2, k, yo, k4, ssk, p, \*p, k2tog, k4, yo, k, p2, k, yo, k4, ssk, p ; work from \*, p, k2tog, k4, yo, k, p2, k, yo, ssk, m1r. Row 22: K, p3, k2, p7, k, \*k, p7, k2, p7, k ; work from \*, k, p7, k2, p3, k. Row 23: M1l, k2tog, k, yo, k, p2, k, yo, k4, ssk, p, \*p, k2tog, k4, yo, k, p2, k, yo, k4, ssk, p ; work from \*, p, k2tog, k4, yo, k, p2, k, yo, k, ssk, m1r. Row 24: K, p4, k2, p7, k, \*k, p7, k2, p7, k ; work from \*, k, p7, k2, p4, k. Row 25: M1il, k2tog, k2, yo, k, p2, k, yo, k4, ssk, p, \*p, k2tog, k4, yo, k, p2, k, yo, k4, ssk, p ; work from \*, p, k2tog, k4, yo, k, p2, k, yo, k2, ssk, m1r. Row 26: K, p5, k2, p7, k, \*k, p7, k2, p7, k; work from \*, k, p7, k2, p5, k. Row 27: M1l, k2tog, k3, yo, k, p2, k, yo, k4, ssk, p, \*p, k2tog, k4, yo, k, p2, k, yo, k4, ssk, p ; work from \*, p, k2tog, k4, yo, k, p2, k, yo, k3, ssk, m1r. Row 28: K, p6, k2, p7, k, \*k, p7, k2, p7, k ; work from \*, k, p7, k2, p6, k. Row 29: M1l, k2tog, k4, yo, k, p2, k, yo, k4, ssk, p, \*p, k2tog, k4, yo, k, p2, k, yo, k4, ssk, p ; work from \*, p, k2tog, k4, yo, k, p2, k, yo, k4, ssk, m1r.
Bind Off:
The bind off used is an ordinary chain bind off with knit sts. Bind off is done on the WS and must not be too tight - I therefore recommend using larger needles (size 8.0 mm) or maybe substituting with a stretchy bind off.
Ordinary chain bind off with knit sts:
K2, pass first st over second st, \*k, pass first st over second st; work from \* until end of row. Weaveinends. For hand knit shawls I always recommend blocking after washing. This pattern, llimages and text is copyrighted, allrights belongs to Ann Thomsen. You are not allowed to publish it in full nor parts of it without my written consent. You arenot allowed to translate itwithoutmywrittenconsent. You are however allowed to sell finished items knit after this pattern - I only kindly request that you give me proper credit for the design.
Yokohama Shawl by Ann Thomsen, copyright 2014, all rights reserved. For personal use only. Version 1.0, December 2014.
CHARTS (the triangle sts)
Please note: Al uuu iullueicu iuws ue llaits aie Io iuws lat aie icau ilu lyill tu iei. · All even numbered rows are ws rows that are read from left to right. Helpful hint: To help keep track of center sts and border sts I recommend placing stitch markers for thosewhileknittingfirstrowofSectionA.

Helpful hints:
My interpretation of gentle blocking of the gauge swatch:
When I start swatching for a pattern from other designers I always wonder if I'm blocking my gauge swatch in the same way and with the same blocking tension as the designer did, since differences in the blocking tension can have a huge impact on the finished size of a knitted garment for instance. The blocking tension is not equally as important when it comes to shawls, but I thought that it might still be helpful if I noted down a few words regarding how I blocked the gauge swatch for this shawl. I tend to block my handknit shawls quite heavily, but when it comes to blocking my gauge swatches for shawls it's a different story. I always wash my gauge swatches the same way, that I would wash the finished hand knit project, and while the swatch is still damp I gently stretch it in shape by gently pulling the corners and edges so that it ends up nice and flat. I don't pull too hard, but just enough to straighten the swatch. Then I pin it down and leave it to dry overnight. When it's dry I unpin it and count the stitches and rows. If you want to know a bit more about tension blocking, then I recommend reading this tutorial from HeartStrings FiberArts: Tips for tension blocking. Adjusting the size of the Yokohama Shawl: You can easily make this shawl smaller or larger than the size shown here in this pattern by adding or omitting repeats of "Section B - Body" - or adding/omitting repeats of "Section D - Border Body". This might also be helpful if you choose a yarn that's heavier or lighter than sport weight and want to compensate in size.
M1L and M1R increases:
These increases are probably my favorite kind of increases, but if you prefer something else, then I always recommend experimenting with different kind of increases and choosing the increase method that you like best. If you decide to use the M1L and M1R as recommended in my pattern, then there is an easy to follow photo tutorial on TwistCollective: Make 1 Left or Right (M1, M1L, M1R)
Purl decreases:
Some might find the purl decreases a bit difficult to do and especially the ssp decrease (slip, slip, purl through back loop). Techknitter has made an awesome tutorial on how to do these decreases: Purl decreases: p2tog, p2tbl, sp which might be helpful. For the ssp you should follow the instructions listed under the headline "LEFT LEANING (as seen from the front)".
Cabled knitting - without the cable needle:
The pattern contains a few cabled sections - I really love the look of cabled knitting, but I always found that the use of cable needles was quite fidgety and always ended up being somewhat frustrated about how time consuming it was for me to knit cables. By chance I stumbled across Grumperinas knitting blog and found a picture tutorial of how to do smaller cables without the use of a cable needle - and this is now how I knit smaller cables. I've never been frustrated about knitting cables since, even though I still think it's a bit fidgety, But it's manageable, and the end result is well worth the trouble, I think. Maybe you feel about cables the same way as I did and therefore I want to share with you the link to Grumperina's tutorials - maybe you will find it helpful too: Cabling without a cable needle


