This is not a pattern. This is a process to custom fit a glove to your hand. First, we'llbreak the glove down into four main parts: the cuff, the thumb increases, the hand, and the fingers. Next, you'll need to gather your "equipment," which consists of fingering weight yarn and a C or D hook. The hook size depends upon how tight/loose your gauge is, or how firm/pliant you'd like the finished fabric to be. (l used a 2.5mm hook.) You'll also need a yarn needle fine enough for weaving ends in. Also, and I cannot stress this enough, TAKE NOTES so that you can make a second glove to match or so that you can make yourself another set later on. The notes I took for my glove are included at the end of this document. You can use it as a guideline but, unless your hands are the same size as mine,I would not use it as a pattern. At several points in describing this process, I make references to the front of the glove and the back of the glove. This comes from the perspective of trying the glove on your right hand. If you are trying the glove on your left hand, you will need to reverse the terminology.
The Cuff:
The length of the cuff depends on how long of a cuff you like. Chain whatever length you would like, and work the cuff in sc blo—-crocheted rib. Work the cuff until it just goes around your wrist when you pull on it only slightly (maybe 1 to 1.5cm gap). You don't want to yank the cuff and stretch it out, and then end up with a glove that is too small. Slip stitch to seam the cuff together.
Thumb Increases (gusset):
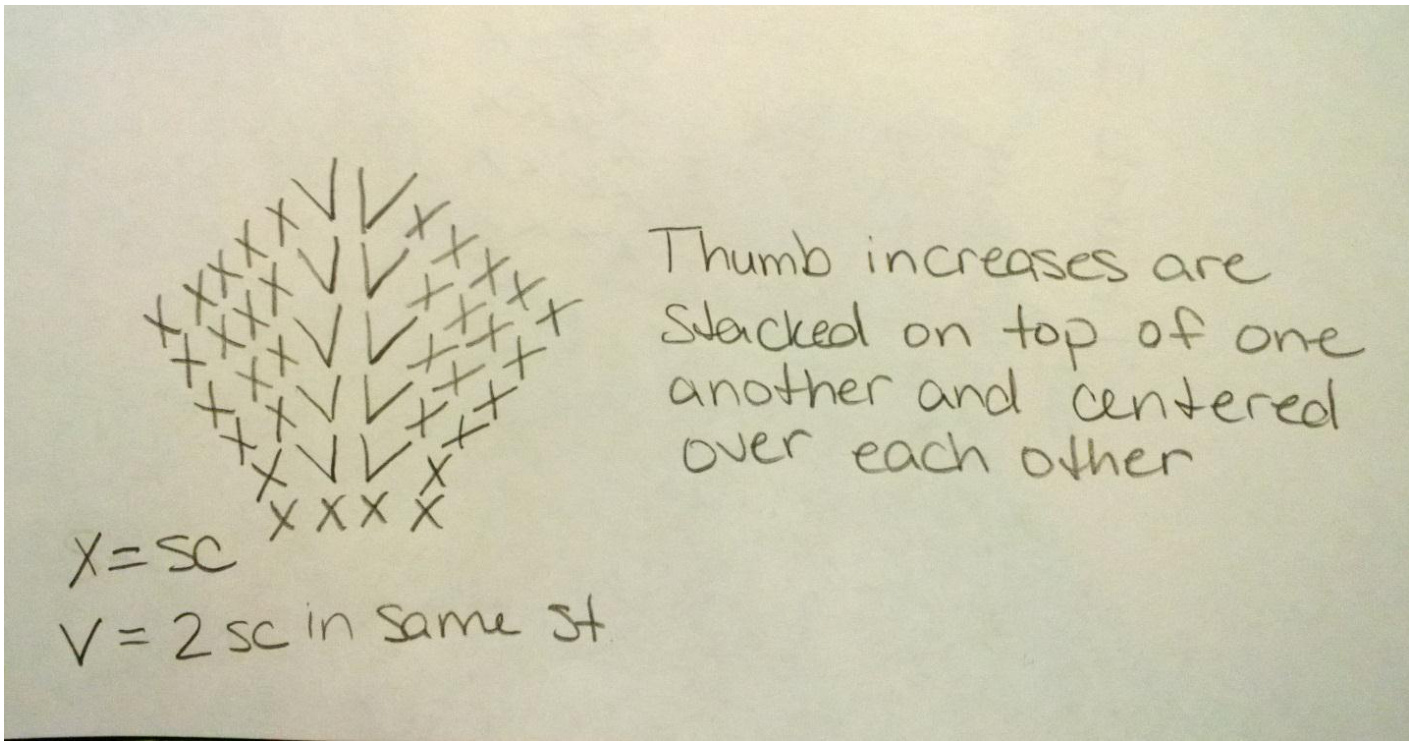
Work a round of sc evenly along the side of the cuff--one in each "hill" and one in each "valley" of your crocheted rib-the number of stitches in your round should equal the number of rows worked for your cuff. Depending on how close you want your thumb to the cuff, you can either start your thumb increases on the next round, or you can do a few more rounds of sc to space the thumb a bit farther from the cuff. If you like to work in the spiral rather than in the round to avoid the join "seam," you may do so... just make sure you keep track of your thumb increases! Hold your hand with the fingers extended. You see how the base of your thumb angles away from the rest of your hand? The thumb increases accommodate that. It is a simple increase, two (2 sc in next st) side by side each round, but the increases of the following rows are centered over the previous increase. See crudely handdrawn chart below. Work enough increases to go from the heel of your hand to that big bottom thumb joint (the number of increase rounds will vary depending on hand size). You will probably need to work a few more rounds without increases after that until you get to the "webbing" between your thumb and index finger.
Hand:
Once you get to that webbing area, you are going to have to chain a few to span the gap from the back of the glove to the front of the glove, and you are also going to have to skip a number of stitches to allow for the space your thumb will go through. Only you know what will work best, and it might take a tiny litle bit of trial and error. I would suggest chaining 3-5 stitches and eyeball how many stitches you need to skip (make sure that these skipped stitches are more or less centered over your gusset increases from before). Sc in that next stitch, and then sc around the bigger hole, skipping the thumb hole, and sc'ing in the back loop of each of the chains that created the thumb hole.
KEEP TRYING ONTHE GLOVE TOGETTHEREST OF THE FINGER HOLES RIGHT
Continue to sc in the spiral until you get to the next finger, which should be the pinky hole, and this time you want to make your chain so that it joins from the front of the glove to the back (it'll be easier to continue working in the spiral). For the pinky hole, you may only want to chain 3—again, depending on hand size. Skip the number of stitches that seems right when you eyeball it, sc in the next stitch, and continue to sc in the spiral (and 1 sc in the back loop of each "pinky chain") until you get to the spaces between your remaining 3 fingers, which should be at about the same level.
Fingers:
This is where it's going to seem a little funny, because at this point we still have not cut the yarn (I like to avoid weaving in ends wherever possible). If your next chain is going to be between the middle and index finger, make it from the back of the glove to the front. If it's between the middle finger and the ring finger, have it go from the front to the back. Whichever way you end up doing, the middle finger is going to be the first finger you do (hence the funny—because yes, I'm apparently 12 years old). Sc in the spiral until you're 2 rounds from the fingertip, then sc2tog in the spiral until the opening is too small to bother with. Cut yarn, leaving a good long tail-this will be used to close any remaining hole and to weave in. (Alternatively, only do the fingers for 5-8 rounds to make half-fingered mitts.) To do the rest of the fingers, you'll have to join yarn at the base of the finger, and sc around in the spiral, similar to the middle finger. When you come to the "corner" of the finger (where the chain that created the finger divide meets the rest of the stitches), you will need to sc2tog. Otherwise, the finger will most likely be too loose and floppy. After you've done your first round or two of sc, try the glove on to make sure the finger opening isn't too tight. If it is, rip back to your first round and increase in one or two places (or undo a "corner" decrease) to loosen the opening. Now, to save yourself some end weaving, you can always sc over the tail of the yarn where you joined, but I do caution you to keep this tail LoosE, otherwise the finger can seem tight when really there are plenty of stitches there, and if you increase when it's not necessary, your glove will have big, puffy fingers. Turn the glove inside out and weave in the ends. Note: I found when I made these gloves that all of the fingers except the pinky required decreases at the "corners." On my glove, the pinky was tight enough without the decreases, but the ring, index finger and thumb each required two decreases, and the middle finger got 4.. all decreases correspond with the number of "corners," and yes, this will make sense when you're making the glove. Do all that one more time, and you have a pair of gloves. Yes, they're very simple and no-frills and not terribly decorative, but they should get the job done. Also, if you buy some conductive thread and work it into the fingertips, you'll be able to work your smart phone or other touch screen device without taking your gloves off! If you are feeling adventurous, you can use two colors of yarn to create the illusion of a certain hand shape in order to be more... expressive. · Islander or surfer relocated to colder climates? Do the cuff, hand, pinky and thumb in MC and index, middle and ring fingers in CC to tell people, "Hang Loose!" · Try the cuff, hand, index finger and pinky in MC and thumb, middle and ring fingers in CC and "Rock on." · Do the cuff, hand, thumb, index finger and pinky in MC and middle/ring fingers in CC and wordlessly tell people,"I loveyou." · Feeling grumpy? Do the cuff, hand and middle finger in MC and all other fingers in CC, and folks should get the picture. · Any flower children? Do the cuff, hand, index and middle fingers in MC and all other fingers in CC to tell people, "Peace!" (Or for folks of a more British/Aussie persuasion, send a different message altogether.) Mix and match. Have fun! This glove process should also be easy enough to adapt in the event that a person has missing/extra/webbed/joined fingers. Just make sure to keep trying the glove on to ensure that custom fit.
Thumb Increase Chart:
My notes: I used Knit Picks Chroma Fingering and a 2.5mm crochet hook. I would guess my hands are approximately ladies medium. You will need to keep trying on your glove as you make it to see what will work best for your hand, but if you'd like an idea of how I did mine, here are some notes. This is not written out as a pattern, but it's all sc and pretty straightforward, so I'm hoping it will be easy to follow. Ch 21 (I like a deep cuff) ·Sc blo for 40 rows, sl st to seam Sc 3 rounds in the spiral (you can do joined rounds if you want, but you'll get that seam) ·Thumb increases (as per the chart) for 7 rounds ·Sc for 9 rounds. ·Ch 5 and sk 12 sts (making the thumb hole) ·Sc for 9 rounds Ch 3 and sk 9 sts (making pinky hole) Sc for not quite 2 rounds Ch 3 and sk 13 sts (making index finger hole) ·Sc 7 sts ·Ch 3 and sk 13 sts (dividing the middle and ring finger) Work fingers as described above


