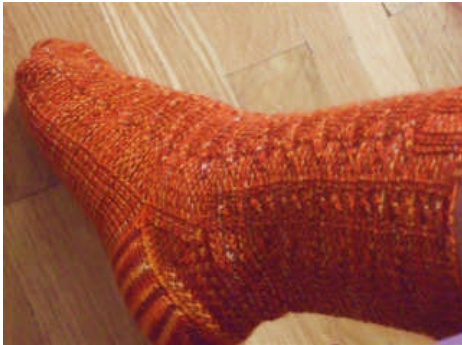
Size: Women's Medium to Large $\mathrm{(Cuff}\,{=}\,8^{\circ})$ Materials: Yarn Ahoy Merino Tencel Sock Yarn (shown here in Rustilicious), 1 skein Gauge: 8 to 8.5 stitches per inch Needle Size: US 1.5 / 2.50 mm
Fuego Socks By: Rosi
Abbreviations
k: knit k2tog: knit two stitches together M1L: make 1 left M1R: make 1 right p: purl p2tog: purl two stitches together RS: right side Sl: slip 1 stitch as if to knit Ssk: slip 2 stitches as if to knit, knit both stitches through back loop sts: stitches WS: wrong side
Pattern
Begin toe:
Using Magic Cast On (Google it if youre unsure),cast on 12 sts on each needle (24 sts total). Knit one row. Row 1: (k1, M1L, knit across to last stitch, M1R, k1) twice. Row 2: knit all sts. Repeat Rows 2 and 3 until you have 32 sts on each needle (64 sts total).
Begin knitting in the round:
With the knit side facing you, knit 16 stithes. M. Knit across the remaining stitches. This is Needle 1 - top of foot. Next, unzip your provisional cast on and place the stitches on your needle. This is Needle 2 - bottom of foot. You now have 65 stitches, (33, 32)
Begin Foot:
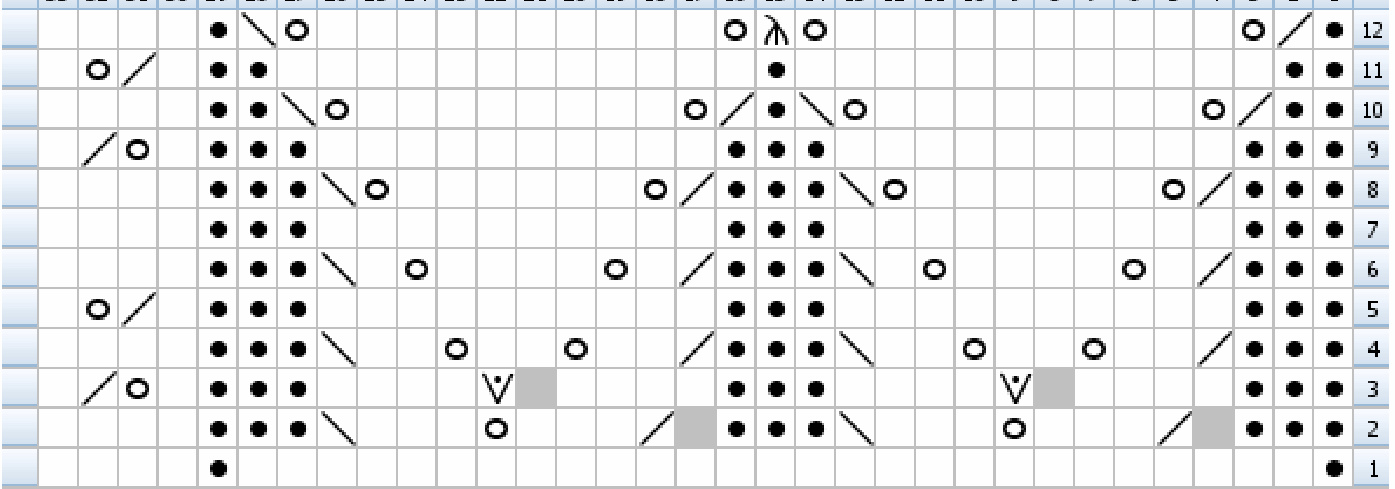
Work Chart 1 of pattern on needle 1 (top of foot) as you continue stockinette stitch on needle 2 (sole stitches. Continue knitting on 65 stitches until your sock reaches the point where your leg connects to your foot, ending with Row 12. If desired, knit for an additional one-half inch to allow for ease. I started the heel after 7 repeats for my $10.5^{\circ}$ foot.) Try to end with last row of chart. You should be ready for the heel on the next row with the WS facing.
Begin Heel:
NOTE: Heel is worked in rows on 32 stitches of Needle 2. Heel Flap Pattern: Row 1: Slip 1, purl across Row 2: Slip 1, knit across Work in heel flap pattern until you have 32 heel flap rows. End with a knit row.
Turn Heel as Follows:
Row 1: S11, p17, p2tog, p1, turn. Row 2: S1 1, k5, ssk, k1, turn Row3: Sl1, purlto gap, ptog (pur together the stitchbeore th ap and the stitch afe the gap),, t Row 4: Sl1, knit togap, ssk (knit tgether the stitch before the gap and the stitch after the gap),k1, tun Repeat rows 3 and 4 until 18 sts remain. End after a knit row.
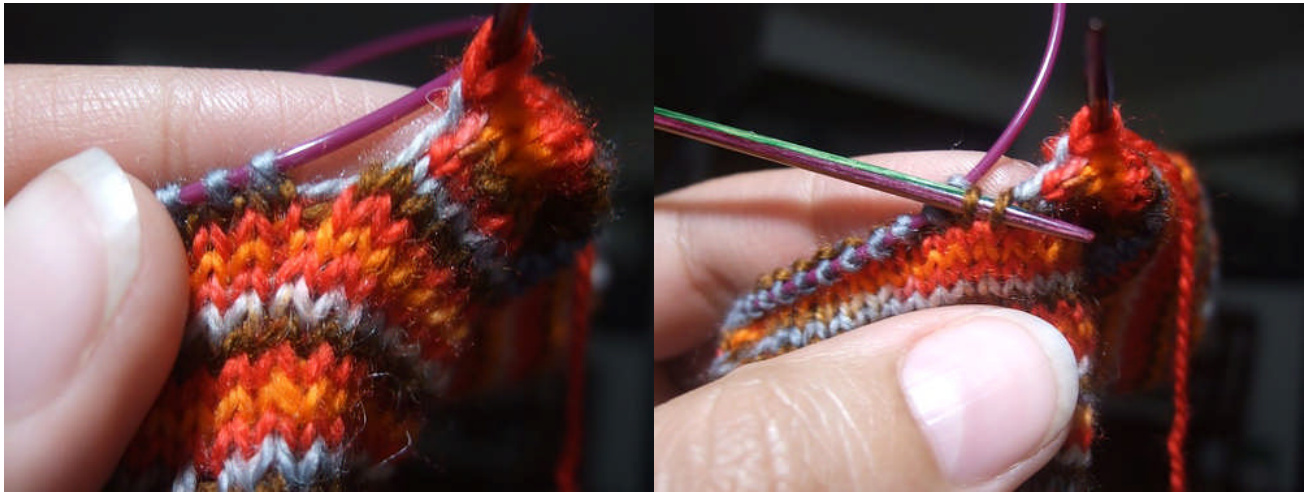
Gusset:
With right sie facing, pickup and knit 8 stitches from the lft sieof theheel flap pusknit ne sthn the gusset corner (see Picture 1). Knit in pattern across needle 1. Pick up one stitch in the other gusset corner and 18 stitches from the right side of the heel flap. Knit these stitches. Knit the remaining stitches on needle 2 and knit in pattern across needle 1. Rearrange stitches so that you have the first 29 sts of Chart 2 on Needle 1 and 59 sts on needle 2.
Picture 1
Gusset Decreases and Heel Back Patterning:
Follow this Heel Pattern on Needle 2 sts only during the Gusset Decrease rounds: Rnd 1: k1, yo, k2tog, knit to last 5 sts, k2tog, yo, k2tog, k1. Rnds 2, 4 and 6: knit across. Rnd 3: k1, k2 tog, yo, ssk, knit to last 5 sts, k2tog, k2tog, yo, k1. Rnd 5: k3, ssk, knit to last 5 sts, k2tog, k3. Rnd 1 of Gusset Decreases: Needle 1: Work next row of chart pattern. Needle 2: Work Rnd 1 of heel pattern. Rnd 2 of Gusset Decreases: Needle 1: Work next row of chart pattern. Needle 2: Work next rnd of heel pattern. Repeat round 2 until you have returned to your original stitch count of 65. Transfer sts as necessary so that you have returned to your original stitch placement. (33, 32)
Begin Sock Leg and Rib:
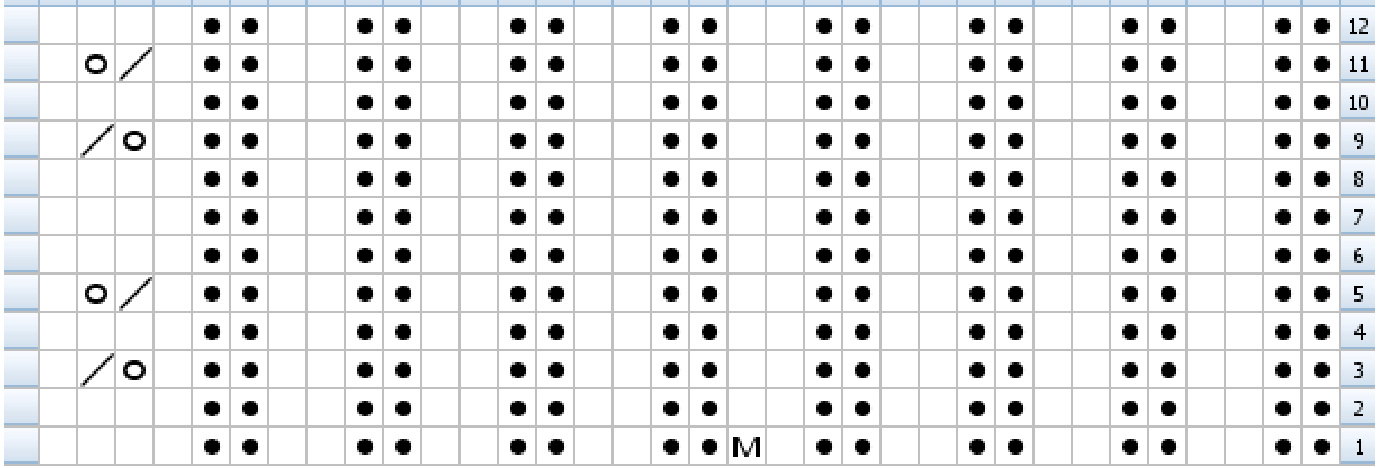
Next Rnd: Work Row 1 of Chart 2 across needle 1; on needle 2 - k16, M1, k16. Stitches total 66. Note: you may have to move some stitches around your needles to make following the chart to knit the leg a bit morecomfortable. Repeat Chart 2 until desired leg height, ending with Row 12. Work Chart 3 for ribbing twice. Cast off loosely - preferably using Elizabeth Zimmerman's sewn cast off. Copyright $\copyright$ Rosi Garmendia, 2007. All rights reserved. For private, non-commercial use only. www.rosi-g.com/soapyknitter 33323130292827 26|252423 22212019 18 1716151413 12 11 10 9 876 5 4 3 2 1
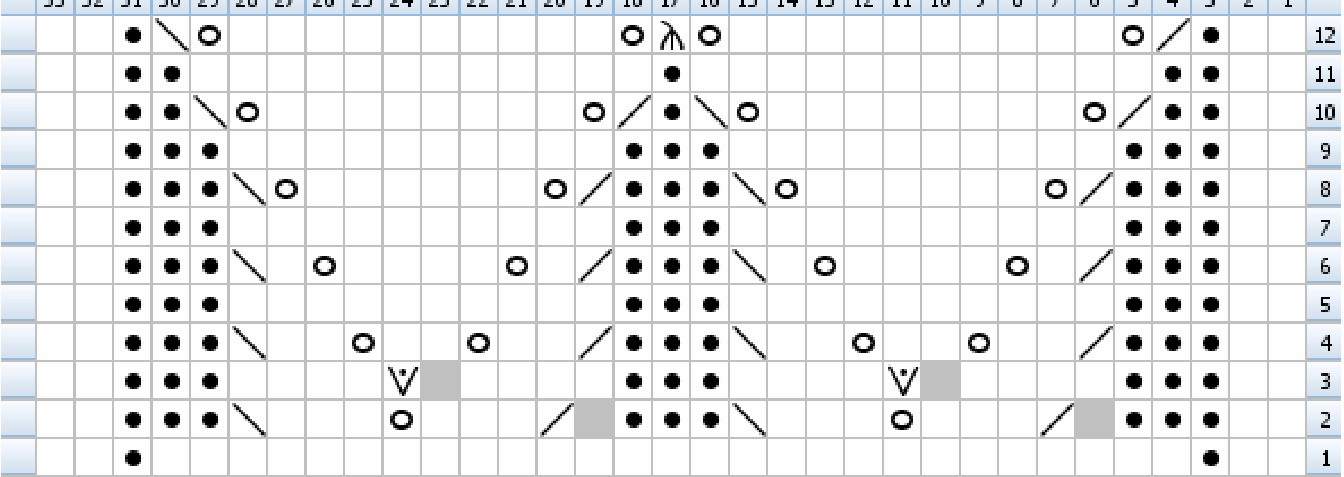
Legend:

knit knit stitch

purl
purl stitch

No Stitch
Placeholder - No stitch made. k2tog Knit two stitches together as one stitch yo Yarn Over

ssk
Slip one stitch as if to knit, Slip another stitch as if to knit. Insert left-hand needle into front of these 2 stitches and knit them together

(p1 k1) in 1 st purl and knit in the yarn over below to make 2 sts from 1
sl1 k2tog psso
slip 1, k2tog, pass slip stitch over K2tog Created in Knit Visualizer (www .knitfoundry.com)
Notes:
Chart 2: For Leg
[33323130292827 2625242322212019181716151413 1211109 654321
Legend:
purl
purl stitch

knit
knit stitch

No Stitch
Placeholder - No stitch made.
k2tog
Knit two stitches together as one stitch yo Yarn Over

ssk
Slip one stitch as if to knit, Slip anther stith as if to knit. Insert left-hand needle into front f these 2 stitches and knit them together

(p1 k1) in 1 st
knit, purl and knit again all in the same st to make 3 sts from 1
sl1 k2tog psso
slip 1, k2tog, pass slip stitch over K2tog Created in Knit Visualizer (www.knitfoundry.com)
Chart 3: Ribbing
34333231302928 2726252423222120 19 18 1716151413121110 9 8 76 5 4 3 2 1
Legend:
purl stitch
purl

knit knit stitch
make one
MMalke one by lifting strand in between stitch just worked and the next stitch, knit into back of this thread.
yo Yarn Over
k2tog Knit two stitches together as one stitch
Created in Knit Visualizer (www.knitfoundry.com)


