"Cireularity"
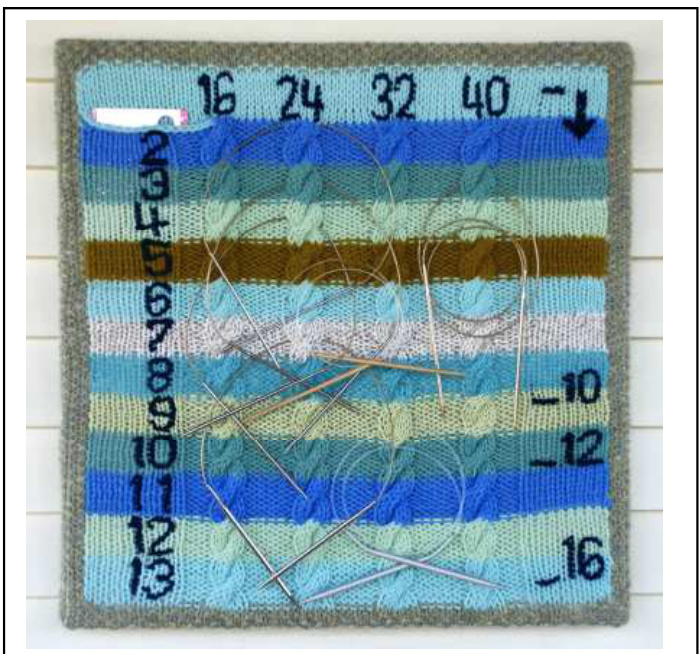
Circular Kpitting Needle Orgapizer Untangle your knitting world with this functional and artful hanging needle organizer. It sorts your circulars by length (on vertical cables) and needle size (on horizontal stripes).
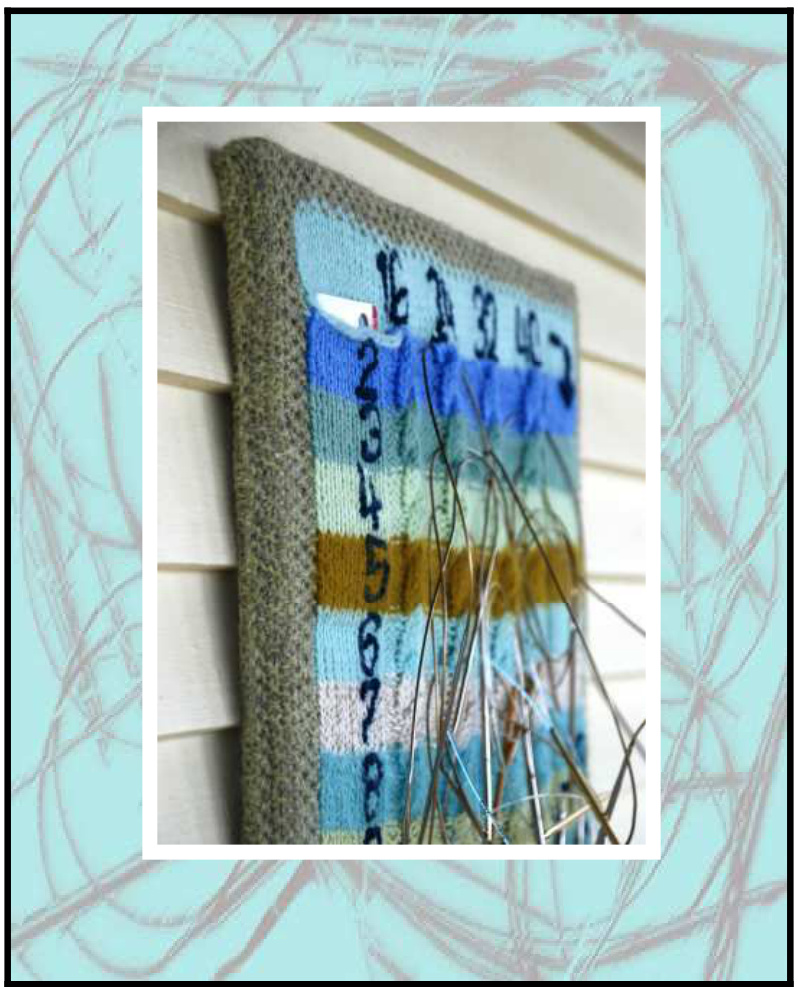
Never again waste time or money due to “lost" circular needles. 9 Keeps your circulars (and you!) nice and relaxed, ready to go to work without kinks or twists. g Needle sizes are embroidered in each stripe along the left edge. Needle lengths are embroidered above each cable. 9 Includes a pocket for your needle sizer. 9 A handy length gauge along the right edge helps you quickly check the approximate length of your circular needles, for easy sorting. The organizer can be knitted of small leftover quantities of your favorite yarns. CUSTOMIZE IT Make as many vertical Rope Cables as needed to match the variety of lengths in your circular needle collection. Make as many stripes as you have circular needle sizes. Make the stripes wider (that is, more rows) if you have many needles in each size / length category. Also described here are options for the embroidery and ways to hang the organizer, which may impact your knitting, so read through the pattern before casting on!
FINISHED MEASUREMENTS: For 12 needle sizes (organized on 1.25 inch [3.2 cmJ stripes) in 4 lengths: 18.5 “h x 18 “w [47 cm h $x$ 46 cm w]. GAUGE: 14 stitches / 24 rows $=\,\cdot$ 4 inches [10 cmJin stockinete stitch, lightly blocked. (Gauge is not critical for this project.)
MATERIALS and TOOLS:
. Yarn: 400 to 450 yards [365 m to 410 m/total, in up to 14 colors. (Each stripe takes approximately 25 yards [23 m] of yarn.) Key: Border: “"Color B"; Stripes: "Color I", “"Color 2", etc.. up to “"Color 13"; Embroidered numbers: “Color E" 3/4" [19 mm] square wood strips: 73 inches [186 cm]total, 2 pieces cut 18 " [46 cm] wide for top and bottom, and 2 pieces cut 17 inches [47 cmJ long for the sides. Sand them and clean of dust. Size 7 [4.5 mm] knitting needles Tapestry needle Power drill, drill bit, 4 wood screws. Woven fabric to cover the stretcher frame Staple gun and 1/4 inch [6 mm] staples .Fishline or narrow ribbon for hanging . Screw eyes, pliers
GLOSSARY:
BO: Bind Off CO: Cast on K: Knit P: Purl Purlwise: Slip the loop from the left needle to the right as though to purl. RS:Right side Seed Stitch: Alternate K and P, placing a K on a P, and a P on a K St St: Stockinette Stitch: K on right side, P on wrong side WS: Wrong side
ROPE CABLE PATTERN:
: Row 1, 3 (RS): K9, P3, K6, P6, K6, P6, K6, P6, K6, P3, K9 : Row 2, 4, 6 (WS): P9, K3, P6, K6, P6, K6, P6, K6, P6, K3, P9 :Row 5: K9, P3, \*place 3 stitches (purlwise) on cable needle to back, K3, K3 off cable needle, $\mathsf{P6}^{\ast\ast}$ , Repeat from \* to \*\* twice, place 3 stitches (purlwise) on cable needle to back, K3, K3 off cable needle, P3, K9.
DIRECTIONS
Lower border: In color B, CO 84. Rows 1- 9: Seed Stitch Side borders, horizontal stripes and vertical cables: Rows 10 - 17: Seed Stitch in Color B for first 9 stitches; Rope Cable Pattern (see below) in Color 1 until the last nine stitches; Seed Stitch in Color B for last 9 stitches. Continue adding additional 8-row stripes of varying colors in Rope Cable Pattern, maintaining Seed Stitch Border as above, until you have completed 11 stripes. Pocket Lining: (Sized for my Susan Bates needle sizer, which measures 5.5" x 3" [14 cm x 8.3cmJ.) Knit separately before knitting the top stripe: In Color 13, CO 17. Knit 5.5 inches [14 cmJ in stockinette stitch, finishing with a right side row. Leave the stitches on the needle or on a stitch holder
Pocket Stripe:
With Color 13, add the top 8-row stripe, this time in plain St St, inserting a pocket as follows: RS: Seed stitch border in Color B for first 9 stitches; With Color 13, K 60, BO 15, Kl; seed stitch border in Color B for last 9 stitches. WS: Seed stitch border in Color B for first 9 stitches, lay the lining on top of the work and in Color 13 purl together the first stitch before the BO with the first stitch of the lining. Purl across 15 stitches of the pocket lining, until one stitch is left, then purl this stitch together with the first stitch after the BO. Purl the rest of the row in Color 13; seed stitch border in Color B for last 9 stitches. Complete the stripe with a total of 8 rows of st. st., maintaining seed stitch border. Top Border: Seed stitch border in Color B for 9 rows; BO.
EMBROIDER THE NUMBERS:
Maybe I'm not typical, but I find it challenging to accomplish nice-looking embroidery on handknit fabric. Duplicate stitch is an option for this design, but for the dimensions as written, it takes up too much room. However it would work fine if you make the stripes with more rows. For this design I used a technique which creates a homespun font. In the number grids below, each box represents one vertical bar (half of a stitch) in stockinette stitch. For the arrow, use duplicate stitch to embroider the shaft, and freeform an arrow head. Wait to embroider the measuring guide lines and numbers until after the organizer is on the stretcher frame, since you won't know the distances until then.

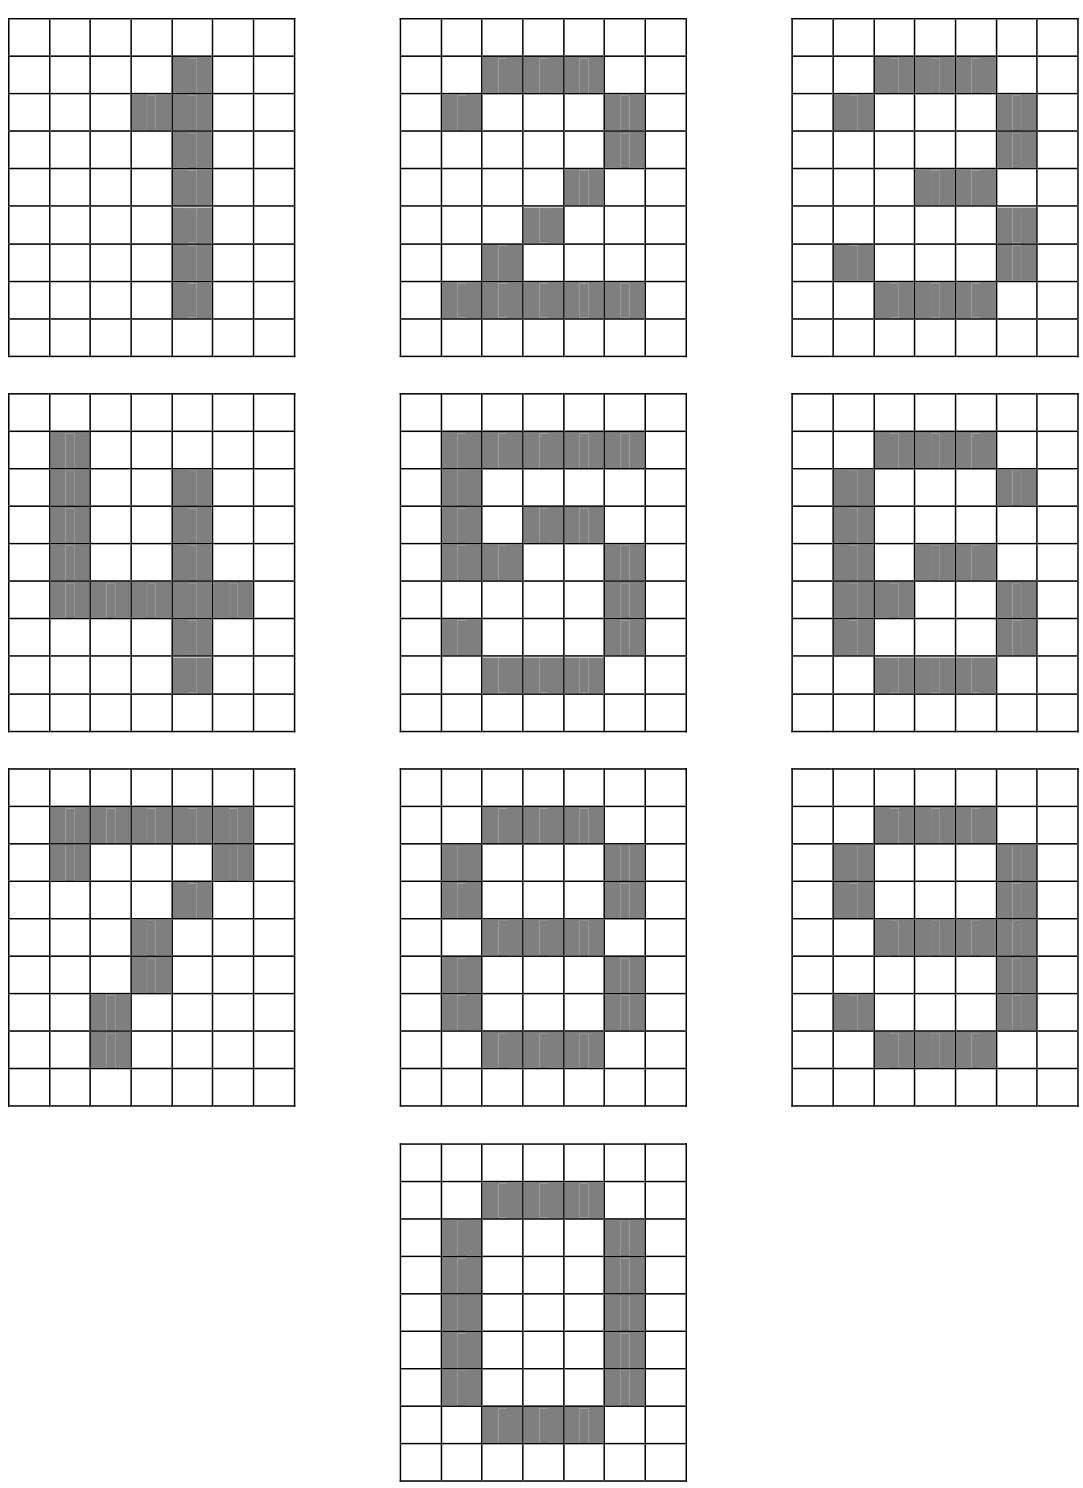
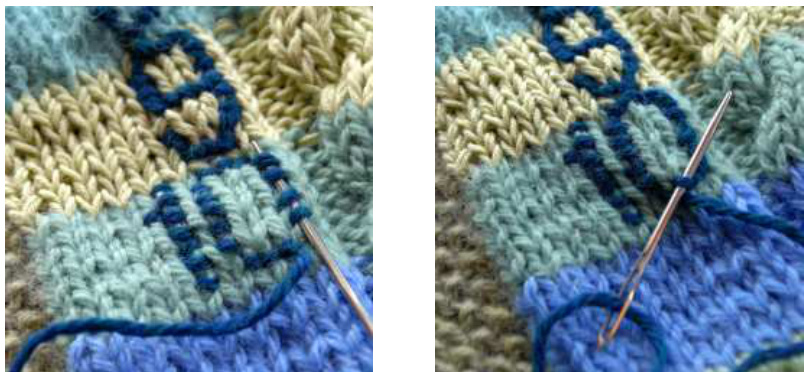
In Color E, with a tapestry needle, bringing the yarn up from the back, place a horizontal stitch on the verticai bars as shown in the grid for each number. Make these stitches somewhat loose/ not too tight. Once all the horizontal stitches for the number are in place, pass the yarn under each stitch, "“drawing" or creating the shape of the number. Be careful not to pick up any yarn from the stockinete fabric below - only pass the yarn under the embroidered stitch. Do not pull tightly. This “drawing" of the number should move through the shape of the number in a relaxed fashion.
FINISHING:
Weave in allthe ends. Whipstitch the pocket lining to the back of the work. Lightly block the edges and stockinette fabric. (Do not block the cables.) Now is a great time to confirm the final dimensions for your stretcher frame. Apply to a stretcher frame: · Join the corners of the frame. · With a staple gun, stretch woven fabric onto the frame. Reasons for the fabric layer: 1) to prevent your handiwork from coming in direct contact with any possible chemicals (especially acid) in the wood; 2) to prevent the wood from showing through the stretched stitches of the border; 3) if your knitted fabric ends up sagging under the weight of your ever-growing circular needle collection, you can lightly and discretely tack the knitted fabric to the woven backing. · Wrap the handknit fabric around the frame, initially fastening with push pins to confirm that everything is straight before permanently attaching with staples. . Apply screw eyes and fish line or ribbon for hanging.
EMBROIDER THE LENGTHGAUGE:
Embroider the length gauge into the right stockinette stitch margin last, after the work is stretched on to the frame, so that it will be somewhat close to accurate. Remember that this is only for quickly checking the length of your circulars when sorting them - it will not be a reliable way to measure anything important!
ALTERNATIVE WAYS TO FRAME / DISPLAY:
Knit the top and bottom borders wide enough for a casing to fit a 1/2 inch [13 mm] dowel. If this method is used, I suggest you also double the side borders so that they can be folded and sewn into a hemmed edging, which will be more stable. Place the work in an art frame: Tack the finished rectangle to the front of a customsized stretcher frame, as above. Then fit this into an art frame. The size of the frame could be determined after you have finished the piece and placed it on the stretcher frame. Or, you could design the work to be placed into a frame you already have. In this instance you would need to account for the desired amount of stretching in your design. ENJOY: Untangle your circulars, sort them to their new residence, and enjoy being more organized! "One spall organizer for a knitter, one giant leap for knitterkind!"


