Monster Cushion by Ariadne Aranea
BEFOREYOUSTART
Machine, yarn and things
This is an easy pattern - easy enough for a first machine-knitting project (after some practice swatches anyway!) You will need to know how to cast on and off, and how to change colours. It will probably help if you have already had a go at knitting a hem and a pocket. :his on a Knitmaster 321. (NOTE: The instructions for a picot hem are at page 39 of th ter 321 manual, and the instructions for a plain pocket are on pages 67-68.) ed were: nylon cord, claw weights (four), latch tool (for dropped stitches!), transfer toc u will need 4-ply yarn - a small amount of white and about 300g of anything you like. This project is for a 45cm square cushion. Gauge isn't critical to the pattern, but it is critical to making sure your finished project willfit your cushion. So, do a gauge swatch and then compare it with your actual cushion size to calculate the number of needles to use. If your gauge is tighter than mine or your cushion is larger, then you will need to use more needles and knit more rows. And vice versa. You will also need: Wasteyarn For the eyes and tongue - either felt oddments and sewing thread/sewing needle, or a 3.5mm crochet hook and some odd bits of yarn in any colour you like. A yarn needle. That's it! Have fun, and try not to drop as many stitches as I did. :)
INSTRUCTIONS
Cast on / Picot hem
Push 110 or so needles forward to D position (holding position, or HP) Cast on using waste yarn and the cast on method of your choice. Knit a few rows and then, with carriage at LEFT, break the waste yarn and knit one row with the nylon cord in the feeder, leaving the carriage at the RIGHT. Knit 7 rows in WHITE yarn, leaving carriage at LEFT. Open all the latches. Starting at the right side, transfer the stitch on needle 2 to needle 3, the stitch on needle 4 to needle 5 and so on to the end. Every other needle has 2 stitches on it, and the ones in between are empty. There may be an odd needle at the end with just one stitch on it, depending on whether you counted right or not when you cast on. That's OK. All needles stay in B position (working position, or WP). Knit 1 row to the RIGHT. This will put loops on the empty needles. Knit 7 rows, leaving carriage at LEFT. Use the transfer tool now to lift the loops from the very first row in main yarn (the one that has main yarn loops with nylon loops between) onto the needles. Now every needle has two loops, except you will probably have one left at the end with only one loop. That's OK. Knit one row across in white yarn to close the hem. That's the hardest part done! You can either pull out the nylon cord now (and the waste yarn will come away with it) or wait until you've knitted a few rows in main yarn first.
The rest
Change to MAlN yarn. Set row counter to zero. Knit about 300 rows, or until work measures 65cm or so long. If you want the rows of teeth closer than in my project, knit more rows (up to 350 or so would be OK, but make sure you stop before work measures 85cm long). Stop with carriage at RIGHT. Now we're going to do a sort of picot hem pocket, like this: o Bring 25 or so needles on each side forward into HP - they will not be knitted. You will have 60 or so needles in WP. 0 Disable the row counter (or if you keep it on, remember once the pocket is complete, to wind it back to the number of rows you were at before you started it i.e. 300 or so) Change to WHiTE yarn. Now make a picot hem exactly as above, except over only the 60 or so centre needles: Knit 7 rows, transfer every other stitch one needle to the right, knit 1 row to put a loop in the emptied needles, then 7 more rows. Lift each loop in the first row of white yarn up and onto the needles. Carriage is at LEFT. Change back to MAiN yarn. Put outside needles back to C position (not B position, or it will knit off all your stitches and make you swear). Knit carefully across the whole row. Hooray! That's the second-hardest part done! Put the row counter back into action. Check it still reads the correct number of rows (300, or more if you wanted the rows of teeth closer together). Knit until the row counter reads 450 or so, work measures about 110cm. Stop. Cast off.
Making up & finishing
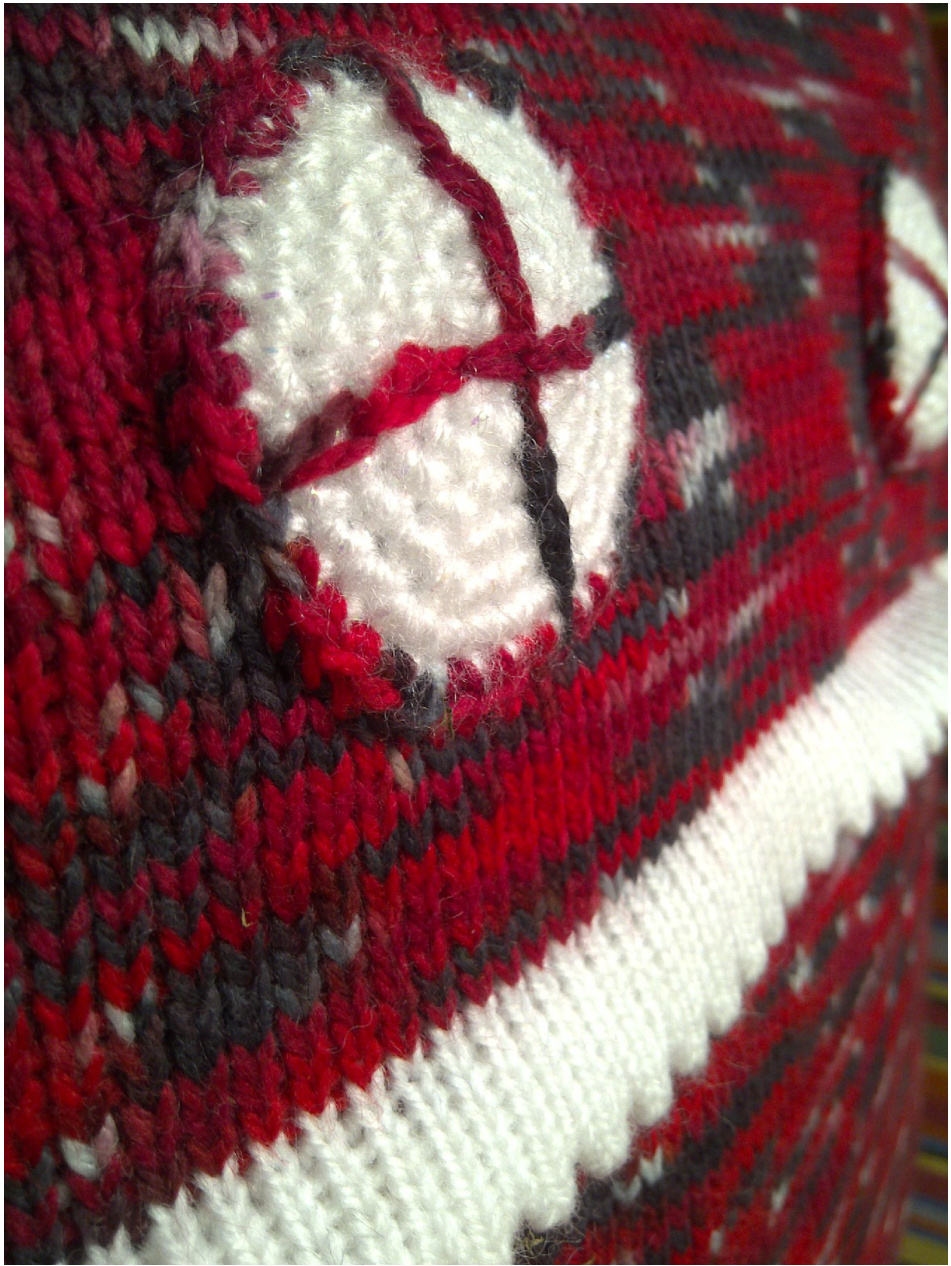
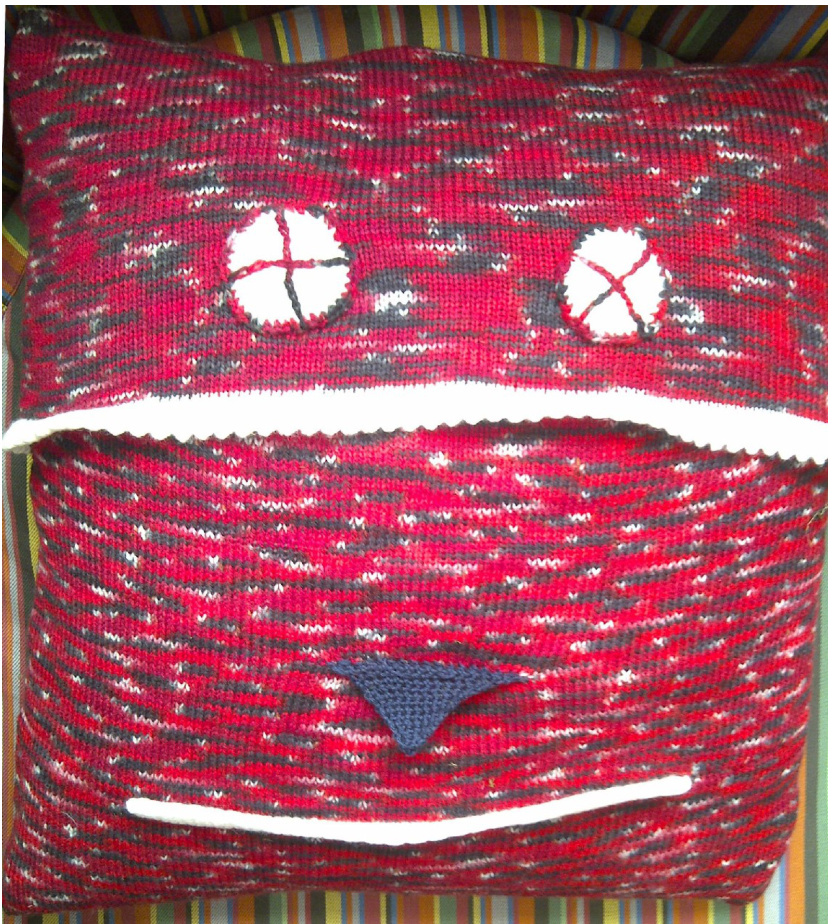
Block, iron or press your knitting carefully to reduce the edge-curl. Fold it as follows: Lay the piece right side up, with the cast off edge at the top. Fold the cast off edge down so that the fold is 45cm from the edge (or whatever the dimensions of your cushion require). Fold the picot-hem edge up, UNDERNEATH the cast on edge - so that the cast-off edge lines up with the fold and the picot hem is between the other two layers of fabric. Wrong side is showing. Pin edges and seam, taking care to stitch through all three layers where required. Turn right side out. Press again if needed. Embellish! Go crazy! I crocheted two circles in white yarn, with an edging in main yarn, embroidered crosseyes and sewed them on. I then crocheted a triangle in dark blue yarn and stitched that on between the rows of teeth to make a tongue. If you prefer, you can use oddments of felt, or whatever else floats your boat.