Maelstrom
Designed by Christine E. McKnight C2008 http://talullahsworld.wordpress.com talullahsworld@sbcglobal.net
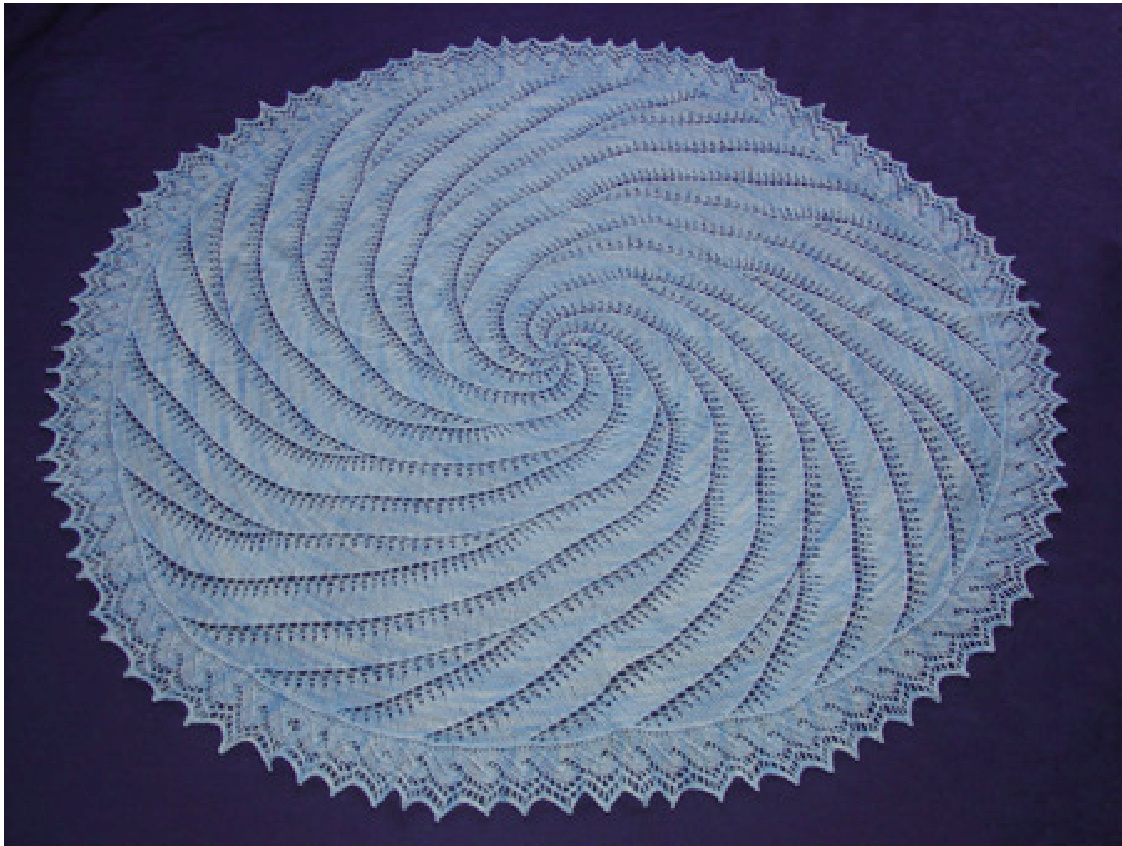
A maelstrom (or malstrom/malstrom in the Scandinavian languages) is a very powerful whirlpool; a large, swirling body of water. The word was introduced from the Nordic form by Edgar Allan Poe in his story "A Descent into the Maelstrom" (1841). In turn, the Nordic word was borrowed from the Dutch maalstroom, which means grinding stream. The original Maelstrom (described by Poe and others) is the Moskstraumen, apowerfultidalcurrentintheLofotenIslandsofftheNorwegiancoast. The Maelstrom shawl was inspired by the Spiralen Doily knitted by the late Erna Anderson (found at http://www.yarnover.net/patterns/doilies/kunststrik/index.html ).
Skills Required
Circular Cast on · Knitting with DPN's Knitting in the round Increases and Decreases Provisional Cast on Knitting on Edging Kitchener Stitch Blocking Lace
Materials
2 - 3 skeins handpainted lace weight yarn from handpaintedyarn.com (850 yards per skein, for a total of 1700 -2500 yards). Scrap piece of yarn or crochet thread Size 3.25mm (US size 3) needles in the following lengths; set of 5 double pointed needles, circular needles in 16, 26, and 40 inch lengths. Stitch marker(s) Tapestry Needle Crochet Hook Needle End Protector
Technical Notes
The Maelstrom Shawl is what I like to call a “Pie” shawl. It is knit from the center outwards, in the round and in eight wedges or slices (with one increase for every wedge for a total of 8 increases) every other round at the beginning of each wedge. Additional increases are compensated with decreases to keep the pattern balanced. I have designed this shawl in such a way that you can make it as big or as small as you like simply by how many repeats of section or chart B you chose to repeat. Yarn weight, knitting gauge and needle size are ultimately up to you. You could easily make a beautiful doily or tablecloth with crochet cotton thread size 10, or make a lovely lapghan using worsted weight wool. Regardless of the yarn choices or how many repeats of part/chart B you decide upon, the edging will need no adjustments as it has been mathematically calculated to fit perfectly within each spiral stripe for the pattern (i.e. each spiral stripe is 21 stitches. The edging is a fourteen row repeat with only seven of the stitches being purled to a stitch on the main section of the shawl. Therefore, each 21 stitch spiral stripe will take 3 repeats of the edging design.) The edging is knitted in a clockwise manner and knitted onto the main section of the shawl on the wrong side rows to create a raised circular ridge of stitches as a continuance of the raised stitches from the decreases of each spiral section. Chart A and Chart B are each one wedge of the pattern and are repeated for a total of eight times to make the full circle of the shawl. Each section of the pattern is written out as well as charted out for your convenience.
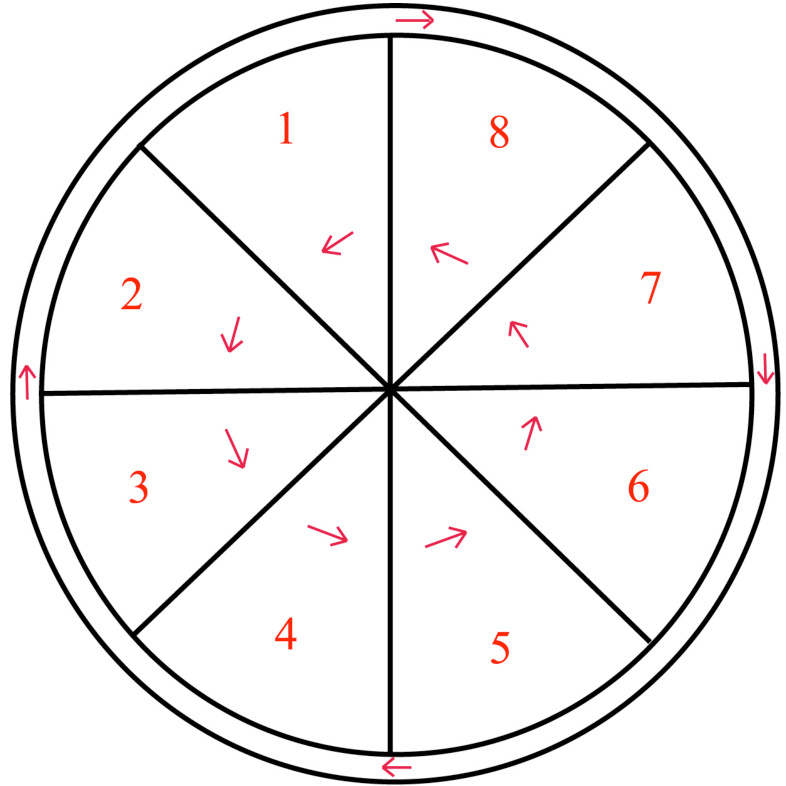
Schematic of the wedge detail of a “Pie” constructed shawl
Basic Instructions
Begin by using a crochet hook to make Emily Ocker's circular cast on and cast on 8 stitches evenly over 4 needles. Knit one round being careful not to twist the stitches. For Part A/Chart A: Begin the shawl foundation section. Repeat each row from \* a total of eight times for each section to complete each round. For Part B/Chart B: Repeat sections between [] 1 time for rows 43-84 (336 stitches at end of pattern repeat), 2 times for rows 85-126 (504 stitches at end of pattern repeat), 3 times for rows 127-210 (672 stitches at end of pattern repeat), and 4 times for rows 211-253 (840 stitches at end of pattern repeat) At the end of the final repeat, cut yarn leaving at least a 10-12 inch tail. Secure to main section of shawl and weave in end. Leave live stitches on circular needles. For the Edging Section/Chart C: Place a needle protector on the tip of the left circular needle to prevent the live stitches from slipping off. Provisionally cast on 13 stitches with waste yarn on 1 DPN's using a crochet hook or other method of your choice. With new yarn, knit set up row for the edging. For row 1, pick up the right side needle of the shawl (with the right side of the shawl facing you and begin working edging pattern with one DPN and right needle of the circular needle. Continue working edging pattern until final repeat row. Careful transfer stitches from provisional cast on onto a dpn, removing the waste yarn. Graft the live stitches together. Weave in all ends. To block with blocking wires: Divide the total number of edge repeats by 8 or 16 and place only that amount on each blocking wire. Carefully pull each section and pin, working around, continue stretching as much as you dare being careful not to pull too severely as to snap or break the yarn. (I was able to block mine fairly severely, but do this slowly adjusting each section several times until you have it pinned out in a good circular manner.) Allow to dry completely. Unpin and enjoy!
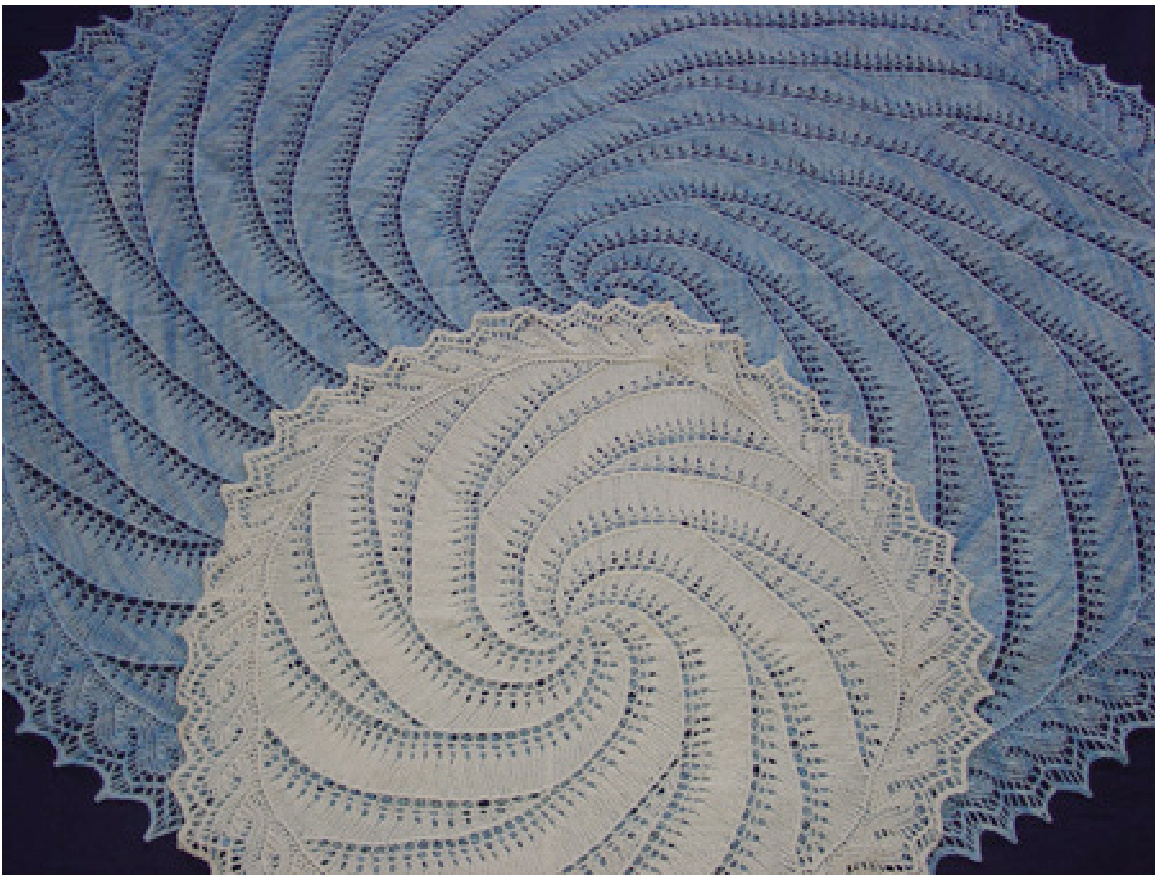
Both of these were knit on US size 3 needles. The smaller doily version is knit in Brown Sheep's Cotton Fine Putty colorway. The larger shoulder shawl is knit in Handpainted Yarn's lace weight singles in the Ceilios Brillantes colorway . Less than 2 skeins were used and four repeats of chart B to make a small shoulder shawl. Additional repeats of Chart B will create a larger shawl.
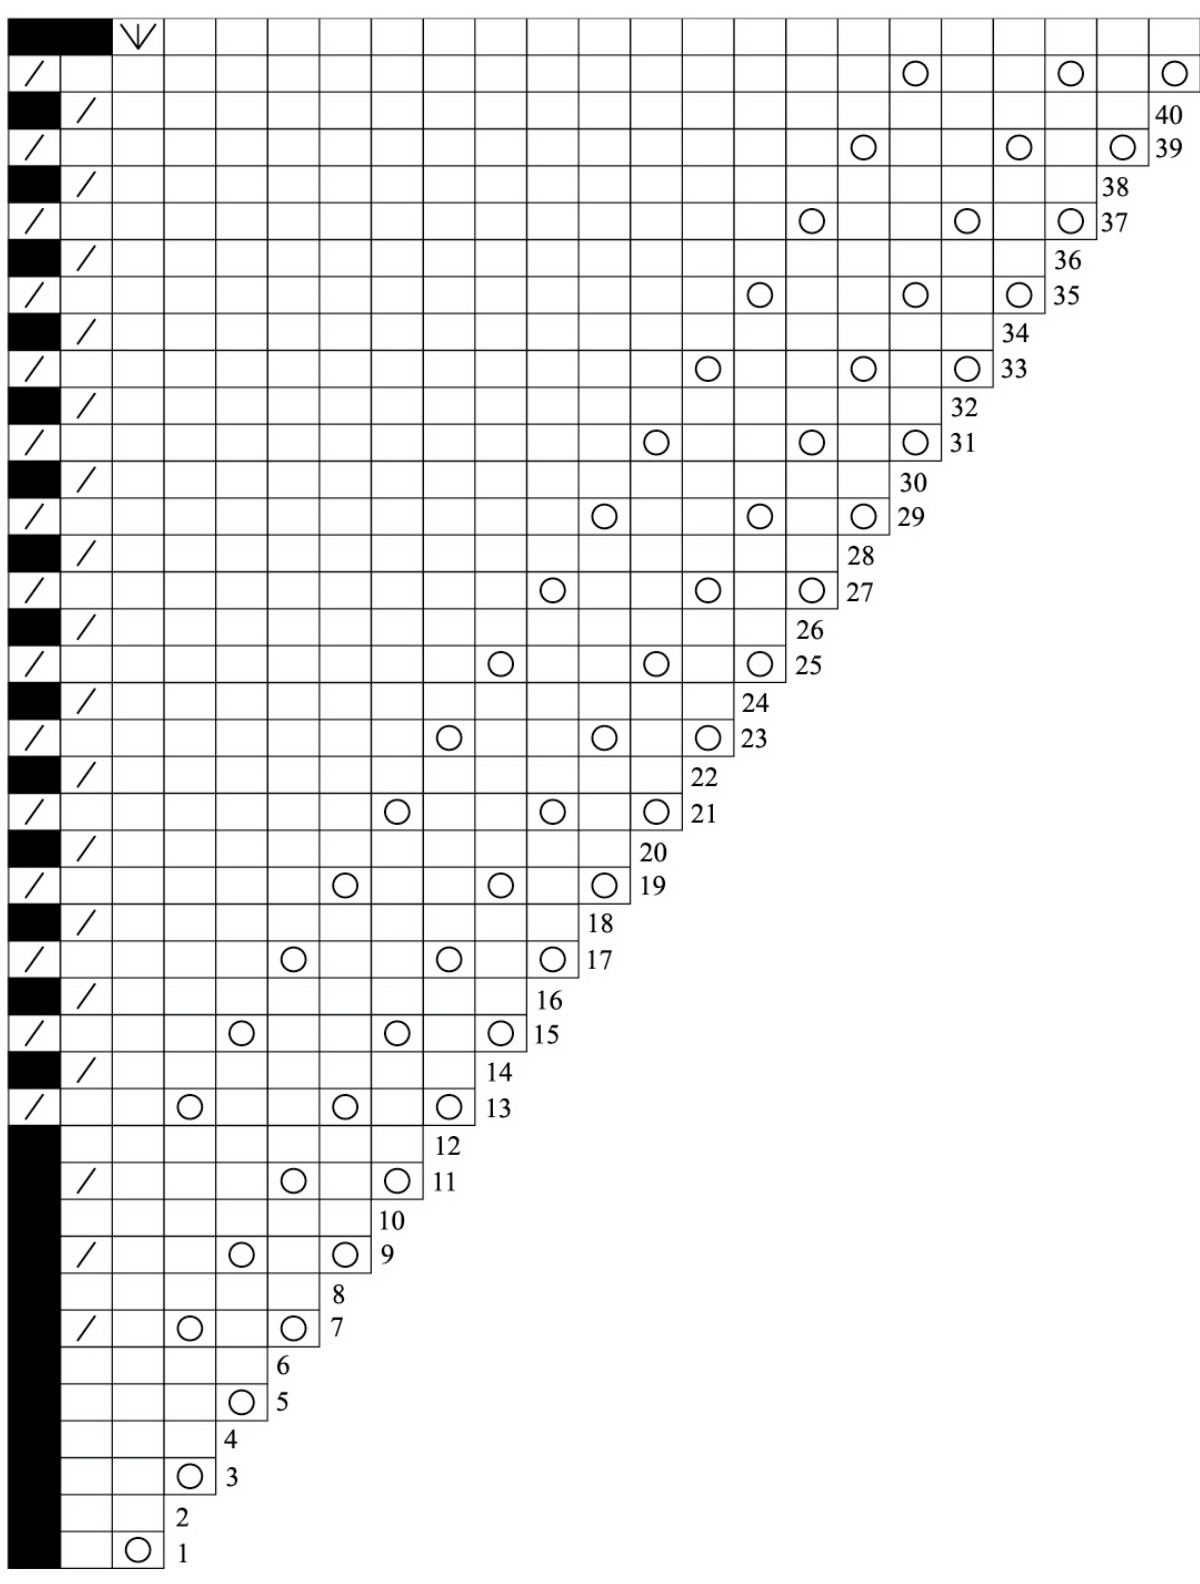
Part A Foundation section
Row 1: \*YO, K1\* Row 2: K2 Row 3: \*YO, K2\* Row 4: K3 Row 5: \*YO, K3\* Row 6: K4 Row 7: \*YO, K1, YO, K1, K2TOG\* Row 8: K5 Row 9: \*YO, K1, YO, K2, K2TOG\* Row 10: K6 Row 11: \*YO, K1, YO, K3, K2TOG\* Row 12: K7 Row 13: \*YO, K1, YO, K2, YO, K2, K2TOG\* Row 14: \*K7, K2TOG\* Row 15: \*YO, K1, YO, K2, YO, K3, K2TOG\* Row 16: \*K8, K2TOG\* Row 17: \*YO, K1, YO, K2, YO, K4, K2TOG\* Row 18: \*K9, K2TOG\* Row 19: \*YO, K1, YO, K2, YO, K5, K2TOG\* Row 20: \*K10, K2TOG\* Row 21: \*YO, K1, YO, K2, YO, K6, K2TOG\* Row 22: \*K11, K2TOG\* Row 23: \*YO, K1, YO, K2, YO, K7, K2TOG\* Row 24: \*K12, K2TOG\* Row 25: \*YO, K1, YO, K2, YO, K8, K2TOG\* Row 26: \*K13, K2TOG\* Row 27: \*YO, K1, YO, K2, YO, K9, K2TOG\* Row 28: \*K14, K2TOG\* Row 29: \*YO, K1, YO, K2, YO, K10, K2TOG\* Row 30: \*K15, K2TOG\* Row 31: \*YO, K1, YO, K2, YO, K11, K2TOG\* Row 32: \*K16, K2TOG\* Row 33: \*YO, K1, YO, K2, YO, K12, K2TOG\* Row 34: \*K17, K2TOG\* Row 35: \*YO, K1, YO, K2, YO, K13, K2TOG\* Row 36: \*K18, K2TOG\* Row 37: \*YO, K1, YO, K2, YO, K14, K2TOG\* Row 38: \*K19, K2TOG\* Row 39: \*YO, K1, YO, K2, YO, K15, K2TOG\* Row 40: \*K20, K2TOG\* Row 41: \*YO, K1, YO, K2, YO, K16, K2TOG\* Row 42: \*K20, K3TOG\* (168 stitches on the need
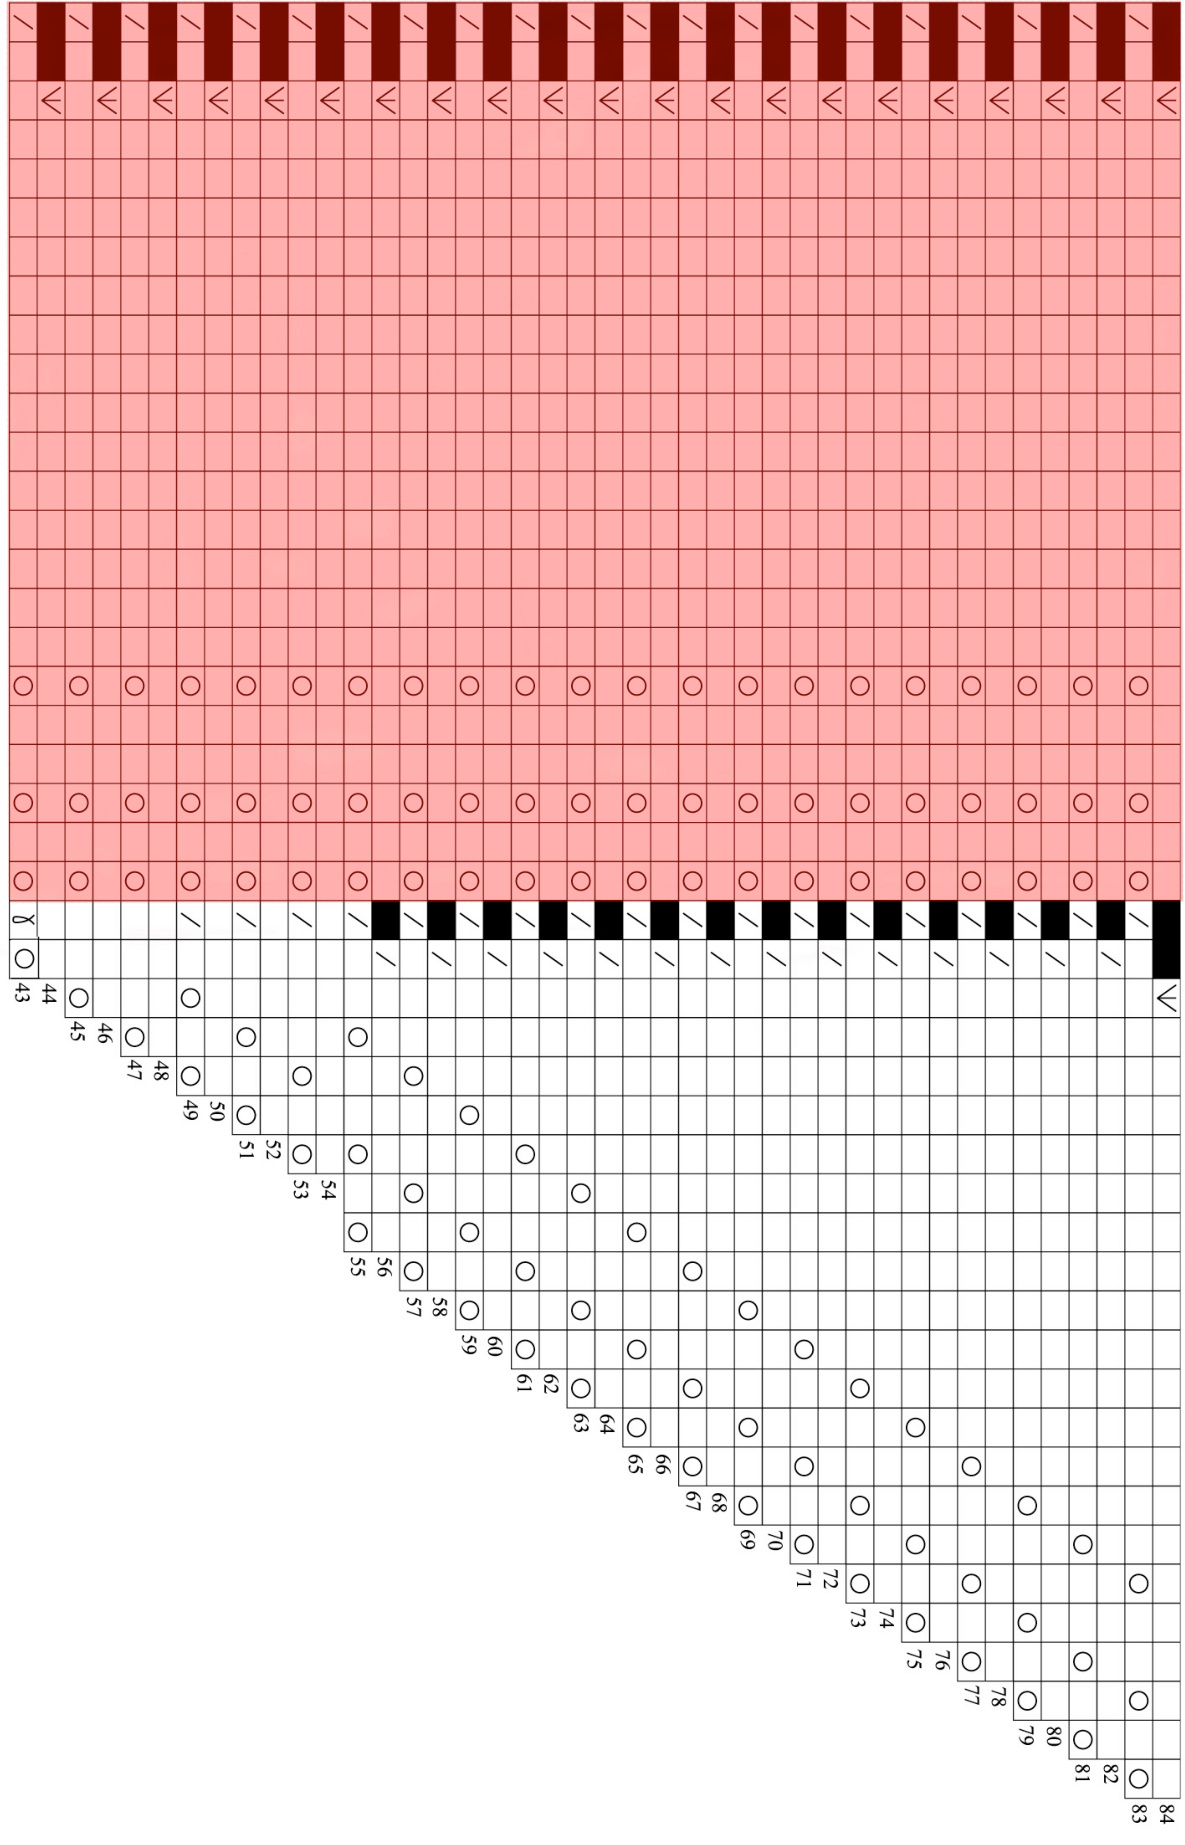
Part B Repeatable Section
Row 43: \*YO, M1,[YO, K1, YO, K2, YO, K16, K2TOG]\* Row 44: \*K22, K3TOG\* Row 45: \*YO, K2, [YO, K1, YO, K2, YO, K16, K2TOG]\* Row 46: \*K23, K3TOG\* Row 47: \*YO, K3, [YO, K1, YO, K2, YO, K16, K2TOG]\* Row 48: \*K24, K3TOG\* Row 49: \*YO, K1, YO, K1, K2TOG, [YO, K1, YO, K2, YO, K16, K2TOG]\* Row 50: \*K25, K3TOG\* Row 51: \* YO, K1, YO, K2, K2TOG, [YO, K1, YO, K2, YO, K16, K2TOG]\* Row 52: \*K26, K3TOG\* Row 53: \* YO, K1, YO, K3, K2TOG, [YO, K1, YO, K2, YO, K16, K2TOG]\* Row 54: \*K27, K3TOG\* Row 55: \* YO, K1, YO, K2, YO, K2, K2TOG, [YO, K1, YO, K2, YO, K16, K2TOG]\* Row 56: \*K7, K2TOG, [K20, K3TOG]\* Row 57: \* YO, K1, YO, K2, YO, K3, K2TOG, [YO, K1, YO, K2, YO, K16, K2TOG]\* Row 58: \*K8, K2TOG, [K20, K3TOG]\* Row 59: \* YO, K1, YO, K2, YO, K4, K2TOG, [YO, K1, YO, K2, YO, K16, K2TOG]\* Row 60: \*K9, K2TOG, [K20, K3TOG]\* Row 61 \* YO, K1, YO, K2, YO, K5, K2TOG, [YO, K1, YO, K2, YO, K16, K2TOG]\* Row 62: \*K10, K2TOG, [K20, K3TOG]\* Row 63: \* YO, K1, YO, K2, YO, K6, K2TOG, [YO, K1, YO, K2, YO, K16, K2TOG]\* Row 64: \*K11, K2TOG, [K20, K3TOG]\* Row 65: \* YO, K1, YO, K2, YO, K7, K2TOG, [YO, K1, YO, K2, YO, K16, K2TOG]\* Row 66: \*K12, K2TOG, [K20, K3TOG]\* Row 67: \* YO, K1, YO, K2, YO, K8, K2TOG, [YO, K1, YO, K2, YO, K16, K2TOG]\* Row 68: \*K13, K2TOG, [K20, K3TOG]\* Row 69: \* YO, K1, YO, K2, YO, K9, K2TOG, [YO, K1, YO, K2, YO, K16, K2TOG]\* Row 70: \*K14, K2TOG, [K20, K3TOG]\* Row 71: \* YO, K1, YO, K2, YO, K10, K2TOG, [YO, K1, YO, K2, YO, K16, K2TOG]\* Row 72: \*K15, K2TOG, [K20, K3TOG]\* Row 73: \* YO, K1, YO, K2, YO, K11, K2TOG, [YO, K1, YO, K2, YO, K16, K2TOG]\* Row 74: \*K16, K2TOG, [K20, K3TOG]\* Row 75: \* YO, K1, YO, K2, YO, K12, K2TOG, [YO, K1, YO, K2, YO, K16, K2TOG]\* Row 76: \*K17, K2TOG, [K20, K3TOG]\* Row 77: \* YO, K1, YO, K2, YO, K13, K2TOG, [YO, K1, YO, K2, YO, K16, K2TOG]\* Row 78: \*K18, K2TOG, [K20, K3TOG]\* Row 79: \* YO, K1, YO, K2, YO, K14, K2TOG, [YO, K1, YO, K2, YO, K16, K2TOG]\* Row 80: \*K19, K2TOG, [K20, K3TOG]\* Row 81: \* YO, K1, YO, K2, YO, K15, K2TOG, [YO, K1, YO, K2, YO, K16, K2TOG]\* Row 82: \*K20, K2TOG, [K20, K3TOG]\* Row 83: \* YO, K1, YO, K2, YO, K16, K2TOG, [YO, K1, YO, K2, YO, K16, K2TOG]\* Row 84: \*K20, K3TOG, [K20, K3TOG]\*
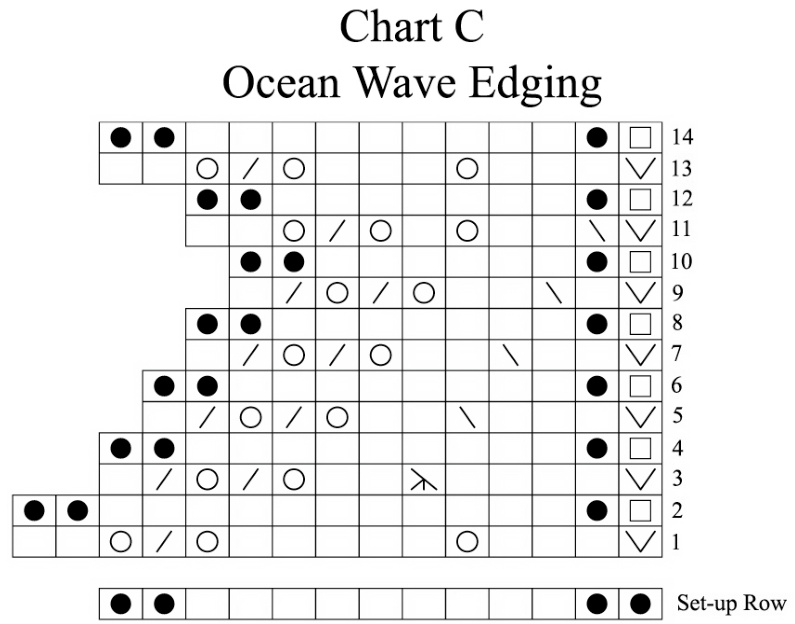
Part C Ocean Waves Edging Pattern (Adapted from Traditional Knitted Lace Shawls by Martha Waterman)
Set up row: K2, P9, K2 Row 1: Slip 1, K3, YO, K5 YO, K2TOG, YO, K2 Row 2: K2, P11, K1, P2TOG Row 3: Slip 1, K4, K3TOG, K2, YO, K2TOG, YO, K2TOG, K1 Row 4: K2, P9, K1, P2TOG Row 5: Slip 1, K3, SSK, K2, YO, K2TOG, YO, K2TOG, K1 Row 6: K2, P8, K1, P2TOG Row 7: Slip 1, K2, SSK, K2, YO, K2TOG, YO, K2TOG, K1 Row 8: K2, P7, K1, P2TOG Row 9: Slip 1, K1, SSK, K2, YO, K2TOG, YO, K2TOG, K1 Row 10: K2, P6, K1, P2TOG Row 11: Slip 1, SSK, K2, YO, K1, YO, K2TOG, YO, K2 Row 12: K2, P7, K1, P2TOG Row 13: Slip 1, K3, YO, K3, YO, K2TOG, YO, K2 Row 14: K2, P9, K1, P2TOG Repeat rows 1 -14 until edging is completed. Graft edges together using kitchener stitch. Weave in ends and block.
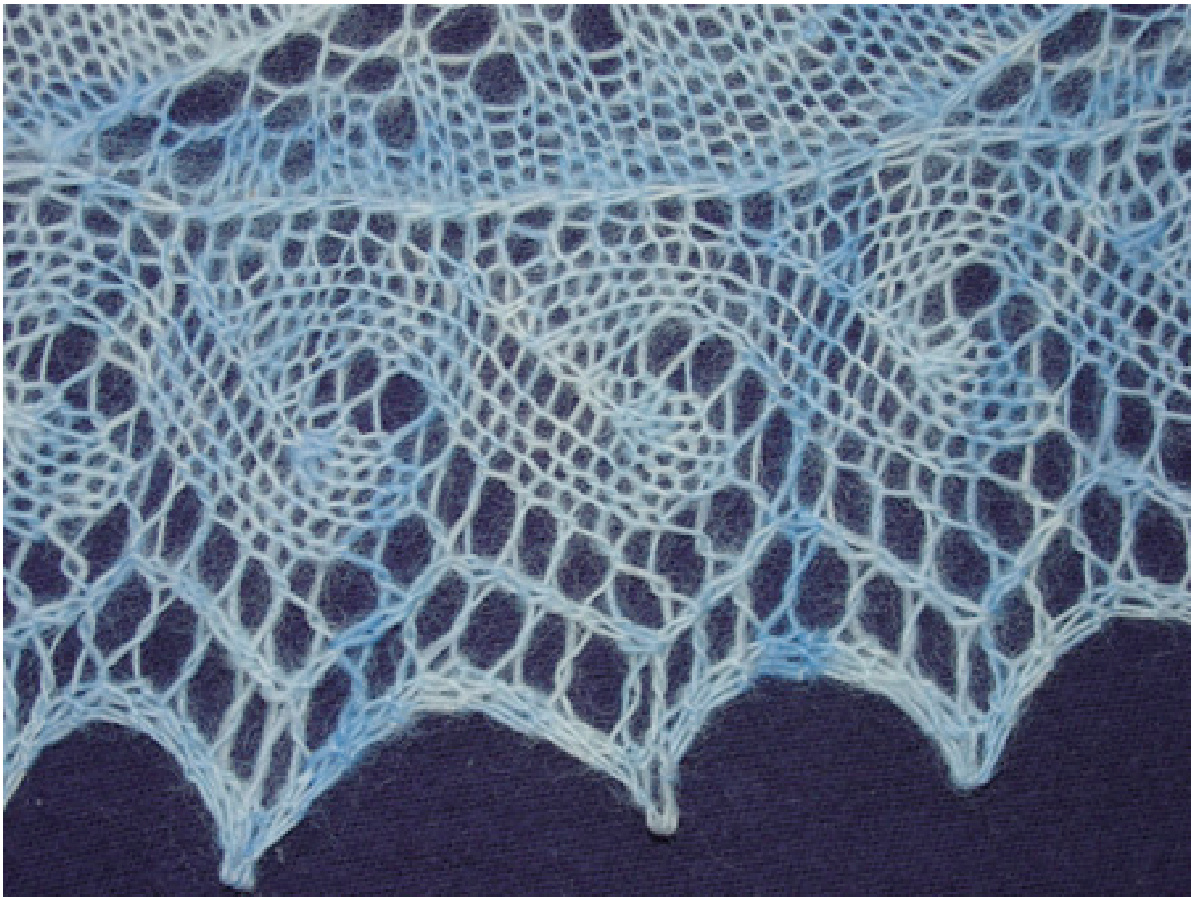
Adapted version of the Ocean Waves edging.
Chart Key for all Charts
Knit on RS, Purl on WS Knit on WS Yarn Over Knit 2 Together (K2TOG) Slip, Slip, Knit (SSK) Purl 2 Together (P2TOG) Double Decrease: Slip 2 Together as to knit, Knit 1, Pass 2 stitches over (SL2,K1,P2SSO) Knit 3 Together (K3TOG) Make 1 (M1) Repeat Red Sections
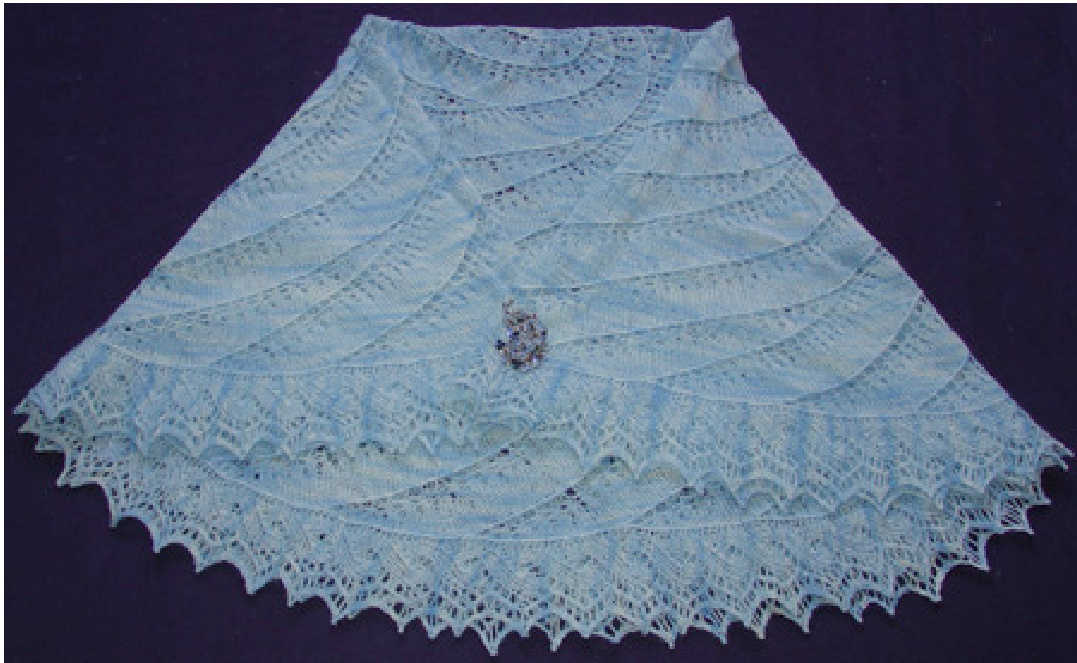
Chart A Foundation Rows
This pattern and images may not be reproduced, distributed, sold or included in pattern kits without the express permission on the designer. Please only print one copy for your personal use. You may use this design for charity or fundraising. If you would like to use this pattern for a class, please contact the designer for special permission. Christine E. McKnight 2008 All rights reserved.


