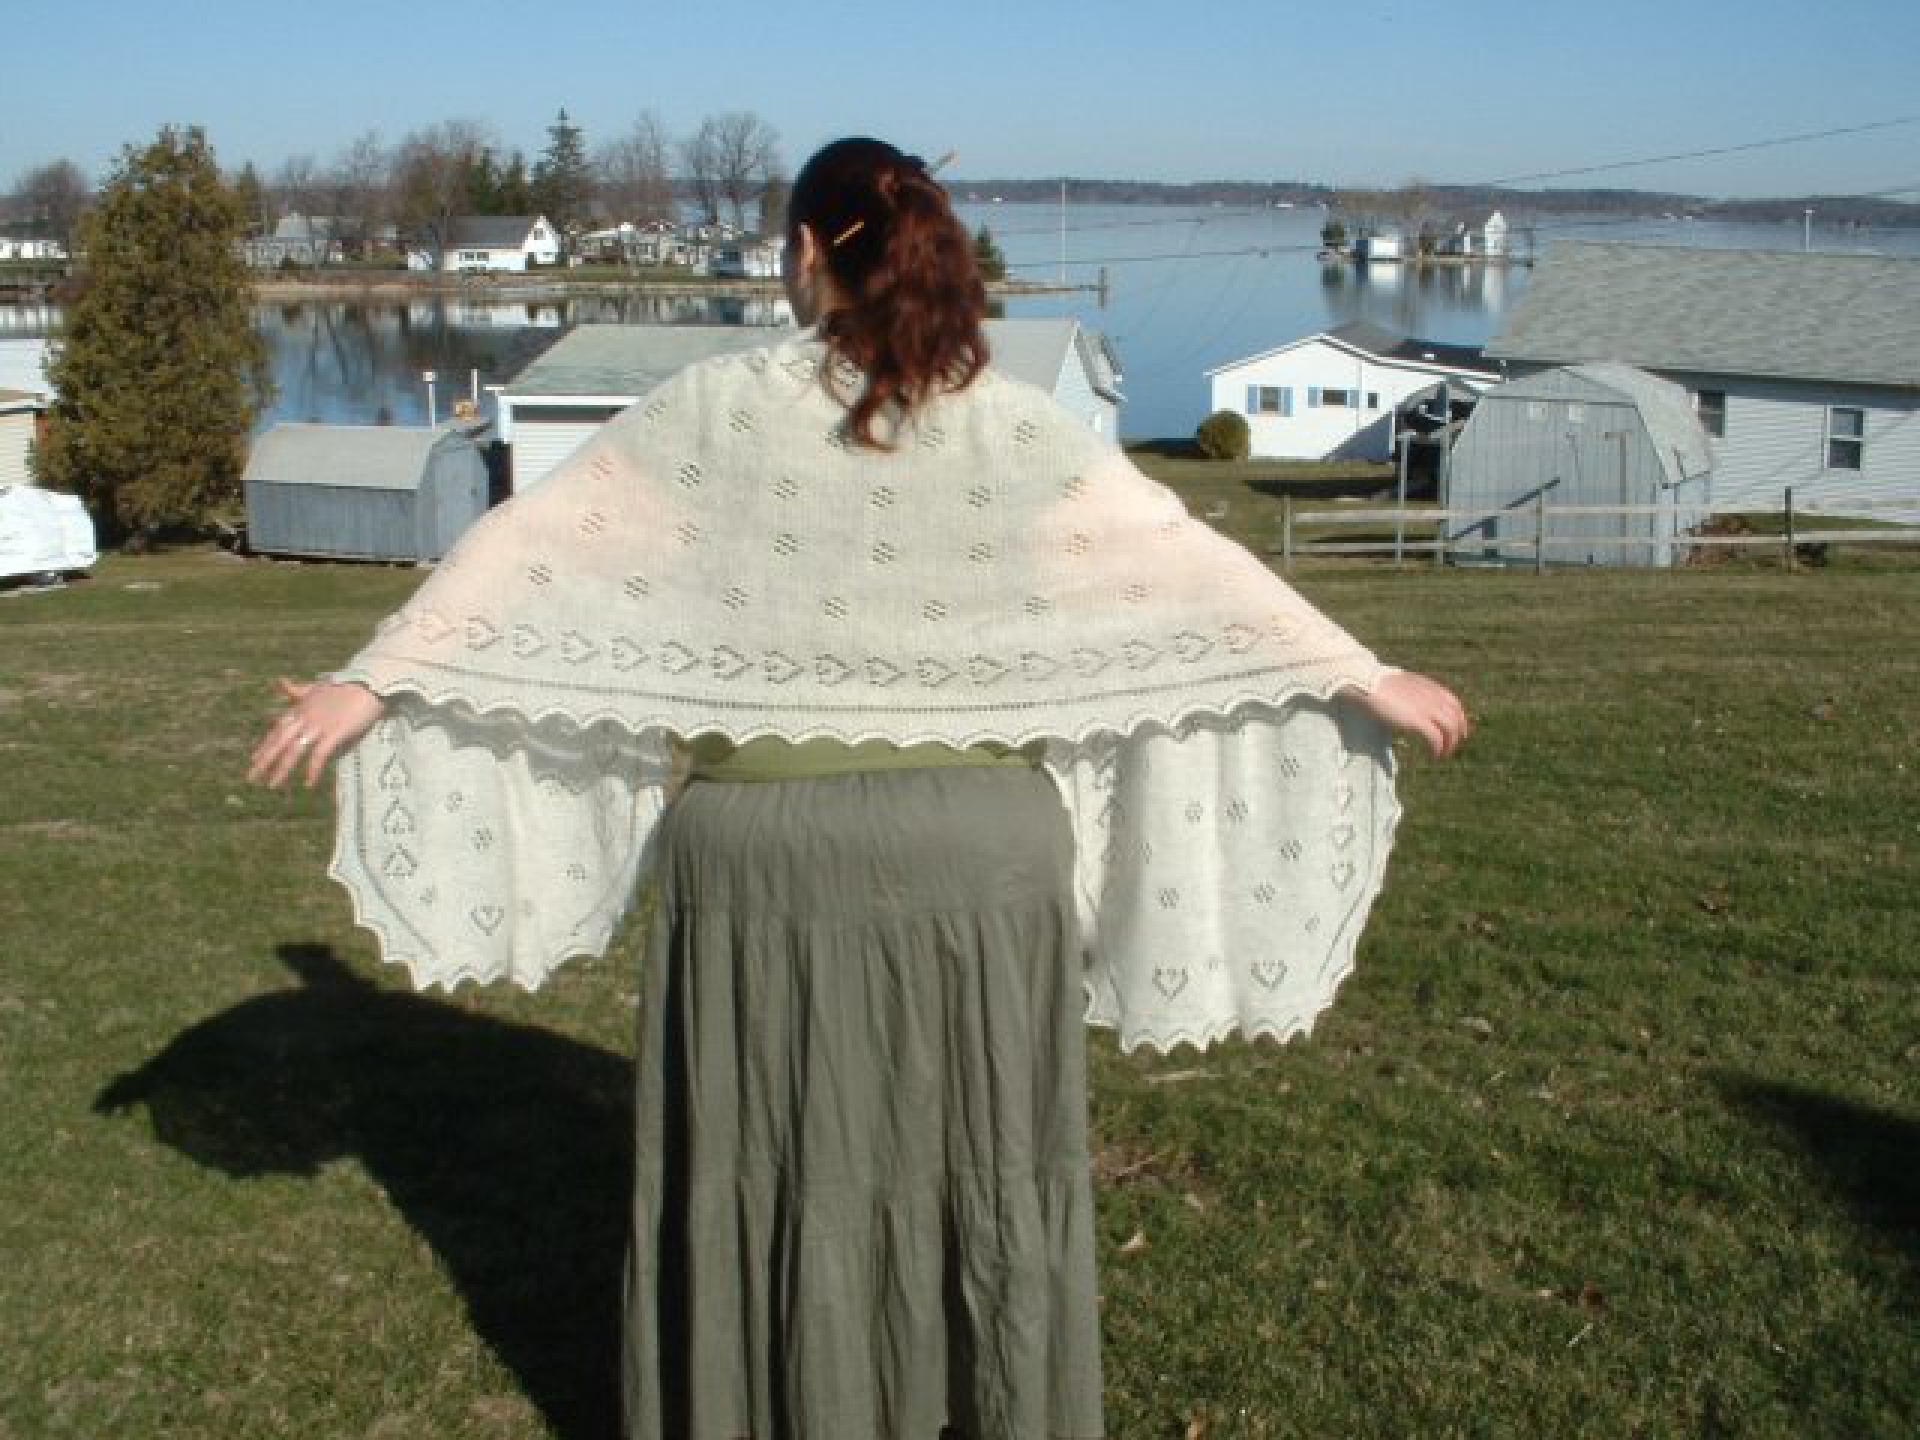
Wedding Veil Shaul
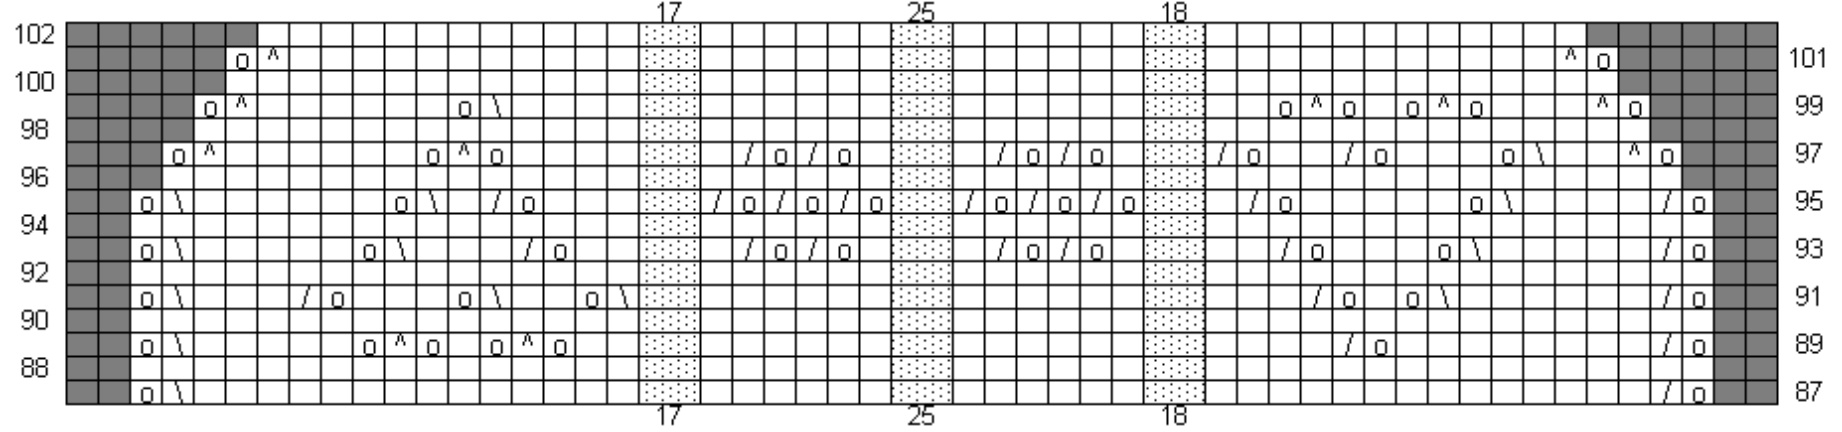
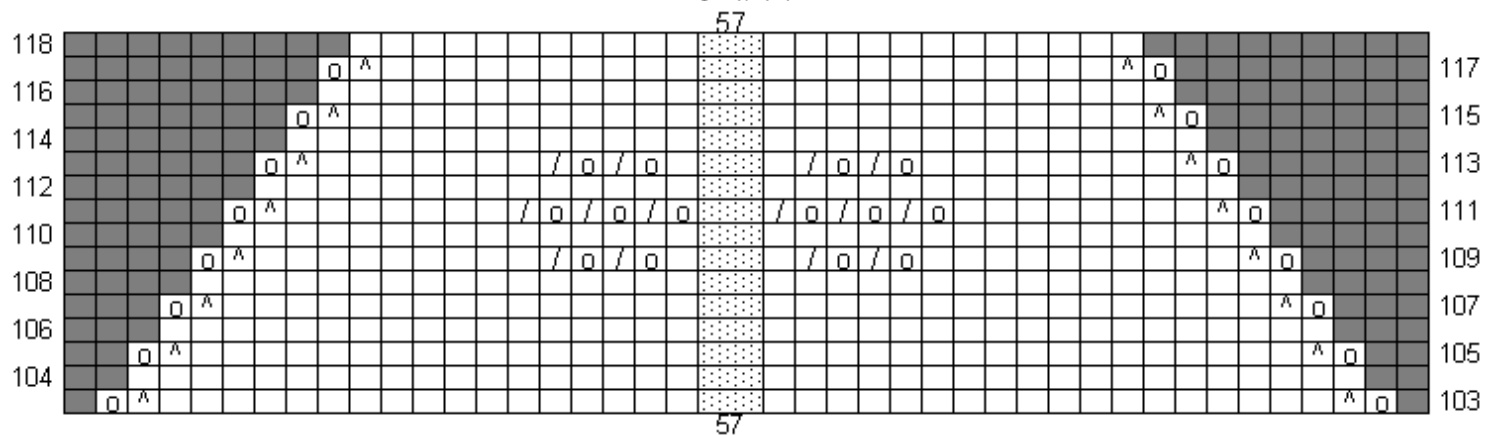
Pattern Copyright 2007 Abigail Welbourn (www.akittenknits.blogspot.com) Please do not sell this pattern or any items made from this pattern, thanks. Materials: US size 5, 24 inch (or longer) circulars 2 skeins Knit Picks $100\%$ Merino Bare lace weight. Stitch Markers (at least tw, up to seven maybedesired to indicate theeginning of motifs and rduce counting) Darning needle Gauge: 5 stitches/inch unblocked in garter stitch Cast on7 stitches using the provisional cast on or some other method that willgive you live stitches at both ends. Knit the first two un-numbered set up rows of chart A. continue with chart A until there are 7 teth. It is now time to turn the corners; this is done in simple Orenburg fashion. First corner: 1) Knit row 1 of chart A, but do not knit the last stitch, leave it on the left hand needle. 2) Turn the work, and slip the next stitch on to the right hand needle, knit across. 3) Knit row 3 of chart A, but once again, do not knit the last stitch. 4) Turn the work, and slip the next stitch on to the right hand needle, knit across. 5) knit row 5 of chart A 6) knit row 6 of chart A 7) Knit row 7 of chart A, but do not knit the last stitch, leave it on the left hand needle. 8) Turn the work, and slip the next stitch on to the right hand needle, knit across. 9) Knit row 9 of chart A. First corner turned. Place marker and pick up and knit one stitch for each selvedge stitch along the side of the edging strip (8 per tooth) plus two extra stitches, one at each end of the strip. Place second marker. (58 sts between markers.) Second corner: Knit across the 7 cast on stitches. 1) Knit row 1 of chart A, but do not knit the last stitch, leave it on the left hand needle. 2) Turn the work, and slip the next stitch on to the right hand needle, knit across. 3) Knit row 3 of chart A, but once again, do not knit the last stitch. 4) Turn the work, and slip the next stitch on to the right hand needle, knit across. 5) knit row 5 of chart A 6) knit row 6 of chart A 7) Knit row 7 of chart A, but do not knit the last stitch, leave it on the left hand needle. 8) Turn the work, and slip the next stitch on to the right hand needle, knit across. Second corner turned. (82 sts) Knit row 9 of chart A (row O of chart Bws) slip the marker and knit the main body stitches through the back loop. Slip marker and knit row 10 of chart A (row 0 of chart Brs) -This completes row 0 of chart 1 and chart B. You will notice that the edging charts are all one row off, and that the left edgeknits its right side on the wrong side of the main shawl body. Rows 23 - 55 of chart B (the rows between the heavy dark lines) repeat themselves throughout the shawl until row 135 of chart 8. Knit charts 1-3,knit chars 4&516tmes each,knit char4 once more then continue on with charts6 8 Continue knitting the edgings along each edge of the shawl as you knit the main body charts. After knitting row 142 of chart 8 it is time to turn the corner, knit the border sideways over the live main body stitches, turn the last corner and graft the live stitches together: Turn the third corner: 1) Knit row 25 of Chart A, but do not knit the last stitch. 2) Turn the work, and slip the next stitch on to the rigt hand nedle, knit across to the last 2 stitches, tog. 3) Knit row 27 of chart A, but once again, do not knit the last stitch. 4) Turn the work, and slip the next stitch on to the right hand neede, knit acros to the last 2 stitches, Ktog. 5) knit row 29 of chart A 6) knit row 30 of chart A 7) Knit row 31 of chart A, but do not knit the last stitch, leave it on the left hand needle. 8) Turn the work, and slip the next stitch on to the right hand needle, knit acros to the last 2 stitches, Ktog. Third corner turned. Remove marker. Now knit Chart A sideways across the top of the shawl: Knit row 1 of chart A,but instead of knitting the last stitch, Ktog (the last stith plus the first shawl stitch) Turn the work, knit row 2 of Chart A \*Knit the next right hand side row of chart A, but don't knit the last stitch, ktog (the last stitch plus a shawl stitch.) turn the work, knit the next wrong side row of Chart A\* Repeat between stars until all shawl stitches up to the last stitch marker have been knit It is now time to turn the last corner: Slip marker, knit across the border stitches. 1) Knit row 25 of Chart A, but do not knit the last stitch. 2) Turn the work, and slip the next stitch on to the right hand needle, knit acros to the last 2 stitches, Ktog. 3) Knit row 27 of chart A, but once again, do not knit the last stitch. 4) Turn the work, and slip the next stitch on to the right hand needle, knit acros to the last 2 stitches, Ktog. 5) knit row 29 of chart A 6) knit row 30 of chart A 7) Knit row 31 of chart A, but do not knit the last stitch, leave it on the left hand needle. 8) Turn the work, and slip the next stitch on to the right hand needle, knit across to the last 2 stitches, Ktog. There are now 9live stithes on each eede, grat thm togetherusing Kithener stith. Weave in ends and block your new Wedding Veil Shawl!
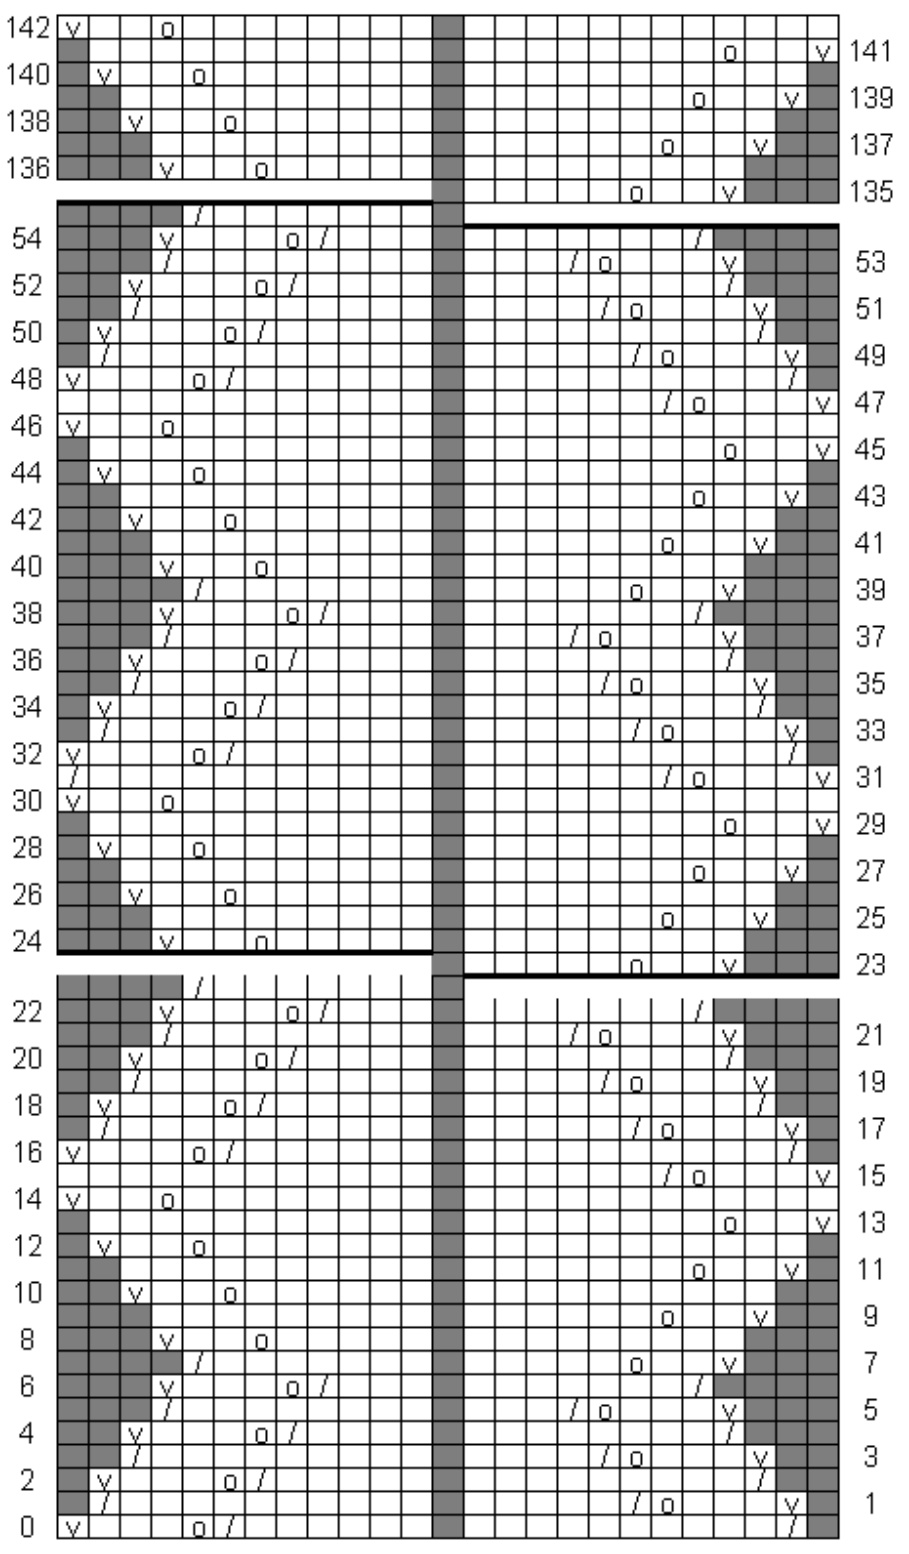
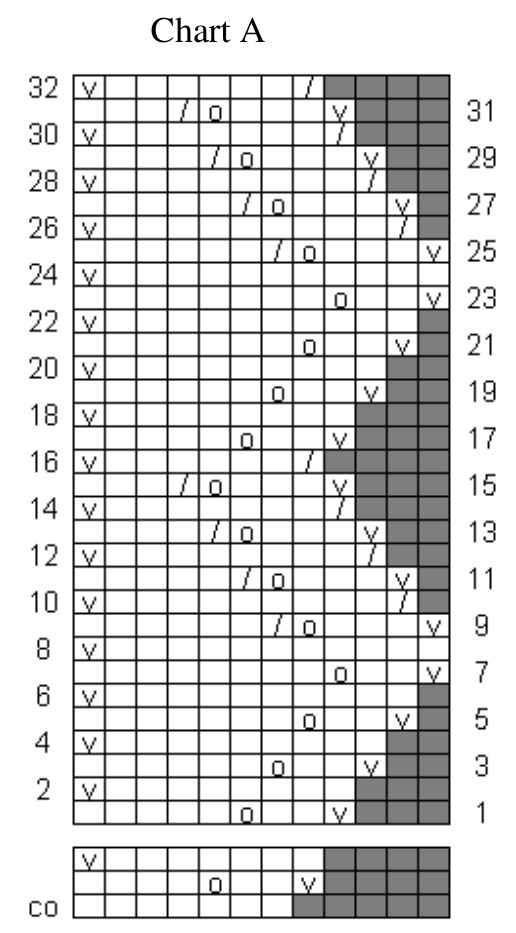
Chart 1
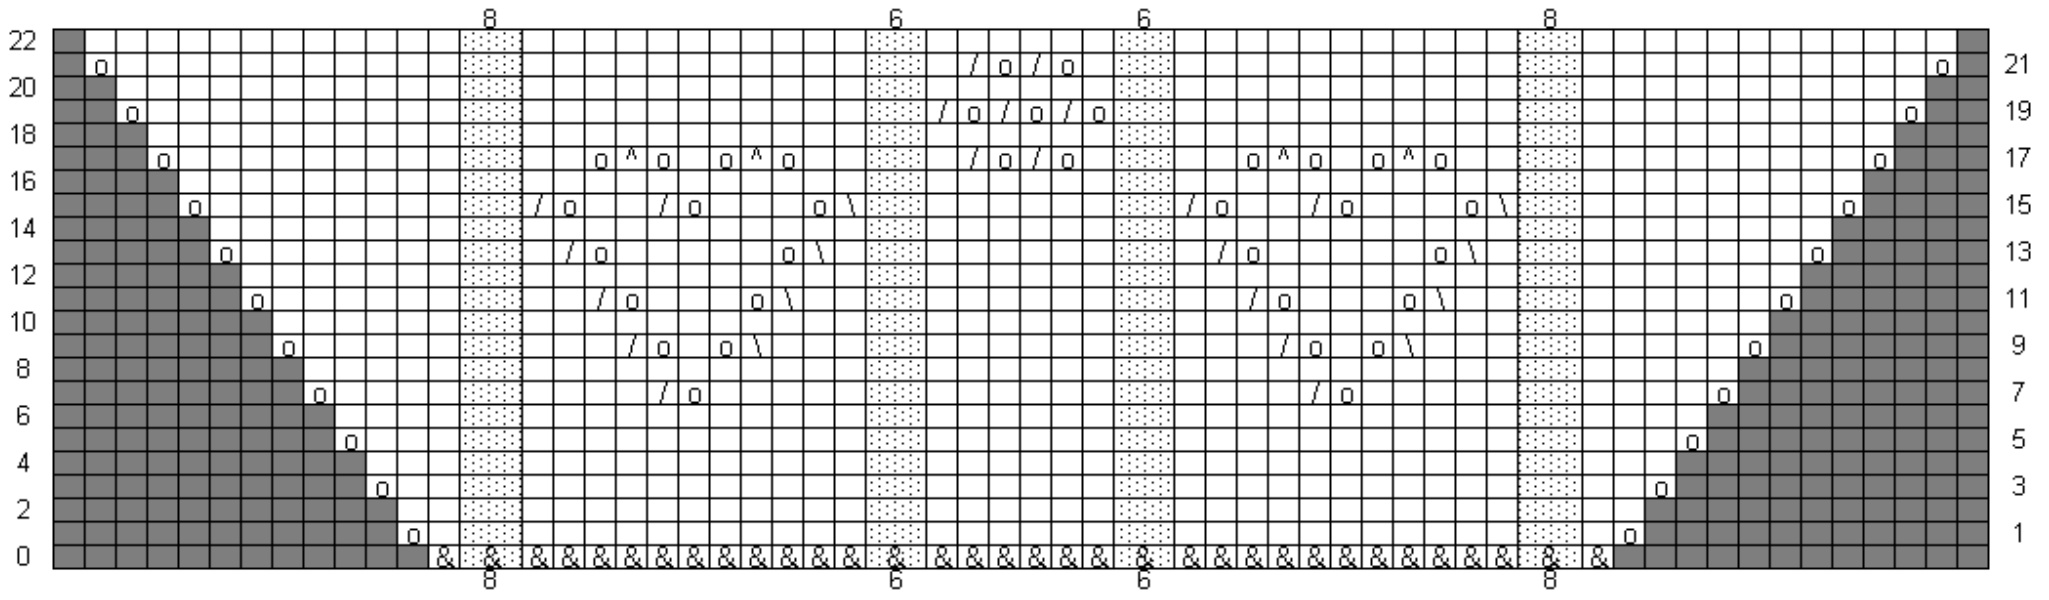
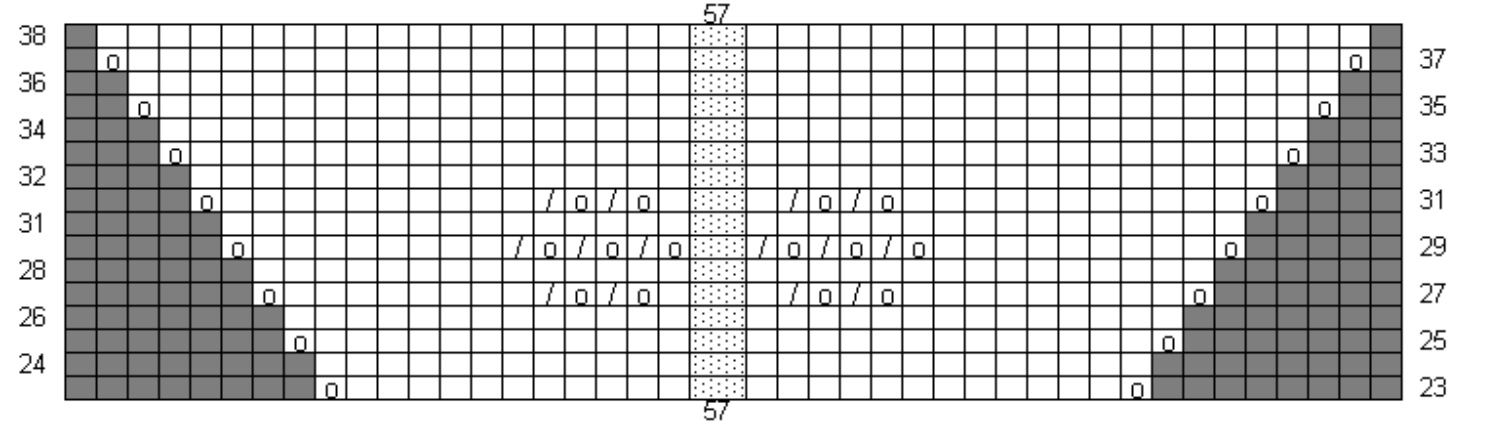
Chart 3
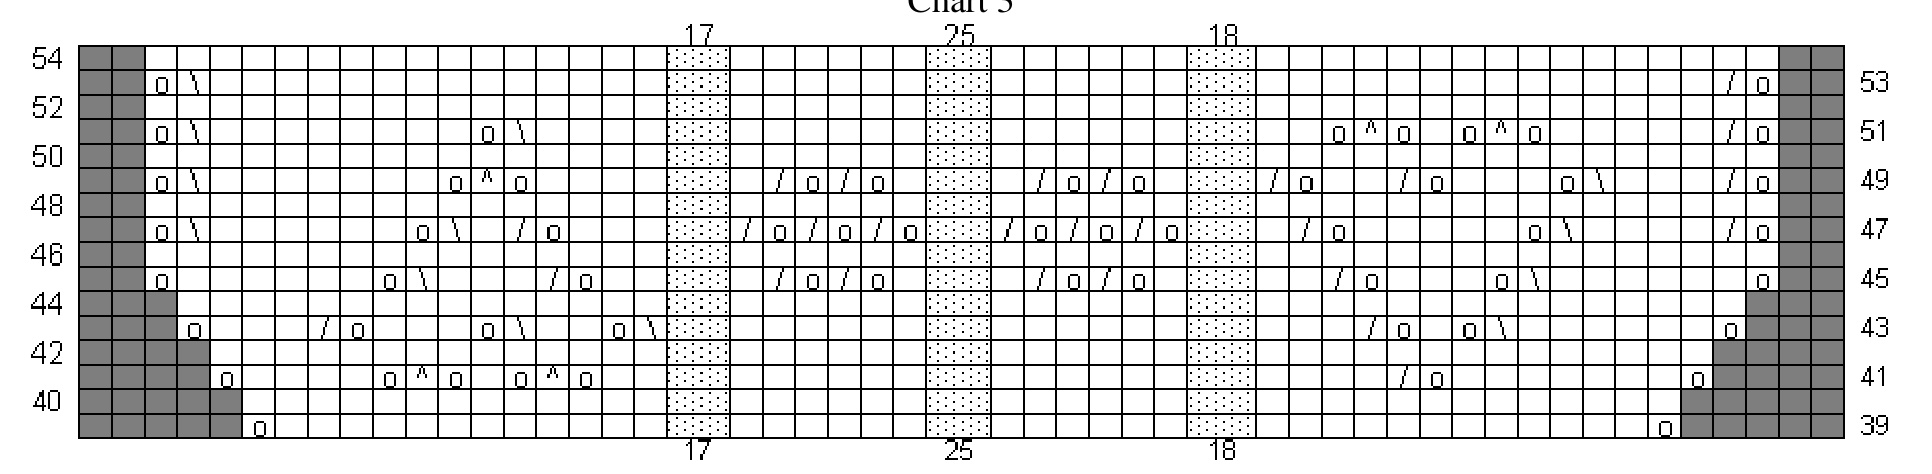
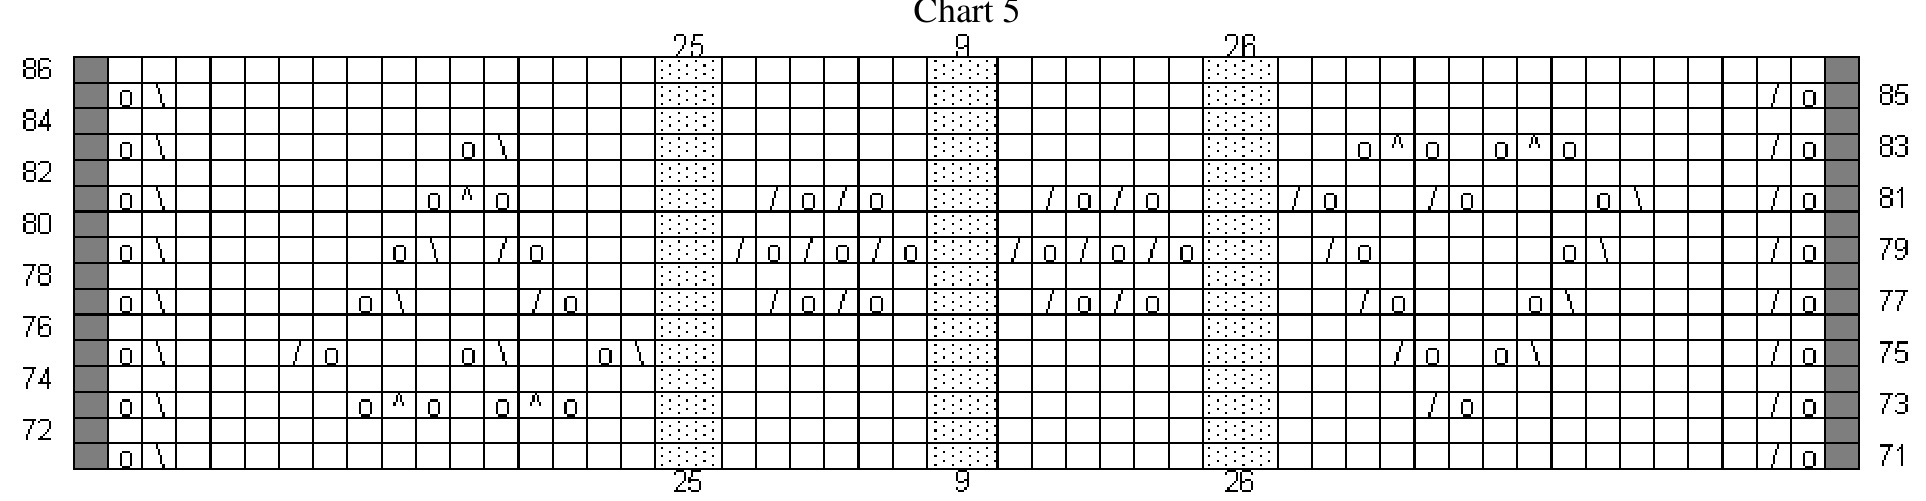
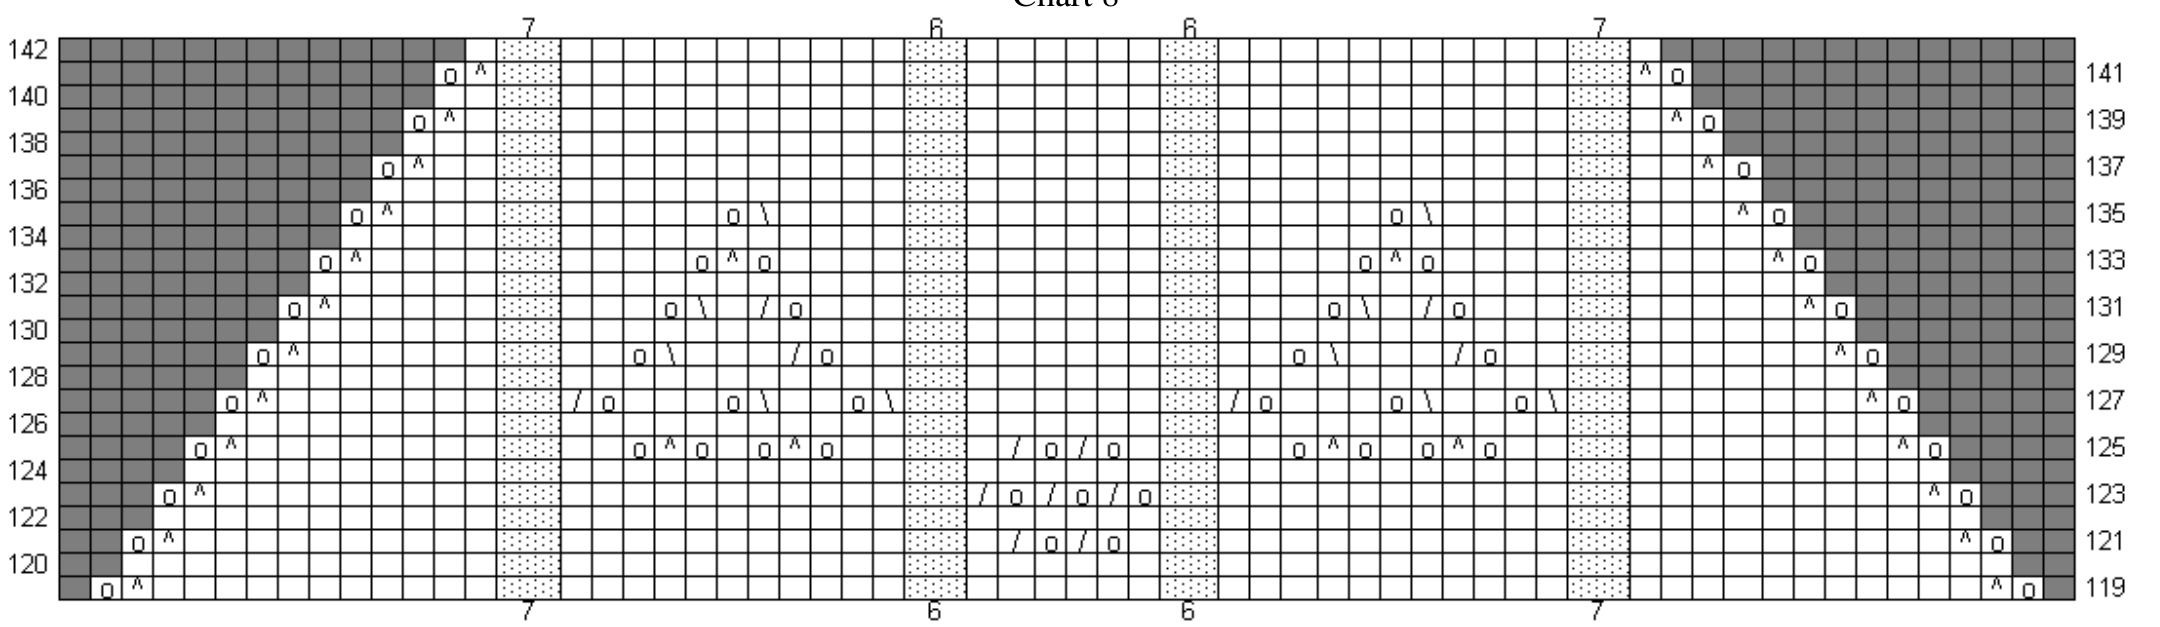
Chart 6