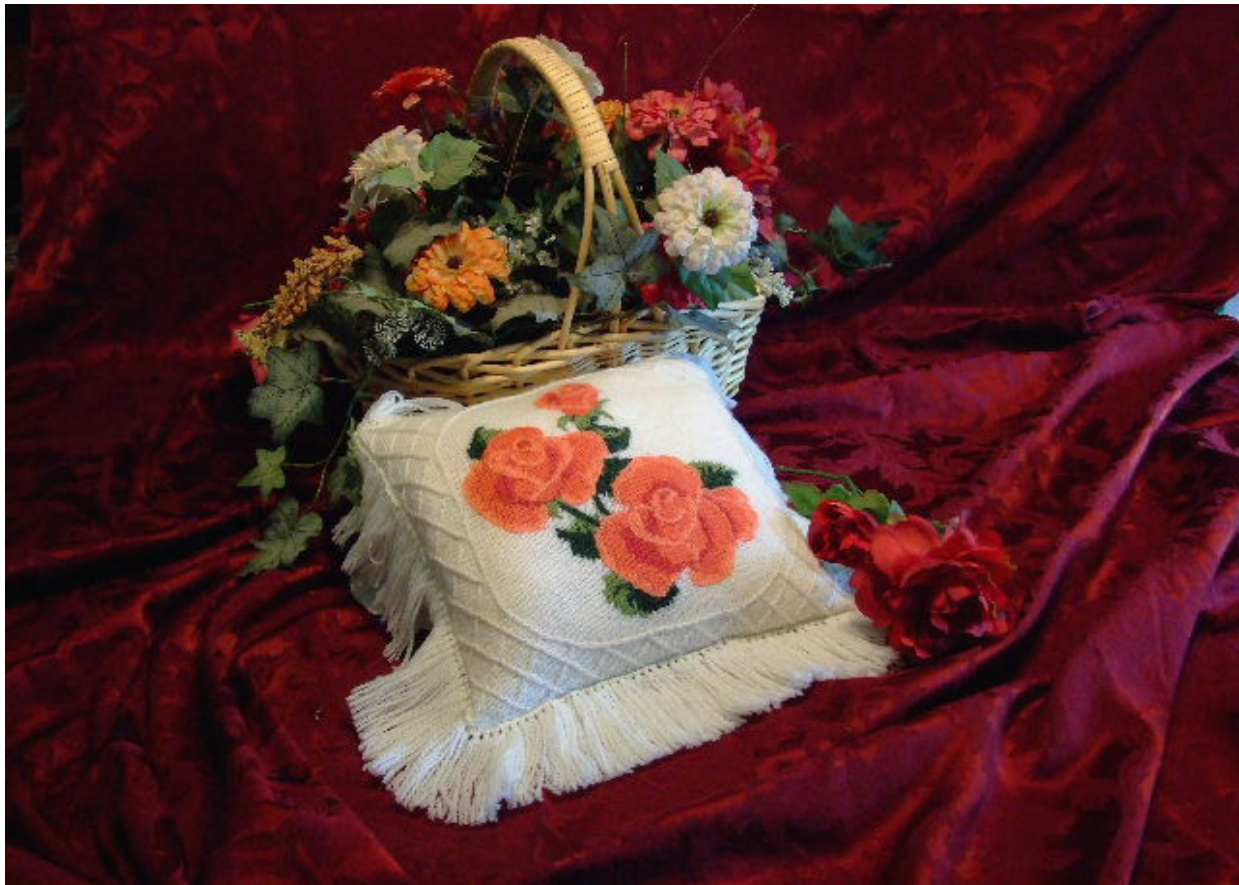
Tropicana Rose Pillow
Tropicana Rose Pillow
Tropicana Rose Pillow
Table of Contents
1. Yarn, needles and supplies - pg 2 2. Charts 1-4 - pgs 3-6 3. Knitting Key and Symbols - pg 7-10 4. Pattern notes- pg 11 5. Row by row instructions and illustrations- pgs 12-19 6. Finishing techniques and pillow assembly- pgs 19-20
Yarn, Needles and Supplies
Yarn - Palette fingering yarn from Knitpicks.com. 1- Conch 1- Rose Hip 1- Rasberry Heather 1- Forest Heather 1- Edamane 3- White are many shades to choose from in Palette, this was just my selection. Gauge - 8 stitch per inch, 11 rows per inch Needles- Size #2,or whatever size you need to maintain gauge. I used Knitpicks fixed circulars. 1- 40-47 inch, \*3- 24 inch. Why so many? I use the shorter circulars to pick up stitches on 3 sides of pillow. I leave them in when I block each side. They act as block rods, as well as needles to set up a three needle BO when unit is assembled. \* The 3 extra needle can be 1's or 2's, as you will use them only for holders. You will be knitting off of them with your #2.
Tropicana Rose Pillow
<html><body><table><tr><td rowspan="2">D □ D □ □ □ 口 D D</td><td rowspan="8"></td><td rowspan="2"></td><td></td><td rowspan="2"></td><td></td><td rowspan="2"></td><td></td><td colspan="9"></td><td colspan="2"></td><td colspan="3"></td><td></td><td colspan="3"></td><td colspan="4"></td><td colspan="2"></td><td rowspan="2"></td></tr><tr><td></td><td></td><td>米</td><td></td><td>*</td><td>t</td><td></td><td></td><td></td><td>米</td><td>t</td><td></td><td>4 米</td><td>米 t</td><td></td><td>4</td><td></td><td>米 t</td><td></td><td></td><td>4 米</td><td></td><td></td><td></td><td>米</td><td></td><td></td></tr><tr><td>□ D</td><td></td><td>米</td><td></td><td></td><td></td><td>米 t S</td><td></td><td>米</td><td>S 米</td><td></td><td>米</td><td>t s</td><td>s 4 米 s</td><td></td><td>S 米</td><td>t</td><td>s J 米 S</td><td></td><td></td><td>米 t s</td><td></td><td>S米 s</td><td></td><td></td><td></td><td>米 t s</td><td></td><td>米 L</td></tr><tr><td>D □ D</td><td>L $</td><td>s</td><td></td><td></td><td></td><td></td><td></td><td></td><td></td><td></td><td></td><td></td><td>S</td><td></td><td></td><td></td><td></td><td></td><td></td><td></td><td>米</td><td></td><td>米</td><td></td><td></td><td></td><td rowspan="2"></td><td rowspan="2">米 $</td><td rowspan="2">米 s s 米</td></tr><tr><td>s 米 S</td><td></td><td>S 米</td><td>L</td><td></td><td></td><td></td><td>米</td><td>米</td><td>米</td><td>t *</td><td></td><td></td><td>4 S</td><td></td><td></td><td></td><td>4 米</td><td></td><td></td><td></td><td></td><td>米 米 t</td><td></td><td></td><td></td><td></td><td></td><td></td><td>s</td></tr><tr><td>D D</td><td colspan="18" rowspan="16"></td><td></td><td></td><td></td><td></td><td>S</td><td></td><td></td><td></td><td></td><td></td><td></td><td></td><td></td><td rowspan="3">米</td><td></td><td rowspan="3">ddddo</td><td>4 米 S</td><td rowspan="3"></td><td>S</td><td rowspan="3">米 S 米 4 米 t s 米</td><td>* 米</td></tr><tr><td></td><td colspan="10">米</td><td>米</td><td></td><td></td><td></td><td></td><td></td><td></td><td></td><td></td><td rowspan="3"></td><td></td><td rowspan="3">米</td></tr><tr><td rowspan="8">米</td><td rowspan="8">S 米 S 米 s 米 4 米 s S 米 t S 米</td><td rowspan="8"></td><td rowspan="8">米</td><td rowspan="8">s 米 t S</td><td rowspan="8"></td><td rowspan="8"></td><td rowspan="8"></td><td>S 米 s</td><td></td><td></td><td>s S</td><td></td><td>S</td><td>S 米</td><td></td><td>S</td><td>s</td><td></td><td></td><td>S 米</td><td></td><td></td><td>米</td><td>S</td><td></td><td rowspan="3"></td></tr><tr><td></td><td></td><td></td><td></td><td></td><td>S</td><td>米</td><td></td><td></td><td>S S</td><td></td><td></td><td>S</td><td>S 米</td><td></td><td></td><td></td><td>米</td><td></td><td>S</td><td></td><td>米 S</td></tr><tr><td></td><td></td><td>来 米</td><td></td><td></td><td></td><td>S米</td><td>S 米 米</td><td></td><td></td><td>S</td><td>S 米</td><td></td><td></td><td>S</td><td>S S</td><td></td><td></td><td></td><td></td><td rowspan="3">米 米</td><td></td><td></td><td>S 米</td><td></td><td></td><td></td></tr><tr><td></td><td>S米</td><td>S米</td><td></td><td>S米</td><td>2米</td><td></td><td>J</td><td></td><td>*</td><td>t S米 t</td><td></td><td>米</td><td>S米 S</td><td>米 L</td><td>S米 S米 J</td><td></td><td>米 S米 2S米</td><td></td><td>S米</td><td>S米</td><td></td><td rowspan="3"></td><td colspan="2"></td><td>S S米</td><td>s</td><td>S米 S 米</td></tr><tr><td>米 t S</td><td></td><td></td><td></td><td></td><td>S米</td><td>t s</td><td>S米 4 S</td><td></td><td></td><td>S 米</td><td>t S</td><td>S米</td><td></td><td>米 t S</td><td>s 米 S</td><td></td><td></td><td>S米 L S</td><td>的米 4</td><td></td><td></td><td colspan="2"></td><td>s</td><td>t S米</td><td></td><td></td></tr><tr><td>米</td><td>S米 s 米</td><td></td><td></td><td></td><td></td><td>4</td><td>S米 S *</td><td>t 米 t</td><td></td><td>4</td><td>4 米 s 米</td><td>s *</td><td></td><td></td><td>S米</td><td>S</td><td></td><td>S米 J</td><td></td><td>米 t</td><td></td><td></td><td></td><td></td><td>米</td><td></td><td>s 米 t</td></tr><tr><td>D □ D D 口</td><td colspan="2">米</td><td>米 t S</td><td>t S 米 t S S 米</td><td>米</td><td>J S米 J 米 米 t s 米 S 米</td><td></td><td>s S s S 米 米</td><td>米 4 米 S 米 t S米 S 米</td><td>S 米 s * s 米</td><td>4 米 米S 米 米S米S米S米S米S米</td><td>S米</td><td>0 0 0 0</td><td>米 t S 米 s 米 S</td><td>米 S 文</td><td>4 s 米</td><td>t</td><td>S * S 米 S</td><td>s 米</td><td>S米</td><td>米</td><td>米 0</td><td>t t</td><td>米</td><td>米</td><td>米</td><td></td><td></td><td>米</td></tr><tr><td>□ □ 米 D D D □ □ □ 4 米 S米 t J D s t 米 D</td><td colspan="2"</table></body></html>
Tropicana Rose Pillow
| 4 S * * S米 S s 米 L 4 * S S 米 * S 米 米 S 米 S S S米 S米 S * S米 S米 L J S S * 米 * 1 s 口口口口口口口 米 米 米 S米 S 米 米 4 米 1 s S S 米 t 米 米 米 1 S S S S米 S o * t 米 * t 口口口口口口口口 1 S米 S米 s s米 S米 米 米 L 1 米 S S米 3 SI S 米 t 4 米 1 S S 9 S | 米 t S | |||||||||||||||||||||||||||||||||
| S | t | 4 * | 米 | * | oo | 1 6 1 | ||||||||||||||||||||||||||||
| S米 4 | s | s | S | S | S | S | S | S | s | 1 5 6 | ||||||||||||||||||||||||
| S米 | 米 S米 | s米 | S 米 | S 米 t S | s 米 S | S 米 t | s 米 | s 米 S | S 米 | S | 口口口口口口口口口口 1 | 1 5 5 | ||||||||||||||||||||||
| S米 r S米 | S * t | 米S | 米 | S米 t | 4 S米 | 米 | s * | t | S米 米 4 | * S米 | S米 | S米 | S米 | s | 4 米 | 1 | 5 5 3 | |||||||||||||||||
| S S | t | 4 米 | 0 | S 米 | S 米 4 米 S米 | t S S 米 米 | 4 S S 米 t 米 | 4 S米 S米 L | *s t S 米 t S t 米 | S 4 * S 0 0 0 0 0 | * S S米 4 S米 J s 米 * 米 0 0 0 0 0 0 0 0 0 0 0 0 0 | 4 s S 米 S米 0 0 0 0 . | 米 t S * 4 S * S 米 | t S米 t S S 4 米 S 米 S米S米S米S米S米S米S米S米S米S米S米S米S米S米 | S米 s S * t S 米 J s 米 | S * 4 S米 S米 * S米 米S | t S S S 米6 * | 4 * | 4 S 米 S S 米 | s 米 t s J 米 米 S 米 s S J 米 S米 | S | * s S 米 t * s 4 米 s 4 米 s * S米 t | 1 1 □□□□□□ 1 1 1 1 ★ 可可口口口口口可 1 1 1 1 口口口口口口口口口 1 1 1 1 1 1 1 | 5 1 4 9 4 4 5 4 3 4 3 9 3 7 3 3 2 9 2 2 2 3 2 1 1 1 7 5 1 1 9 0 0 5 o 0 1 9 | ||||||||||
| t 米 S米 S米 * 米 0 0 | J S米 s 米 0 0 0 | * | 米 0 0 | 米 米 | s S L 米 t S 米 * | |||||||||||||||||||||||||||||
Tropicana Rose Pillow
Tropicana Rose Pillow
Tropicana Rose Pillow
7
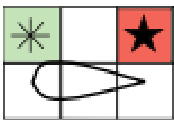
Knitting Key and Symbols
| 米 | ||
| s |
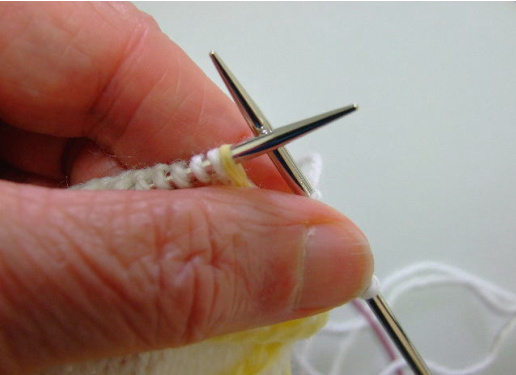
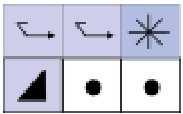
[S |·| = CC-R (2) You move the Slipped chain two sitiches to the right. See illustration below. As you can see, I do not use a dpn, or cable holder. Of course you can if you'd like, but this is much faster once you get the hang of it. I call it the SPP method(Stick, Pinch, Pull). This method applies to single moves as well.
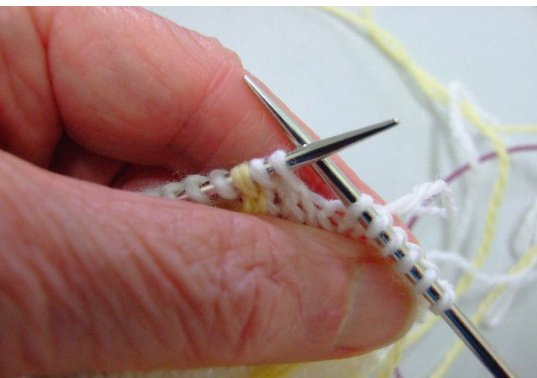
1. Stop 2 sts before the chain.
2. Insert RN into chain(Stick). Designed by Judith A Helms Copyright 2010 www.idahostixandstrings.com
Tropicana Rose Pillow
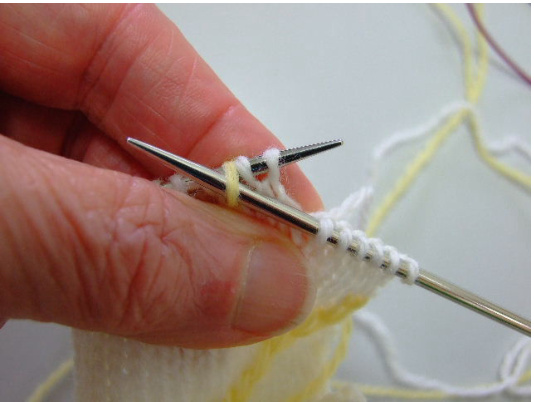
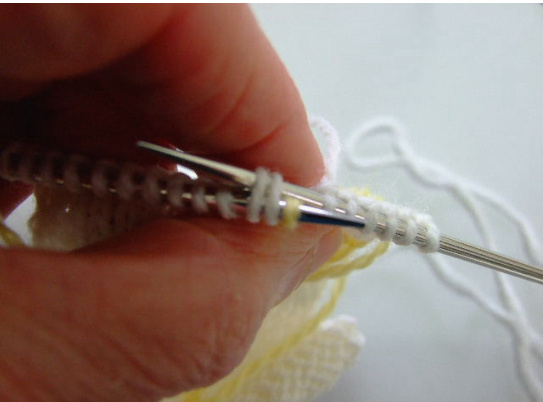
3. Pinch all 3 sts tog with right thumb and index finger. Pull off LN. Pick up freed sts with LN.
4. Replace chain to LN, and knit through back loop. You wil notice that he left leg of the chain in on the front side of the needle 米S= CC-L (2) Move Slipped st to left, two stitches.
1. Knit to chain.
Tropicana Rose Pillow
9
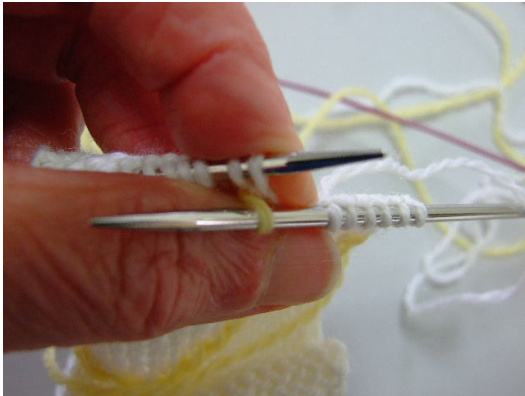
2. Stick RN into back of two sts to left.
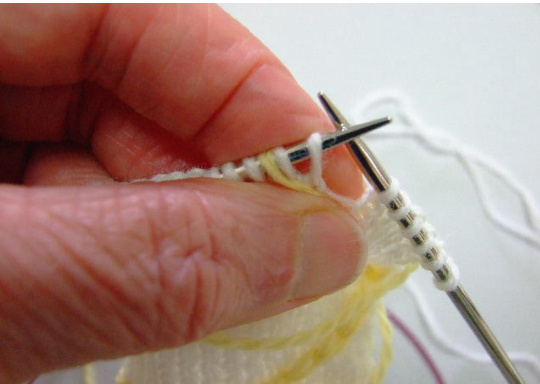
3. Pinch, Pull, releasing chain. Pick up chain with LN. Slip the two stitches moved back to LN. Knit 2.
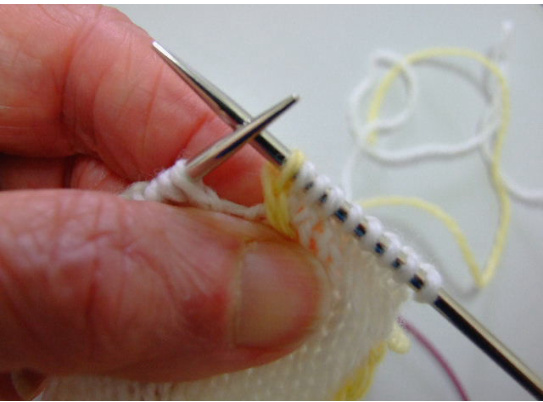
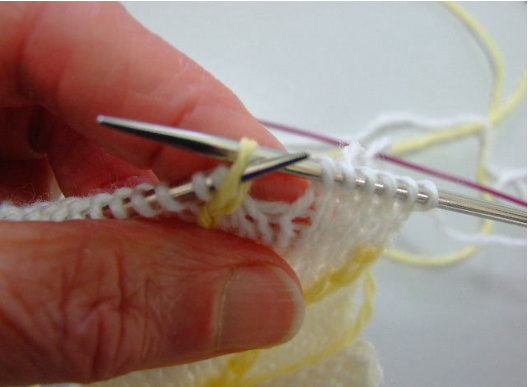
4. Knit chain. = New loop is knitting with the st to it's immediate right. = New loop is SSK'd with stitch to it's immediate left.

= Slip C-ch, knit center stitch and C-ch to left, tog. PSSO. V=FliYOsthathelf lofthelp is onyourlft pul through that lg to fom aw stitch (make one). Designed by Judith A Helms Copyright 2010 www.idahostixandstrings.com
Tropicana Rose Pillow
CN = circle needle SPP = Stick, Pinch, Pull (moving stitches without cable holders) K-ch = Knit chain, making sure that left leg of stitch is in front, then knit through back loop. All chains should lie open, resembling a crocheted chain. H-ch = Horizontal chain. H-loop = Horizontal chain loop
pn hald t CcC= Cable Chain Cros Put 1 &2 C ch and center st) on cable holder/ or dpn, hold to front of work. Knit chain(3) to left. Slip center st(2) onto LN, Knit. Slip remaining chain(1) onto LN. Make sure the left leg of stitch in at front of work, K -ch. You can also work this using my SPP(stick, pinch, pull) method. Begin by sticking the tip of the RN into the back of st #3(left side chain); SPP, release sts 1-2; pick up sts 1&2 on LN. Knit st #3. CC-L, sts 1&2, (this brings center st to right), knit center st. Reposition remaining chain on left needle, and knit it. Once you get this method you will find it very efficient.
Tropicana Rose Pillow
Knitting Notes
1. I use a long separate strand of yarn for my oval chains. Why? This gives you the flexibility to adjust the tension on your chains forming the oval, making it possible to have rounder corners. Cut about a 2 yarn strand, pick it up in the middle to make you first stitch as illustrated by the starred stitch above. You will be using the right tail to go up the right side, and the left tail to continue up the left side after you complete the horizontal chain across the 29throw. 2. When I work Intarsia, I use a Russian join to add to my strand of working yarn, rather than adding in a new one. I unwrap the yarn about 4 inches, and cut off one ply. I do the same for the new yarn. I thread a sharp needle with the single ply, then I lay the single ply of the new yarn over that section about half way down.. Beginning just where the yarns cross, I weavethe sinlge ply back into itself for at least 2 inch or more. Next, Itighten down the loop made over the new strand and smooth it out, trimming off any access.Threading the second strand, I repeat the process. The next step is to wet the yarns((I just put it in my mouth), then I rub them together(felt). I know this takes a bit of time, but it works great and eliminates a lot of ends you would otherwise have to weave in when you're done. If you need more info you might check out YOUTUBE, there are some good tutorials on the subject there. 3. Plan your colored strands additions. I often take one long strand and pick it up in the middle to begin the color, especially when it is a single stitch of color going in two directions.
Instructions
I am going to give you the first complete diamond border in a row by row fashion. From that point on you will follow the chart, accept for those rows that are starred- ( ★ ). These rows are marked on the right side of your chart. adjacent to the number of the row. All even numbered rows are purled, and the chains slipped, accept for the starred rows that include the bottom and top edge of the oval frame.
Set--up Rows
We begin with a provisional cast on. With crochet hook and waste yarn, chain 139. Break yarn, leaving about a 6 inch tail. Make loose knot about half way to end of yarn. With working background yarn, count in 5 chains from end that has the knot, and begin picking up 129 sts on #2 needle. Work as follows Row - A K1; P across to last st, K 1. Designed by Judith A Helms Copyright 2010 www.idahostixandstrings.com
Tropicana Rose Pillow
Row - B Knit across. Row - C K 1; P 2;\* Sl 1, P 1, Sl 1; P 9; repeat from \* 9 times; end Sl 1, P 1, Sl 1; P 2, K 1. Note - You will be knitting the beginning st of every row(edge stitch).
Beginning the Chart.
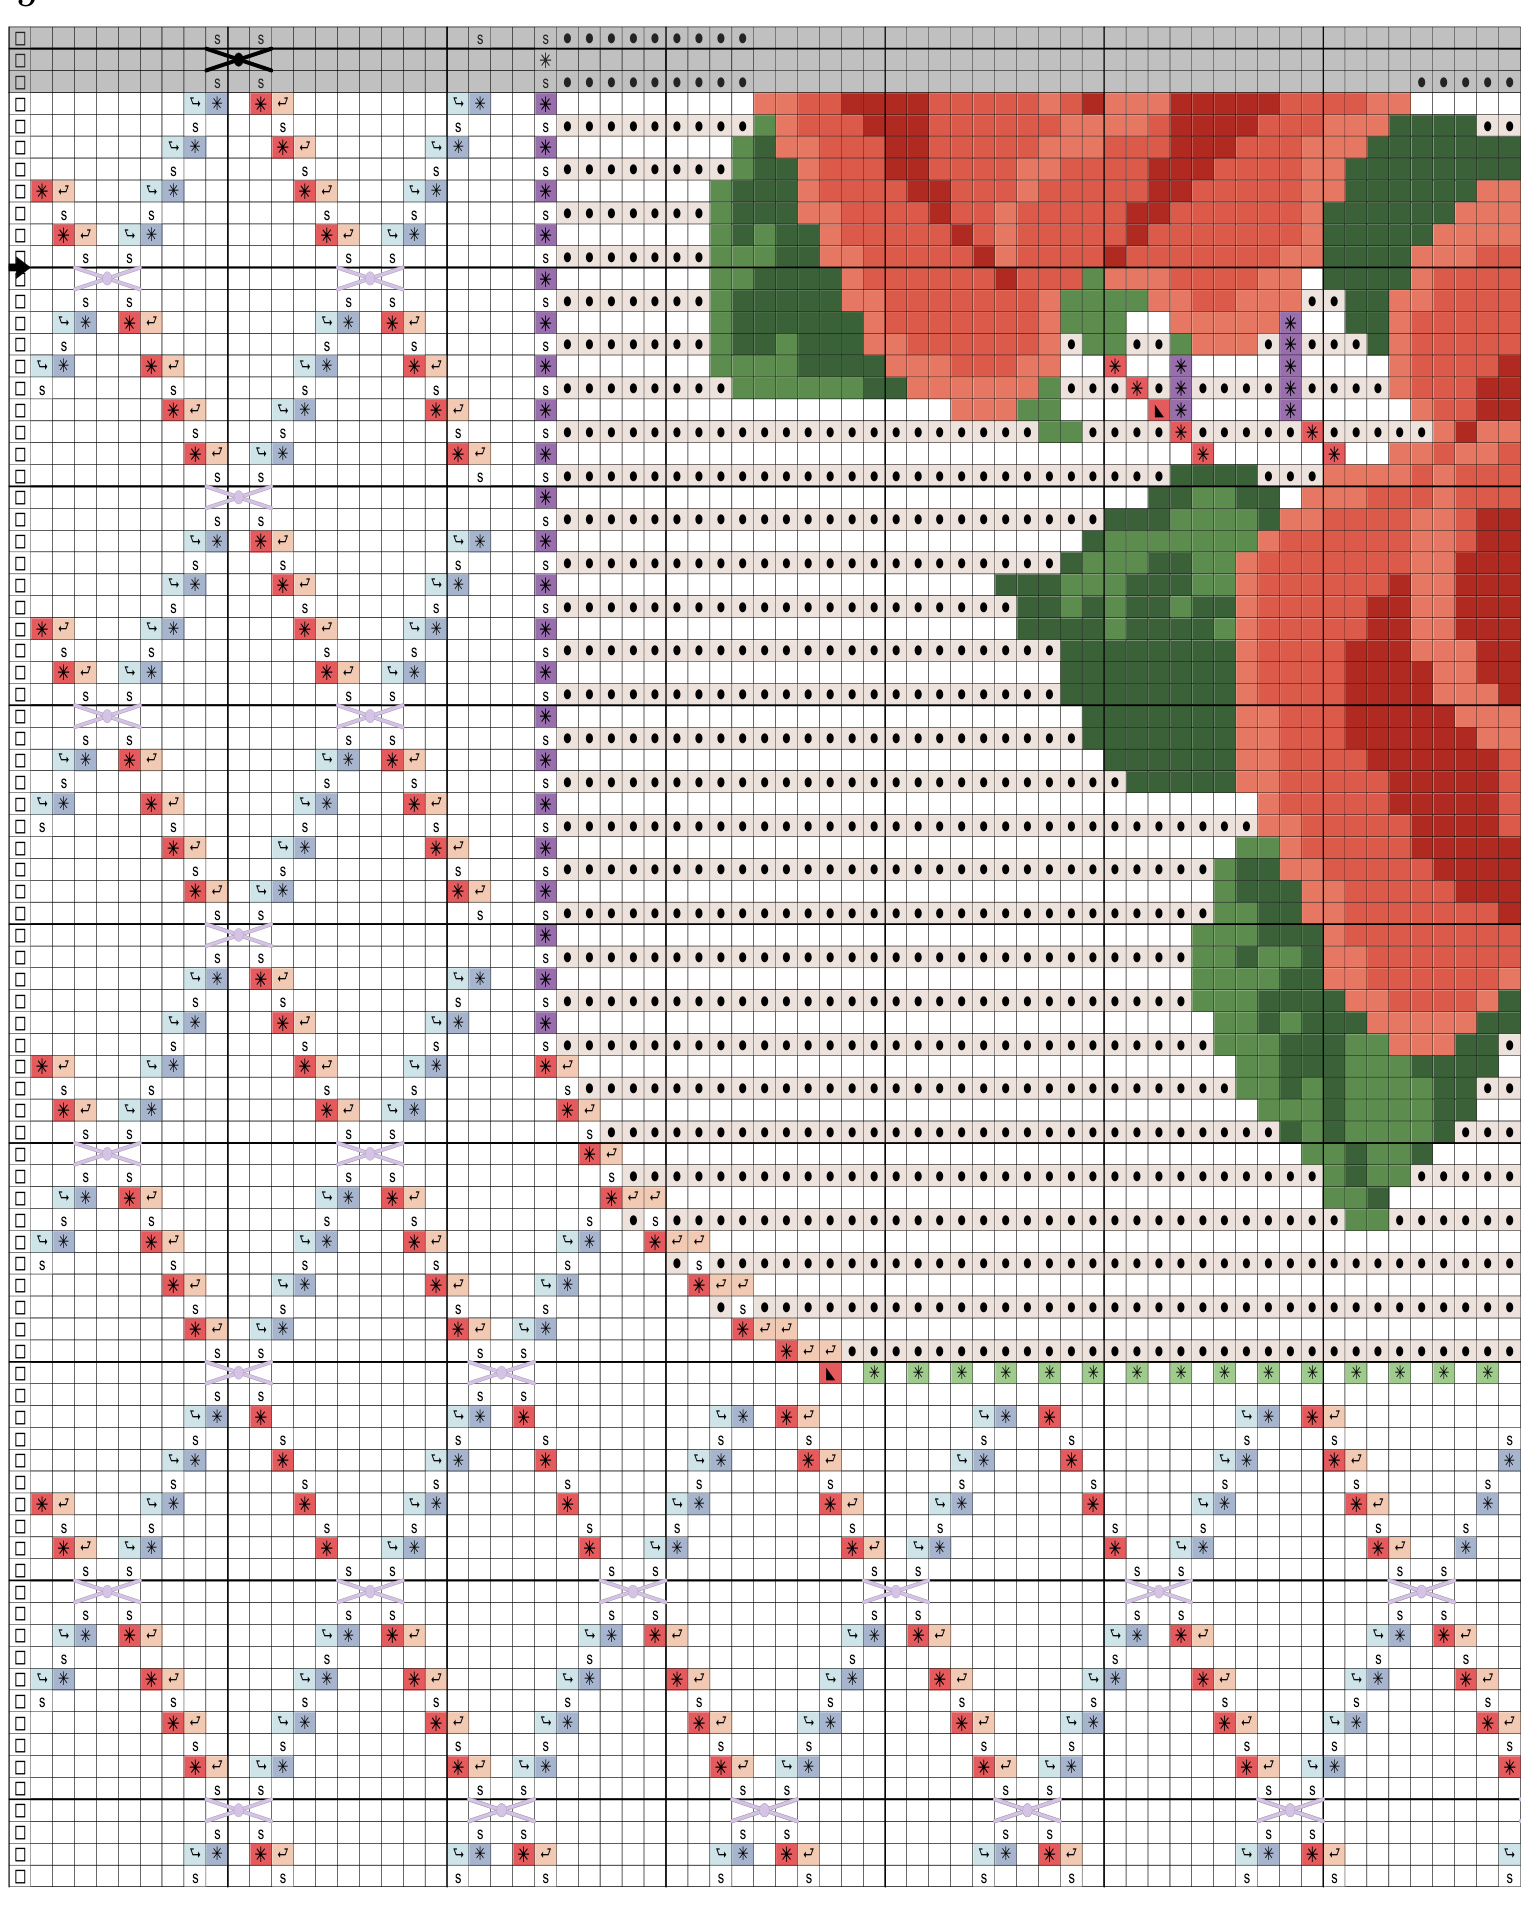
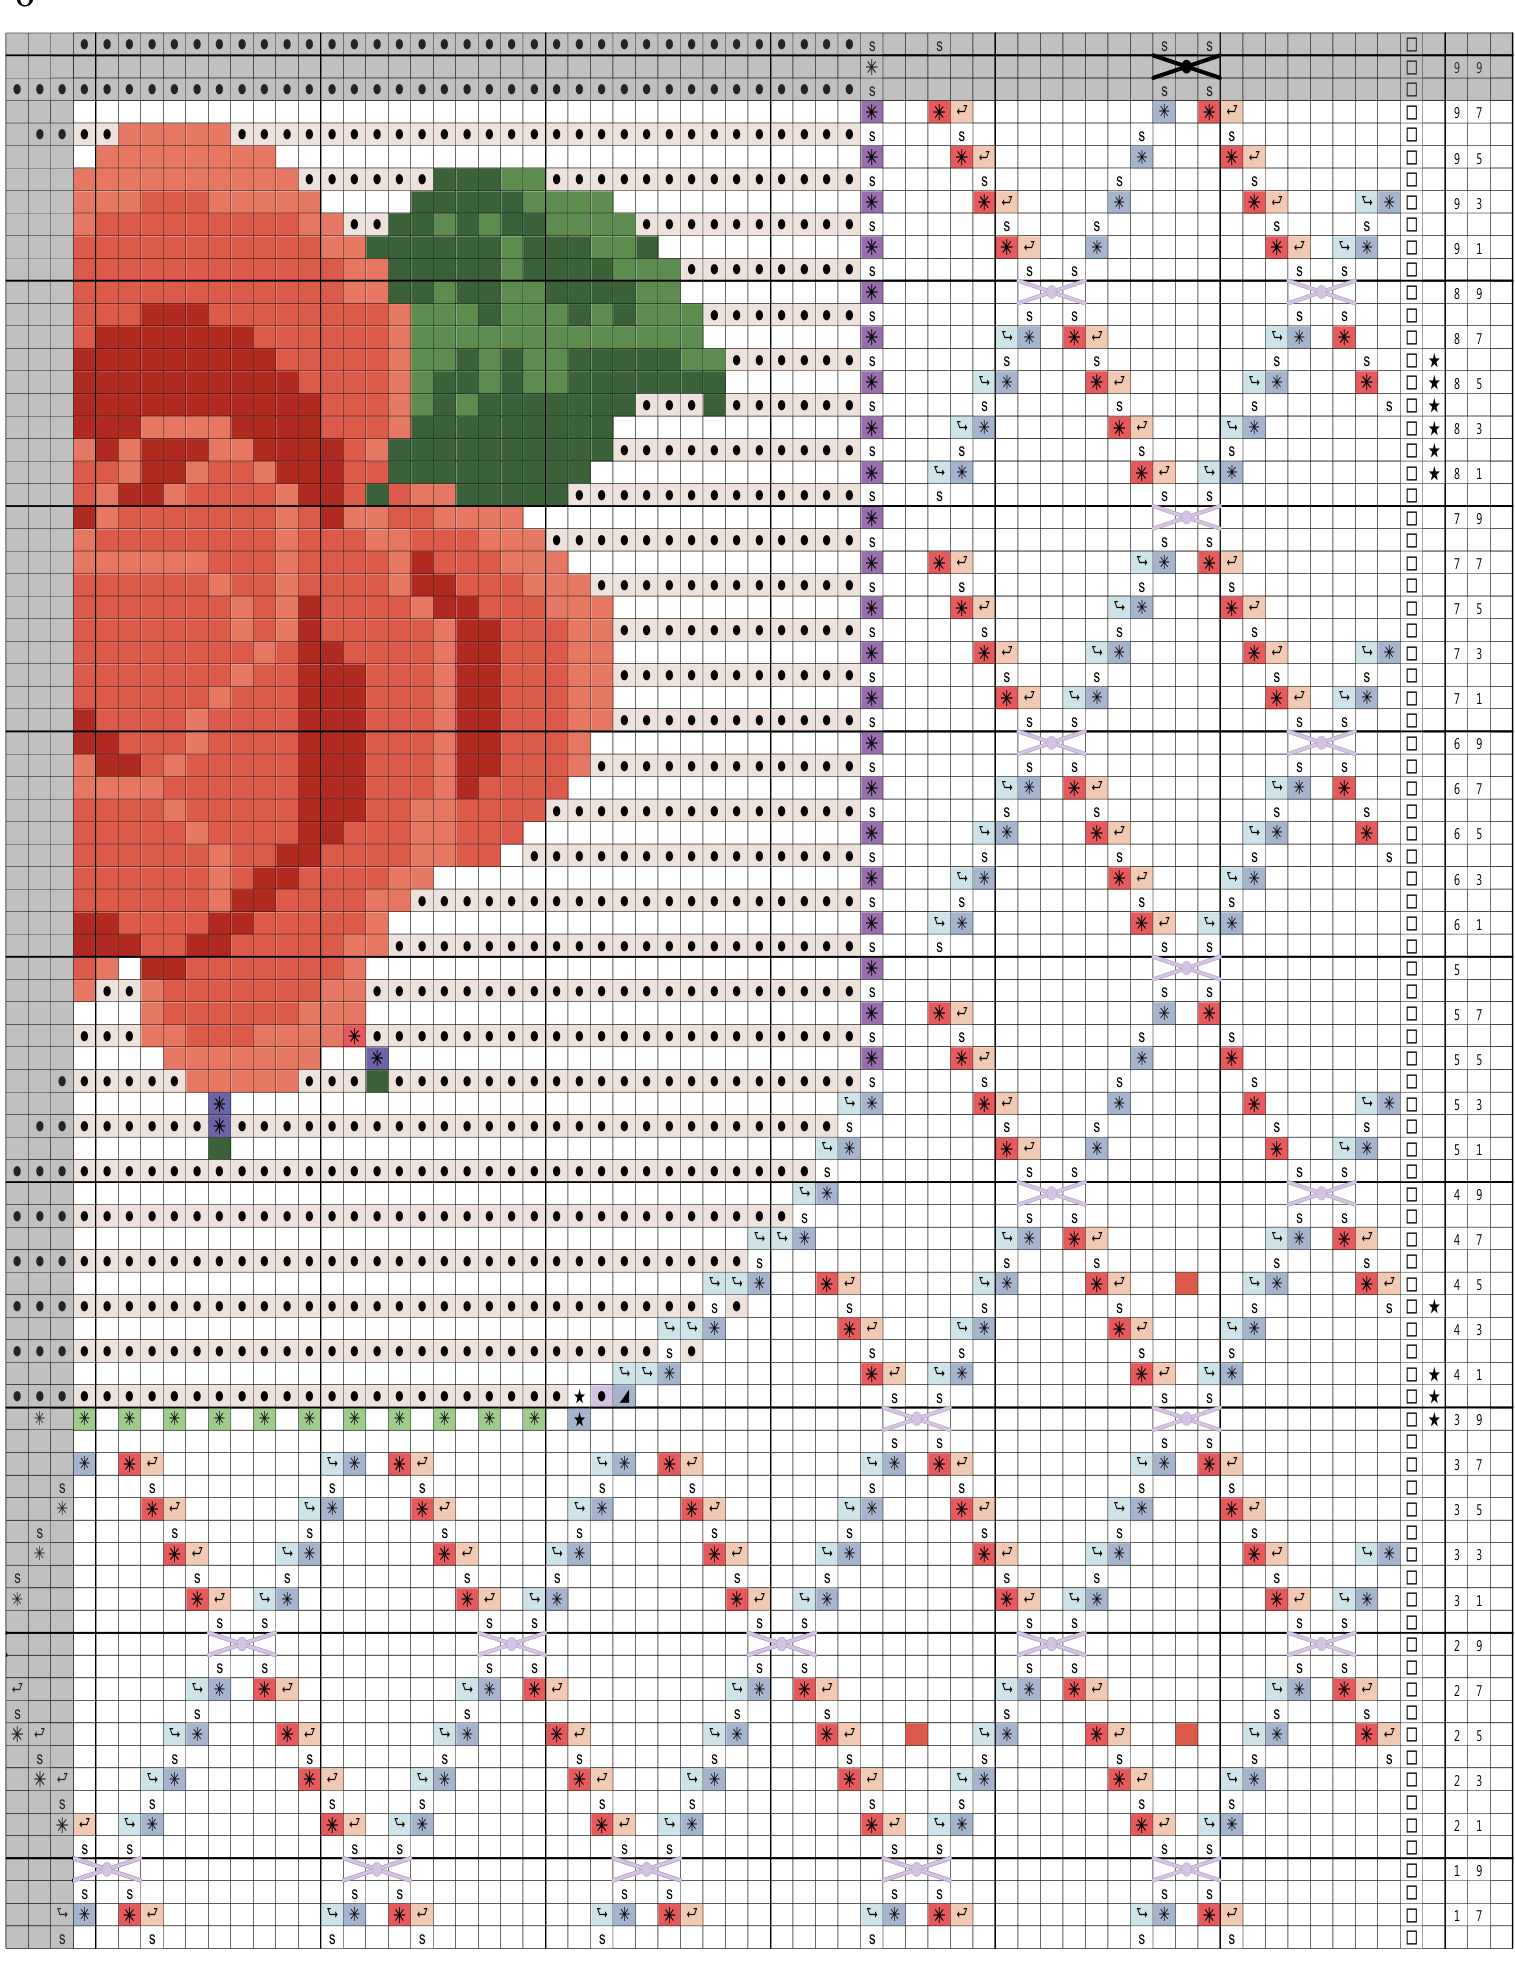
Row-1. K 2; \*[CC-R, K-ch, K 2, CC-L, K 1, K-ch; K 7]; Repeat from \*, 8 times; end- CC-R, K-ch, K 2, CC-L, K 1, K-ch, K 2. Row- 2. K 1, Purl across, slipping all chains, end K 1. Repeat this row for all even rows unless indicated by at beginning of row. Row- 3. K 1, \*[CC-R, K-ch, K 4, CC-L, K 1, K-ch; K 5]; repeat from \* 8 times. End - CC-R, Kch, K 4, CC-L, K 1, K-ch K 1. Row- 5. K 7; \*[CC-L, K1, K-ch, K 3, CC-R, K-ch; K 6]; repeat from \* 8 times. End - CC-L, K 1, K-ch, K 3, CC-R, K-ch; K8. Row- 7. K8; \*[CC-L, K 1, K-ch, K 1, CC-R, K-ch; K 8];repea tfrom \* 8 times. End - CC-L, K 1, K-ch, K 1, CC-R, K-ch; K9. Row- 9. K 9; \*[ work CCC over next 3 stitches; K 9];repeat from \* 8 times. End, work CCC ; K 9. Row- 11. K8; \*[CC-R, K-ch, K 2, CC-L, K 1, K-ch; K 7]; repeat from \* 8 times. End, CC-R, Kch, K 2, CC-L, K 1, K-ch; K 8. Row- 13. K 7, \*[CC-R, K-ch, K 4, CC-L, K 1, K-ch; K 5]; repeat from \* 8 times. End - CC-R, Kch, K 4, CC-L, K 1, K-ch K 7. Row- 15. K 1,\* [CC-L, K 1, K-ch; K 3, CC-R, K-ch, K 6]; repeat from \* 9 times. End -CC-L, K 1, K-ch; K 3, CC-R, K-ch, K 1. Row- 17. K 2;\* [CC-L, K 1, K-ch; K 1, CC-R, K-ch. K 8]; repeat from \* 9 times. End -[CC-L, K 1, K-ch; K 1,CC-R, K-ch. K3.] Row- 19. K3; \*[work CCC over next 3 sts; K 9]; repeat from \* 9 times. End- work CCC, K3. Rows 21-27, work as for rows 1-7. ow- 28. K 1, Purl across, slip chains where indicated on chart. End K : ★ Row- 29. K 9; work CCC; K 9, work CCC; K 13. Copyright 2010 www.idahostixandstrings.com
Tropicana Rose Pillow
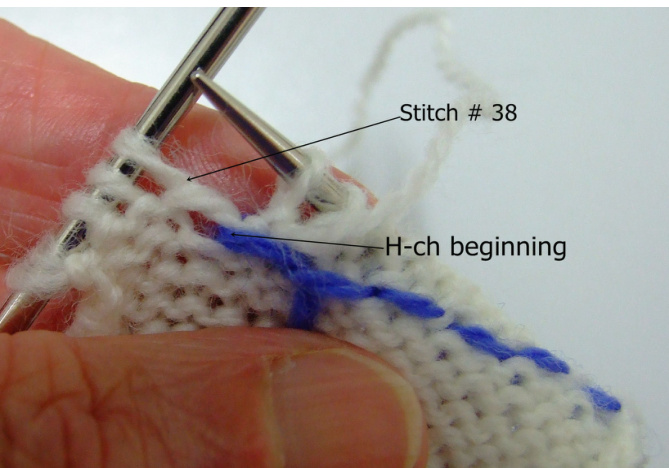
The starred stitch (38)is the beginning of the oval frame around the roses. Knit st 38 and 39, slip both stitches back to LN. Using a crochet hook and a separate strand of yarn, that has been picked up in the middle(see Knitting Notes), pick up loop in stitch just below the one you just knitted in #38, as shown in illust. side. Lay this loop to the left, holding it down with you left thumb. Slip st 39 and 39 back to RN. Slip new loop onto RN. This new loop is the beginning of your H-ch (horizontal chain). Now, slip the new loop onto the RN, and begin the horizontal chain across the row.
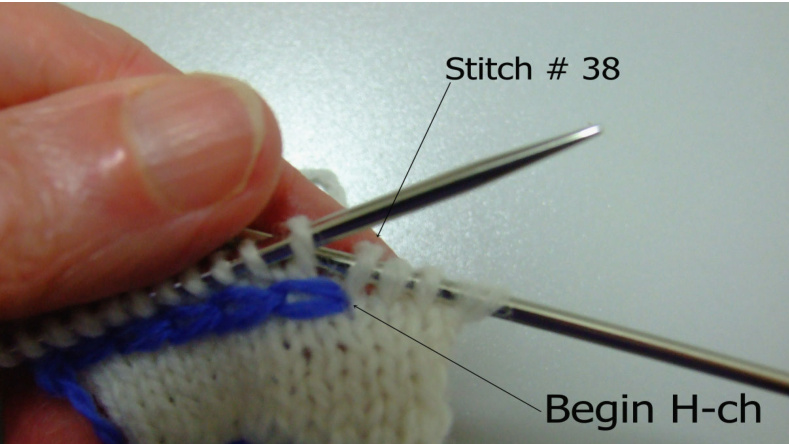
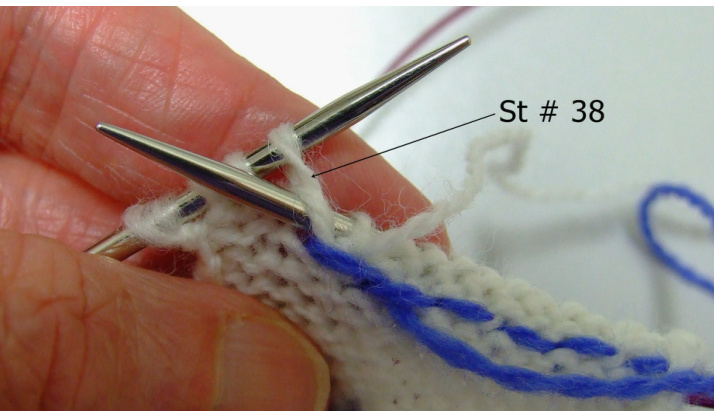
See the Wandering Cable Chain tutorial PDF included with this pattern for complete illustrated instructions on horizontal chain. You might want to work the practice piece first. Begin working the horizontal chain across the row,using the frame strand for the H chain, and the working yarn for the background stitches. Pick up the last H- ch at stitch 9o. Knit stitch 91 with working yarn, then SSK the last H-loop together with st # 92, using Frame strand. tinue across row with working yarn, K 13, work CCC, K 9, work CCC, K +Row- 30. K1, P8, Sl 1, P 1, Sl 1; P 9; Sl 1, P 1, Sl 1; P 11; Remember, it is the chain you are moving. If you look at the chart you can see it moving it 2 stitches to the left.米\~ But, to accomplish this from the purl side, you will make the same move as if you are moving it 2 stitches to the right. See pages 7-9.
Copyright 2010 www.idahostixandstrings.com
Tropicana Rose Pillow
Insert RN into the chain (92), SPP, releasing the 2 back ground sts,place them on the LN. Return the chain to the LN. Purl the chain, with the frame strand. ALT. OPT.- slip next 2 sts to dpn, or cable holder, hold to front of work, purl chain. Return 2 sts to LN, P 2. Be sure to use the frame strand to purl the chain. Now, with the working yarn purl across to st #38.
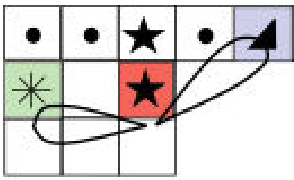
Chart view, front
Purlside view of st #38/
Insert needle as shown in same hole as you picked up the ist H-st.
Tropicana Rose Pillow
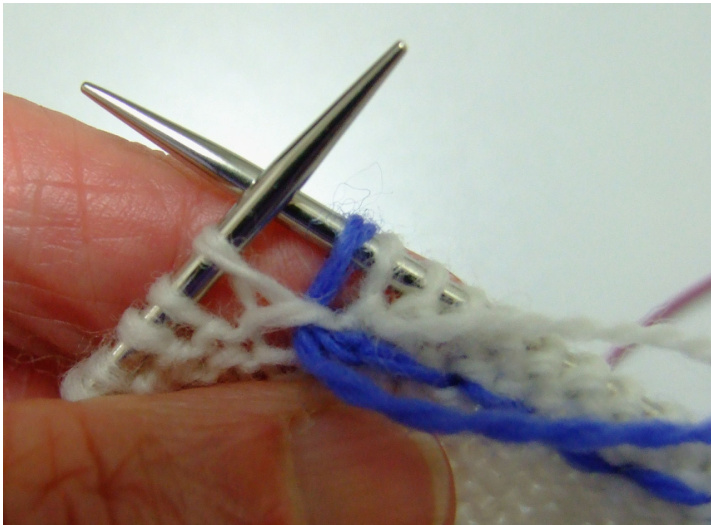
Using frame strand, pull loop through hole.

Release loop and hold to front. Next, with working yarn P sts #38 and 37.
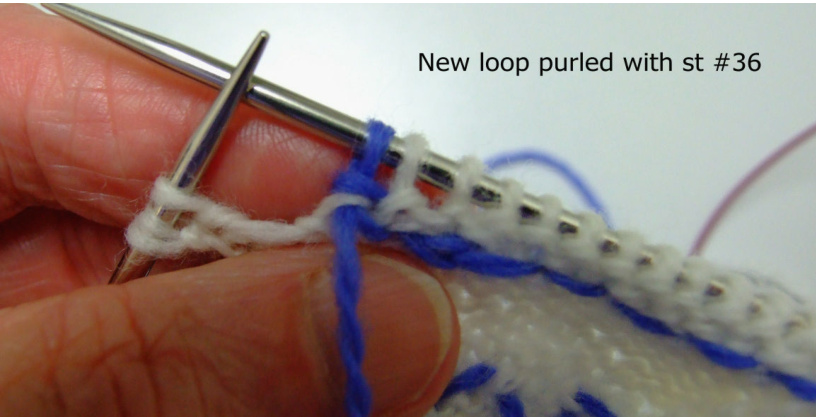
Purl new loop and st #36 tog. using frame strand.
Tropicana Rose Pillow
16
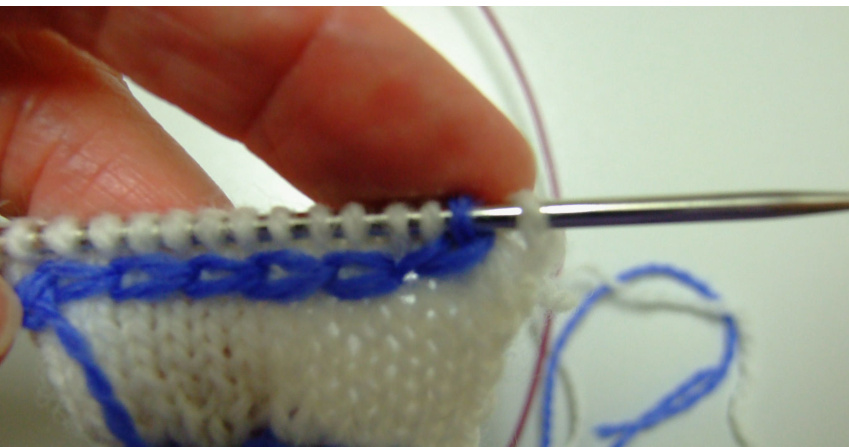
This is just a swatch view, but your new chain leaning to the right should look like this.
CONT. ROW
Pick up working yarn and P 11, Sl 1, P 1, Sl 1, P 9; Sl 1, P 1, Sl 1; P 8, K 1 -R, K-ch, K 2, CC-L, K 1, K-ch; K 7; CC-R, K-ch, K 2, CC-L, K 1, K-ch; K CC-R (2) see page 7-9; K-ch, Knit 59 sts.

CC-L (2) see pg 8-9; K 2, K-ch. K 8; CC-R, K-ch, K 2, CC-L, K1, K-ch. K 7; CC-R, K-ch, K 2, CC-L, K 1, K-ch; K 8. \* You will also notice that on the last two rows, unlike the rest of the pattern, we did not slip the chain as before. This was done to create a more gradual curve on both sides, each using it's respective frame strand. the stitch wil lbe elongated without slipping because it is on a separate strans .It is at this point that I check the tension on my chains, adjusting them with the tip of one of my needles, woking my way up the chain, taking up any slack. Row- 32. K 1, purl across, slipping all chains indicated on chart. End K 1. Row- 33. K 7; CC-R, K-ch, K 4, CC-L, K 1, K-ch; K 5, CC-R, K-ch, K 4, CC-L, K 1, K-ch; K 5, CC-R (2), K63, CC-L (2), K 2, K-ch; K5, CC-R, K-ch, K 4, CC-L, K 1, K-ch; K 5; CC-R, K-ch, K 4, CC-L, K 1, K-ch; K 7. Row-34. K1, Sl 1, P5, Sl 1, P5, Sl 1, P 5, Sl 1, P 5, Sl 1; P 61; Sl 1, P 5, Sl1, P5, Sl 1, P 5, Sl 1, P5, Sl 1, P 5, Sl 1, K 1. Row- 35. K 1, CC-L, K 1, K-ch, K 3, CC-R, K-ch; K 6, CC-L, K 1, K-ch, K 3, CC-R, K-ch, K 6; CCL, K 1, K-ch; K 2; CC-R (2), K 67, CC-L (2), K 2, K-ch; K 2; CC-R, K-ch, K 6; CC-L, K 1, K-ch, K 3, CC-R, K-ch, K 6; CC-L, K 1, K-ch, K 3, CC-R, K-ch, K 2. \* Row- 36. K 1, Purl across, slipping all chains. BEGIN INTARSIA DESIGN Designed by Judith A Helms Copyright 2010 www.idahostixandstrings.com
Tropicana Rose Pillow
\* Stem options
1. Knit in normally 2. Establish them as a chain 3. Creating them with a crochet hook after the piece is done. I like #3. It gives me complete control over the stitches, but ittotally depends on the look you Want. Continue to work chart as establish through row 127. Row- 128. K1, P 8, Sl 1, P 1, Sl 1; P 9; Sl 1, P 1, Sl 1; P 9; You see this 米on the chart, but, you will be performing the move explained below. 2 i1 Ch Thisis the pur side vew. Slip the tip of your RN under the front lops ofst and 2. Pinch all three sts, pull off to the right, freeing the chain. Pick up chain with LN. Slip st 1 and 2 back onto LN. Purl st 1 and 2 with working yarn. P the chain with frame strand. The chain has been moved to the your left (toward the center). It now looks like this. With working yarn, P 57.

Ch 1l 2 Thisis the purl side view. Slin thetipofyourRN around to the kitside and stick it through the back loop of the Chain. PInch to secure all three sts, pull of needle to right. Pick up sts 1 and 2 with LN. Slip chain onto LN, Purl with frame strand. The chain has been moved to the right(toward center). It now looks lide this.·米 With working yarn P 11; Sl 1, P 1, Sl 1; P 9; Sl 1, P 1, Sl 1; P 9. \*Row- 129. K 9; Wk CCC over next 3 sts. K 9, Wk CCC over next 3 sts. K 11, CC-L (2) K 2, K ch with frame strand, dropnew st of chain off needle, hold down with left thumb. With working yarn, YO, K 1. Slip chain loop under thumb back up onto RN. Use this loop to begin working the H-chain across the top. Work horizontal chain across row. Pick up last H-loop through st #9o. K next st (91). Work CC-R (2), but instead of knitting the chain, pass it over the last H-loop on RN. Pull last H-loop completely through. With yarn needle bring it through it's original base to back of work. You can fast it now, or later. Drop frame yarn. Copyright 2010 www.idahostixandstrings.com
Tropicana Rose Pillow
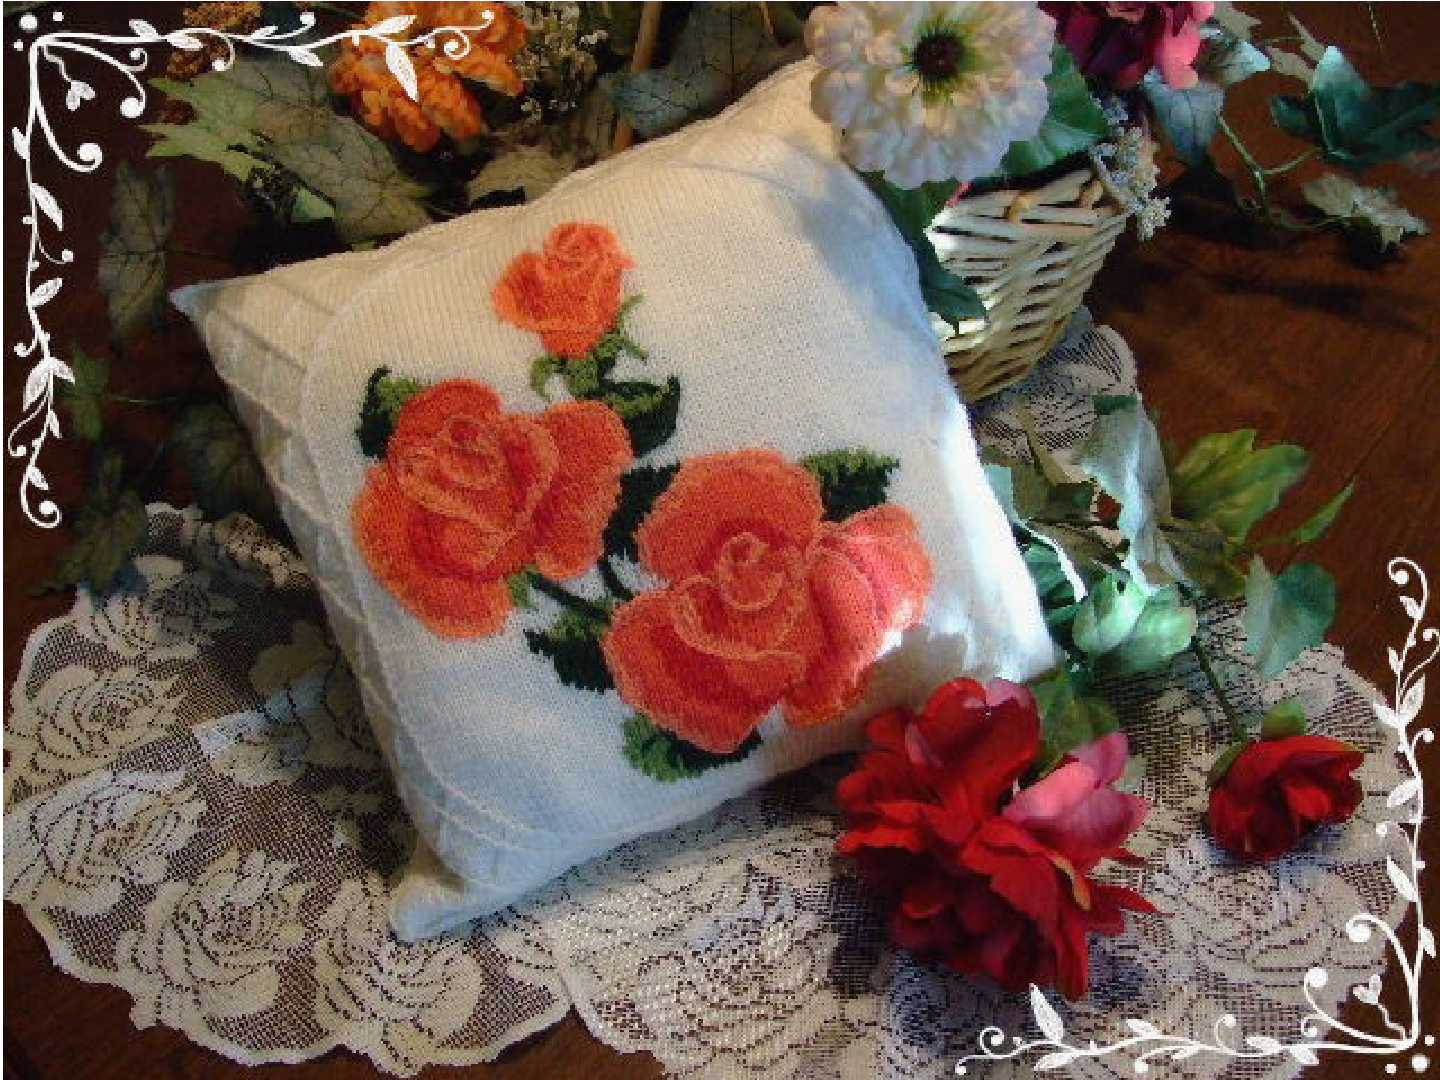
18 With working yarn YO, K13, wk CCC over next 3 sts. K 9; wk CCC over next 3 sts. K 9. ★ Row- 130. K1, P 8; Sl 1, P 1, Sl 1; \*[ P 9; Sl 1,P 1, Sl 1];Repeat 6 times; P 7, make one (flip YO, so that the left left of the loop is on your left, purl through this leg). P 1; Sl 1, P 1, Sl 1; P 9, Sl 1, P 1, Sl 1; P 9, Sl 1, P 1, Sl 1; P 8, K 1. Rows 131-175. You are now set up to finish the chart, working the chains as before. Row- 176. Purl across Row- 177. Knit across Row- 178. Purl across Row- 179. Knit across Once finished, you now can decide if you want to outline the roses with a crocheted chain as I did, leave the needlepoint look. If you are going to outline, then use only one ply of the wool. You can see in the photo that I used the lightest shade of salmon.

Getting Ready to Block
1. Slip row 161 onto one of the 24 inch fixed CN. A. Stop here and weave in all tails before proceeding. 2. With right side of work facing you, pick up 132 sts,(extra sts are for corner ease) down left side of pillow top, Pick rate is PU-4, Skip 1. Put these sts on another 24 inchCN. Designed by Judith A Helms Copyright 2010 www.idahostixandstrings.com
Tropicana Rose Pillow
3. Carefully release provisional chain starting at the end you made the knot in. Slip the sts onto your third 24 inch CN. Turn work so right side is facing. With working yarn, knit arcoss the129 sts. 4. Now that your 24 in. CN is released,use it to pick up the 132 sts on the left side of the pillow top. Once you havepicked up all the sts, put each individual side onto a piece of waste yarnor individual needles, leaving a generous tail. Soak unit in tepid water with a bit of wool wash. Squeeze out the water, and block it on a towel that has been place on a suface you can pin through. Use your needles ( or waste yarn)as blocking rods, pinning against them to block your pillow to size, 16 by 16. Let dry. If you need your needles, thread a strand of waste yarn, and carefully remove one needle, picking up the edge sts. Repeat this process for each needle. Set top aside for later assembly.
Back
1. Cast on 129 as before. 2. Your options for the back are many A. Knit it in plain stockinette B. Duplicate the front without the picture C. Duplicate the front with another color combo for the roses D. Work the diamond pattern over the entire surface. That's what I did. E. Work the front pattern without the roses.
Pillow Assembly
When back is finished, pick up stitches on sides and bottom as before and block. Once you have the back on the waste yarn strands, you can begin the assembly as follows: 1. With wrongs sides of pillow together(right sides facing out) check to make sure they they match-top to top, bottom to bottom. 2. Slip one side of sts of pillow top back onto a 24 in CN, then slip the sts of the corresponding sts of back onto another 24 in CN. Beginning at a corner, work a 3 needle bind off across these sts. Repeat this process twice more. You now have bound off 3 sides of your pillow. 3. Slip the last remaining sts of pillow onto your 2 , 24 in, CN's. Insert a purchased pillow form, or one you have made yourself. Designed by Judith A Helms Copyright 2010 www.idahostixandstrings.com
Tropicana Rose Pillow
4. Using the 3 needle bind off, close the last section. Fasten and weave ends in. \* If you want to be able to remove cover, knit and extra 1/2 -3/4 in to the last section on each side. Fold under and insert a zipper. You can also re-inforce it with ribbon.
Edge Options
As you can see in the picture at the beginning of this file, I originally chose to leave my pillow plain. But, then, I just had to try making a fringe. See picture on next page. This fringe is made up of 3 strands of 7 in. long yarn, folded into, and drawn through with a crochet hook, every other st along BO edge. I think it works well, but it's your call. Be sure to comb out and steam your fringe before trimming.