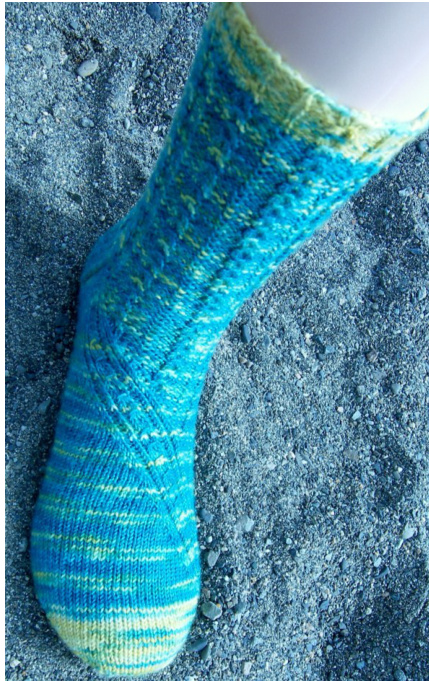
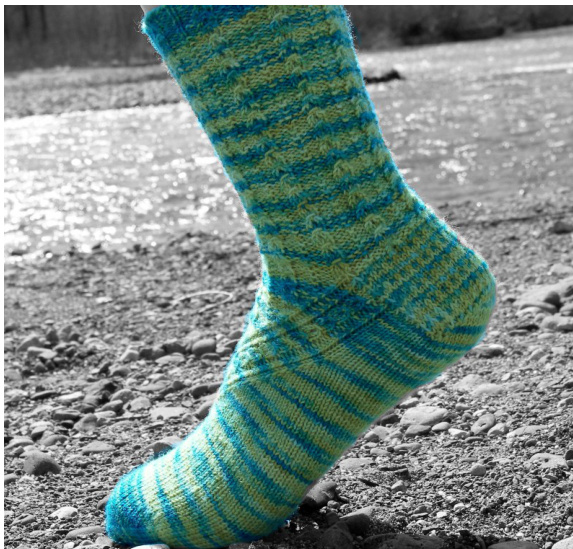
Bubble Stream designed by Cailyn Meyer dailyskein.wordpress.com
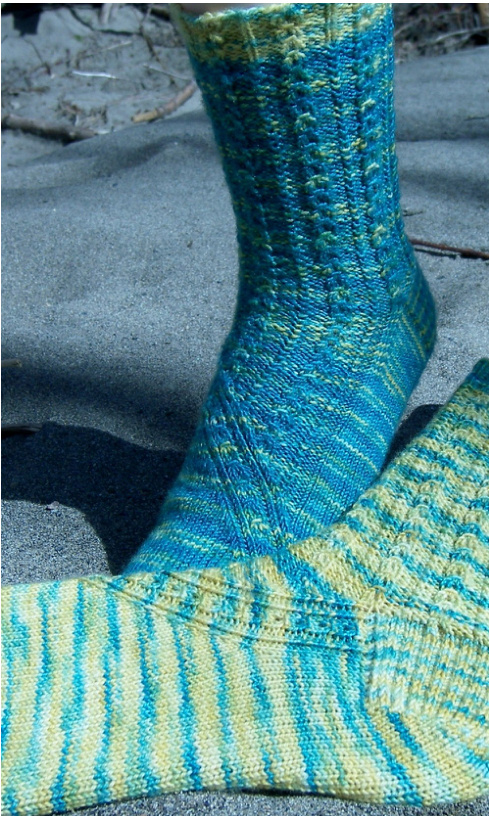
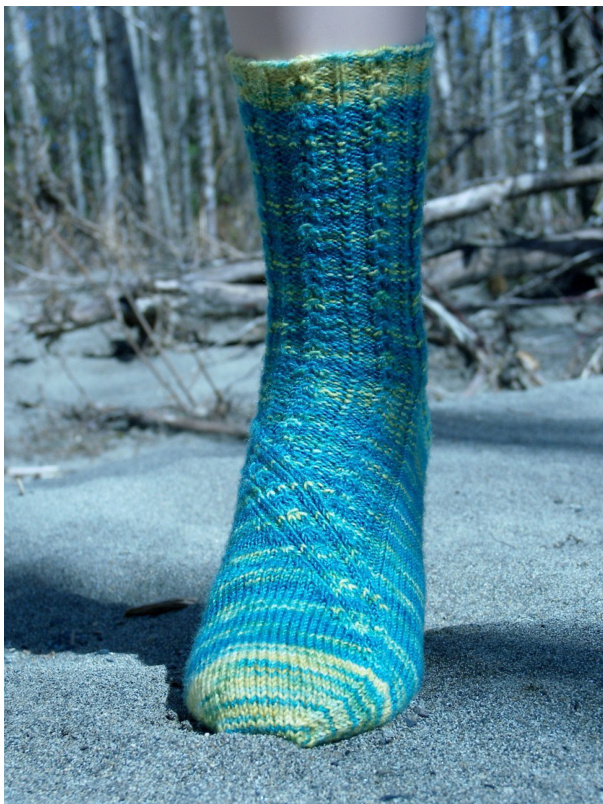
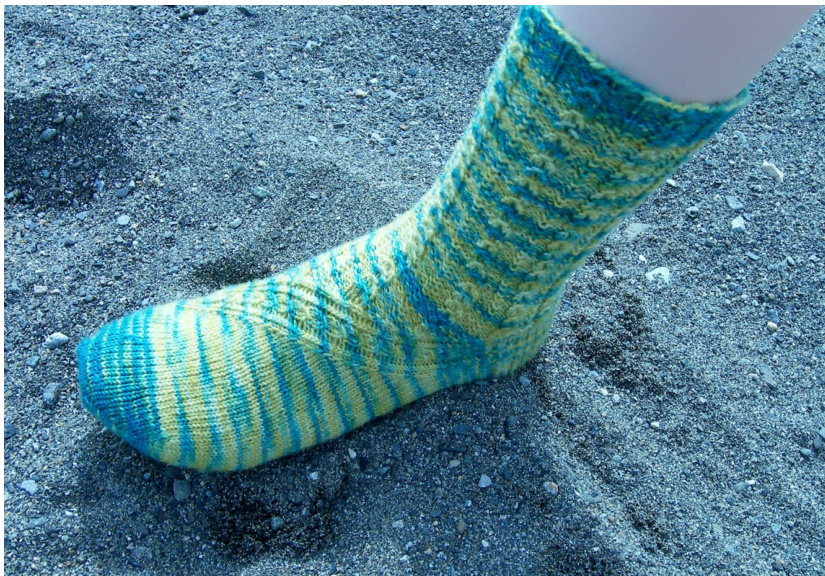
Finished Size: 7.5"midfoot circumference ● Yarn: Barking Dog Yarns Opposites Attract [100% Superwash merino] 400 yds/4 oz Color: Tristan and Isolde; 1 ●Needle: Size 1 (2.25mm) or size needed to obtain gauge Gauge: 40 sts x 58 rows = 4" in Chart B ● Notions: Scrap yarn or stitch holder, 3 stitch markers, tapestryneedle Bubble Stream is a playful sock that was designed for the Barking Dog Yarns April knitalong. The little bubbles are made with mock cables that are fun to work, using just a slipped stitch and a yarn over. The mock cables alternate with a line of moss stitch to add a little interest in between. But the best part of this sock pattern is the gusset and foot.
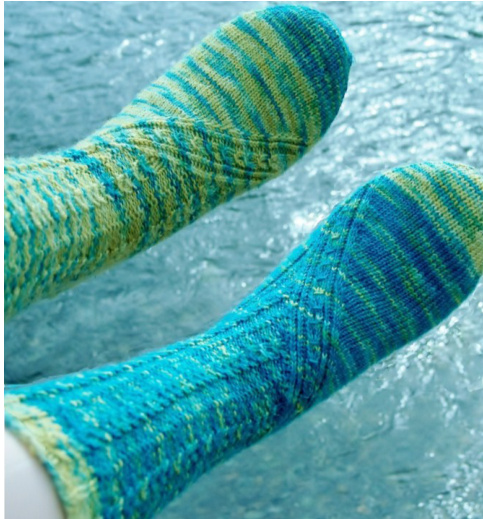
Half of the gusset is patterned in the same mock cable with twisted stitches on either side for emphasis. This panel travels across the foot, ending at the opposite side just in time to start the toe. Each sock (left or right) has it's own page of written directions, although the instructions for the leg and heel are the same for both socks. There is also a separate page for each sock's charts, although Chart A and B are the same on both. This way there is less flipping back and forth between pages for eachsock.
The pattern begins by casting on in "Color 1." Either miniskein of Opposites Attract can be Color l; it is just a shorter the color that you're not using for the leg of the sock.' The sock measures about 7 inches long by the time Chart E/H is completed; the last page of the pattern has a suggestion for shortening the sock if needed. If you don't need a shorter sock, then the last page of the pattern does not need to be printed (except there are pretty pictures there too).
If you have questions or comments about this pattern, please email Cailyn at dailyskein@gmail.com or message CailynDragon on Ravelry.
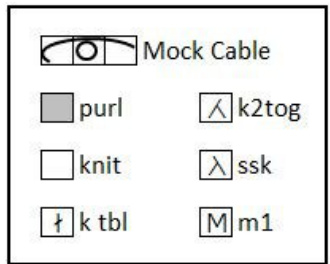
Special Stitches
Mock Cable: Insert right needle purlwise into third stitch on the left needle. Pull this stitch up and over the first two stitches and off the needle. Knit the first stitch on the left needle, yarn over, knit the second stitch. Mock cable completed. er the strand between the stitches from front to back and knit into the back of the new stit m1p: Insert left needle under the strand between the stitches from back to front and purl into the front of the new stitch k tbl: knit through the back loop sm: slip marker
Right Sock
Cuff CO 64 sts in Color 1. Join in the round, being careful not to twist."Color 1"can be either color. Work Rounds 1-4 of Chart A until work measures 1 inch from cast on, ending on Round 4. Chart A repeats 4 times around thesock. Cut Color 1 and join Color 2. Leg Work Rounds 1-4 of Chart B until leg is desired length (shown 6 inches) ending on Round 4. Chart B repeats 4 times around the sock.
Heel
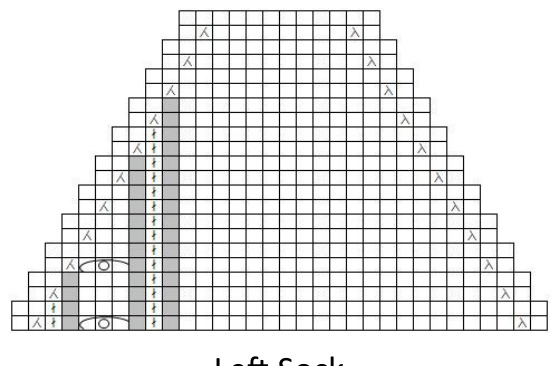
To center the heel flap and instep design, the first stitch of the round is knitted and placed on the heel needle as the first stitch of the heel. Row 1 (RS): Knit the first st of the round, turn. This is the first heel stitch. Row 2 (Ws): Sl 1, purl 15, m1p, p15, turn. 1 st increased. Heel will be worked back and forth over these 32 stitches. The heel stitches, including the stitch from Row 1, should be on one needle. Put the other 33 stitches on a spare needle, scrap yarn, or stitch holder as desired. Row 3 (RS): \*SI 1, k1\* 16x, turn. Row 4 (WS): SI 1, p31, turn. Row 5 (RS): \*SI 1, k1\* 16x, turn. Repeat Rows 4-5 another 14 times, for a total of 32 rows (16 slipped stitches on each side of the heel flap) ending on Row 5. Turn Heel Row 1 (Ws): Sl 1, p17, p2tog, p1, turn. Row 2 (RS): Sl 1, k5, ssk, k1, turn. Row 3: Sl 1, p6, p2tog, p1, turn. Row 4: Sl 1, k7, ssk, k1, turn. Row 5: Sl 1, p8, p2tog, p1, turn. Row 6: Sl 1, k9, ssk, k1, turn. Row 7: Sl 1, p10, p2tog, p1, turn. Row 8: Sl 1, k11, ssk, k1, turn. Row 9: Sl 1, p12, p2tog, p1, turn. Row 10: Sl 1, k13, ssk, k1, turn. Row 11: Sl 1, p14, p2tog, p1, turn. Row 12: Sl 1, k15, ssk, k1, turn. Row 13: Sl 1, p16, p2tog, turn. Row 14: Sl 1, k16, ssk, do not turn. 18 sts remain. Gusset Pick up and knit 16 sts along the heel flap. Instep: K2, \*p5, k3,\* 3x, p5, k2. Pick up and knit 16 sts along the heel flap, k7, k2tog. Mark this as the beginning of the round. The decrease takes care of the extra stitch that was increased on the heel flap. 82 sts. The decreases for the gusset on the right side will consume instep stitches. The decreases for the gusset on the left side will consume the gusset stitches as normal. Chart C is worked once per round; it does not repeat. K16, work next row of Chart C, knit to the end of the round. Continue as above until all 18 rows of Chart C have been worked.64 sts. Foot Chart D continues the crossover pattern from Chart C. Chart D is worked once per round; it does not repeat. K15, work next row of Chart D, knit to the end of the round. Workasaboveuntil all44rowsofChartDhavebeenworked. Chart E continues the crossover pattern. Chart E is worked on the left side of the instep; it does not repeat. K37, work next row of Chart E, knit to the end of the round. Continue asaboveuntil all17rowsofChartEhavebeen worked. Knit until foot is 1.5" shorter than desired length. Toe Cut Color 1 and join Color 2. Set Up Round: K16, place marker, k32, place marker, k16. Round 1: Knit to 3 sts before first marker, k2tog, k1, sm, k1, ssk, knit to 3 sts before second marker, k2tog, k1, sm, k1, ssk, knit to the end of the round. Round 2: Knit all stitches. Repeat Rounds 1-2 until 24 stitches remain. Graft remaining stitches together. Weave in all ends and block if desired. This work by Cailyn Meyer is licensed under a Creative Commons Attribution -Noncommercial-ShareAlike3.0 United StatesLicense.April 2011.
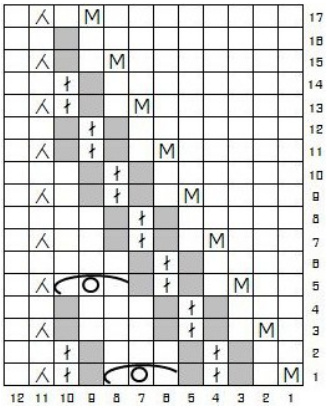
Chart E
Chart D
Right Sock
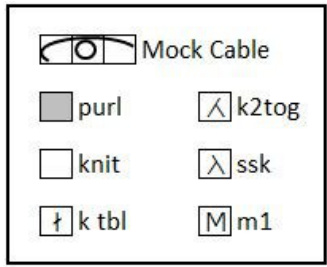
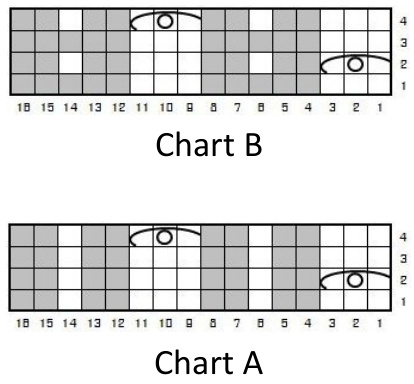
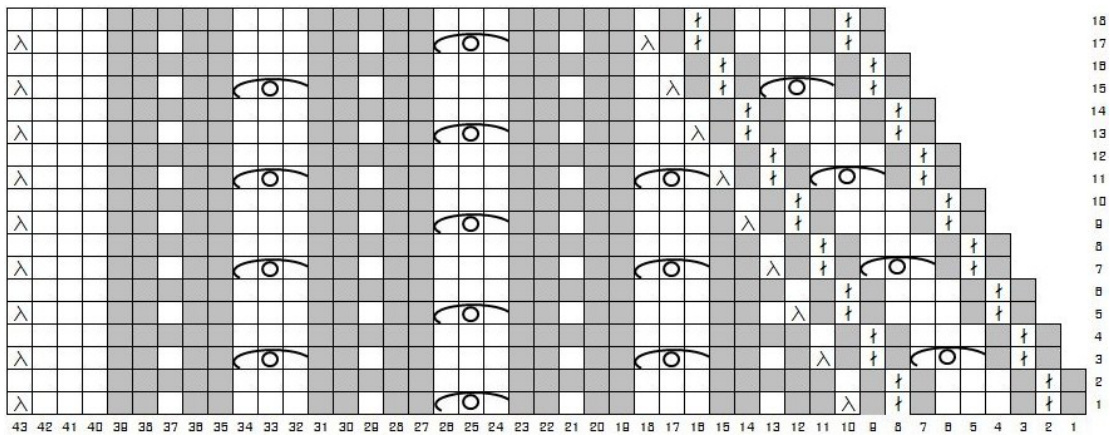
Chart C
Left Sock
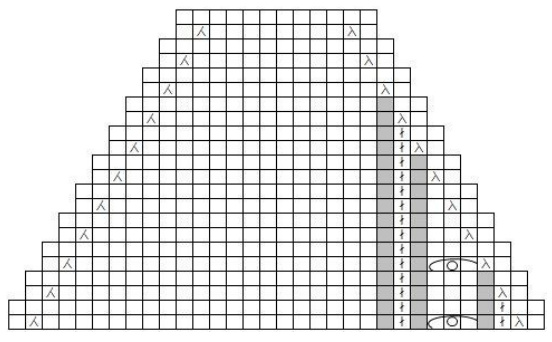
Cuff CO 64 sts in Color 2. Join in the round, being careful not to twist. Work Rows 1-4 of Chart A until work measures 1 inch from cast on, ending on Row 4. Chart A repeats 4 times around the sock. Cut Color 2 and join Color 1. Leg Work Rows 1-4 of Chart B until leg is desired length (shown 6 inches) ending on Row 4. Chart B repeats 4 times around the sock. Heel To center the heel flap and instep design, the first stitch of the round is knitted and placed on the heel needle as the first stitch of the heel. Row 1 (RS): Knit the first st of the round, turn. This is the first heel stitch. Row 2 (Ws): Sl 1, purl 15, m1p, p15, turn. 1 st increased. Heel will be worked back and forth over these 32 stitches. The heel stitches, including the stitch from Row 1, should be on one needle. Put the other 33 stitches on a spare needle, scrap yarn, or stitch holder as desired. Row 3 (RS): \*SI 1, k1\* 16x, turn. Row 4 (ws): Sl 1, p31, turn. Row 5 (RS): \*SI 1, k1\* 16x, turn. Repeat Rows 4-5 another 14 times, for a total of 32 rows (16 slipped stitches on each side of the heel flap) ending on Row 5. Turn Heel Row 1 (Ws): Sl 1, p17, p2tog, p1, turn. Row 2 (RS): Sl 1, k5, ssk, k1, turn. Row 3: Sl 1, p6, p2tog, p1, turn. Row 4: Sl 1, k7, ssk, k1, turn. Row 5: Sl 1, p8, p2tog, p1, turn. Row 6: Sl 1, k9, ssk, k1, turn. Row 7: Sl 1, p10, p2tog, p1, turn. Row 8: Sl 1, k11, ssk, k1, turn. Row 9: Sl 1, p12, p2tog, p1, turn. Row 10: Sl 1, k13, ssk, k1, turn. Row 11: Sl 1, p14, p2tog, p1, turn. Row 12: Sl 1, k15, ssk, k1, turn. Row 13: Sl 1, p16, p2tog, turn. Row 14: Sl 1, k16, ssk, do not turn. 18 sts remain. Gusset Pick up and knit 16 sts along the heel flap, place marker. Instep: K2, \*p5, k3,\* 3x, p5, k2. Pick up and knit 16 sts along the heel flap, k7, k2tog. Mark this as the beginning of the round. The decrease takescare of the extra stitch that wasincreased on the heel flap. 82 sts. The decreases for the gusset on the left side will consume instep stitches. The decreases for the gusset on the right side will consume the gusset stitches as normal. Chart F is worked once per round; it does not repeat. Knit to 3 sts before marker, work next row of Chart F, knit to the end of theround. Continue as above until all 18rows of ChartF havebeen worked. Remove marker. 64 sts.
Foot
Chart G continues the crossover pattern from Chart F. Chart G is worked once per round; it does not repeat. K16, work next row of Chart G, knit to the end of the round. Work as above until all 44 rows of Chart G have been worked. Chart H continues the crossover pattern. Chart H is worked on the right side of the instep; it does not repeat. K16, work Chart H, knit to the end of the round. Continue as above until all 17 rows of Chart H have been worked. Knit until foot is 1.5" shorter than desired length. Toe Cut Color 1 and join Color 2. Set Up Round: K16, place marker, k32, place marker, k16. Round 1: Knit to 3 sts before first marker, k2tog, k1, sm, k1, ssk, knit to second marker, k2tog, k1, sm, k1, ssk, knit to the end of theround. Round 2: Knit all stitches. Repeat Rounds 1-2 until 24 stitches remain. Graft remaining stitches together. Weave in all ends and block if desired.
Left Sock
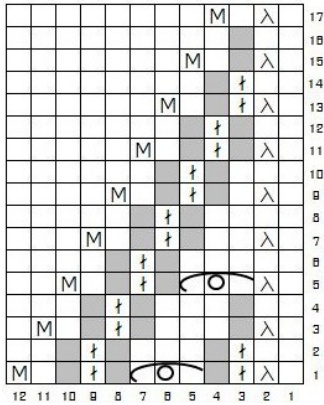
Chart H
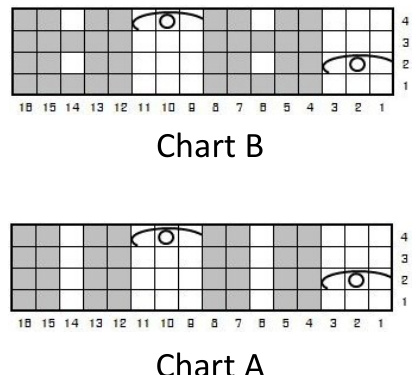
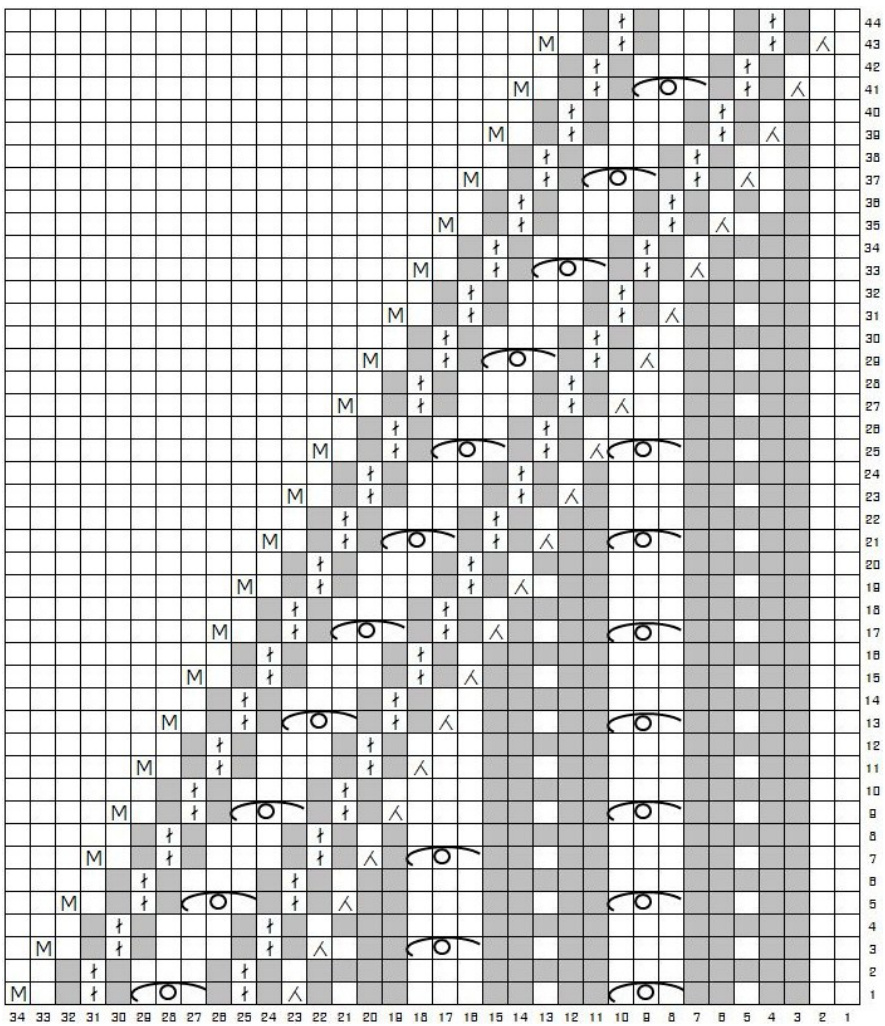
Chart G
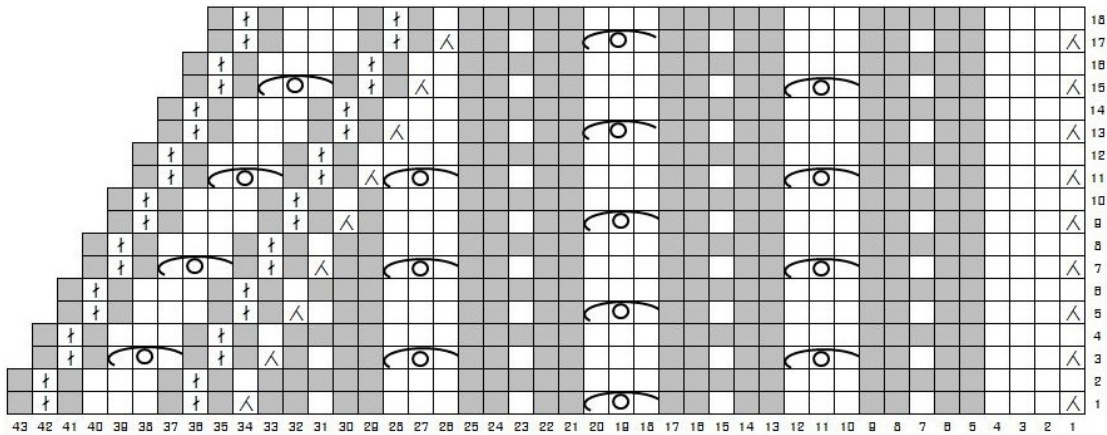
Chart F
Tip!
The sock foot should measure about 7 inches long after Chart E/H are completed. The toe is 1.5 inches long, which means that the pattern as written will be no shorter than 8.5 inches. If a shorter sock is desired, some or all of Chart E/H can be worked at the same time as some of the toe decreases. Skip the increases on the chart and only work the decreases. The rest of the toe would be worked as normal This makes the sock about 1 inch shorter. Below is an example of this, where Chart E/H are worked entirely during the toe decreases.
Right Sock
This work by Cailyn Meyer is licensed under a Creative Commons Attribution -Noncommercial-Share Alike 3.0 United States License. April 2011.


