FARTHING PATTERNS
MINIATuRe ‘KNITTiNg In THe ROUNd '- NoTeS ANd PaTTeRN
SECTION 1 KNITTING IN THE ROUND
Many people are put off by the idea of kniting in the round (knitting with 4 or more double ended needles) as it sounds complicated. However once you get used to the idea of knitting in the round' you will wonder what you were ever scared of. In human sized knitting this method is often used to knit socks, in miniature kniting it can be a good way of avoiding bulky seams on garments like sweaters and hats. Double-ended knitting needles are available in various lengths, however there is no 'correct' length it is all down to personal preference and we suggest you use a needle length that feels comfortable to you. The needle that is actually being used for knitting is usually referred to as an 'active' needle and the other needles are 'passive' Knitting on double-ended needles can cause worries that stitches will slip off the ends of the needles not currently in use, this is easily solved by using point protectors on these ends and moving the point protectors from the ends of each of the needles as you work around. When you become more proficient and confident you will probably no longer need to do this. Many people wonder why circular needles are not available for miniature knitting, the main reason being that a circular needle has an optimum length for working and this would require many more stitches than most miniature patterns actually have. This is the same reason as when knitting baby shawls in full size using circular needles, the last few rounds still have to be worked on four needles, as the number of stitches on the needle is too small to be workedonacircularneedle.
Why knit “in the round'?
When knitting first began as a craft all knitting was done this way. The only stitches used were plain knitting and patterns were formed by using one or more colours in the knitting. By the 16th Century purl stitches were developed and 'clocking' patterns (formed by mixing plain and purl stitches) grew in popularity. At about this time experiments were also made knitting with two needles. Prior to this time all knitting had been tube like, but was first felted (once more becoming popular in modern times) to make a fabric and then cut and sewn into the required shape. By Victorian times knitting on two needles was much more popular and garments were actually shaped as they were knitted. Older more traditional garments such as fishermen's ganseys and socks are still knitted in the round today and some of these patterns have remained virtually unchanged for centuries. Kniting in the round gives a seamless garment, which does not have any points of weakness such as seams and in the case of socks is more comfortable for the wearer. Yokes on sweaters are often knitted on four needles as this gives a continuous patternwithout breaks for seams.
To start knitting in the round you need to be able to do two things:
1. Cast on (preferably using the thumb method as this gives a neater edge) 2. Knit on two needles, (sounds obvious, but start on two needles before progressing to four!) For the purposes of this next section we will assume that four double-ended kniting needles will be used for knitting. (Some European countries routinely use five needles for circular knitting, but when working in miniature you do not often need more than four needles, although of course this is down to personal preference and experience)
STARTING TO KNIT IN THE ROUND
1. Casting on
This can be very tricky when you first do this, as you will have needles dangling as you cast on all the stitches. The trick is to try not to let the dangling needles get twisted. A pattern will usually state the number of stitches to be cast on; you will then have to divide the total number by three For example if the pattern states 48 stitches then 48 divided by 3 = 16 stitches on each of the three needles. Sometimes the number doesn't divide equally by three, so you may have slightly different numbers of stitches on eachneedle.
2. Knitting the first round
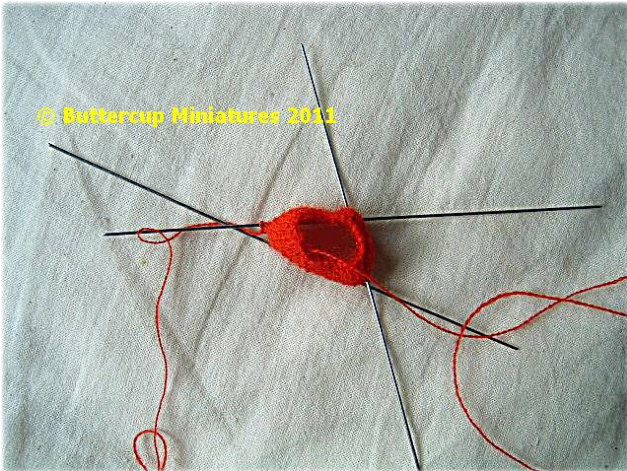
This is the trickiest part of the knitting and once this round is completed it is a lot easier. · Making sure the cast on stitches are not twisted on the needles, make the needles into a triangular shape and use the 4th needle (which now becomes the active needle) to work the stitches on the 1st needle. Leave the end of the cast on wool hanging, as this will mark the start of each round.
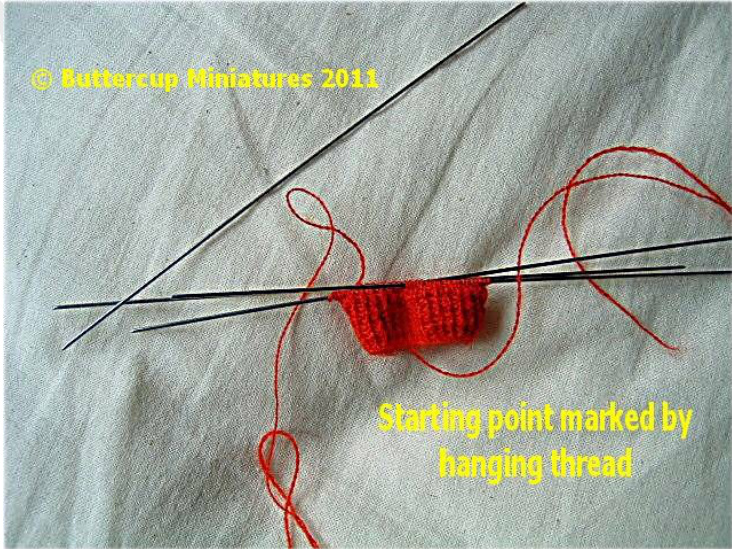
Knit into the first stitch on the 1st needle (making sure you do not use the hanging end of the casting on to knit with). Knit across all the other stitches on the first needle, your 4th needle will now have the stitches on and the 1st needle will be empty. This 1st needle now becomes the active needle and you now knit across all the stitches on the 2nd needle until this is emptied and the 1st needle has the stitches from the 2nd needle. You now knit the stitches from the 3"d needle using the now empty 2nd needle. When all the stitches from the 3rd needle have been worked you have completed a ROUND (if this had been on two needles it would have been called a row). The dangling marker thread shouldbedirectlybelowthispoint. If this is your first attempt at knitting in the round, you may wish to place point protectors or elastic bands on the points of the needles which are not active to stop the stitches from sliding off, so whilst working you have only the two active points unprotected. As you move to the next needle move the point protector from the point of the needle you will be working on to the one you have just finished with. As you become more experienced you willfind this is no longer necessary.
3. Working further rounds
This becomes much simpler as the stitches are now arranged in a circle and you just keep knitting the stitches from each needle. If you continue to work rounds of plain knitting you will notice that you have knitted a tube, which resembles stocking (stockinette)stitch. Sometimes if you are working a pattern or rib you will need to 'purl' a stitch, but most knitting in the round' is just plain knitting, sometimes with two or more colours.
Moving on from plain knitting and note on knitting squares
Once you have mastered simple knitting in the round you may wish to try a pattern. One of the simplest things to knit is a hat. NOTE: The pattern in section 2 is worked in rib to make it stretchier, so purl stitches are used. To knit a square you will require 5 needles, one for each side of the square and one to work round the knitting. Squares are usually knitted from the outside towards the centre and often incorporate lace patterns. Sometimes, as in the case of Shetland lace knitting, instead of casting on the first round a strip of edging is knitted, this is joined to form a circle and the stitches are picked up around the inside edge of this strip. The stitches are evenly divided over four needles to form the four sides of the square. As the square knitting is worked decreases are made at the corners, with fewer stitches on each successive round. As the centre of the square is reached it becomes more difficult to knit on the decreasing number of stitches, so the stitches are usually drawn up by threading the yarn through these last few stitches and fastening off. +++++++++++++++++++++++++++++++++++++++++++++++++++++++++++++++++++++++++++++++++++++++++++++++
SECTION 2: KNITTING PATTERN
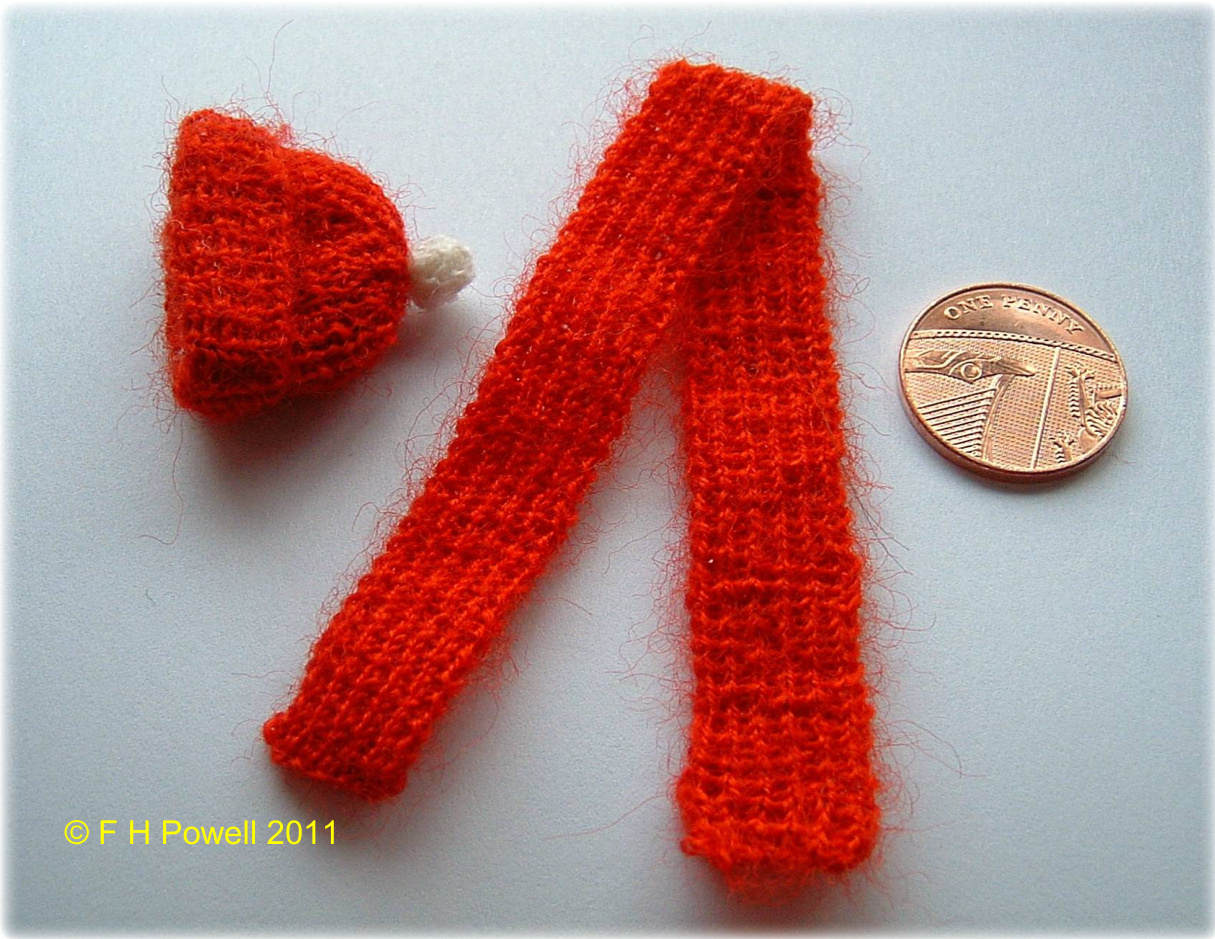
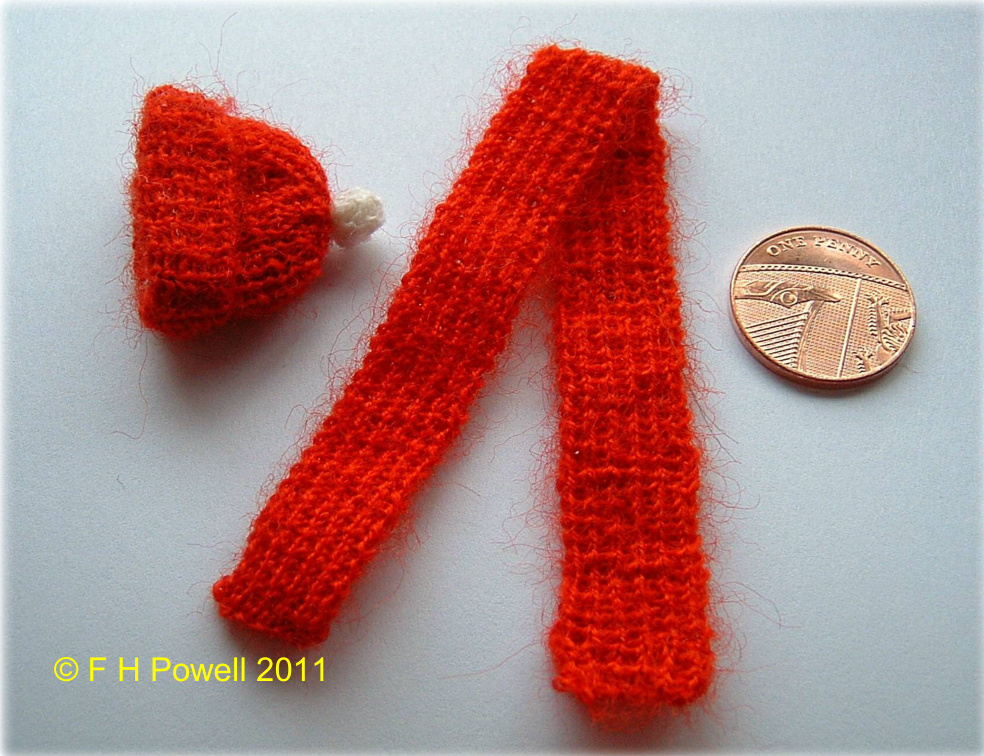
HAT AND SCARF SET (1/12"t scale) This will fit either an adult or child doll.
NOTES:
The hat is worked on 4 double-ended needles. If you are not used to working in rib start on the scarf to get used to the pattern If you use double ended knitting needles to make the scarf you may wish to place elastic bands or point protectors on the ends that are not in use to stop the stitches sliding off.
Abbreviations: st - stitch; k - knit; p - purl; ()- repeat instructions between brackets as detailed in text; k2togtbl - knit the next 2 stitches together through the backs of the loops to make one stitch; p2tog - purl next 2 stitches together to form one stitch
Materials required:
Hat - set of 4 double-ended size 19 (1.00 mm/US size 5/0), 28 yards/25 metres 1-ply wool or cotton, optional - small amount 1-ply wool in contrast colour for bobble. Scarf - pair of size 19 (1.00 mm/US size 5/0), 15 yards/13 metres 1-ply wool or cotton. SCARF (make 1) Cast on 12 sts. Row 1: (k 1, p 1) to end Repeat row 1 until scarf measure approximately 5-inches/13 cm or required length. Castoff. Sew in all loose ends.
Hat (maKe 1)
Using the thumb method and a set of 4 needles, cast on 48 sts ( then divide sts so there are 16 sts on each of three needles). Making sure the cast on stitches are not twisted on the needles, make the needles into a triangular shape and use the 4th needle to work the stitches on the 1st needle. Leave the end of the cast on wool hanging, as this will mark the start of each round. Work each round (all the stitches on the 3 needles) as follows: Round 1: (k 1, p 1) to end of round. At the end of the round you immediately start the next round by repeating round 1. Repeat round 1 until the work measures 1-inch/2.5 cm from cast on edge, finishing at the end of a round. Next round: (k2togtbl, p2tog) to end of round. (24 sts) Next round: (k 1, p 1) to end of round Next round: (k2togtbl, p2tog) to end of round. (12 sts) Break yarn, thread it through remaining stitches and draw up. Sew in loose ends. Turn hat right side out. Tomakebobble Cast on 3 sts. Row 1: k Row 2: inc in 1st st, k 1, inc in last st. (5 sts) Row 3: k Row 4: inc in 1st st, k 3, inc in last st. (7 sts) Rows 5-7: k Row 8: k2tog, k 3, k2tog. (5 sts) Row 10: k2tog, k 1, k2tog. (3 sts) Row 11: k Cast off.
To make up
Leave a 6-inch/18cm long length of thread when you cut yarn. Sew a line of running stitches around edge of circle and pull up to form a ball, sew in place, place a wisp of yarn inside pompom and sew pompom to form a ball, sew pompom securely to topof hat. Turn up brim (of hat to about %4-inch/0.5 cm) Do not press or this willflatten pattern

Copyright Frances H. Powell 2011 All rights reserved. This pattern is for private use only and may not be reproduced in any form, or reproduced for commercial gain including selling any item knitted up from these patterns without written permission from Buttercup Miniatures. Reproducing or transmitting this pattern by any means for any purpose other than for personal use constitutes a violation of copyright law. For scale information: the UK Penny coin used on the photos is just slightly larger than a US Cent coin. The actual diameter is %-inch or 2 cm. The UK penny coin sits just inside a European (Euro) 5c coin.


