
SPILLYJANEKNITS
YARN
≥ One skein of Sunday Knits Eden 3-ply (225m / 50g) in Beet (Main Colour - MC) ≥# One skein of Sunday Knits Nirvana 3-ply (225m / 50 g) in Sand (Contrast Colour - CC.) A 15" piece of waste yarn of the same weight in a contrasting colour to hold the thumb stitches is also required.
NEEDLES
One set of five (5) double pointed needles in US 1 (2.25 mm) or size necessary to obtain gauge. NOTIONS A stitch marker to mark beginning of round (optional.) and a sewing needle to weave in ends.
THE MITTENS
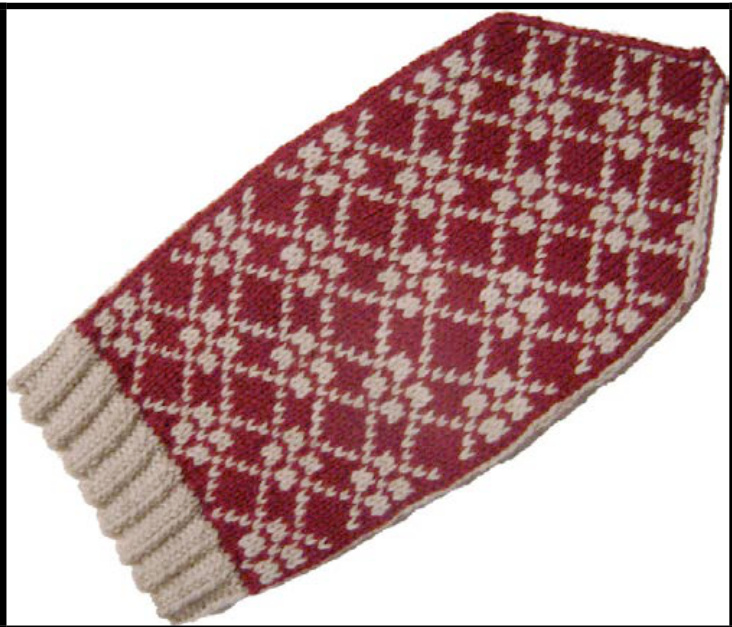
Camilla
BY SPILLYJANE HttP://SPillYJane.blOGSPOt.COm
PATTERN NOTES
Instructions are provided for making both regular and fingerless mittens. Please take care to follow the directions for the type of mitten that you are making. Also note that the yarn requirements remain the same for the fingerless mittens.
SIZE
Women's Medium (or any hand that is 8" in circumference.) GAUGE 9 stitches = 1 inch (2.5 cm) in Stockinette st.
THE PATTERN
CUFF
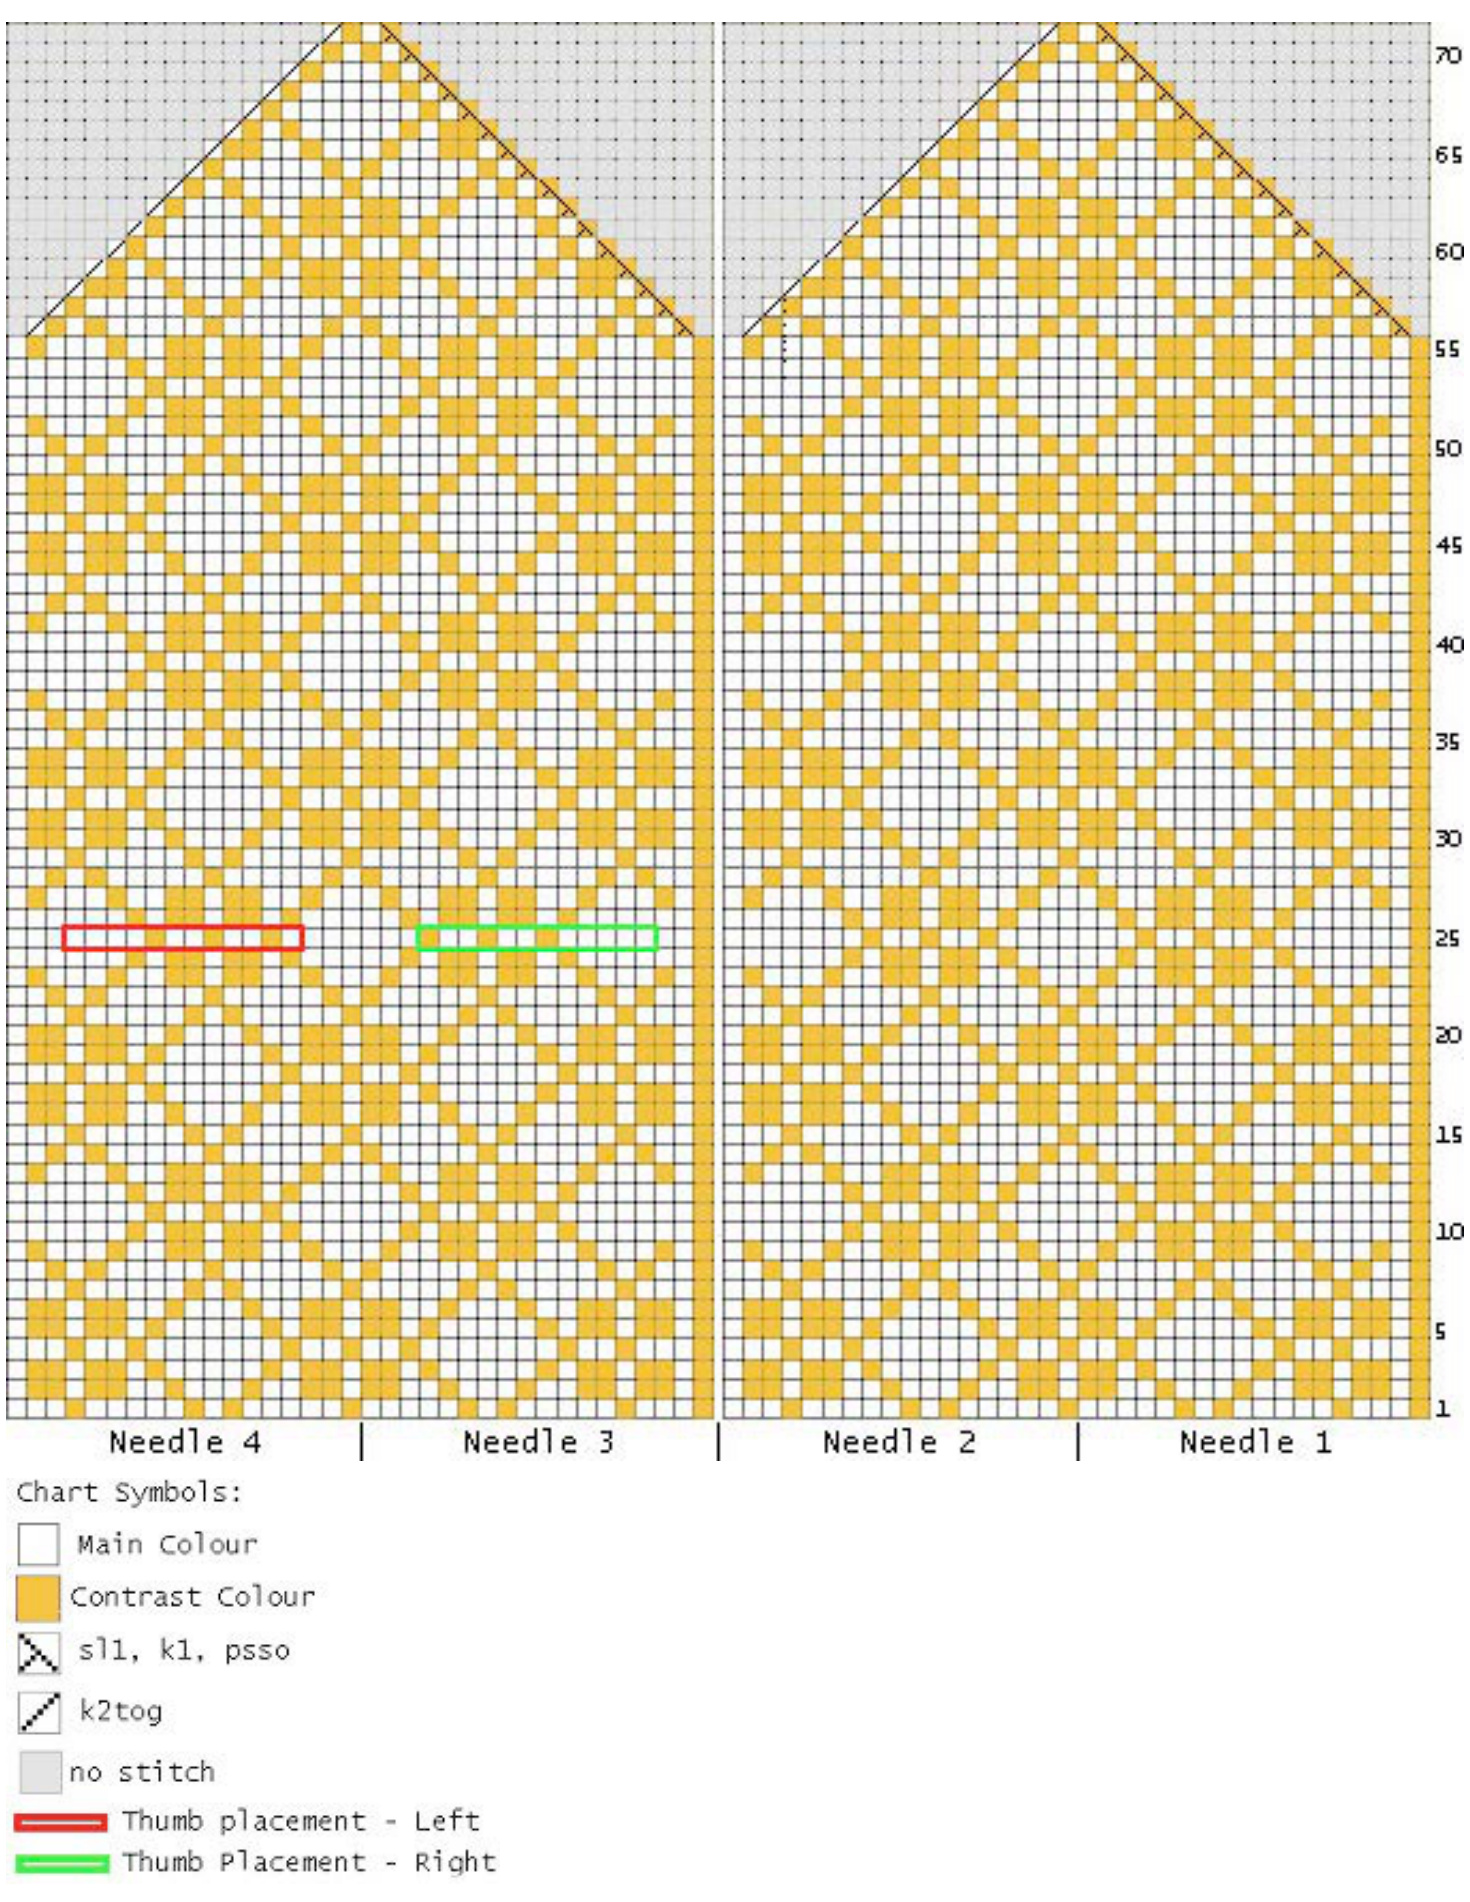
Using the CC, cast on 72 stitches using the Long Tail Cast On, or any other stretchy cast on. Distribute stitches evenly across four (4) needles - 18 stitches on each. The needles will now be known as Needles 1, 2. 3 and 4 respectively. Being careful not to twist the stitches, join in the round by moving the first stitch cast on on Needle 1 to Needle 4. Pass the last stitch cast on Needle 4 over this stitch and onto Needle 1. Thus the first and the last stitches have switched places. Prepare to begin to work in the round working the cuff as follows: Round 1: K2tbl. p2. Repeat across all sts for the entire round. Repeat Round 1 for the next nine (9) rounds, for a total of ten (1o) rounds of ribbing. Ribbing is complete. When ribbing is complete, work all stitches of the following round in Stockinette stitch. Prepare to work body of mitten, working from the Chart. Work from the Chart, following from right to left. Please note that the chart shows every stitch in every Round. Continue working from the Chart until Round 25 where there is a mark denoting thumb placement. Prepare to set aside stitches for the thumb.
Thumb Placement:
> For Left hand mitten: Work across all stitches on Needles 1, 2 and 3. Knit the first 3 stitches on Needle 4. Using the 15" piece of waste yarn knit the next 12 stitches on Needle 4. Slip these stitches back onto the left hand needle and continue to work in pattern. Knit the last 3 remaining stitches on Needle 4 (18 stitches on Needle 4). For Right hand mitten: Work across Needles 1 and Needle 2. Knit the first 3 stitches on Needle 3. Using the 15" piece of waste yarn knit the next 12 stitches on Needle 3. Slip these stitches back onto the left hand needle and continue to work in pattern. Knit the last 3 stitches on Needle 3 (18 stitches on Needle 3). Work across all stitches on Needle 4 in pattern. NOTE: If making Fingerless Mittens please work from the following directions. If making regular mittens please skip the following directions and proceed to the Regular Mittens section.
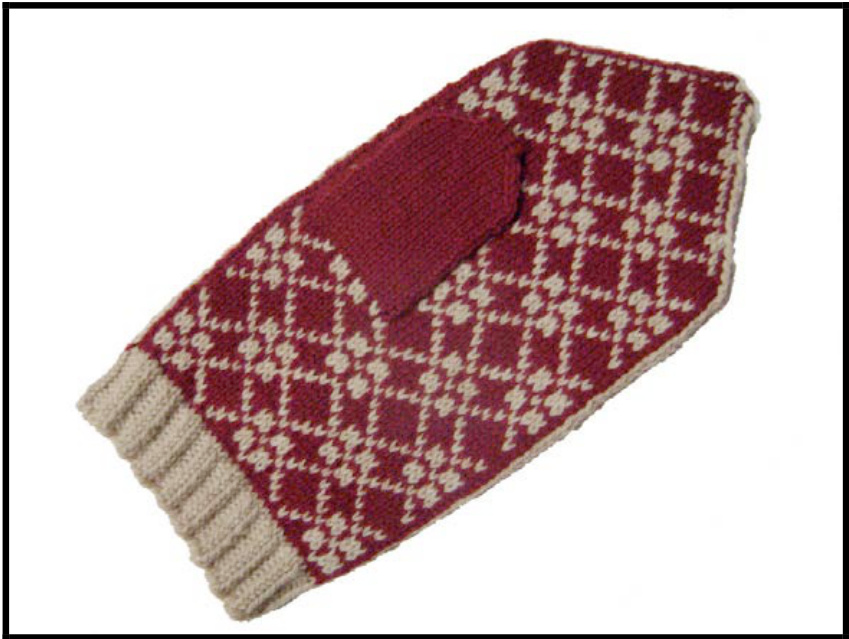
FINGERLESS MITTENS
Work to the end of Round 43. or until mitten reaches just below the recipient's knuckles (or desired length.) Break Main Colour yarn. Working with CC only. prepare to begin to complete fingerless mitten body as follows: Rounds 1 - 5: Using CC only. work k2tbl. p2 rib across all sts. Bind off all stitches loosely. The fingerless mitten body is complete. Proceed to work the fingerless mitten thumb. Fingerless Mitten Thumb: Pick up 10 stitches both above and below the stitches held on the waste yarn for a total of 20 stitches, discarding the waste yarn when finished. Divide the stitches evenly across four needles - 6 stitches on each Needle. Be sure to also pick up 4 stitches at either side of the thumbhole -- one each at the beginning of Needles 1 and 3 and one each at the end of Needles 2 and 4 (28 stitches total - 7 stitches on each Needle.) Prepare to work the thumb. starting from the outer lower corner and working across the front of the thumb. This first Needle will be known as Needle 1. with the other Needles known as 2. 3 and 4 respectively. Work the thumb asfollows: Round 1: With MC only. knit across all stitches. Continue working Round 1 until thumb reaches just below the recipient's thumb joint (or desired length.) knitting to the end of Needle 4. Prepare to begin to complete thumb asfollows: Rounds 1 - 4: Using MC only. work k2tbl, p2 rib across all sts. Bind off all stitches loosely. The fingerless mitten thumb is complete. Proceed to Finishing directions below.
REGULAR MITTENS
Continue knitting from the Chart until Round 56. where the finger decreases begin. >NOTE: The finger decreases can be successfully executed working only from the chart or from the instructions below (or both.) Finger Decreases: Decrease for the fingertips in the following manner: > Needle 1: Slip the first stitch, kl in yarn colour denoted by Chart. pass slipped stitch over, work across all remaining stitches in pattern. ≥ Needle 2: Work across all stitches in pattern until two (2) stitches remain. Knit these two stitches together using yarn colour denoted by Chart. >Needle 3: Slip the first stitch, kl in yarn colour denoted by Chart, pass slipped stitch over, work across all remaining stitches in pattern. ≥ Needle 4: Work across all stitches in pattern until two (2) stitches remain. Knit these two stitches together using yarn colour denoted by Chart. Repeat this procedure until 8 stitches remain, working the final round to the end of Needle 4. There should now be 2 stitches on each Needle (8 stitches total.) Slip all stitches from Needle 2 onto Needle 1. and all stitches from Needle 4 onto Needle 3 (4 stitches on each Needle). Break CC yarn, leaving a long enough tail to be woven in. Break MC yarn, leaving a generous amount to graft remaining stitches. Using MC yarn, Kitchener stitch the top of the mitten closed. Prepare to knit thumb. Thumb: Pick up 12 stitches both above and below the stitches held on the waste yarn for a total of 24 stitches, discarding the waste yarn when finished. Divide the stitches evenly across four needles - 6 stitches on each Needle. Be sure to also pick up 4 stitches at either side of the thumbhole -- one each at the beginning of Needles 1 and 3. and one each at the end of Needles 2 and 4 (28 stitches total - 7 stitches on each Needle.) Prepare to knit the thumb, starting from the outer lower corner and working across the front of the thumb. This first Needle will be known as Needle 1, with the other Needles known as 2, 3 and 4 respectively. Work the thumb as follows: Round 1: With MC only. knit across all stitches. Continue working Round 1 until thumb reaches to about the tip of the recipient's thumb (or desired length.) knitting to the end of Needle 4. Prepare to begin to decrease for the thumb as follows: > Needle 1: Slip the first stitch, kl., pass slipped stitch over, work across all remaining stitches in pattern. >Needle 2: Work across all stitches in pattern until 2 stitches remain. Knit these two stitches together. > Needle 3: Slip the first stitch, kl. pass slipped stitch over, work across all remaining stitches in pattern. ≥ Needle 4: Work across all stitches in pattern until 2 stitches remain. Knit these two stitches together. Repeat this until 8 stitches remain. There should now be 2 sts on each Needle (8 stitches total.) Slip all stitches from Needle 2 onto Needle 1, and all stitches from Needle 4 onto Needle 3 (4 stitches on each Needle). Break CC yarn, leaving a tail long enough to be woven in later. Break MC yarn, leaving a generous amount to graft remaining stitches. Using MC yarn, Kitchener stitch the top of the thumb closed.
FINISHING
Weave in ends. Place mitten beneath a damp tea towel and press with a hot iron to steam block.
THE CHART
@ Jane Dupuis, 2oll. Please only copy these instructions for your own personal use, and do not sellfinished objects made from this pattern. Find more great patterns on the SpillyJane website (spillyiane.blogspot.com). on Etsy (spillyiane.etsy.com). and on Ravelry (www.ravelry.com/designers/spilliane).


