Edelweiss
by Barbara Gasteiger This pattern uses the famous "Wildschutzdoppelzopfer" (poacher's double braid). It is said to have been worn by Georg Jennerwein, an infamous 19th century poacher and a kind of Bavarian Robin Hood.
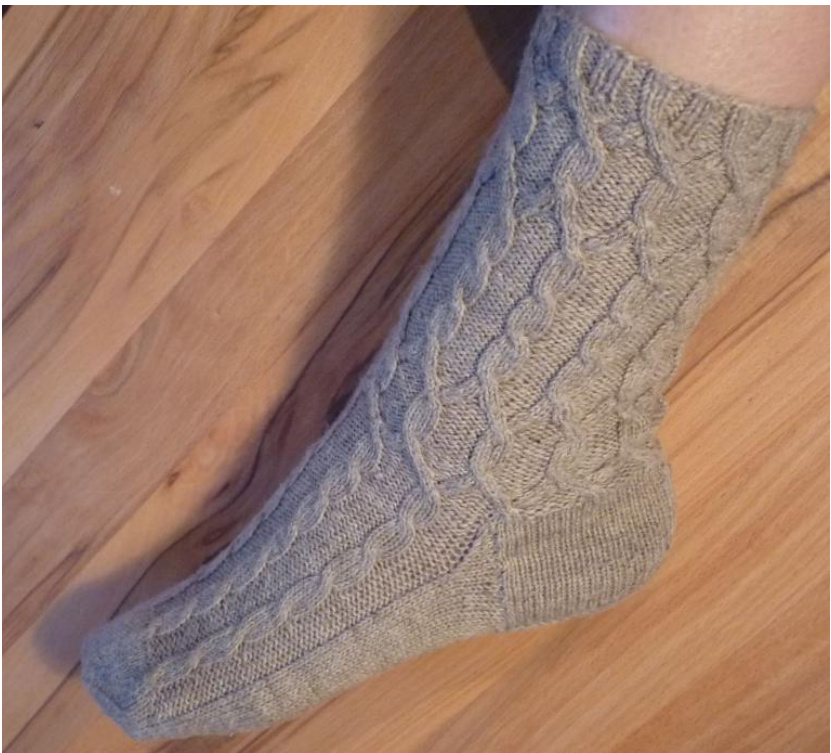
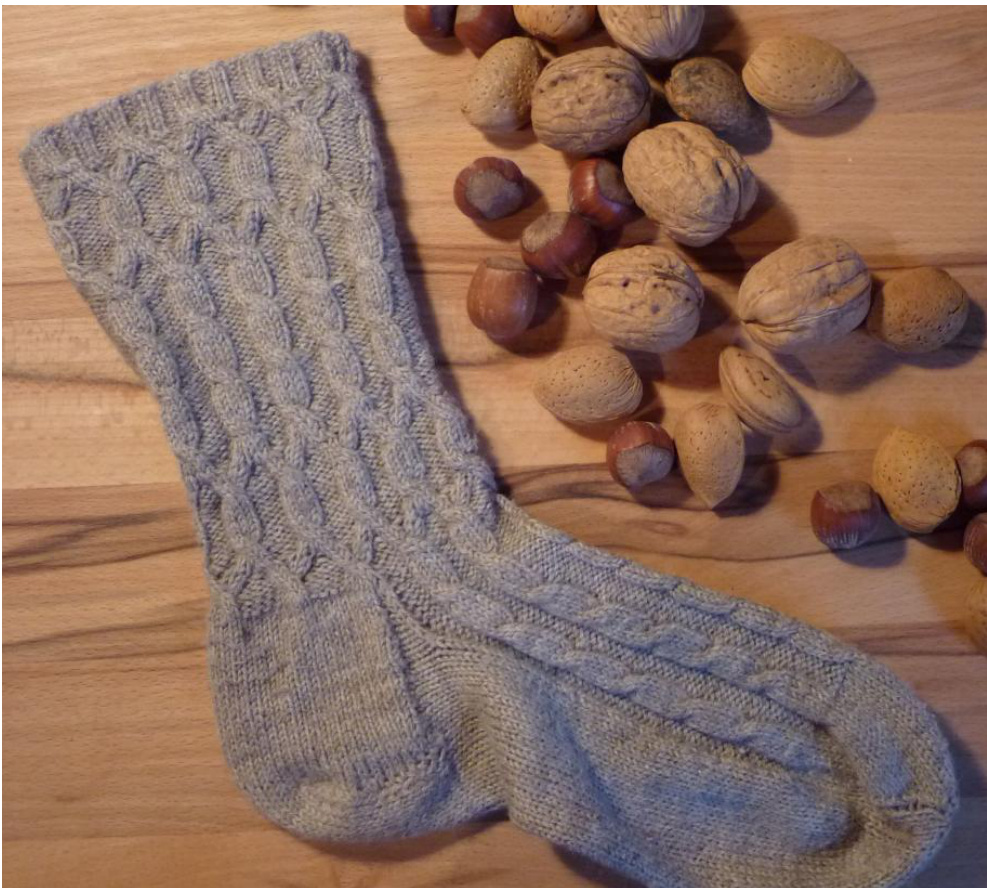
This is a traditional Bavarian pattern as handed down from mother to daughter. Every village had their own distinctive patterns. They sometimes served to identify the bodies of mountaineers that had fallen to their death in the treacherous regions of the Alps. It sometimes took weeks to find a body, and by then all that remained to tell where the person had come from were the well-known cable and lace patterns on the hand-knitted stockings. Material: 100gr Lana Grossa Meilenweit or similar 4-ply sock weight yarn in a natural colour. I used 2,5mm double-pointed needles, or circulars for magic loop method. USE THE NEEDLES THAT GIVE YOU GAUGE. Gauge: 30 st over 10 cm / 4 in in stockinette stitch.
INSTRUCTIONS
CO 80. (Don't worry: the foot part only has 68 stitches around.)
Ribbing
Repeat Row 1 of chart for 8 rows. @ 2011 by Barbara Gasteiger. I'm lobelia72 on Ravelry.
Leg part
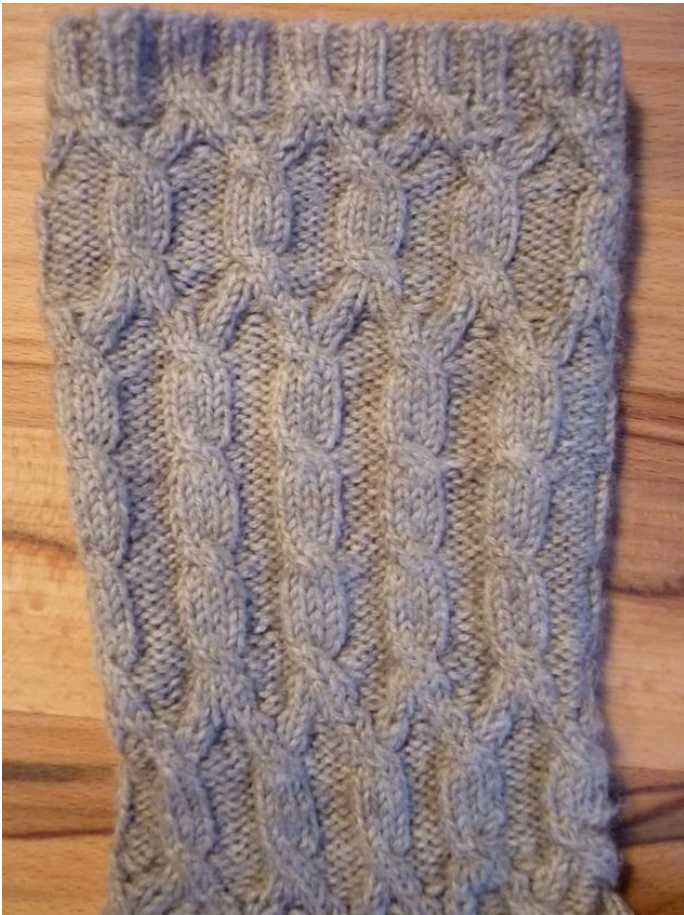
Knit in pattern as charted. PLEASE NOTE: The chart only shows the ODDNUMBERED ROWS. Work the even-numbered rows as the stitches appear, i.e., knit the knit stitches and purl the purl stitches. Repeat rows 13-21 three times, then continue with row 22. After row 31 (final row of the chart), work rows 11-27 one more time. Then start the heel flap.
Heel flap
The needles after and before the cast-on thread are now called needle 1 and needle 4. Needles 2 and 3 are not being worked on for now. The heel flap is worked over 44 stitches (40 stitches on needle 1 and 4, plus 2 on each side “stolen" from needle 2 and 3). Knit back and forth over the 44 stitches on needle 1 and 4. Knit in stockinette stitch (knit on right side, purl on wrong side) for 32 rows or until flap measures 6 cm / 2 14 in. End with a purl row.
Turning the heel
Arrange the 44 heel stitches in three sections of 12, 20, 12 stitches. The heel is turned by decreasing away the 12 stitches on each side until only the centre 20 are left. Knit across the first 12 stitches, then another 19 to the last stitch of the centre section, and SSK that last stitch of centre section with first stitch of second side section.Turn work. Slip one, purl 18 across the centre section. P2TOG the last stitch of the centre section and the first of the side section. Continue until only the centre stitches are left, like this: \*Turn, slip one, knit x, SSK. Turn, slip one, purl x, P2TOG \*
Gusset
Slip the first stitch and knit across the centre heel section. Then pick up and knit 14 sts along the side of the heel flap. To avoid a hole before the first “real" stitch of the instep, you can pick up the horizontal strand at the gusset point and knit it through the back of the loop to twist it, knitting it together with the first instep stitch. Knit in pattern across the instep stitches on needles 2 and 3. @ 2011 by Barbara Gasteiger. I'm lobelia72 on Ravelry. Pick up and knit 14 sts down the other side of the heel flap. From now on, knit only chart lines 13-21 for the top of the foot part of the sock. The sole part of the sock is knit in plain stockinette. Rows now start at the middle of the heel. The gusset is formed by decreasing two stitches (one stitch on either side), followed by a “normal" round (without decreases). These two rounds are repeated until there are 68 stitches in total on all needles. Gusset row 1 (decrease): \*Knit to last 3 sts of needle 1, K2TOG, knit 1. Knit in pattern across instep. Needle 4: k1, SSK, knit to end. Gusset row 2 ("normal"): Knit one row in pattern on top of the sock, plain stockinette on the bottom (sole). Repeat until there are 68 stitches left in total.
Foot
Knit in pattern on top and stockinette on bottom of sock. At 4 cm / 1 12 in before your desired length, start the toe part.
Toe
Decrease every row like this: (nit to last 4 sts of needle 1, K2TOG, knit 2. Knit first 2 sts of needle 2, SSk knit to end. Knit to last 4 sts of needle 3, K2TOG, knit 2. Knit first 2 sts of needle 4, SSK, knit to end. 4 stitches decreased. \* Repeat from ' When 8 sts remain, put 4 stitches on each of two needles, then graft the toe, OR pul the thread through all stitches and secure. Weave in any ends.
THANKS
to Nina Hyland (Nene on Ravelry; check out her patten shop!) for helping me BIG TIME to write up the pattern. @ 2011 by Barbara Gasteiger. I'm lobelia72 on Ravelry.
Cdelweiss
by Barbara Gasteiger
CHART
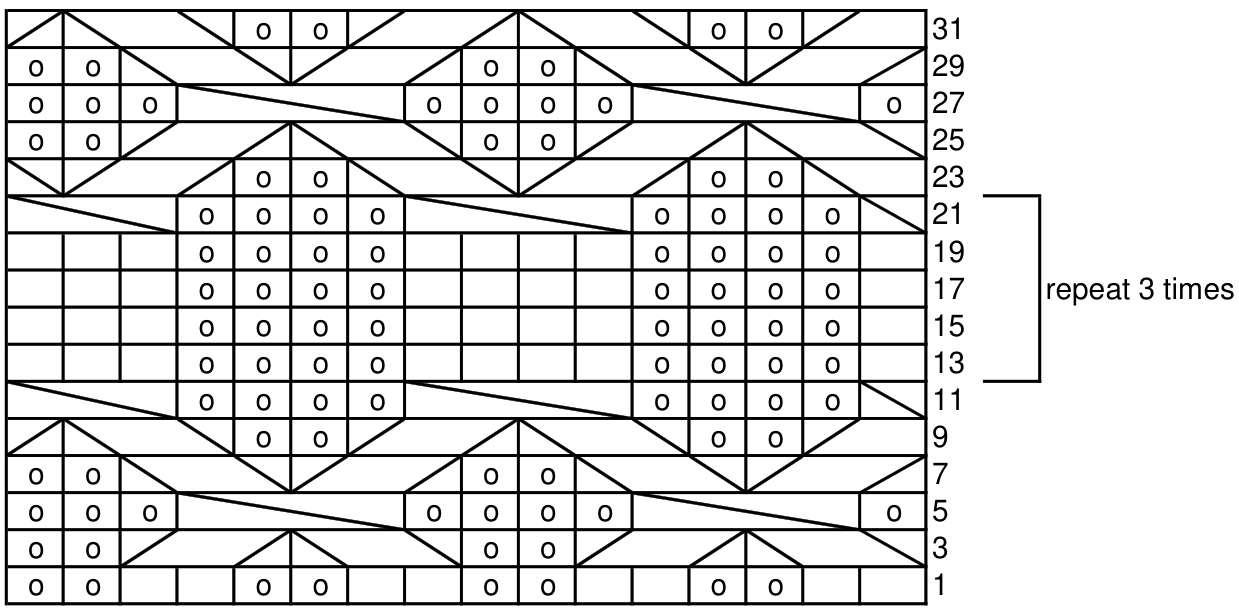
PLEASE NOTE: The chart only shows THE ODD-NUMBERED ROWS. Work the even-numbered rows as the stitches appear, i.e., knit the knit stitches and purl the purl stitches.
Chart symbols
knit purl slip 2 st to cable needle and hold in front; k2; k2 from cable needle slip 2 st to cable needle and hold in front; p1; k2 from cable needle slip 1 st to cable needle and hold in back; k2; p1 from cable needle NOTE: The cable symbols on the first 1 and last 3 stitches of rows 11 and 21 of the chart may be a bit confusing. They are read as (The chart was done in Excel and that was the only way I could think of to make that symbol split across the chart repeat.)


