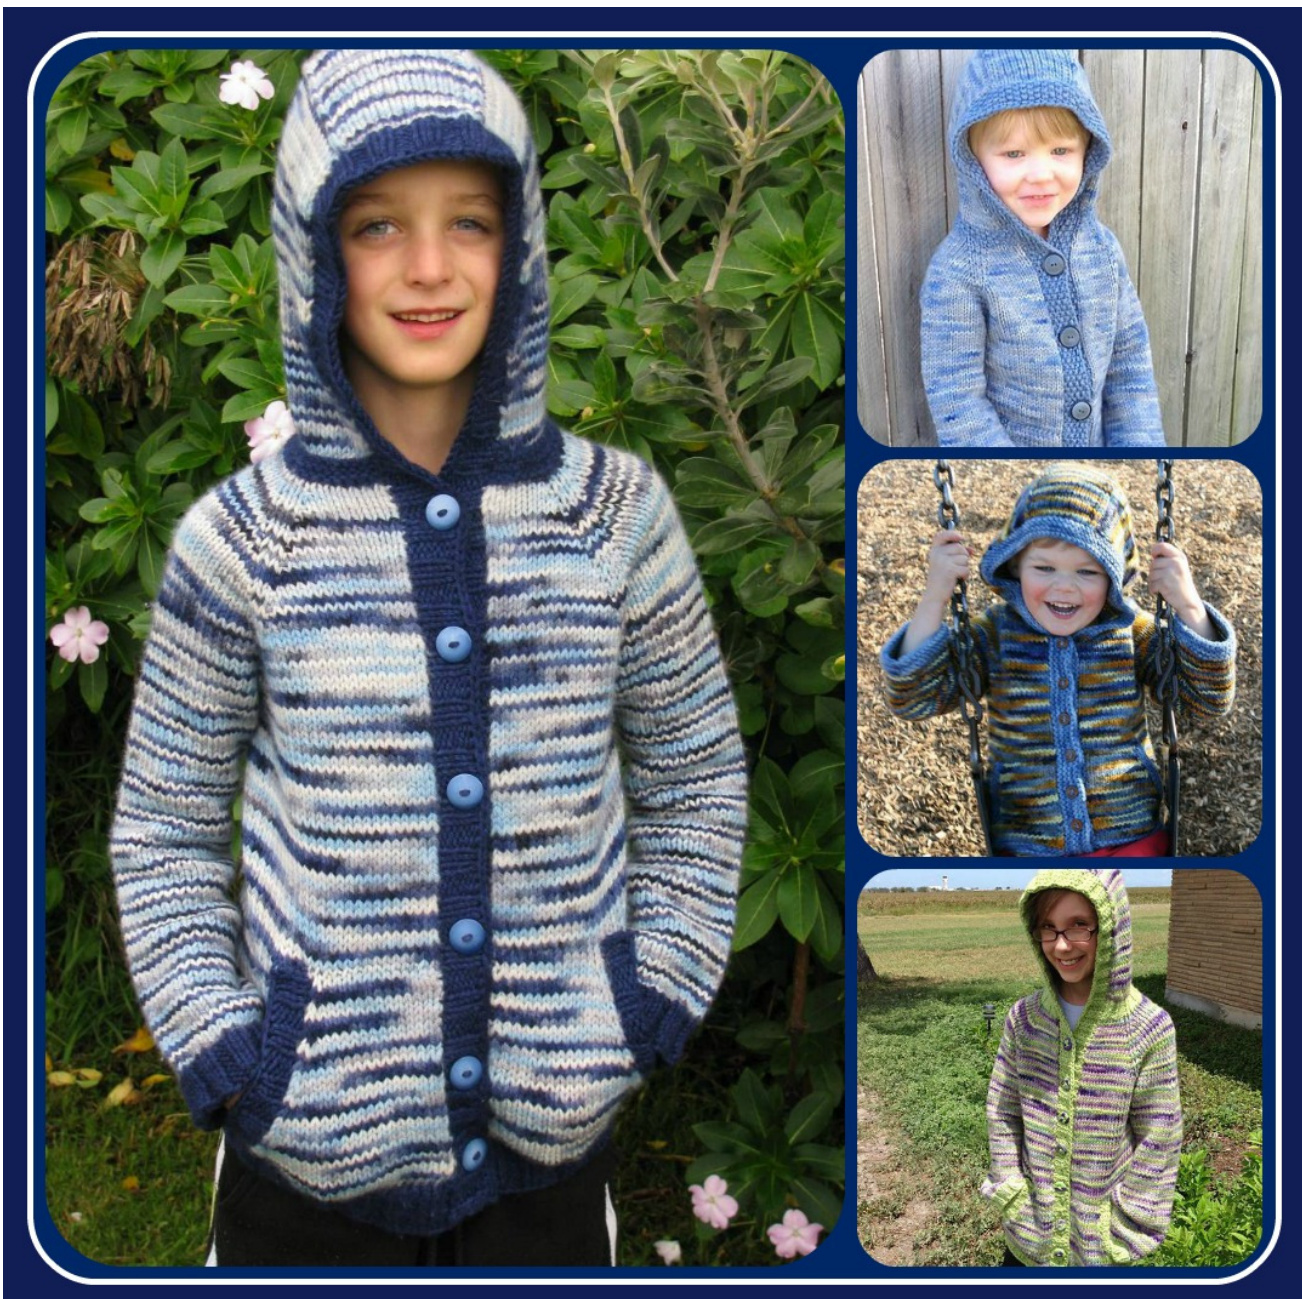
Zach Jacket

Yarn Requirements
12ply/bulky weight yarn - main colour and contrast colour. Some suggested yarns Mosaic Moon Gaia Bulky. Mosaic Moon Kona Bulky. MMR bulky. O Bendigo Woollen Mills Rustic 12 ply.
Approximate yardage required:
Main -150(175,200,225,250,275,325) [375,425, 500, 600, 675]yards. Contrast-55(65,65,75, 100, 100,125) [125, 150, 165, 185, 185]yards. Hood -65(75,75,75,100,100,125) [125, 150, 150, 175, 175]yards.
Gauge/Tension
16st/10cm (4st/1")
You will need
6mm circular needle (or size to achieve correct gauge) 80 or 100 cm. 5.5mm circular needle (or size 1 less than gauge) 80 or 100cm 4 stitch markers. Waste yarn. 5 or 6 one inch buttons.
Abbreviations
co- Cast off. MC- Main colour yarn. CC- Contrast colour yarn. k- knit. p- purl. pm - place marker. sm- slip marker. rs - right side. wS - wrong side. K2tog - knit 2 together. S1p - slip 1 stitch purlwise.
Techniques
ssk - slip 1 stitch knitwise, slip 1 stitch knitwise, put left needle through the front of both stitches (from the left) and knit them together. kfb - Knit into the front of the stitch, then into the back of the same stitch. pfb - Purl into the front of the stitch, then into the back of the same stitch. m1b - From behind, lift up the bar between the stitches with the left needle, insert the right needle into the front of the stitch and knit. m1f- From the front, lift up the bar between the stitches with the left needle, insert the right needle into the back of the stitch and knit. m1p(b) - from the back, lift up the bar between the stitches and insert the right needle into the front of the stitch and purl. m1p(f) - from the front, lift up the bar between the stitches and insert the right needle into the back of the stitch and purl. Backwards loop cast on - http://www.knittinghelp.com/video/play/ba ckward-loop-cast-on Tutorial on how to pick up stitches in stocking stitch - http://vimeo.com/23092274
Ease
Positive ease has been written into the pattern. Make sure you choose the size that best fits the chest size of the child rather than age. You can add extra length if you need too.
Edging options
There are 3 options for the edging - Garter, Moss stitch and 2x2 rib. Some require different stitch counts but I have clearly stated in the pattern what to do for which option.
Hood and Pockets
The hood is added on after the main body of the jacket has been knit and is optional. The pockets are also optional and have been written for sizes 12m +. Sizes nb(3m, 6m, 9m, 12m, 18m, 24m) [3y, 4y, 5y, 6y, 8y ] To fit chest size of: 15(16, 17, 18, 19, 20, 21) [22, 23, 24, 25, 26.5] inches.
Start Knitting!
Using contrast yarn and 5.5mm needle,
Collar
Cast on 28(30, 36,36,40,40,46) [50,52,52) 56, 60] stitches.
Garter
Knit 6 rows. Go to marker set up row.
Moss stitch
Row 1 (ws) - \* p1, k1 - repeat from \* to end of row. Row 2 - \*k1, p1 - repeat from \* to end of row Repeat rows 1 & 2 1 more time. (4 moss stitch rows) Go to marker set up row
2x2 Rib
All sizes except 3m, 24m & 3y. Row 1 (ws) - p3, k2, \*p2, k2. Repeat from \* to last 3 stitches, p3 Row 2 - k3, p2, \*k2, p2. Repeat from \* to last 3 stitches,k3 Repeat rows 1 & 2 twice more. Sizes 3m, 24m & 3y only Row 1(ws) - \*p2, k2. Repeat from \* to end of row, finishing with a p2 Row 2 - \*k2, p2. Repeat from \* to end of row, finishing with a k2. Go to marker set up row Marker set up row
Change to MC and 6mm needle
Purl across placing markers as indicated on the chart below:
| Size | |||||
| Nb | 4 | 4 | 12 | 4 | 4 |
| 3m | 4 | 5 | 12 | 5 | 4 |
| 6m | 5號 | 6 | 14 | 6 | 5 |
| 9m | 5號 | 6 | 14 | 6 | 5 |
| 12m | 6 | 6 | 16 | 6 | ¥9 |
| 18m | 6 | 6 | 16 | 6 | 6 |
| 24m | 7 | 7 | 18 | 7 | 7 |
| 3y | ¥8 | 7 | 20 | 7 | ¥8 |
| 4y | ¥8 | 8 | 20 | 8 | ¥8 |
| 5y | ¥8 | ¥8 | 20 | 8 | ¥8 |
| 6y | 9 | ¥8 | 22 | 8 | ¥6 |
| 8y | 10 | 9 | 22 | 6 | 10 |
Row 2(lncrease row) - \*Knit to 2 stitches before marker, kfb, k1, sm, kfb Repeat from \* to the end of the row. (8 stitches increased) Row 3 - purl Repeat rows 2 & 3 9(10, 10, 11, 11, 12, 12) [12, 13, 14, 14, 15] more times for a total of 10(11, 11,12,12,13,13) [13,14,15,15,16] times. Final stitch count will be:
| Size | Total | |||||
| Nb | 14 | 24 | 32 | 24 | 14 | 108 |
| 3m | 15 | 27 | 34 | 27 | 15 | 118 |
| 6m | 16 | 28 | 36 | 28 | 16 | 124 |
| 9m | 17 | 30 | 38 | 30 | 17 | 132 |
| 12m | 18 | 30 | 40 | 30 | 18 | 136 |
| 18m | 19 | 32 | 42 | 32 | 19 | 144 |
| 24m | 20 | 33 | 44 | 33 | 20 | 150 |
| 3y | 21 | 33 | 46 | 33 | 21 | 154 |
| 4y | 22 | 36 | 48 | 36 | 22 | 164 |
| 5y | 23 | 38 | 50 | 38 | 23 | 172 |
| 6y | 24 | 38 | 52 | 38 | 24 | 176 |
| 8y | 26 | 41 | 54 | 41 | 26 | 188 |
Dividing for sleeves
Knit to 2 stitches before marker, kfb, k1, remove marker and place all the stitches to the 2nd marker onto waste yarn, remove marker. Using backwards loop, co 2(2, 2,2,2,2,2) [2,2,2,3, 3]st, kfb (pulling yarn tight). Knit across the back to 2 stitches before the 3rd marker, kfb, k1, remove marker and place all the next stitches till the 4th marker onto waste yarn, remove marker. Using backwards loop, co 2(2, 2, 2, 2, 2, 2) [2, 2, 2, 3, 3]st, kfb (pulling yarn tight) knit to end of row. You will now have 68(72,76, 80,84,88,92) [96, 100, 104, 110, 116] stitches. Row 1 - Purl (pulling yarn tight at the underarm joins). Row 2 - Knit. Row 3 - Purl. Continue in stst (repeating row 2 & 3) until length measures (from the shoulder): 9(10, 11, 12, 12.5 13, 14)[ 14.5, 15, 16, 17,18.5] inches, finishing with a purl row. Sizes nb - 9m - continue onto hem Sizes 12m - 8y - Leave the stitches on a spare cable and move on to the pockets (lf you don't want pockets, then just continue onto the hem instructions)
Pockets
Left pocket (when worn)
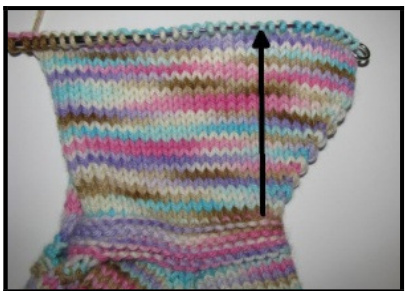
Count back -(-,-,-,27 27, 27)[27,27,33,33,33] rows. Starting at the edge of the jacket and using MC, pick up -(-,-,-, 10, 12, 12)[ 14, 14, 14, 14, 14] stitches. Row 1 - Purl Row 3 - P2, m1p(b), purl to end of row Row 4 - Knit Row 5 - Purl Row 6 - Knit until 2 stitches remain m1b, k2 Repeat rows 1 -6 until you have -(-, -,-, 18, 20, 20)[ 22,22, 24, 24, 24] stitches Knit 2 more rows in stocking stitch. Place on spare needle.
Right Pocket (when worn)
Count back -(-,-,-,27 27, 27)[27,27,33,33,33] rows. Count in -(-, -, -, 10, 12, 12)[ 14, 14, 14, 14, 14] stitches from the edge and starting here, pick up -(-,-,-, 10, 12,12)[ 14, 14,14,14, 14] stitches to the edge of the jacket. Row 1- Purl Row 2 - knit Row 3 - Purl until 2 st remain, m1p(f), p2 Row 4- Knit Row 5- Purl Row 6 - Knit 2, m1f, knit to end of row Repeat rows 1 -6 until you have -(-, -, -, 18, 20, 20)[ 22,22,24, 24,24] stitches Knit 2 rows stocking stitch Place on spare needle
Hem
(RS) Change to CC and 5.5mm needle. Knit together 1 stitch from the left pocket with the first stitch from the body of the jacket, continue until all the left pocket stitches have been joined, knit across until -(-, -, -, 18, 20, 20)[ 22, 22, 24, 24, 24] stitches remain (If you are choosing a 2x2 rib hem, you will need to make sure your stitch count is a multiple of 4, if you need to decrease stitches do so evenly between the two pockets). Knit together one stitch from the right pocket with 1 stitch from the body of the jacket, continue until all the right pocket stitches have been joined to the jacket. Garter - knit 7 rows Moss stitch - knit 5(5, 5, 5, 5,7,7)[7,7,7,7,7] rows in moss stitch 2x2 rib Row 1 - p3,k2, \*p2, k2. Repeat from \* until last 3 stitches, p3 Row 2-k3, p2, \*k2, p2. Repeat from \* until last 3 stitches,k3 Repeat rows 1 & 2 for a total of 5(5, 5, 5, 5, 7, 7)[7, 7,7,7, 7] rows. Cast off in knit, leaving the last stitch on your needle. If you are adding a hood, place this stitch on a stitch holder and move onto hood instructions on following page, otherwise move on to Edging (no hood) instructions. Do not break yarn.
Edging (no hood)
Place the last stitch on the 5.5mm needle, turn your work and start picking up stitches up the right edge of the jacket. Pick up and knit 2 out of every 3 stitches up until where the contrast colour joins the maincolour at the neckline.
When you come to the side of the pocket, you will be picking up a stitch through both the pocket and jacket, joining them together. If you are knitting rib button bands, you will need to make sure that your stitch count is a multiple of 4 plus 2. (For garter and moss stitch edging, please refer to the worksheet at the end of the pattern before continuing to make sure you have picked up enough stitches.) Rows 1 - 3 - knit in chosen edging stitch Row 4 - buttonhole row. For garter/moss edging - Please refer to the worksheet at the end of the pattern. Knit _-_ (b), \*yo, k2tog, k_-_(c). Repeat from \* until there are 3 stitches before the top of the jacket, yo, k2tog, k1. (1 have put thebuttonhole instructions as for knitting in garter stitch. If doing moss stitch you will need to'read'the stitches and make sure it stays in themossstitchpattern)
2x2 rib edging
Evenly space the buttonholes in the purl sections (on the right side) by doing p2tog, yo. Remove marker and knit in chosen edging to the end of the row. Rows 5 - 7- knit in chosen edging stitch Cast off in pattern.
Edging for opposite side
With right side facing and starting near the top of the jacket where the collar joins the main colour, pick up and knit 2 out of every 3 stitches, ending at the bottom of the jacket. When you come to the side of the pocket, you will be picking up a stitch through both the pocket and jacket, joining them together. Garter- knit 7 rows Moss stitch - Knit 7 rows moss stitch 2x2 rib - knit 7 rows rib, starting with p2 Cast off in knit.
Hood
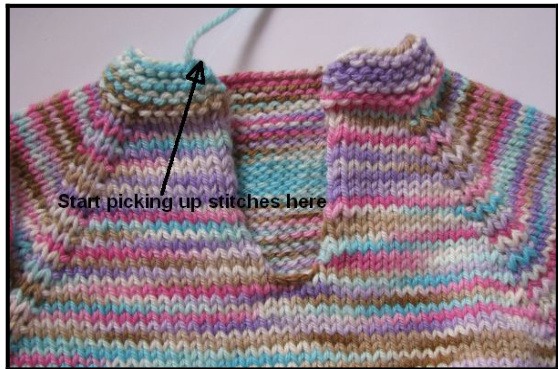
Using MC, 6mm needle and with the front facing, start at the left top edge of the neckline (where your cast on tail is), pick up and knit 27(29,35,35,39,39,45) [49,51,51,55,59] stitches.
Row 1 -purl 14(15,18,18,20,20,23) [25,26, 26, 28, 30], pm, purl to end of round. Row 2 (increase row) - Knit to one stitch before marker, kfb, sm, kfb, knit to end of row. Row 3 - Purl Repeat rows 2 & 3 5(5,5,5,5,5, 5)[5,5,5,4, 3] more times for a total of 6(6, 6, 6, 6, 6, 6)[6, 6, 6, 5, 4] increase rows. Total stitch count 39(41, 47,47,51, 51, 57) [61, 63,63, 65, 67] stitches. Continue in stocking stitch until hood measures 5(5, 5.5, 6, 6, 6.5,6.5)[7/17,7,7.5,7.5,8) inches/cm from the top of the neckline. If you are knitting for a child older than the size you are doing, add extra length. (Measure close to the middle of the hood, near the increases rather than near the front edge of the hood.) Decrease Row (RS) Knit to 2 stitches before marker, ssk, sm, k1, k2tog, knit to end of row. Repeat the decrease row (on the RS rows) 1 (1, 1, 1, 2,2,2) [2,2, 2,2,3] more times for a total of 2(2,2,2,3,3,3) [3,3,3,3,4] times
Total 35(39,43,43,45,45,51)[55,57,57,59, 59] stitches.
Top of the Hood Shaping
On the next right side row, knit 22(23, 26, 26, 27,28,31)[33,34,34,35, 35] stitches (remove stitch marker as you come to it), ssk. A-turn work, sl1p, p 9(9, 9, 9, 9, 11, 11) [11, 11, 11, 11, 11] p2tog. B - turn work, sl1p, k 9(9,9,9, 9, 11, 11) [11, 11, 11, 11, 11] ssk. Repeat instructions A & B until 11(11, 11, 11, 11, 13, 13) [13, 13, 13, 13, 13] stitches remain on the needle. Leave on the needle. You will now be knitting the edging around the neckline and hood.
Edging (with hood)
Take the last stitch from the hem cast off and place on smaller diameter needle, turn your work and start picking up stitches up the right edge of the jacket. Pick up and knit 2 out of every 3 stitches up side of the jacket. When you come to the side of the pocket, you will be picking up a stitch through both the pocket and jacket, joining them together. Place a stitch marker just below the side of the collar. (This is to mark where the buttonholes will go.) Continue picking up stitches up the side of the hood. Knit across the live stitches left on the top of the hood, pick up and knit 2 out of every 3 stitches down the opposite side of the hood and jacket. When you come to the side of the pocket, you will be picking up a stitch through both the pocket and jacket, joining them together. If you are doing 2x2 rib, make sure that you have a multiple of 4 stitches plus 2. For garter and moss stitch edging refer to the chart at the back to ensure you have picked up the correct number of stitches for buttons to be placed evenly Rows 1 - 3 - Knit in chosen edging pattern. If doing 2x2 rib, start with a p2
Row 4 - buttonhole row
Garter/Moss stitch edging- Knit (b), \*yo, k2tog, k_—-_(c). Repeat from \* until there are 3 stitches before the marker, yo, k2tog, k1. (refer to worksheet at the end of the pattern) Remove marker and knit in chosen edging to the end of therow 2x2 Rib edging - Evenly space the buttonholes between the marker and bottom of the jacket in the purl parts of the rib but doing a p2tog, yo. Remove marker and knit in pattern to end of row. Rows 5 - 7 - Knit in chosen edging pattern. Cast off in pattern.
Pocket Edging
Using 6mm needles and CC, pick up and knit 2 stitches for every 3 rows along the diagonal edge of the pockets. Knit 5 rows in edging pattern Cast off in knit (A note about 2x2 rib. You will need an even number of stitches. If you have a stitch count that is a multiple of 4, start and end the first row with purl3. If you have a stitch count that is a multiple of 4 plus 2, then start and end the first rowwithp2)
Sleeves
(Using 80cm 6mm needle - you will need to magic loop) Place the stitches on waste yarn onto needle. Pick up and knit 2(2, 2,2,2, 2, 2)[ 2, 2, 2,3, 3] stitches under the arm, place marker, pick up another 2(2, 2,2,2,2,2)[2,2,2, 2,2] stitches. Knit a round. Total stitches 28(31, 32, 34, 34,36, 37)[ 37,40, 42, 43, 46] Decrease Round - Knit 1(1, 1, 1, 1, 1, 1)[ 1, 1, 1, 1, 1] ,k2tog, knit around until 3(3,3,3,3,3, 3)[ 3, 3, 3, 4, 4] stitches remain, ssk, knit to marker. Total sleeve stitches 26(29,30, 32, 32,34,35)[ 35,38,40, 41, 44]
Sizes 18m - 8y
Knit 8 rounds Repeat decrease round Sizes 8y - Knit 8 rounds Repeat decrease round Total sleeve stitches 26(29,30,32,32,32,33)[ 33,36,38,39,40] All sizes-Knit in the round until the sleeve measures 4.5(5,5.5, 6, 6.5,7, 8)[8.5,9.5, 10.5, 12, 13] inches from the underarm
Change to contrast colour.
Using smaller diameter needle Round 1 Knit a round, if you are knitting a moss stitch cuff, then decrease to make the stitch count an odd number. If you are knitting 2 x 2 rib, decrease evenly to make the stitch count a multiple of 4. Knit 6 rounds of your chosen cuff option. Cast off in pattern. Repeat with second sleeve.
Finishing
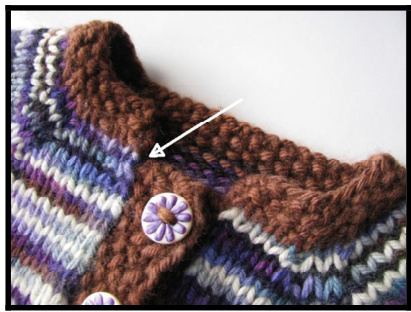
Weave in ends. Sew the pocket edging parallel to the bottom of the jacket. Block and sew buttons on. I want to say a very special thank you to my wonderful testers - Shelley, Julie, Becca, Lisa, Trish, Vic, Sheryl, Aimee, Meg, Sally, Tammy, Lori, Stacie, Ida, Laura, Katherine, Pia, Julie, Monica, Megan, Holly and Kat. The copyright of this pattern remains with the author-Rachel Evans,button&beandesigns. This pattern is intended for personal home use only. Any commercial use of this pattern without written permission from the author is in violation of copyright. If you wish to sell garments from this pattern, a cottage license is available. Please contact me on Ravelry under the username CraftyWeeWifeyorbyemail at craftyweewifey@yahoo.co.nz
Worksheet to work out buttonhole placement.
Please do this worksheet before continuing with the edging. If you have 0 or 1 remainder (b) then you will need to pick up 1 or 2 more stitches. (b) needs to be a minimum of 2 for the buttons to be even. 1. Count the stitches between the marker (if you have knit a hood) or the top of the edging (if no hood) and the bottom of the jacket - 2. Subtract 3 from that number of stitches - 3. Divide the remaining stitches by one less than the number of buttonholes you want - (a) remainder (b). 4. Subtract 2 from (a) - (c). 5. Knit (b), \*yo, k2tog, k_(c). Repeat from \* until there are 3 stitches before the marker, yo, k2tog, k1. (l have written the instructions as for doing the garter edging. If doing a moss stitch edging you will need to make sure you 'read' the stitches and keep the moss stitch pattern as you make the buttonholes.)
Example
I have 52 stitches between the marker and the bottom of the jacket. I want 6 buttons. 1. = 52 2. 52-3= 49 3. 49 / 5 = 9 remainder 4, therefore (a) = 9, (b) = 4 4. 9 minus 2 = 7, therefore (c) = 7 So I will Knit —-4—— (b), \*yo, k2tog, k7(c). Repeat from \* until there are 3 stitches before the marker, yo, k2tog, k1.


